


一 前言
前段时间,一直对eBPF感兴趣,也写了一些eBPF的入门介绍文章,朋友就发来个连接说这是一个好东西,我看,是利用eBPF来实现的,刚好最近在研究,所以就有了这篇的介绍文章。
二 eCapture 是什么
官方介绍如下:
eBPF HOOK uprobe实现的各种用户态进程的数据捕获,无需改动原程序。SSL/HTTPS数据导出功能,针对HTTPS的数据包抓取,不需要导入CA证书。bash的命令捕获,HIDS的bash命令监控解决方案。mysql query等数据库的数据库审计解决方案。
地址:ecapture/README_CN.md at master · ehids/ecapture (github.com)
eBPF程序可以对内核的静态跟踪点,动态跟踪点,设置钩子,然后当内核执行到这些点的时候,会自动调用我们设置好的钩子,这样我们就可以对一些数据进行监控,网络流量也可以进行转发,甚至对数据包进行修改,简直是黑魔法;不光可以对内核的进行动态追踪,对用户态进程也可以,我记得我上篇文章就介绍对简单的c程序的代码的hook。
eCapture就是这个原理,对用户态程序的具体追踪,具体原理如下:
eCapture系统用户态程序使用Golang语言开发,具有良好的系统兼容性,无依赖快速部署,更适合云原生场景。内核态代码使用C编写,使用clang/llvm编译,生产bpf字节码后,采用go-bindata转化为golang语法文件,之后采用ehids/ebpfmanager类库,调用bpf syscall进行加载、HOOK、map读取。golang编译后,无其他任何依赖即可运行,兼容linux kernel 4.18以上所有版本。
架构图如下: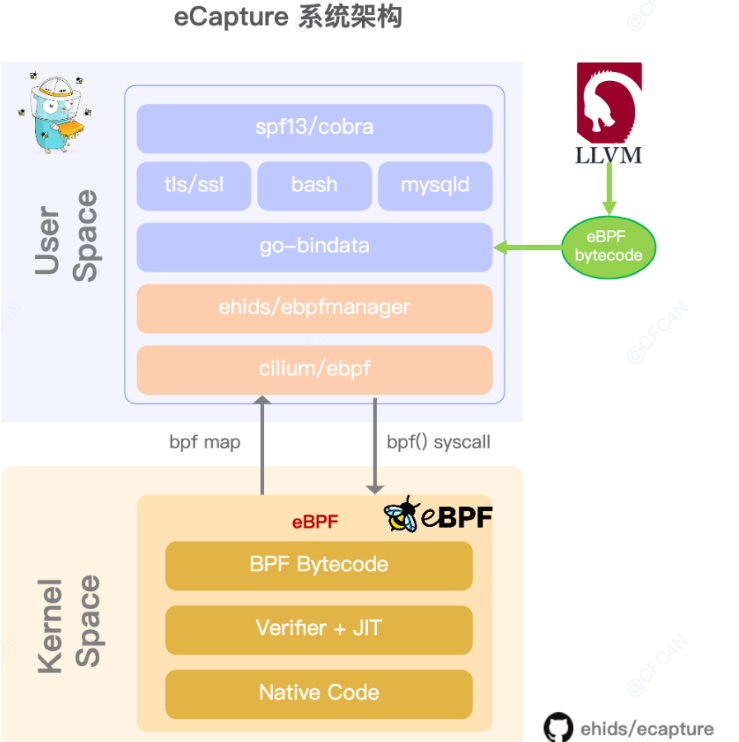
三 安装和使用
我曾经想在centos 8.x 上尝试,发现充满了挫折,真不建议用这个系统作为ebpf的实验环境,又发现不少朋友采用 ubuntu服务器,遂下载 ubuntu-21.10-live-server-amd64.iso安装体验了一把,可以说是非常顺利,几乎使用到的安装命令都是一把过,强烈推荐,而且没有的命令,会直接提供安装命令,非常的人性化;当然如果你就喜欢挑战困难,可以试试centos 8.x上编译内核,打开一些选项后,编译起来常常报错,安装相关依赖又困难重重,我遇到错误如下,如果有大神对这方便比较精通可以指点下:
vim .config
# 添加:CONFIG_DEBUG_INFO_BTF=y

# 编译
make  -j4
LD [M]  kernel/bpf/preload/bpf_preload.o
ld: kernel/bpf/preload/bpf_preload_kern.o: unable to initialize decompress status for section .debug_addr
ld: kernel/bpf/preload/bpf_preload_kern.o: unable to initialize decompress status for section .debug_addr
ld: kernel/bpf/preload/bpf_preload_kern.o: unable to initialize decompress status for section .debug_addr
ld: kernel/bpf/preload/bpf_preload_kern.o: unable to initialize decompress status for section .debug_addr
kernel/bpf/preload/bpf_preload_kern.o: file not recognized: 不可识别的文件格式
make[3]: *** [scripts/Makefile.build:483:kernel/bpf/preload/bpf_preload.o] 错误 1
make[2]: *** [scripts/Makefile.build:549:kernel/bpf/preload] 错误 2
make[1]: *** [scripts/Makefile.build:549:kernel/bpf] 错误 2
make: *** [Makefile:1846:kernel] 错误 2
make: *** 正在等待未完成的任务....
3.1 ubuntu下环境准备
3.1.1 安装编译和依赖头文件工具等
sudo apt-get install -y make clang llvm libelf-dev libbpf-dev bpfcc-tools libbpfcc-dev linux-tools-$(uname -r) linux-headers-$(uname -r)3.1.2 安装git和golang
sudo apt-get git
sudo apt-get golang
指定golang使用代理,不然下载不了github上的库:
go env -w GO111MODULE=on
go env -w GOPROXY=https://goproxy.io,direct
3.1.3 编译eCapture
非常顺利的一气呵成的编译:
git clone https://github.com/ehids/ecapture.git
cd ecapture
make
3.2 运行使用
root@ubuntu-lab:/home/miao/ecapture-master# ./bin/ecapture
NAME:
 ecapture - capture text SSL content without CA cert by ebpf hook.

USAGE:
 ecapture [flags]

VERSION:
 --

COMMANDS:
 bash capture bash command
 help Help about any command
 mysqld capture sql queries from mysqld 5.6/5.7/8.0 .
 tls alias name:openssl , use to capture tls/ssl text content without CA cert.

DESCRIPTION:
 eCapture is a tool that can capture plaintext packets
 such as HTTPS and TLS without installing a CA certificate.
 It can also capture bash commands, which is suitable for
 security auditing scenarios, such as database auditing of mysqld, etc.

 Repository: https://github.com/ehids/ecapture

OPTIONS:
  -d, --debug[=false] enable debug logging
  -h, --help[=false] help for ecapture
      --hex[=false] print byte strings as hex encoded strings
  -p, --pid=0  if target_pid is 0 then we target all pids
通过命令来看,核心的三个功能,一个是bash的输入内容的记录,一个是对mysql的sql命令的记录,一个是对tls 明文数据捕获。
bash记录,可以用在入侵检测,或者我们打开功能后可以监看黑客的入侵过程;
mysql的sql命令记录,可以用在数据库审计,数据防泄露等场景;
tls明文数据捕获,可以用在比较机器被入侵了,通信是加密的,我们可以通过这些命令查看传递的是什么内容,这点真的很酷。
好了,下面进入演示环节:
3.2.1 bash命令记录
root@ubuntu-lab:/home/miao/ecapture-master# ./bin/ecapture  bash
2022/04/09 04:45:48 start to run EBPFProbeBash module
2022/04/09 04:45:48 pid info :8130
2022/04/09 04:45:48 HOOK binrayPath:/bin/bash, FunctionName:readline
2022/04/09 04:45:48 target all process.
2022/04/09 04:45:54  PID:3687,  Comm:bash,  Line: pwd
2022/04/09 04:46:03  PID:3687,  Comm:bash,  Line: cat /etc/passwd
如上,我们可以在记录中查看到命令执行的时间,命令名为bash,命令id为3687,具体命令行为pwd,第二个命令为cat /etc/passwd.
3.2.2 mysql命令记录
# 安装server 注意这个程序不支持mysql,所以只能安装mariadb
miao@ubuntu-lab:~/ehids-agent-master$ sudo apt-get  install mariadb-server

# mysql命令执行:
sudo mysql -u root
[sudo] password for miao:
Welcome to the MariaDB monitor.  Commands end with ; or \g.
Your MariaDB connection id is 30
Server version: 10.5.15-MariaDB-0ubuntu0.21.10.1 Ubuntu 21.10

Copyright (c) 2000, 2018, Oracle, MariaDB Corporation Ab and others.

Type 'help;' or '\h' for help. Type '\c' to clear the current input statement.

MariaDB [(none)]> show databases;
+--------------------+
| Database           |
+--------------------+
| information_schema |
| mysql              |
| performance_schema |
+--------------------+
3 rows in set (0.001 sec)

MariaDB [(none)]> create database test;
Query OK, 1 row affected (0.000 sec)

MariaDB [(none)]> use test;
Database changed
MariaDB [test]> CREATE TABLE user(
    ->            id int(10) unsigned not null auto_increment,
    ->            name varchar(25),
    ->            sex varchar(5),
    ->            age int(10),
    ->            password varchar(25),
    ->            primary key(id))engine=Innodb;
Query OK, 0 rows affected (0.013 sec)

MariaDB [test]> create table test(id  int(10),name varchar(64),aget int(10));
Query OK, 0 rows affected (0.010 sec)
MariaDB [test]> insert test values(1,'abc',14);
Query OK, 1 row affected (0.003 sec)
MariaDB [test]> insert test values(2,'edf',14);
Query OK, 1 row affected (0.001 sec)
MariaDB [test]> insert test values(3,'dfg',18);
Query OK, 1 row affected (0.001 sec)
MariaDB [test]> select * from test;
+------+------+------+
| id   | name | aget |
+------+------+------+
|    1 | abc  |   14 |
|    2 | edf  |   14 |
|    3 | dfg  |   18 |
+------+------+------+
3 rows in set (0.000 sec)

MariaDB [test]> delete from test where id=3;
Query OK, 1 row affected (0.001 sec)
MariaDB [test]> commit;
Query OK, 0 rows affected (0.000 sec)
MariaDB [test]> drop table user;
Query OK, 0 rows affected (0.003 sec)
MariaDB [test]> quit
Bye
演示了增删改查和创建删除表等命令,我们来看看审计的情况:
root@ubuntu-lab:/home/miao/ecapture-master# ./bin/ecapture mysqld
2022/04/09 04:57:32 start to run EBPFProbeMysqld module
2022/04/09 04:57:32 pid info :11307
2022/04/09 04:57:32 Mysql Version:mysqld-5.6, binrayPath:/usr/sbin/mariadbd, FunctionName:_Z16dispatch_command19enum_server_commandP3THDPcjbb ,UprobeOffset:0
2022/04/09 04:57:48  PID:10185, Comm:mariadbd, Time:3827419930458,  length:(32/32),  Line:select @@version_comment limit 1
2022/04/09 04:58:06  PID:10185, Comm:mariadbd, Time:3845780980800,  length:(14/14),  Line:show databases
2022/04/09 04:58:16  PID:10185, Comm:mariadbd, Time:3855625666790,  length:(20/20),  Line:create database test
2022/04/09 04:58:20  PID:10185, Comm:mariadbd, Time:3859549915643,  length:(17/17),  Line:SELECT DATABASE()
2022/04/09 04:58:20  PID:10185, Comm:mariadbd, Time:3859551387926,  length:(14/14),  Line:show databases
2022/04/09 04:58:20  PID:10185, Comm:mariadbd, Time:3859551716349,  length:(11/11),  Line:show tables
2022/04/09 05:00:39  PID:10185, Comm:mariadbd, Time:3998880500344,  length:(228/228),  Line:CREATE TABLE user(
           id int(10) unsigned not null auto_increment,
           name varchar(25),
           sex varchar(5),
           age int(10),
           password varchar(25),
           primary key(id))engine=Innodb
2022/04/09 05:02:51  PID:10185, Comm:mariadbd, Time:4131399810197,  length:(60/60),  Line:create table test(id  int(10),name varchar(64),aget int(10))
2022/04/09 05:03:09  PID:10185, Comm:mariadbd, Time:4148536516108,  length:(30/30),  Line:insert test values(1,'abc',14)
2022/04/09 05:03:16  PID:10185, Comm:mariadbd, Time:4156272316044,  length:(30/30),  Line:insert test values(2,'edf',14)
2022/04/09 05:03:25  PID:10185, Comm:mariadbd, Time:4165122488367,  length:(30/30),  Line:insert test values(3,'dfg',18)
2022/04/09 05:03:32  PID:10185, Comm:mariadbd, Time:4172032070611,  length:(18/18),  Line:select * from test
2022/04/09 05:04:00  PID:10185, Comm:mariadbd, Time:4199712261102,  length:(27/27),  Line:delete from test where id=3
2022/04/09 05:04:02  PID:10185, Comm:mariadbd, Time:4202319566537,  length:(6/6),  Line:commit
2022/04/09 05:04:17 PID:10185, Comm:mariadbd, Time:4217159993175, length:(15/15), Line:drop table user审计记录的内容包括:时间、进程id、进程名、命令长度、命令行;注意:没有执行结果的展示,也没有命令的返回值,如果能做到输入的命令和返回的内容就好了,不过这个改造起来难度应该也不大,如果返回的select的内容很多,可能map记录不一定存的下,但是我觉得执行成功失败还是要有的,有兴趣的同学可以继续完善下。
3.2.2 tls 通信明文还原
本来我是用编译的程序来还原的,发现不能用,原因是:
root@ubuntu-lab:/home/miao/ecapture-master/bin# ./ecapture  tls
2022/04/09 07:33:55 pid info :17222
2022/04/09 07:33:55 start to run EBPFProbeOPENSSL module
2022/04/09 07:33:55 start to run EBPFProbeGNUTLS module
2022/04/09 07:33:55 start to run EBPFProbeNSPR module
2022/04/09 07:33:55 HOOK type:2, binrayPath:/lib/x86_64-linux-gnu/libnspr4.so
2022/04/09 07:33:55 target all process.
2022/04/09 07:33:55 HOOK type:2, binrayPath:/lib/x86_64-linux-gnu/libssl.so.1.1
2022/04/09 07:33:55 libPthread so Path:/lib/x86_64-linux-gnu/libpthread.so.0
2022/04/09 07:33:55 target all process.
2022/04/09 07:33:55 HOOK type:2, binrayPath:/lib/x86_64-linux-gnu/libgnutls.so.30
2022/04/09 07:33:55 target all process.
2022/04/09 07:33:55 couldn't start bootstrap manager: error:1 error occurred:
 * error:opening uprobe: symbol connect: not found , isRet:%!d(bool=false), {UID:, EbpfFuncName:probe_connect}

, probes activation validation failed
看样子是ebpf的函数名竟然找不到,可能是我装的ebpf版本太新了。看还有一个编译好的版本,所以尝试下:
wget https://github.do/https://github.com/ehids/ecapture/releases/download/v0.1.5/ecapture_v0.1.5.zip解压后运行,果然没报错:
root@ubuntu-lab:/home/miao# ./ecapture tls
2022/04/09 07:39:15 pid info :17414
2022/04/09 07:39:15 start to run EBPFProbeOPENSSL module
2022/04/09 07:39:15 start to run EBPFProbeGNUTLS module
2022/04/09 07:39:15 start to run EBPFProbeNSPR module
2022/04/09 07:39:15 HOOK type:2, binrayPath:/lib/x86_64-linux-gnu/libssl.so.1.1
2022/04/09 07:39:15 target all process.
2022/04/09 07:39:15 HOOK type:2, binrayPath:/lib/x86_64-linux-gnu/libgnutls.so.30
2022/04/09 07:39:15 target all process.
2022/04/09 07:39:15 HOOK type:2, binrayPath:/lib/x86_64-linux-gnu/libnspr4.so
2022/04/09 07:39:15 target all process.
2022/04/09 07:40:38 PID:17458, Comm:wget, TID:17458, TYPE:Send, DataLen:126 bytes, Payload:
GET / HTTP/1.1
User-Agent: Wget/1.21
Accept: */*
Accept-Encoding: identity
Host: www.baidu.com
Connection: Keep-Alive
2022/04/09 07:40:38 PID:17458, Comm:wget, TID:17458, TYPE:Recived, DataLen:116 bytes, Payload:
HTTP/1.1 200 OK
Content-Length: 2443
Content-Type: text/html
Server: bfe
Date: Sat, 09 Apr 2022 07:40:38 GMT
2022/04/09 07:40:38 PID:17458, Comm:wget, TID:17458, TYPE:Recived, DataLen:1063 bytes, Payload:
<!DOCTYPE html>
<!--STATUS OK--><html> <head><meta http-equiv=content-type content=text/html;charset=utf-8><meta http-equiv=X-UA-Compatible content=IE=Edge><meta content=always name=referrer><link rel=stylesheet type=text/css href=https://ss1.bdstatic.com/5eN1bjq8AAUYm2zgoY3K/r/www/cache/bdorz/baidu.min.css><title>百度一下,你就知道</title></head> <body link=#0000cc> <div id=wrapper> <div id=head> <div class=head_wrapper> <div class=s_form> <div class=s_form_wrapper> <div id=lg> <img hidefocus=true src=//www.baidu.com/img/bd_logo1.png width=270 height=129> </div> <form id=form name=f action=//www.baidu.com/s class=fm> <input type=hidden name=bdorz_come value=1> <input type=hidden name=ie value=utf-8> <input type=hidden name=f value=8> <input type=hidden name=rsv_bp value=1> <input type=hidden name=rsv_idx value=1> <input type=hidden name=tn value=baidu><span class="bg s_ipt_wr"><input id=kw name=wd class=s_ipt value maxlength=255 autocomplete=off autofocus=autofocus></span><span class="bg s_btn_wr"><input type=submit id=su value=百度
2022/04/09 07:40:38 PID:17458, Comm:wget, TID:17458, TYPE:Recived, DataLen:1380 bytes, Payload:
下 class="bg s_btn" autofocus></span> </form> </div> </div> <div id=u1> <a href=http://news.baidu.com name=tj_trnews class=mnav>新闻</a> <a href=https://www.hao123.com name=tj_trhao123 class=mnav>hao123</a> <a href=http://map.baidu.com name=tj_trmap class=mnav>地图</a> <a href=http://v.baidu.com name=tj_trvideo class=mnav>视频</a> <a href=http://tieba.baidu.com name=tj_trtieba class=mnav>贴吧</a> <noscript> <a href=http://www.baidu.com/bdorz/login.gif?login&tpl=mn&u=http%3A%2F%2Fwww.baidu.com%2f%3fbdorz_come%3d1 name=tj_login class=lb>登录</a> </noscript> <script>document.write('<a href="http://www.baidu.com/bdorz/login.gif?login&tpl=mn&u='+ encodeURIComponent(window.location.href+ (window.location.search === "" ? "?" : "&")+ "bdorz_come=1")+ '" name="tj_login" class="lb">登录</a>');
</script> <a href=//www.baidu.com/more/ name=tj_briicon class=bri style="display: block;">更多产品</a> </div> </div> </div> <div id=ftCon> <div id=ftConw> <p id=lh> <a href=http://home.baidu.com>关于百度</a> <a href=http://ir.baidu.com>About Baidu</a> </p> <p id=cp>©2017 Baidu <a href=http://www.baidu.com/duty/>使用百度前必读</a> <a href=http://jianyi.baidu.com/ class=cp-feedback>意见反馈</a> 京ICP证030173号 <img src=//www.baidu.com/img/gs.gif> </p> </div> </div> </div> </body> </html>这是我在另外一个终端运行以下命令,抓获的结果。
wget https://www.baidu.com同时发现个问题,我在服务器上部署一个https的服务器,通过windows下的浏览器访问这个地址,没有看到抓获的明文内容,所以我猜应该是只处理了客户端命令,回头看下原理验证下。
四 原理分析
原理比较简单,其实就是去找用户空间的运行程序或库的特定函数的地址信息,然后在这个函数地址安装hook,这样就可以在程序进入到这个函数的时候,执行我们的代码,就可以把得到的报文信息简单打印出来。
这些函数位置如何找那,参考官网的文章,以tls模块为例子说明下。
4.1 tls 明文抓包的原理
ecapture tls 命令启动tls/ssl 模块,支持三个常用的tls库,分别是:
openssl ,动态链接库名字为libssl.so
gnutls ,动态链接库名字为libgnutls.so
nss/nspr ,动态链接库名字为libnspr4.so
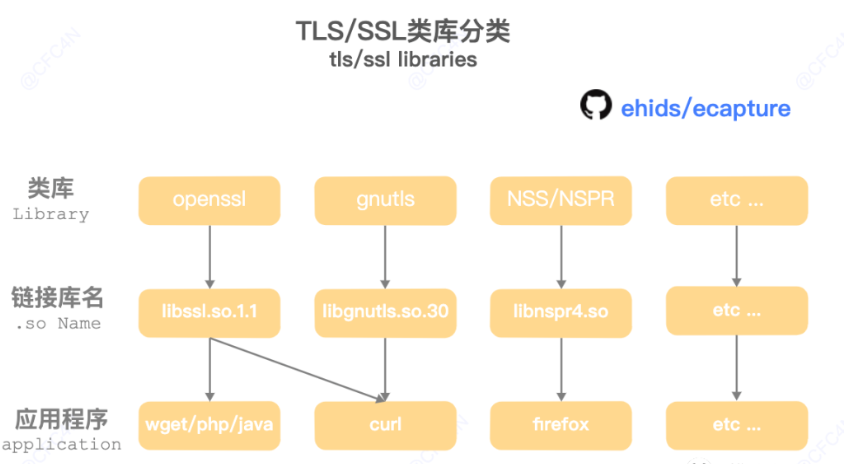
比如我们测试用的是wget,我们先查看wget使用什么tls库,如下命令:
root@ubuntu-lab:/home/miao/apache-tomcat-9.0.0.M20/bin# ldd `which wget` |grep -E "tls|ssl|nspr|nss"
 libssl.so.1.1 => /lib/x86_64-linux-gnu/libssl.so.1.1 (0x00007f9099d0a000)
我们可以看到依赖的libssl库是ecapture 可以hook的,所以我们可以使用wget进行https请求,同时进行明文抓包。这样看来,只要程序进行通信的时候使用了这三类tls库,就可以进行明文抓包。
下一步就是定位函数了,定位函数需要对libssl库有所了解,知道哪个是解密出明文的,然后通过:
objdump -T /lib/x86_64-linux-gnu/libssl.so.1.1这个命令查看符号的地址,做hook即可,这是我猜测的,看了下代码:
func (this *MOpenSSLProbe) setupManagers() error {
 var binaryPath, libPthread string
 switch this.conf.(*OpensslConfig).elfType {
 case ELF_TYPE_BIN:
  binaryPath = this.conf.(*OpensslConfig).Curlpath
 case ELF_TYPE_SO:
  binaryPath = this.conf.(*OpensslConfig).Openssl
 default:
  //如果没找到
  binaryPath = "/lib/x86_64-linux-gnu/libssl.so.1.1"
 }

 libPthread = this.conf.(*OpensslConfig).Pthread
 if libPthread == "" {
  libPthread = "/lib/x86_64-linux-gnu/libpthread.so.0"
 }
 _, err := os.Stat(binaryPath)
 if err != nil {
  return err
 }

 this.logger.Printf("HOOK type:%d, binrayPath:%s\n", this.conf.(*OpensslConfig).elfType, binaryPath)
 this.logger.Printf("libPthread so Path:%s\n", libPthread)

 this.bpfManager = &manager.Manager{
  Probes: []*manager.Probe{
   {
    Section:          "uprobe/SSL_write",
    EbpfFuncName:     "probe_entry_SSL_write",
    AttachToFuncName: "SSL_write",
    BinaryPath:       binaryPath,
   },
   {
    Section:          "uretprobe/SSL_write",
    EbpfFuncName:     "probe_ret_SSL_write",
    AttachToFuncName: "SSL_write",
    BinaryPath:       binaryPath,
   },
   {
    Section:          "uprobe/SSL_read",
    EbpfFuncName:     "probe_entry_SSL_read",
    AttachToFuncName: "SSL_read",
    BinaryPath:       binaryPath,
   },
   {
    Section:          "uretprobe/SSL_read",
    EbpfFuncName:     "probe_ret_SSL_read",
    AttachToFuncName: "SSL_read",
    BinaryPath:       binaryPath,
   },
   {
    Section:          "uprobe/connect",
    EbpfFuncName:     "probe_connect",
    AttachToFuncName: "connect",
    BinaryPath:       libPthread,
   },
  },

  Maps: []*manager.Map{
   {
    Name: "tls_events",
   },
   {
    Name: "connect_events",
   },
  },
 }

 this.bpfManagerOptions = manager.Options{
  DefaultKProbeMaxActive: 512,

  VerifierOptions: ebpf.CollectionOptions{
   Programs: ebpf.ProgramOptions{
    LogSize: 2097152,
   },
  },

  RLimit: &unix.Rlimit{
   Cur: math.MaxUint64,
   Max: math.MaxUint64,
  },
  // 填充 RewriteContants 对应map
  ConstantEditors: this.constantEditor(),
 }
 return nil
}
可以看到就是在SSL_read和SSL_write的函数上建立hook,hook函数看样子是probe_ret_SSL_read和probe_ret_SSL_write,我们继续看下这两个函数是干嘛的。
我们只看openssl的代码,这部分是通过c代码来实现的,结构很清晰:
SEC("uprobe/SSL_write")
int probe_entry_SSL_write(struct pt_regs* ctx) {
uint64_t current_pid_tgid = bpf_get_current_pid_tgid();
uint32_t pid = current_pid_tgid >> 32;
// if target_ppid is 0 then we target all pids
if (target_pid != 0 && target_pid != pid) {
return 0;
}
void * ssl = (void *) PT_REGS_PARM1(ctx);
// https://github.com/openssl/openssl/blob/OpenSSL_1_1_1-stable/crypto/bio/bio_local.h
struct ssl_st ssl_info;
bpf_probe_read_user(&ssl_info, sizeof(ssl_info), ssl);
struct BIO bio_w;
bpf_probe_read_user(&bio_w, sizeof(bio_w), ssl_info.wbio);
// get fd ssl->wbio->num
u32 fd = bio_w.num;
debug_bpf_printk("uprobe SSL_write FD:%d\n", fd);
const char* buf = (const char*)PT_REGS_PARM2(ctx);
struct active_ssl_buf active_ssl_buf_t;
__builtin_memset(&active_ssl_buf_t, 0, sizeof(active_ssl_buf_t));
active_ssl_buf_t.fd = fd;
active_ssl_buf_t.buf = buf;
bpf_map_update_elem(&active_ssl_write_args_map, ¤t_pid_tgid, &active_ssl_buf_t, BPF_ANY);
return 0;
}
SEC("uretprobe/SSL_write")
int probe_ret_SSL_write(struct pt_regs* ctx) {
uint64_t current_pid_tgid = bpf_get_current_pid_tgid();
uint32_t pid = current_pid_tgid >> 32;
// if target_ppid is 0 then we target all pids
if (target_pid != 0 && target_pid != pid) {
return 0;
}
struct active_ssl_buf* active_ssl_buf_t = bpf_map_lookup_elem(&active_ssl_write_args_map, ¤t_pid_tgid);
if (active_ssl_buf_t != NULL) {
const char* buf;
u32 fd = active_ssl_buf_t->fd;
bpf_probe_read(&buf, sizeof(const char *), &active_ssl_buf_t->buf);
process_SSL_data(ctx, current_pid_tgid, kSSLWrite, buf, fd);
}
bpf_map_delete_elem(&active_ssl_write_args_map, ¤t_pid_tgid);
return 0;
}
// Function signature being probed:
// int SSL_read(SSL *s, void *buf, int num)
SEC("uprobe/SSL_read")
int probe_entry_SSL_read(struct pt_regs* ctx) {
uint64_t current_pid_tgid = bpf_get_current_pid_tgid();
uint32_t pid = current_pid_tgid >> 32;
// if target_ppid is 0 then we target all pids
if (target_pid != 0 && target_pid != pid) {
return 0;
}
void * ssl = (void *) PT_REGS_PARM1(ctx);
// https://github.com/openssl/openssl/blob/OpenSSL_1_1_1-stable/crypto/bio/bio_local.h
struct ssl_st ssl_info;
bpf_probe_read_user(&ssl_info, sizeof(ssl_info), ssl);
struct BIO bio_r;
bpf_probe_read_user(&bio_r, sizeof(bio_r), ssl_info.rbio);
// get fd ssl->rbio->num
u32 fd = bio_r.num;
debug_bpf_printk("uprobe SSL_read FD:%d\n", fd);
const char* buf = (const char*)PT_REGS_PARM2(ctx);
struct active_ssl_buf active_ssl_buf_t;
__builtin_memset(&active_ssl_buf_t, 0, sizeof(active_ssl_buf_t));
active_ssl_buf_t.fd = fd;
active_ssl_buf_t.buf = buf;
bpf_map_update_elem(&active_ssl_read_args_map, ¤t_pid_tgid, &active_ssl_buf_t, BPF_ANY);
return 0;
}
SEC("uretprobe/SSL_read")
int probe_ret_SSL_read(struct pt_regs* ctx) {
uint64_t current_pid_tgid = bpf_get_current_pid_tgid();
uint32_t pid = current_pid_tgid >> 32;
// if target_ppid is 0 then we target all pids
if (target_pid != 0 && target_pid != pid) {
return 0;
}
struct active_ssl_buf* active_ssl_buf_t = bpf_map_lookup_elem(&active_ssl_read_args_map, ¤t_pid_tgid);
if (active_ssl_buf_t != NULL) {
const char* buf;
u32 fd = active_ssl_buf_t->fd;
bpf_probe_read(&buf, sizeof(const char *), &active_ssl_buf_t->buf);
process_SSL_data(ctx, current_pid_tgid, kSSLRead, buf, fd);
}
bpf_map_delete_elem(&active_ssl_read_args_map, ¤t_pid_tgid);
return 0;
}最终都调用process_SSL_data来处理的,代码如下:
static int process_SSL_data(struct pt_regs* ctx, uint64_t id, enum ssl_data_event_type type,
                            const char* buf, u32 fd) {
    int len = (int)PT_REGS_RC(ctx);
    if (len < 0) {
        return 0;
    }

    struct ssl_data_event_t* event = create_ssl_data_event(id);
    if (event == NULL) {
        return 0;
    }

    event->type = type;
    event->fd = fd;
    // This is a max function, but it is written in such a way to keep older BPF verifiers happy.
    event->data_len = (len < MAX_DATA_SIZE_OPENSSL ? (len & (MAX_DATA_SIZE_OPENSSL - 1)) : MAX_DATA_SIZE_OPENSSL);
    bpf_probe_read(event->data, event->data_len, buf);
    bpf_get_current_comm(&event->comm, sizeof(event->comm));
    bpf_perf_event_output(ctx, &tls_events, BPF_F_CURRENT_CPU, event,sizeof(struct ssl_data_event_t));
    return 0;
}
通过bpf的函数读取解密后的数据,进程名字,然后通过事件的形式输出。整体逻辑没细看,大差不差吧,下次有空好好分析下代码吸收下。


 2908
2908


 被折叠的 条评论
为什么被折叠?
被折叠的 条评论
为什么被折叠?
 到【灌水乐园】发言


