


一、参考资料
官网资料:[Oracle Database 2 Day + Real Application Clusters Guide]
Real Application Clusters Administration and Deployment Guide
CSDN:【Oracle 11G RAC 零基础搭建】_大水牛的博客-CSDN博客_rac搭建
JanNest – Oracle 11g RAC 集群 安装 与 部署_哔哩哔哩_bilibili
二、创建虚拟机
本次选择Redhat6.5作为镜像,每台机器分配30G的磁盘空间,4G的内存,以及两张网卡,并生成对应的MAC地址,主机名为rac1和rac2

磁盘分区如下:

三、网络配置
网络地址规划
public、vip和scan-ip要在同一个网段,private在另一个网段
| 主机名 | rac1 | rac2 |
|---|---|---|
| public | 192.168.178.11 | 192.168.178.12 |
| private | 192.168.163.11 | 192.168.163.12 |
| vip | 192.168.178.111 | 192.168.178.112 |
| scan-ip | 192.168.178.200 | 192.168.178.200 |
| eth0MAC地址 | 00:50:56:3D:B3:AC | 00:50:56:38:A1:4A |
| eth1MAC地址 | 00:50:56:26:8E:DF | 00:50:56:38:A1:4A |
节点一
查看网卡配置
查看MAC地址是否正确
cat /etc/udev/rules.d/70-persistent-net.rules

配置网卡1
vim /etc/sysconfig/network-scripts/ifcfg-eth0
配置文件如下:硬件地址要和虚拟机匹配
DEVICE=eth0
TYPE=Ethernet
ONBOOT=yes
NM_CONTROLLED=yes
BOOTPROTO=static
HWADDR=00:50:56:3D:B3:AC
IPADDR=192.168.178.11
NETMASK=255.255.255.0
PREFIX=24
GATEWAY=192.168.178.2
DEFROUTE=yes
IPV4_FAILURE_FATAL=yes
IPV6INIT=no
NAME="System eth0"
配置网卡2
vim /etc/sysconfig/network-scripts/ifcfg-eth1
配置文件如下:硬件地址要和虚拟机匹配
DEVICE=eth1
TYPE=Ethernet
ONBOOT=yes
NM_CONTROLLED=yes
BOOTPROTO=static
HWADDR=00:50:56:26:8E:DF
IPADDR=192.168.163.11
NETMASK=255.255.255.0
PREFIX=24
DEFROUTE=yes
IPV4_FAILURE_FATAL=yes
IPV6INIT=no
NAME="System eth1"
修改hosts文件
vim /etc/hosts
添加如下内容:
# public
192.168.178.11 rac1
192.168.178.12 rac2
# private
192.168.163.11 rac1-priv
192.168.163.12 rac2-priv
# vip
192.168.178.111 rac1-vip
192.168.178.112 rac2-vip
# scan-ip
192.168.178.200 rac-scan
修改完成后reboot生效

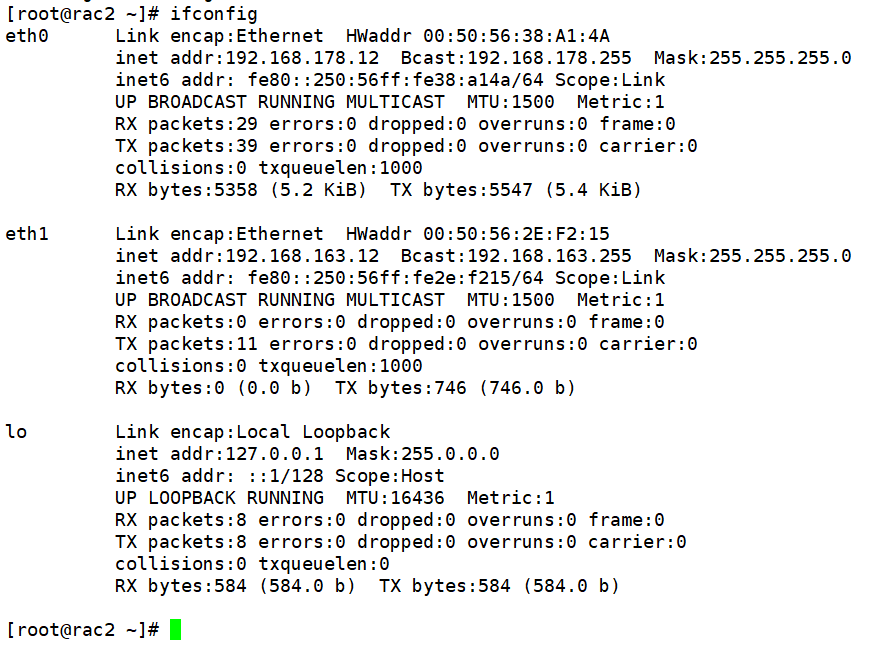
节点二
查看网卡配置
查看MAC地址是否正确
cat /etc/udev/rules.d/70-persistent-net.rules

配置网卡1
vim /etc/sysconfig/network-scripts/ifcfg-eth0
配置文件如下:硬件地址要和虚拟机匹配
DEVICE=eth0
TYPE=Ethernet
ONBOOT=yes
NM_CONTROLLED=yes
BOOTPROTO=static
HWADDR=00:50:56:38:A1:4A
IPADDR=192.168.178.12
NETMASK=255.255.255.0
PREFIX=24
GATEWAY=192.168.178.2
DEFROUTE=yes
IPV4_FAILURE_FATAL=yes
IPV6INIT=no
NAME="System eth0"
配置网卡2
vim /etc/sysconfig/network-scripts/ifcfg-eth1
配置文件如下:硬件地址要和虚拟机匹配
DEVICE=eth1
TYPE=Ethernet
ONBOOT=yes
NM_CONTROLLED=yes
BOOTPROTO=static
HWADDR=00:50:56:2E:F2:15
IPADDR=192.168.163.12
NETMASK=255.255.255.0
PREFIX=24
DEFROUTE=yes
IPV4_FAILURE_FATAL=yes
IPV6INIT=no
NAME="System eth1"
修改hosts文件
vim /etc/hosts
添加如下内容:
# public
192.168.178.11 rac1
192.168.178.12 rac2
# private
192.168.163.11 rac1-priv
192.168.163.12 rac2-priv
# vip
192.168.178.111 rac1-vip
192.168.178.112 rac2-vip
# scan-ip
192.168.178.200 rac-scan
修改完成后reboot生效
四、配置共享磁盘
创建共享磁盘
在VM安装目录使用命令行输入如下命令进行磁盘创建,本次选择的创建地址为F:\RAC\sharedisk,分别创建3个OCR磁盘,一个数据盘和一个归档盘。
vmware-vdiskmanager.exe -c -s 2Gb -a lsilogic -t 2 "F:\RAC\sharedisk\OCR01.vmdk"
vmware-vdiskmanager.exe -c -s 2Gb -a lsilogic -t 2 "F:\RAC\sharedisk\OCR02.vmdk"
vmware-vdiskmanager.exe -c -s 2Gb -a lsilogic -t 2 "F:\RAC\sharedisk\OCR03.vmdk"
vmware-vdiskmanager.exe -c -s 15Gb -a lsilogic -t 2 "F:\RAC\sharedisk\DATA1.vmdk"
vmware-vdiskmanager.exe -c -s 5Gb -a lsilogic -t 2 "F:\RAC\sharedisk\ARCH.vmdk"
修改虚拟机配置文件
将两台虚拟机关闭后打开其配置文件(文件名后缀是vmx),在最后加入如下两行配置:
disk.locking = "FALSE"
disk.EnableUUID = "TRUE"
添加磁盘
在虚拟机的设置里点击硬件的添加,选择添加现有虚拟磁盘,将之前创建的5个磁盘依次添加,选择vmdk后缀,并选择保持现有格式。
添加后如下:


查看是否添加
启动虚拟机,在两个节点使用如下命令:
ll /dev/sd*

可以看到多了sdb–sdf五块磁盘。
五、创建用户及目录
创建grid和oracle用户及所属组
在两个节点都执行以下命令
groupadd oinstall
groupadd dba
groupadd oper
groupadd asmadmin
groupadd asmoper
groupadd asmdba
useradd -g oinstall -G dba,asmoper,asmadmin,asmdba grid
useradd -g oinstall -G dba,oper,asmdba,asmadmin oracle
echo grid | passwd --stdin grid
echo oracle | passwd --stdin oracle
创建目录并修改权限
在两个节点都执行以下命令
mkdir -p /u01/app/oraInventory
chown -R grid:oinstall /u01/app/oraInventory
chmod -R 775 /u01/app/oraInventory
mkdir -p /u01/app/grid
chown -R grid:oinstall /u01/app/grid
chmod -R 775 /u01/app/grid
mkdir -p /u01/app/11.2.0.4/grid
chown -R grid:oinstall /u01/app/11.2.0.4/grid
chmod -R 775 /u01/app/11.2.0.4/grid
mkdir -p /u01/app/oracle
chown -R oracle:oinstall /u01/app/oracle
chmod -R 775 /u01/app/oracle
mkdir -p /u01/app/oracle/product/11.2.0.4/db_1
chown -R oracle:oinstall /u01/app/oracle/product/11.2.0.4/db_1
chmod -R 775 /u01/app/oracle/product/11.2.0.4/db_1
六、 配置环境变量
RAC1环境变量
在节点一配置如下环境变量
su - grid
vim .bash_profile
export ORACLE_SID=+ASM1
export ORACLE_BASE=/u01/app/grid
export ORACLE_HOME=/u01/app/11.2.0.4/grid
export LD_LIBRARY_PATH=$LD_LIBRARY_PATH:$ORACLE_HOME/lib
export PATH=$ORACLE_HOME/bin:$PATH
source .bash_profile
su - oracle
vim .bash_profile
export ORACLE_SID=orcl1
export ORACLE_BASE=/u01/app/oracle
export ORACLE_HOME=/u01/app/oracle/product/11.2.0.4/db_1
export LD_LIBRARY_PATH=$LD_LIBRARY_PATH:$ORACLE_HOME/lib
export PATH=$ORACLE_HOME/bin:$PATH
source .bash_profile
RAC2环境变量
su - grid
vim .bash_profile
export ORACLE_SID=+ASM2
export ORACLE_BASE=/u01/app/grid
export ORACLE_HOME=/u01/app/11.2.0.4/grid
export LD_LIBRARY_PATH=$LD_LIBRARY_PATH:$ORACLE_HOME/lib
export PATH=$ORACLE_HOME/bin:$PATH
source .bash_profile
su - oracle
vim .bash_profile
export ORACLE_SID=orcl2
export ORACLE_BASE=/u01/app/oracle
export ORACLE_HOME=/u01/app/oracle/product/11.2.0.4/db_1
export LD_LIBRARY_PATH=$LD_LIBRARY_PATH:$ORACLE_HOME/lib
export PATH=$ORACLE_HOME/bin:$PATH
source .bash_profile
七、修改配置文件
使用root用户在两个节点修改配置文件
修改Linux系统的安全服务
vim /etc/selinux/config
SELINUX改成disabled
修改系统资源限制
vim /etc/security/limits.conf
在结尾加上如下内容:
oracle soft nproc 2047
oracle hard nproc 16384
oracle soft nofile 1024
oracle hard nofile 65536
grid soft nproc 2047
grid hard nproc 16384
grid soft nofile 1024
grid hard nofile 65536
修改系统内核参数
vim /etc/sysctl.conf
加上:
kernel.sem=250 32000 100 128
kernel.shmmni=4096
fs.file-max=6815744
fs.aio-max-nr=1048576
net.ipv4.ip_local_port_range=9000 65000
net.core.rmem_default=262144
net.core.rmem_max=4194304
net.core.wmem_default=262144
net.core.wmem_max=1048576
sysctl -p
八、安装依赖
在两个节点使用root用户安装依赖
配置yum源
vim /etc/yum.repos.d/iso.repo
修改内容如下:
[iso]
name=iso
baseurl=file:///mnt
enabled=1
gpgcheck=0
加入光盘后使用如下命令挂载到mnt目录
mount /dev/cdrom /mnt

刷新yum源
yum clean all
扫描是否配置成功
yum list
安装依赖
网上找到了两个,有所不同,我都执行了
yum -y install binutils compat-libstdc++-33 glibc ksh libaio libgcc libstdc++ make compat-libcap1 gcc gcc-c++ glibc-devel libaio-devel libstdc++-devel sysstat
yum install -y binutils-* compat-libstdc++-33-* elfutils-libelf-* elfutils-libelf-devel-* gcc-* gcc-c++-* glibc-* glibc-common-* glibc-devel-* glibc-headers-* ksh-* libaio-* libgcc-* libstdc++-* make-* sysstat-* unixODBC-* unixODBC-devel-* compat-libcap*
安装完成后单独rpm安装pdksh依赖
rpm -ivh pdksh-5.2.14-30.x86_64.rpm --nodeps
九、关闭服务
使用root用户在两个节点执行如下命令:
service iptables stop
chkconfig autofs off
chkconfig acpid off
chkconfig sendmail off
chkconfig cups-config-daemon off
chkconfig cpus off
chkconfig xfs off
chkconfig lm_sensors off
chkconfig gpm off
chkconfig openibd off
chkconfig pcmcia off
chkconfig cpuspeed off
chkconfig nfslock off
chkconfig iptables off
chkconfig ip6tables off
chkconfig rpcidmapd off
chkconfig apmd off
chkconfig sendmail off
chkconfig arptables_jf off
chkconifg microcode_ctl off
chkconfig rpcgssd off
chkconfig ntpd off
十、配置互信
解压安装包
使用root用户解压第三个安装包
unzip p13390677_112040_Linux-x86-64_3of7.zip
配置两节点互信
解压后在节点一上使用root用户在grid/sshsetup目录下执行如下命令:每个命令要求输入四次密码
./sshUserSetup.sh -user grid -hosts "rac1 rac2" -advanced -noPromptPassphrase
./sshUserSetup.sh -user oracle -hosts "rac1 rac2" -advanced -noPromptPassphrase
验证
在节点一和节点二上分别用grid和oracle用户进行测试:
ssh rac1 date
ssh rac2 date
ssh rac1-priv date
ssh rac2-priv date
都不用输密码代表配置互信成功
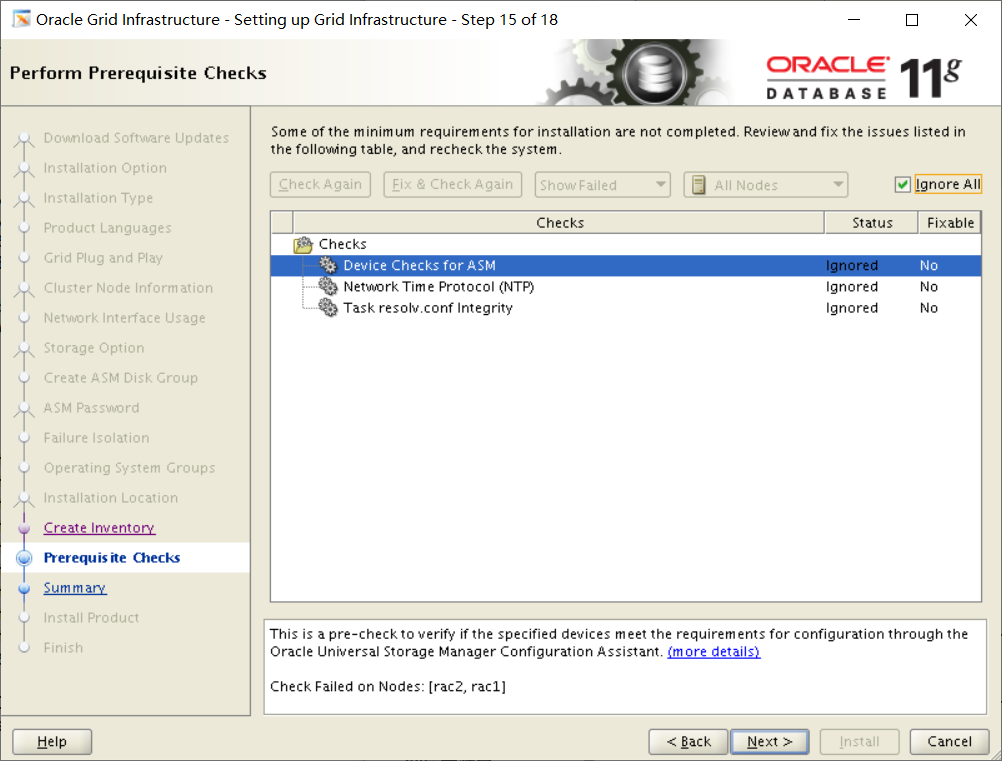
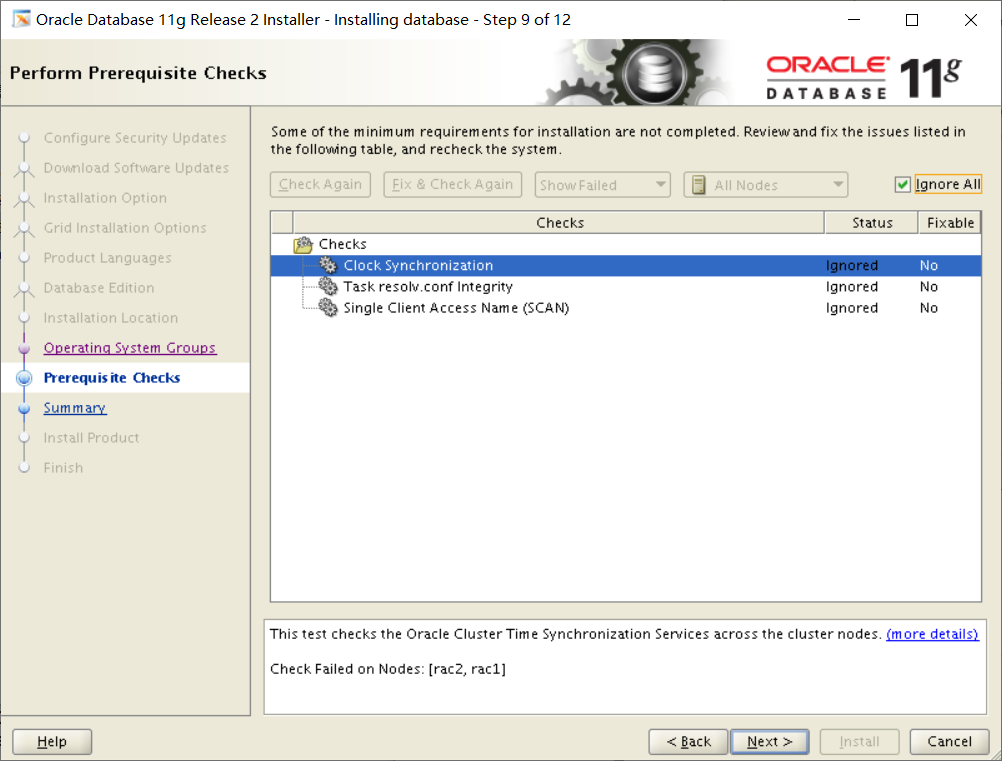
十一、安装前CVU检查
安装cvuqdisk依赖
在节点一grid/rpm目录下有一个cvuqdisk-1.0.9-1.rpm包,使用scp命令将其复制到节点二
scp cvuqdisk-1.0.9-1.rpm rac2:/opt/soft
在两个节点下使用root用户安装此依赖
rpm -ivh cvuqdisk-1.0.9-1.rpm
执行检查
在节点一使用grid用户执行如下命令
export CVUQDISK_GRP=oinstall
echo $CVUQDISK_GRP
在grid目录下执行如下命令
./runcluvfy.sh stage -post hwos -n rac1,rac2 -verbose

这里第一次没成功,我看了一下发现虚拟机配置文件的disk.EnableUUID参数变成FALSE了,关闭虚拟机后修改成TRUE后检测成功。
十二、设置UDEV规则
在两个节点使用root用户执行以下命令:
>/etc/udev/rules.d/99-oracle-asmdevices.rules
export DISK=0
for i in b c d e f
do
DISK=$(expr $DISK + 1)
UUID=`scsi_id -gud /dev/sd$i`
echo "KERNEL==\"sd*\", SUBSYSTEM==\"block\", PROGRAM==\"/sbin/scsi_id --whitelisted --replace-whitespace --device=/dev/\$name\", RESULT==\"$UUID\", NAME=\"asm-disk$DISK\",
OWNER=\"grid\", GROUP=\"asmadmin\", MODE=\"0660\" " >>/etc/udev/rules.d/99-oracle-asmdevices.rules
done
查看是否添加成功:
cat /etc/udev/rules.d/99-oracle-asmdevices.rules

重启UDEV
/sbin/udevadm control --reload-rules
/sbin/start_udev

此时能看到/dev目录下的文件有所改变:

不过此时再使用CVU检测就发现又不通过了,不过好像不影响后续安装
十三、开始安装grid软件
在节点一切换到grid用户
设置图形化界面
export DISPLAY=192.168.178.1:0.0
echo $DISPLAY
启动图形化安装
在grid目录下执行安装命令
./runInstaller
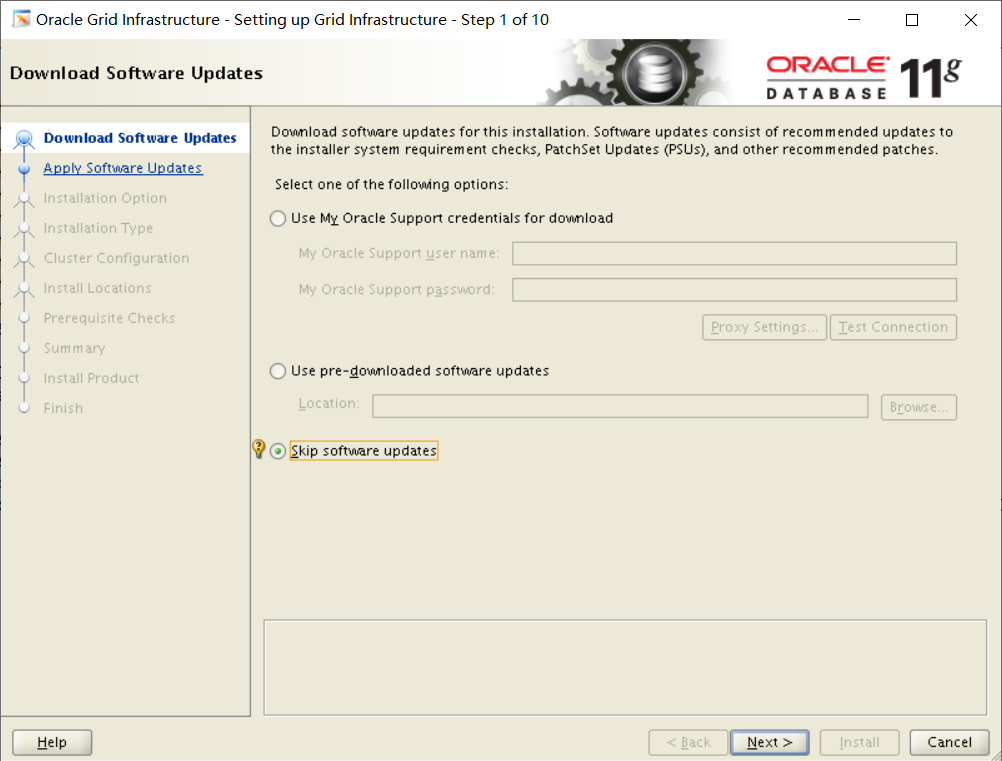
安装选项基本都是下一步,详看资料
执行脚本
安装过程中要在两个节点分别执行两个脚本
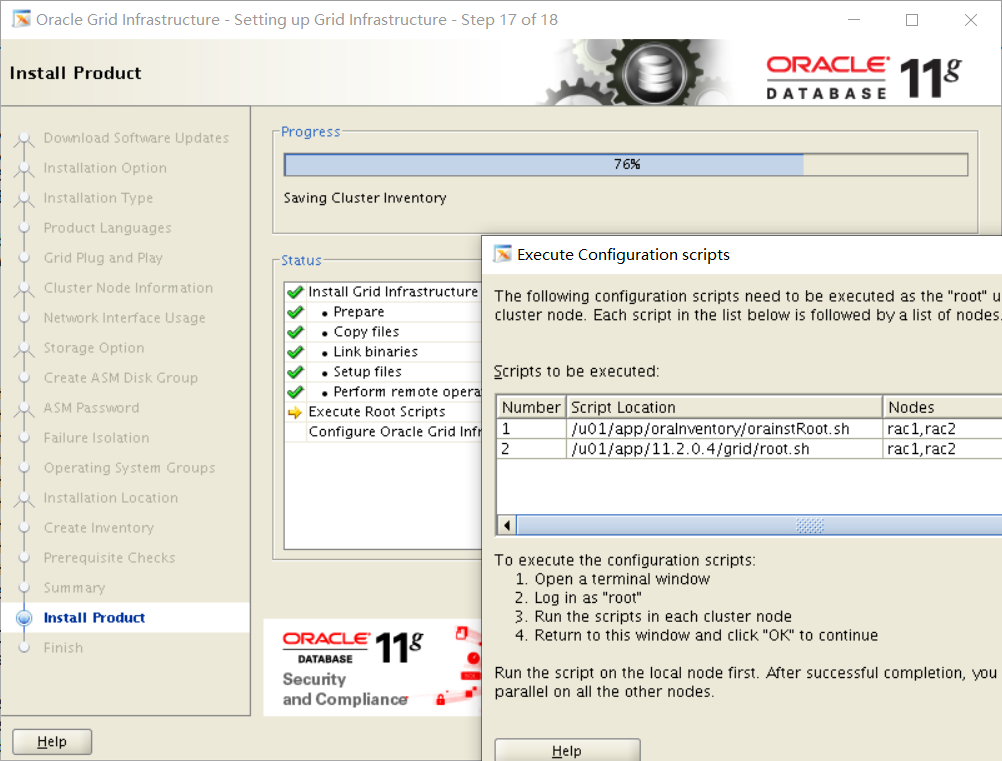
- 节点一执行第一个脚本:
[root@rac1 ~]# /u01/app/oraInventory/orainstRoot.sh
Changing permissions of /u01/app/oraInventory.
Adding read,write permissions for group.
Removing read,write,execute permissions for world.

Changing groupname of /u01/app/oraInventory to oinstall.
The execution of the script is complete.
- 节点二执行第一个脚本:
[root@rac2 ~]# /u01/app/oraInventory/orainstRoot.sh
Changing permissions of /u01/app/oraInventory.
Adding read,write permissions for group.
Removing read,write,execute permissions for world.

Changing groupname of /u01/app/oraInventory to oinstall.
The execution of the script is complete.
- 节点一执行第二个脚本:这个脚本跑的比较慢
[root@rac1 ~]# /u01/app/11.2.0.4/grid/root.sh
Performing root user operation for Oracle 11g

The following environment variables are set as:
    ORACLE_OWNER= grid
    ORACLE_HOME=  /u01/app/11.2.0.4/grid

Enter the full pathname of the local bin directory: [/usr/local/bin]:
   Copying dbhome to /usr/local/bin ...
   Copying oraenv to /usr/local/bin ...
   Copying coraenv to /usr/local/bin ...


Creating /etc/oratab file...
Entries will be added to the /etc/oratab file as needed by
Database Configuration Assistant when a database is created
Finished running generic part of root script.
Now product-specific root actions will be performed.
Using configuration parameter file: /u01/app/11.2.0.4/grid/crs/install/crsconfig_params
Creating trace directory
User ignored Prerequisites during installation
Installing Trace File Analyzer
OLR initialization - successful
  root wallet
  root wallet cert
  root cert export
  peer wallet
  profile reader wallet
  pa wallet
  peer wallet keys
  pa wallet keys
  peer cert request
  pa cert request
  peer cert
  pa cert
  peer root cert TP
  profile reader root cert TP
  pa root cert TP
  peer pa cert TP
  pa peer cert TP
  profile reader pa cert TP
  profile reader peer cert TP
  peer user cert
  pa user cert
Adding Clusterware entries to upstart
CRS-2672: Attempting to start 'ora.mdnsd' on 'rac1'
CRS-2676: Start of 'ora.mdnsd' on 'rac1' succeeded
CRS-2672: Attempting to start 'ora.gpnpd' on 'rac1'
CRS-2676: Start of 'ora.gpnpd' on 'rac1' succeeded
CRS-2672: Attempting to start 'ora.cssdmonitor' on 'rac1'
CRS-2672: Attempting to start 'ora.gipcd' on 'rac1'
CRS-2676: Start of 'ora.cssdmonitor' on 'rac1' succeeded
CRS-2676: Start of 'ora.gipcd' on 'rac1' succeeded
CRS-2672: Attempting to start 'ora.cssd' on 'rac1'
CRS-2672: Attempting to start 'ora.diskmon' on 'rac1'
CRS-2676: Start of 'ora.diskmon' on 'rac1' succeeded
CRS-2676: Start of 'ora.cssd' on 'rac1' succeeded

ASM created and started successfully.

Disk Group SYSTEMDG created successfully.

clscfg: -install mode specified
Successfully accumulated necessary OCR keys.
Creating OCR keys for user 'root', privgrp 'root'..
Operation successful.
CRS-4256: Updating the profile
Successful addition of voting disk 624861adc0ca4f27bf506f96877aff41.
Successful addition of voting disk 33b3f9400a9c4f1cbf346ae054034ae6.
Successful addition of voting disk 40a0f075e55e4f4ebf663bf53a7e1cc6.
Successfully replaced voting disk group with +SYSTEMDG.
CRS-4256: Updating the profile
CRS-4266: Voting file(s) successfully replaced
##  STATE    File Universal Id                File Name Disk group
--  -----    -----------------                --------- ---------
 1. ONLINE   624861adc0ca4f27bf506f96877aff41 (/dev/asm-disk1) [SYSTEMDG]
 2. ONLINE   33b3f9400a9c4f1cbf346ae054034ae6 (/dev/asm-disk2) [SYSTEMDG]
 3. ONLINE   40a0f075e55e4f4ebf663bf53a7e1cc6 (/dev/asm-disk3) [SYSTEMDG]
Located 3 voting disk(s).
CRS-2672: Attempting to start 'ora.asm' on 'rac1'
CRS-2676: Start of 'ora.asm' on 'rac1' succeeded
CRS-2672: Attempting to start 'ora.SYSTEMDG.dg' on 'rac1'
CRS-2676: Start of 'ora.SYSTEMDG.dg' on 'rac1' succeeded
Configure Oracle Grid Infrastructure for a Cluster ... succeeded
- 节点二执行第二个脚本:
[root@rac2 ~]# /u01/app/11.2.0.4/grid/root.sh
Performing root user operation for Oracle 11g

The following environment variables are set as:
    ORACLE_OWNER= grid
    ORACLE_HOME=  /u01/app/11.2.0.4/grid

Enter the full pathname of the local bin directory: [/usr/local/bin]:
   Copying dbhome to /usr/local/bin ...
   Copying oraenv to /usr/local/bin ...
   Copying coraenv to /usr/local/bin ...


Creating /etc/oratab file...
Entries will be added to the /etc/oratab file as needed by
Database Configuration Assistant when a database is created
Finished running generic part of root script.
Now product-specific root actions will be performed.
Using configuration parameter file: /u01/app/11.2.0.4/grid/crs/install/crsconfig_params
Creating trace directory
User ignored Prerequisites during installation
Installing Trace File Analyzer
OLR initialization - successful
Adding Clusterware entries to upstart
CRS-4402: The CSS daemon was started in exclusive mode but found an active CSS daemon on node rac1, number 1, and is terminating
An active cluster was found during exclusive startup, restarting to join the cluster
Configure Oracle Grid Infrastructure for a Cluster ... succeeded
安装完成

由于 SCAN VIP 主机名 epayrac-scan 没有在 DNS 注册,导致 Oracle Cluster Verification Utility失败,可以忽略此错误。

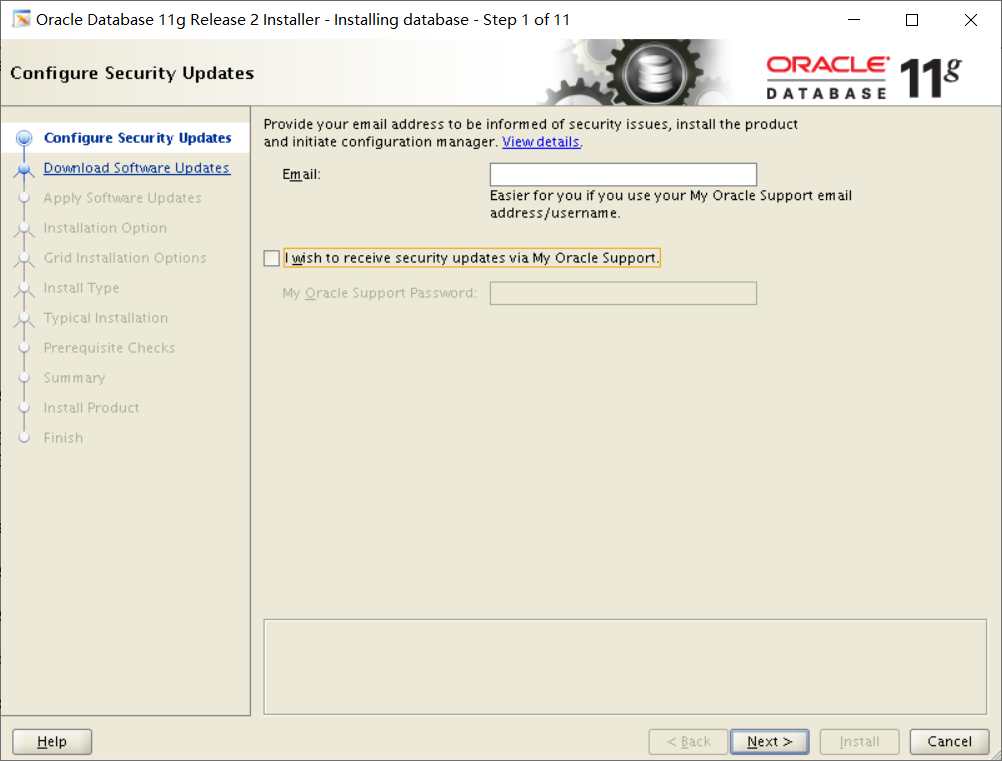
十四、安装DB
解压安装包
在节点一使用root用户解压
unzip p13390677_112040_Linux-x86-64_1of7.zip
unzip p13390677_112040_Linux-x86-64_2of7.zip
设置图形化界面
登录oracle用户
export DISPLAY=192.168.178.1:0.0
echo $DISPLAY
启动图形化安装
在解压好的database目录下使用oracle用户执行安装命令
./runInstaller
开始安装
执行脚本

- 节点一执行
[root@rac1 ~]# /u01/app/oracle/product/11.2.0.4/db_1/root.sh
Performing root user operation for Oracle 11g

The following environment variables are set as:
    ORACLE_OWNER= oracle
    ORACLE_HOME=  /u01/app/oracle/product/11.2.0.4/db_1

Enter the full pathname of the local bin directory: [/usr/local/bin]:
The contents of "dbhome" have not changed. No need to overwrite.
The contents of "oraenv" have not changed. No need to overwrite.
The contents of "coraenv" have not changed. No need to overwrite.

Entries will be added to the /etc/oratab file as needed by
Database Configuration Assistant when a database is created
Finished running generic part of root script.
Now product-specific root actions will be performed.
Finished product-specific root actions.
- 节点二执行
[root@rac2 ~]# /u01/app/oracle/product/11.2.0.4/db_1/root.sh
Performing root user operation for Oracle 11g

The following environment variables are set as:
    ORACLE_OWNER= oracle
    ORACLE_HOME=  /u01/app/oracle/product/11.2.0.4/db_1

Enter the full pathname of the local bin directory: [/usr/local/bin]:
The contents of "dbhome" have not changed. No need to overwrite.
The contents of "oraenv" have not changed. No need to overwrite.
The contents of "coraenv" have not changed. No need to overwrite.

Entries will be added to the /etc/oratab file as needed by
Database Configuration Assistant when a database is created
Finished running generic part of root script.
Now product-specific root actions will be performed.
Finished product-specific root actions.
执行后安装完成。
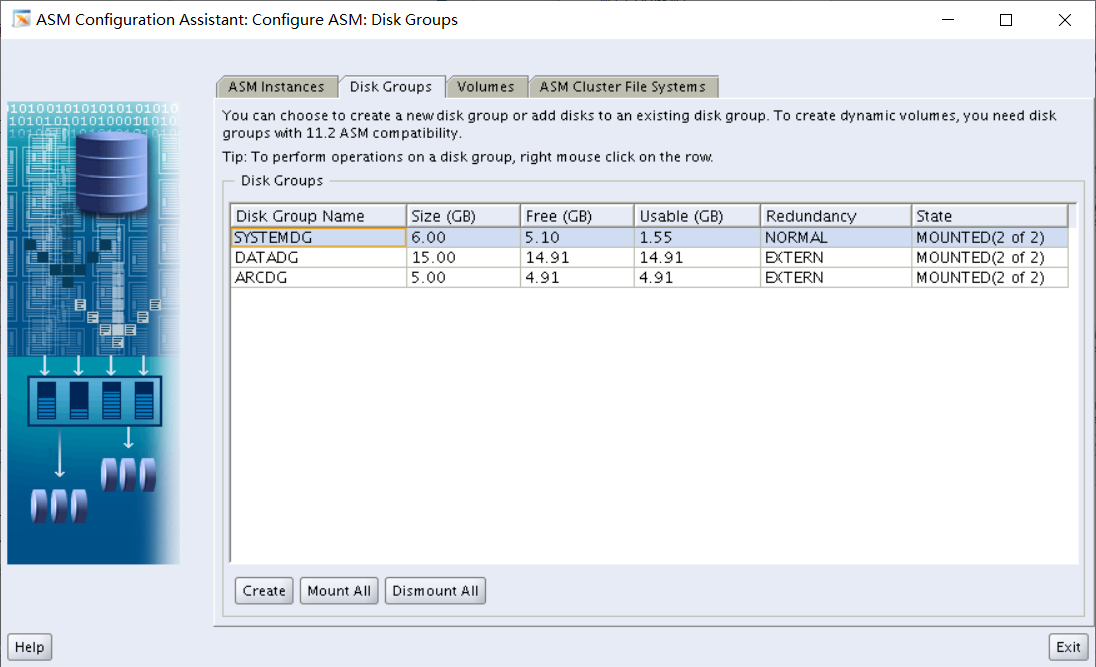
十五、创建ASM磁盘组
在节点一使用grid用户执行
登录grid用户
export DISPLAY=192.168.178.1:0.0
echo $DISPLAY
启动图形化界面安装
asmca
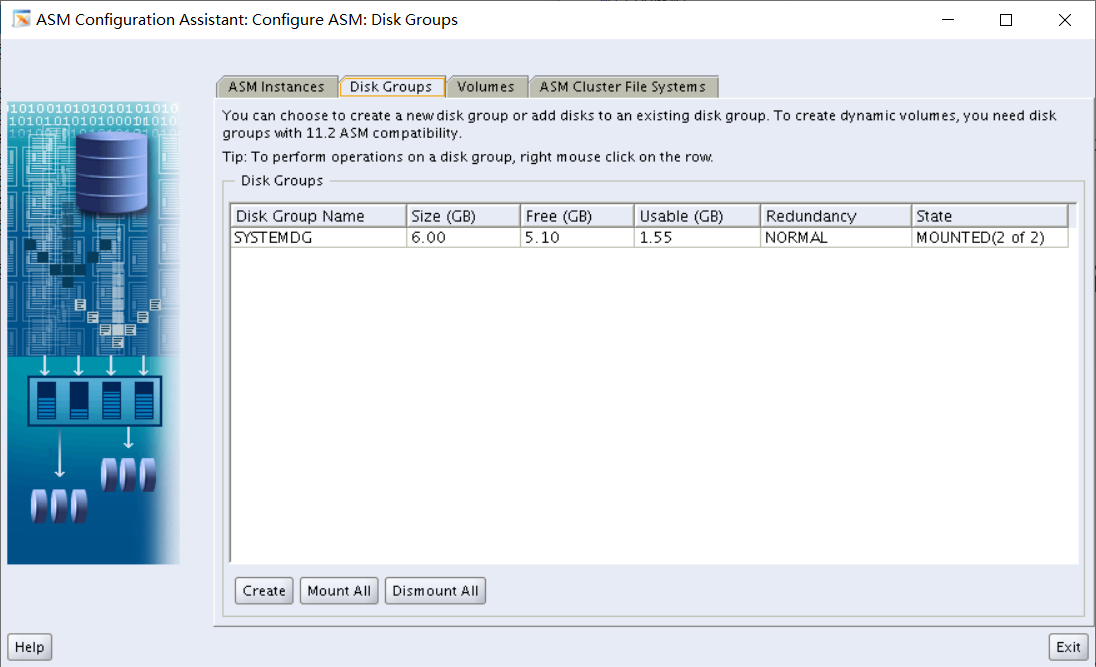
- 点击create,创建磁盘组


- 创建成功
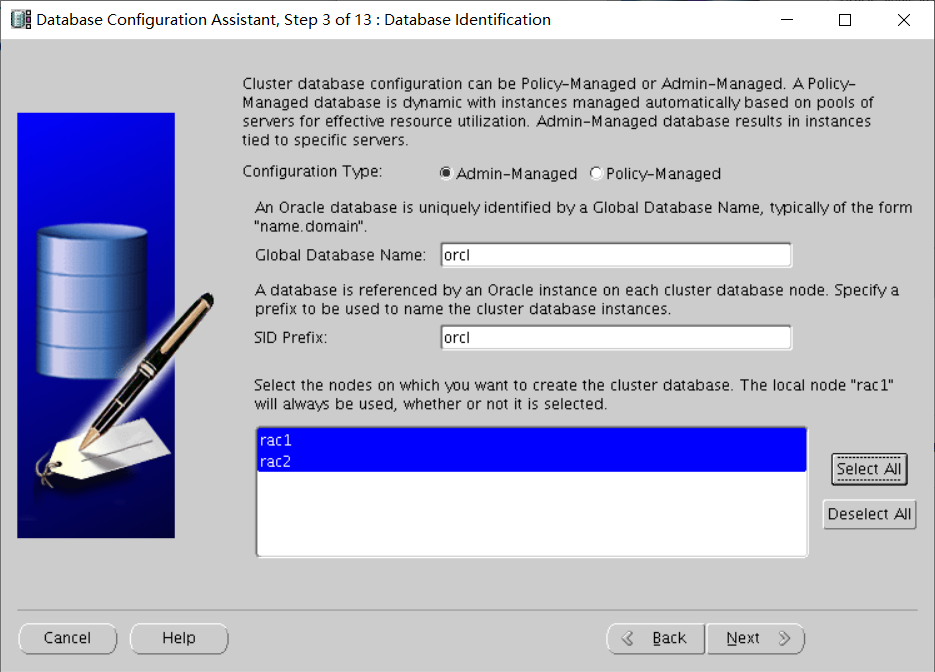
十六、创建数据库
在节点一使用oracle用户执行
登录oracle用户
export DISPLAY=192.168.178.1:0.0
echo $DISPLAY
启动图形化界面安装
dbca


安装完成

[oracle@rac1 u01]$ crs_stat -t
Name           Type           Target    State     Host
------------------------------------------------------------
ora.ARCDG.dg   ora....up.type ONLINE    ONLINE    rac1
ora.DATADG.dg  ora....up.type ONLINE    ONLINE    rac1
ora....ER.lsnr ora....er.type ONLINE    ONLINE    rac1
ora....N1.lsnr ora....er.type ONLINE    ONLINE    rac1
ora....EMDG.dg ora....up.type ONLINE    ONLINE    rac1
ora.asm        ora.asm.type   ONLINE    ONLINE    rac1
ora.cvu        ora.cvu.type   ONLINE    ONLINE    rac1
ora.gsd        ora.gsd.type   OFFLINE   OFFLINE
ora....network ora....rk.type ONLINE    ONLINE    rac1
ora.oc4j       ora.oc4j.type  ONLINE    ONLINE    rac1
ora.ons        ora.ons.type   ONLINE    ONLINE    rac1
ora.orcl.db    ora....se.type ONLINE    ONLINE    rac1
ora....SM1.asm application    ONLINE    ONLINE    rac1
ora....C1.lsnr application    ONLINE    ONLINE    rac1
ora.rac1.gsd   application    OFFLINE   OFFLINE
ora.rac1.ons   application    ONLINE    ONLINE    rac1
ora.rac1.vip   ora....t1.type ONLINE    ONLINE    rac1
ora....SM2.asm application    ONLINE    ONLINE    rac2
ora....C2.lsnr application    ONLINE    ONLINE    rac2
ora.rac2.gsd   application    OFFLINE   OFFLINE
ora.rac2.ons   application    ONLINE    ONLINE    rac2
ora.rac2.vip   ora....t1.type ONLINE    ONLINE    rac2
ora....ry.acfs ora....fs.type ONLINE    ONLINE    rac1
ora.scan1.vip  ora....ip.type ONLINE    ONLINE    rac1


 1万+
1万+


 被折叠的 条评论
为什么被折叠?
被折叠的 条评论
为什么被折叠?
 到【灌水乐园】发言


