


1、介绍
虽然静态代理模式很好用,但是静态代理还是存在一些局限性的,比如使用静态代理模式需要程序员手写很多代码,这个过程是比较浪费时间和精力的。一旦需要代理的类中方法比较多,或者需要同时代理多个对象的时候,这无疑会增加很大的复杂度。
代理类在程序运行时创建的代理方式被成为动态代理。 我们上面静态代理的例子中,代理类(studentProxy)是自己定义好的,在程序运行之前就已经编译完成。然而动态代理,代理类并不是在Java代码中定义的,而是在运行时根据我们在Java代码中的“指示”动态生成的。相比于静态代理, 动态代理的优势在于可以很方便的对代理类的函数进行统一的处理,而不用修改每个代理类中的方法。
2、动态代理简单实现
在java的java.lang.reflect包下提供了一个Proxy类和一个InvocationHandler接口,通过这个类和这个接口可以生成JDK动态代理类和动态代理对象。
public class DynamicProxyTest {

    interface IHello {
        void sayHello();
    }

    static class Hello implements IHello {
        @Override
        public void sayHello() {
            System.out.println("hello world");
        }
    }

    static class DynamicProxy implements InvocationHandler {

        Object originalObj;

        Object bind(Object originalObj) {
            this.originalObj = originalObj;
            return Proxy.newProxyInstance(originalObj.getClass().getClassLoader(), originalObj.getClass().getInterfaces(), this);
        }

        /**
         *Object proxy是代理的对象, Method method是IHello接口的sayHello,通过反射获取,如下源码中m3 = Class.forName("org.fenixsoft.bytecode.DynamicProxyTest$IHello").getMethod("sayHello", new Class[0]);  Object[] args是真实对象中调用方法的参数
         */
        @Override
        public Object invoke(Object proxy, Method method, Object[] args) throws Throwable {
            System.out.println("welcome");
            return method.invoke(originalObj, args);
        }
    }

    public static void main(String[] args) {
        IHello hello = (IHello) new DynamicProxy().bind(new Hello());
        hello.sayHello();
    }
}
动态代理原理分析
上面说到,动态代理的优势在于可以很方便的对代理类的函数进行统一的处理,而不用修改每个代理类中的方法。是因为所有被代理执行的方法,都是通过在InvocationHandler中的invoke方法调用的,所以我们只要在invoke方法中统一处理,就可以对所有被代理的方法进行相同的操作了。上述代码里,唯一的“黑厘子”就是Proxy.newProxyInstance()方法,除此之外再没有任何特殊之处。
在JDK动态代理中涉及如下角色:
业务接口Interface、业务实现类target、业务处理类Handler、JVM在内存中生成的动态代理类$Proxy0
动态代理原理图:
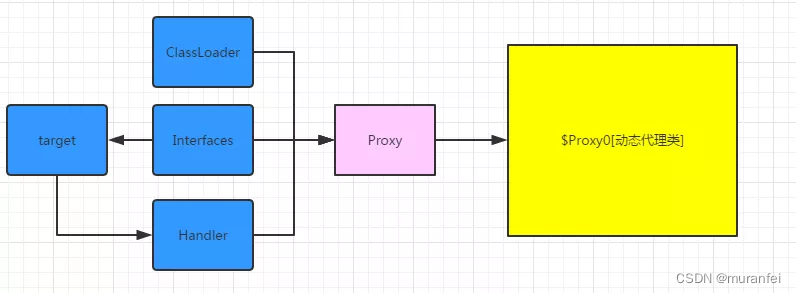
说白了,动态代理的过程是这样的:
Proxy通过传递给它的参数(interfaces/invocationHandler)生成代理类$Proxy0;cons.newInstance(new Object[]{h}
Proxy通过传递给它的参数(ClassLoader/interfaces)来加载生成的代理类$Proxy0的字节码文件;
Class<?> cl = getProxyClass0(loader, intfs);
动态代理的关键代码就是Proxy.newProxyInstance(classLoader, interfaces, handler),我们跟进源代码看看
public static Object newProxyInstance(ClassLoader loader, Class<?>[] interfaces, InvocationHandler h) throws IllegalArgumentException {
  // handler不能为空
    if (h == null) {
        throw new NullPointerException();
    }

    final Class<?>[] intfs = interfaces.clone();
    final SecurityManager sm = System.getSecurityManager();
    if (sm != null) {
        checkProxyAccess(Reflection.getCallerClass(), loader, intfs);
    }

    /*
     * Look up or generate the designated proxy class.
     */
  // 通过loader和接口,得到代理的Class对象
    Class<?> cl = getProxyClass0(loader, intfs);

    /*
     * Invoke its constructor with the designated invocation handler.
     */
    try {
        final Constructor<?> cons = cl.getConstructor(constructorParams);
        final InvocationHandler ih = h;
        if (sm != null && ProxyAccessHelper.needsNewInstanceCheck(cl)) {
            // create proxy instance with doPrivilege as the proxy class may
            // implement non-public interfaces that requires a special permission
            return AccessController.doPrivileged(new PrivilegedAction<Object>() {
                public Object run() {
                    return newInstance(cons, ih);
                }
            });
        } else {
       // 创建代理对象的实例
            return newInstance(cons, ih);
        }
    } catch (NoSuchMethodException e) {
        throw new InternalError(e.toString());
    }
}
我们看一下newInstance方法的源代码:
private static Object newInstance(Constructor<?> cons, InvocationHandler h) {
    try {
        return cons.newInstance(new Object[] {h} );
    } catch (IllegalAccessException | InstantiationException e) {
        throw new InternalError(e.toString());
    } catch (InvocationTargetException e) {
        Throwable t = e.getCause();
        if (t instanceof RuntimeException) {
            throw (RuntimeException) t;
        } else {
            throw new InternalError(t.toString());
        }
    }
}
讲解完了代理类的生成源码,我们一定想要看看代理类的代码是什么样的,下面提供一个生成代理类的方法供大家使用:
/**
 * 代理类的生成工具
 * @author ChenHao
 * @since 2019-4-2
 */
public class ProxyGeneratorUtils {

    /**
     * 把代理类的字节码写到硬盘上
     * @param path 保存路径
     */
    public static void writeProxyClassToHardDisk(String path) {
        // 第一种方法
        // System.getProperties().put("sun.misc.ProxyGenerator.saveGeneratedFiles", true);

        // 第二种方法

        // 获取代理类的字节码
        byte[] classFile = ProxyGenerator.generateProxyClass("$Proxy11", UserServiceImpl.class.getInterfaces());

        FileOutputStream out = null;

        try {
            out = new FileOutputStream(path);
            out.write(classFile);
            out.flush();
        } catch (Exception e) {
            e.printStackTrace();
        } finally {
            try {
                out.close();
            } catch (IOException e) {
                e.printStackTrace();
            }
        }
    }
    public static void main(String[] args) {
        ProxyGeneratorUtils.writeProxyClassToHardDisk("C:/x/$Proxy11.class");
    }

}
此时就会在指定的C盘x文件夹下生成代理类的.class文件,我们看下反编译后的结果:
package org.fenixsoft.bytecode;

import java.lang.reflect.InvocationHandler;
import java.lang.reflect.Method;
import java.lang.reflect.Proxy;
import java.lang.reflect.UndeclaredThrowableException;

public final class $Proxy0 extends Proxy
  implements DynamicProxyTest.IHello
{
  private static Method m3;
  private static Method m1;
  private static Method m0;
  private static Method m2;
  /**
  *注意这里是生成代理类的构造方法,方法参数为InvocationHandler类型,看到这,是不是就有点明白
  *super(paramInvocationHandler),是调用父类Proxy的构造方法。
  *父类持有:protected InvocationHandler h;
  *Proxy构造方法:
  *    protected Proxy(InvocationHandler h) {
  *         Objects.requireNonNull(h);
  *         this.h = h;
  *     }
  *
  */
  public $Proxy0(InvocationHandler paramInvocationHandler)
    throws
  {
    super(paramInvocationHandler);
  }

  /**
  *
  *这里调用代理对象的sayHello方法,直接就调用了InvocationHandler中的invoke方法,并把m3传了进去。
  *this.h.invoke(this, m3, null);  this.h就是父类Proxy中保存的InvocationHandler实例变量
  *来,再想想,代理对象持有一个InvocationHandler对象,InvocationHandler对象持有一个被代理的对象,
  *再联系到InvacationHandler中的invoke方法。嗯,就是这样。
  */
  public final void sayHello()
    throws
  {
    try
    {
      this.h.invoke(this, m3, null);
      return;
    }
    catch (RuntimeException localRuntimeException)
    {
      throw localRuntimeException;
    }
    catch (Throwable localThrowable)
    {
      throw new UndeclaredThrowableException(localThrowable);
    }
  }

  // 此处由于版面原因,省略equals()、hashCode()、toString()三个方法的代码
  // 这3个方法的内容与sayHello()非常相似。

  static
  {
    try
    {
      m3 = Class.forName("org.fenixsoft.bytecode.DynamicProxyTest$IHello").getMethod("sayHello", new Class[0]);
      m1 = Class.forName("java.lang.Object").getMethod("equals", new Class[] { Class.forName("java.lang.Object") });
      m0 = Class.forName("java.lang.Object").getMethod("hashCode", new Class[0]);
      m2 = Class.forName("java.lang.Object").getMethod("toString", new Class[0]);
      return;
    }
    catch (NoSuchMethodException localNoSuchMethodException)
    {
      throw new NoSuchMethodError(localNoSuchMethodException.getMessage());
    }
    catch (ClassNotFoundException localClassNotFoundException)
    {
      throw new NoClassDefFoundError(localClassNotFoundException.getMessage());
    }
  }
}
这个代理类的实现代码也很简单,它为传入接口中的每一个方法,以及从 java.lang.Object中继承来的equals()、hashCode()、toString()方法都生成了对应的实现 ,并且统一调用了InvocationHandler对象的invoke()方法(代码中的“this.h”就是父类Proxy中保存的InvocationHandler实例变量)来实现这些方法的内容,各个方法的区别不过是传入的参数和Method对象有所不同而已,所以无论调用动态代理的哪一个方法,实际上都是在执行InvocationHandler.invoke()中的代理逻辑。
缺点
由Proxy创建的动态代理 不支持 对 实现类的代理
动态代理类都 extend Proxy类,implements了代理的interface。
由于java不能多继承,这里已经继承了Proxy类了,不能再继承其他的类.
所以JDK的动态代理不支持对实现类的代理,只支持接口的代理。


 1483
1483


 被折叠的 条评论
为什么被折叠?
被折叠的 条评论
为什么被折叠?
 到【灌水乐园】发言


