


Ubuntu中安装TVM环境
参考教程
依赖环境
Ubuntu安装相关依赖库:
#安装相关依赖
sudo apt-get update
sudo apt-get install -y python3 python3-dev python3-setuptools gcc libtinfo-dev zlib1g-dev build-essential cmake libedit-dev libxml2-dev
#其他依赖环境查看
llvm-as -version # LLVM version 14.0.0
clang -v # clang version 14.0.0
cmake -version # cmake version 3.10.2
gcc/g++ -v # version 7.5.0
源码下载与安装
1.源码下载
因为考虑到github仓库下载的网速的问题,并且在对仓库clone的时候需要使用--recursive对第三方库模块一起进行克隆,第一次使用github链接下载的时候有第三方库未下载下来导致编译过程失败,于是转向用基于Gitee安装的方式,可以用Gitee上的镜像源
git clone https://gitee.com/mirrors_apache/tvm_1.git
同时还需要对子仓库进行克隆,修改里面的.gitmodules里的子仓库的地址
我的.gitmodules文件的配置,因为有一些有公开的仓库链接,所以直接用了公开的链接:
[submodule "dmlc-core"]
        path = 3rdparty/dmlc-core
        url = https://gitee.com/mirrors_dmlc/dmlc-core_1.git
[submodule "dlpack"]
        path = 3rdparty/dlpack
        url = https://gitee.com/yocto_1/dlpack.git
[submodule "3rdparty/rang"]
        path = 3rdparty/rang
        url = https://gitee.com/t-head-linux/rang.git
[submodule "3rdparty/vta-hw"]
        path = 3rdparty/vta-hw
        url = https://gitee.com/xiaodongdong402/tvm-vta.git
[submodule "3rdparty/libbacktrace"]
        path = 3rdparty/libbacktrace
        url = https://gitee.com/qDriving/libbacktrace.git
[submodule "3rdparty/cutlass"]
        path = 3rdparty/cutlass
        url = https://gitee.com/mushan2/cutlass.git
修改后命令行执行生效:
git submodule sync
git submodule update --init
2.源码编译
基于cmake进行编译
mkdir build
cp cmake/config.cmake build/
cd build/
vim config.cmake # 这里设置打开llvm,debug等重要工具
# set(USE_MICRO ON)
# set(USE_CPP_RPC ON)
# set(USE_GRAPH_RUNTIME_DEBUG ON)
# set(USE_MICRO_STANDALONE_RUNTIME ON)
# set(USE_LLVM ON)
cmake ..
make -j4
# 这里完成后会生成libtvm.so
3.Python环境安装
创建一个新的虚拟环境(python 3.8) tvm进行配置:
conda create -n tvm38 python=3.8
source activate tvm # 进入搭建的环境中
pip install tornado psutil xgboost mxnet tensorflow attrs cloudpickle decorator synr==0.6.0# 安装包
sudo vi ~/.bashrc # 将刚编译好的tvm放到系统环境变量中
#插入下面的代码
export TVM_HOME="/mnt/e/00_TVM/tvm"
export PYTHONPATH=$TVM_HOME/python:${PYTHONPATH}
#保存后更新
source ~/.bashrc
4.C++ Test部分
使用Google Test来驱动 TVM 中的 C++ 测试。
#这里也是选择使用的gitee的开源的链接
git clone https://gitee.com/spearNeil/googletest.git
cd googletest
mkdir build
cd build
cmake ..
make
sudo make install
5.python链接TVM
链接的提示要3.8版本的python,因为安装的tvm的版本比较新
# cd /home/ubuntu/zc/TVM/tvm/python
python setup.py install
因为之前编译的时候没有配置好LLVM的环境,之后重新编译了TVM,然后python链接的时候使用以下命令,可以在命令行直接使用TVMC命令了
cd tvm/python
python gen_requirements.py
python setup.py build
python setup.py install
6.测试例子
环境安装成功

使用TVMC
参考相关官方文件和博客使用TVMC:
使用 TVMC 编译和优化模型
TVMC介绍
将 ONNX 模型编译到 TVM 运行时
示例记录:
#a.模型下载
pip install onnx onnxoptimizer
wget https://github.com/onnx/models/raw/main/vision/classification/resnet/model/resnet50-v2-7.onnx

#b.模型编译
tvmc compile \
--target "llvm" \
--input-shapes "data:[1,3,224,224]" \
--output resnet50-v2-7-tvm.tar \
resnet50-v2-7.onnx
#编译之后生成模型tar文件,查看模型文件
mkdir model
tar -xvf resnet50-v2-7-tvm.tar -C model
ls model
模型编译后生成的文件:

其中:
mod.so 是模型,表示为 C++ 库,可由 TVM 运行时加载
mod.json 是 TVM 中继计算图的文本表示(Q:可以基于这个文件做一些图结构的提取来辅助理解吗)
mod.params 是一个包含预训练模型参数的文件(Q:是不是可以自己修改文件中的参数配置,最终的模型的参数从这个配置文件中进行加载吗)
使用 TVMC 从编译模块运行模型
TVMC.npz 对输入和输出数据都采用了 NumPy 的格式
1.数据输入预处理:
参考教程,以猫的图像为输入进行处理,ResNet-50 v2 模型,输入应该是 ImageNet 格式,处理脚本代码如下,使用pip install --user pillow 安装受支持的 Python 图像库版本
输入预处理脚本:
#!python ./preprocess.py
from tvm.contrib.download import download_testdata
from PIL import Image  # 需要安装依赖库:pip install pillow
import numpy as np

img_url = "https://s3.amazonaws.com/model-server/inputs/kitten.jpg"
img_path = download_testdata(img_url, "imagenet_cat.png", module="data")

# resnet50 要求输入图像大小为224x224
resized_image = Image.open(img_path).resize((224, 224))
img_data = np.asarray(resized_image).astype("float32")

'''
流行的深度学习框架中有不同的数据格式,典型的有NCHW和NHWC格式
深度学习框架中,数据一般是4D,用NCHW或NHWC表达,其中:
N - Batch
C - Channel
H - Height
W - Width
'''
#ONNX使用 NCHW 格式的输入,将NHWC转为NCHW
img_data = np.transpose(img_data, (2, 0, 1)) #np.transpose()能够进行坐标轴映射相当于满足 NHWC->NCHW的坐标转换,不过是三维的,因为是只有一张图片,所以N=1嘛,batch维在后面添加了

# 归一化,根据ImageNet数据库给的参数归一化输入
imagenet_mean = np.array([0.485, 0.456, 0.406])
imagenet_stddev = np.array([0.229, 0.224, 0.225])
norm_img_data = np.zeros(img_data.shape).astype("float32")
for i in range(img_data.shape[0]):
      norm_img_data[i, :, :] = (img_data[i, :, :] / 255 - imagenet_mean[i]) / imagenet_stddev[i]

# 加上batch维
img_data = np.expand_dims(norm_img_data, axis=0) #在这里增加batch维度,np.expand_dims(a,axis)表示在a上扩展维度

# 保存为.npz格式,TVMC已经提供了对这种数据格式的支持
np.savez("imagenet_cat", data=img_data)
运行python preprocess.py 后可以看到生产了imagenet_cat.npz可以作为输入
2.运行编译模块:
可以用上列处理过的数据输入之前编译好的模型进行预测了
tvmc run \
--inputs imagenet_cat.npz \
--output predictions.npz \
resnet50-v2-7-tvm.tar
运行上述命令后生成.npz格式的预测结果,我们需要对其进行处理
3.输出后处理:
输出后处理脚本代码,
import os.path
import numpy as np
from scipy.special import softmax
from tvm.contrib.download import download_testdata

# 下载标签
labels_url = "https://s3.amazonaws.com/onnx-model-zoo/synset.txt" #拿到训练的数据标签
labels_path = download_testdata(labels_url, "synset.txt", module="data")

with open(labels_path, "r") as f:
    labels = [l.rstrip() for l in f]

output_file = "predictions.npz"

# 读取输出结果
if os.path.exists(output_file):
    with np.load(output_file) as data:
        scores = softmax(data["output_0"]) # 对输出数据求softmax,归一化指数函数,把多分类的结果以概率的形式展现出来
        scores = np.squeeze(scores)  # 将scores的shape中为1的维度去掉
        ranks = np.argsort(scores)[::-1]  # 获取scores从小到大的索引值,然后是使用-1表示逆序了,为什么是索引值,因为不同的索引值表示不同的标签类

        for rank in ranks[0:5]:  # 打印前top 5的分值
            print("class='%s' with probability=%f" % (labels[rank], scores[rank]))
输出如下:

完成使用TVMC编译加载预测模型的过程,TVM中还提供了能够对模型进行优化的方式,下面进行尝试使用TVMC对上例的模型进行优化
自动调优 ResNet 模型
TVMC默认使用xgboost调优器进行调优,需要指定调优记录的输出路径文件,整个调优过程本质上是一个参数选择的过程,对不同的算子使用不同的参数配置,然后选择模型运行最快的那一组参数,属于一种参数空间搜索的策略,一般情况下都会比较耗时。本例中通过指定--number和--repeat来限制调优运行的总次数,可以使用tvmc tune --help查看其提供的其他搜索算法Note:这里的优化搜索的逻辑有点像调优框架 Opentuner,不过想知道xgboost模型是怎么训练的
调优
tvmc tune --target "llvm" \
    --output resnet50-v2-7-autotuner_records.json \
    --number 10 \
    --repeat 10 \
    resnet50-v2-7.onnx
(Q:上面的命令的调优的搜索空间是默认的吗,之后考虑参考学习自动搜索空间的模型优化的教程进行相关优化的学习)
调优过程完成之后可以看到生成了调优结果记录文件,记录了每轮调优的相关信息

编译调优模型
利用调优生成的记录文件,进行调优模型的编译
tvmc compile --target "llvm" \
    --output resnet50-v2-7-tvm_autotuned.tar \
    --tuning-records resnet50-v2-7-autotuner_records.json \
    resnet50-v2-7.onnx
对比调优前后的模型
上述之前有对数据预处理,此处只执行模型预测和处理预测结果的脚本
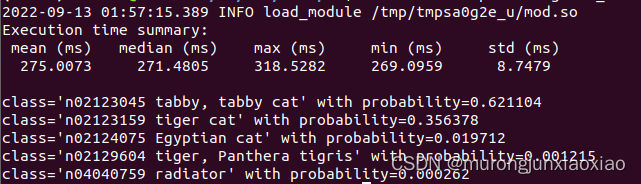
运行调优前模型:
#python pre_process.py
tvmc run --inputs imagenet_cat.npz \
    --output predictions.npz \
    --print-time \
    --repeat 100 \
    resnet50-v2-7-tvm.tar
python post_process.py
预测结果:
运行调优后的模型:
tvmc run --inputs imagenet_cat.npz \
    --output predictions.npz \
    --print-time \
    --repeat 100 \
    resnet50-v2-7-tvm_autotuned.tar
python post_process.py
预测结果:
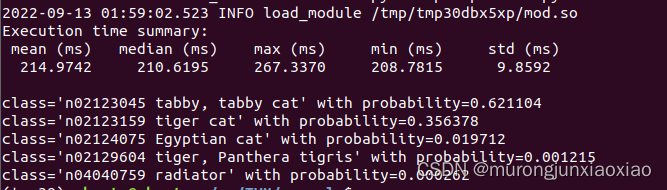
确实调优后模型预测时间变短了,对预测结果的精度几乎没什么影响
问题记录:
编译模型的时候出错:
应该是编译的时候选择配置LLVM的时候出错了,之前修改config.cmake文件的时候直接在文件前面直接添加
set(USE_LLVM ON) 本身文件后面有set(USE_LLVM OFF)可能设置被覆盖了吧


 465
465


 被折叠的 条评论
为什么被折叠?
被折叠的 条评论
为什么被折叠?
 到【灌水乐园】发言


