


还未完成验证,只是作为纪录,后续有时间完善
1、下载ProtocolBuffer包(2.5版本与下面的object-c插件不兼容,建议下载2.4.1版本的):
http://code.google.com/intl/zh-CN/apis/protocolbuffers/
编译安装(生成的编译器protoc在/usr/local/bin目录下):
cd protobuf-2.4.1
./configure
make
make install
2、下载Objective-C compiler for ProtocolBuffer(目前有两种类型的实现)。
(1)、针对ProtocolBuffer2.2做修改,使最后生成的.proto文件编译器(protoc)支持Objective-C类型的文件输出。
http://code.google.com/p/metasyntactic/wiki/ProtocolBuffers
(2)、针对ProtocolBuffer2.3推出的plugin模式编写插件,以插件方式支持Objective-C类型的文件输出。
https://github.com/booyah/protobuf-objc
我选用第(1)种方式,这也是Google推荐的方式。
http://code.google.com/p/metasyntactic/wiki/ProtocolBuffers,下载源码压缩包后解压到相关目录
进入该目录,并执行:
cd ProtocolBuffers-2.2.0-Source
./configure
make
make install
没有这么顺利
google/protobuf/message.cc:130:60: error: implicit instantiation of undefined
template 'std::__1::basic_istream<char, std::__1::char_traits<char> >'
return ParseFromZeroCopyStream(&zero_copy_input) && input->eof();
^
/Applications/Xcode.app/Contents/Developer/Toolchains/XcodeDefault.xctoolchain/usr/bin/../include/c++/v1/iosfwd:109:33: note:
template is declared here
class _LIBCPP_TYPE_VIS_ONLY basic_istream;
^
google/protobuf/message.cc:135:67: error: implicit instantiation of undefined
template 'std::__1::basic_istream<char, std::__1::char_traits<char> >'
return ParsePartialFromZeroCopyStream(&zero_copy_input) && input->eof();
^
/Applications/Xcode.app/Contents/Developer/Toolchains/XcodeDefault.xctoolchain/usr/bin/../include/c++/v1/iosfwd:109:33: note:
template is declared here
class _LIBCPP_TYPE_VIS_ONLY basic_istream;
^
2 warnings and 2 errors generated.
make[2]: *** [message.lo] Error 1
make[1]: *** [all-recursive] Error 1
make: *** [all] Error 2
-
解决方法如下:
找到文件src/google/protobuf/message.cc 在文件的第一个#include之上的一行,加入
#include <istream>
继续运行make ,即成功通过。
3、测试.proto文件编译
写一个person.proto文件:
- message Person {
- required string name = 1;
- required int32 id = 2;
- optional string email = 3;
- enum PhoneType {
- MOBILE = 0;
- HOME = 1;
- WORK = 2;
- }
- message PhoneNumber {
- required string number = 1;
- optional PhoneType type = 2 [default = HOME];
- }
- repeated PhoneNumber phone = 4;
- }
编译该文件:
protoc person.proto --objc_out=/Output/Directory/
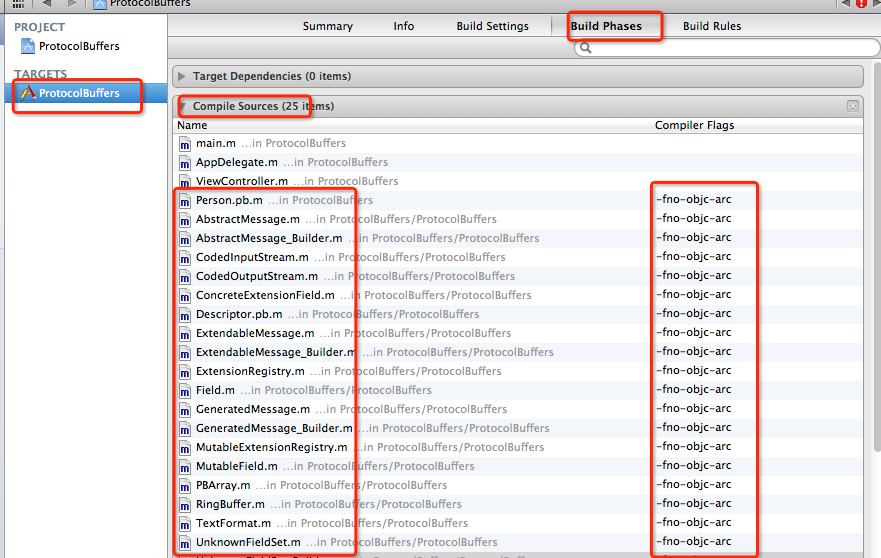
protoc会使用该插件编译.proto文件,最终生成两个文件:Person.pb.h 、Person.pb.m(不支持ARC)
如果工程中使用了ARC ,所以需要使用-fno-objc-arc来标识相关的文件不使用ARC机制:
这个步骤通过后,说明ProtocoBuffer Compiler for Objective-C可以正常工作了。
4、在Xcode中使用ProtocolBuffer
将步骤2中protobuf-obj/src/runtime/Classes目录导入到Xcode项目中,导入时,选中”Copy items into destination group‘s folder(if needed)“。
导入位置选择项目根目录。导入完毕后,项目根目录下将会出现Classes目录,将该目录改名为ProtocolBuffers(注意最后的s): mv Classes ProtocolBuffers
修改项目属性中”Build Settings-->Search Paths-->Header Search Paths”,将项目根目录“.”添加到头文件搜索路径中去。
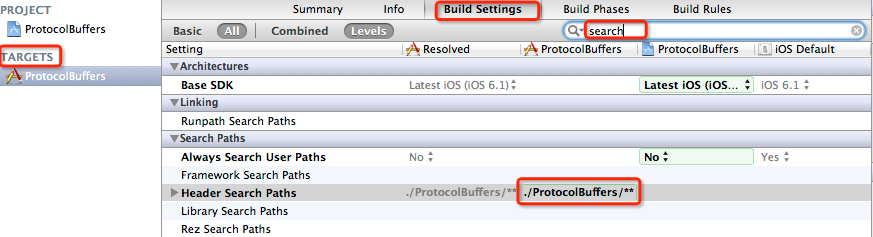
这样ProtocolBuffer for Objective-C的工作环境就配置好了。
5、使用
1)、将步骤3中编译输出的Person.pb.h 和Person.pb.m添加到项目中
2)、将Person.pb.h 中的 #import <ProtocolBuffers/ProtocolBuffers.h> 改为#import"ProtocolBuffers/ProtocolBuffers.h"
3)、在需要使用的地方引入头文件:#import "Person.pb.h"
- - (void)viewDidLoad
- {
- [super viewDidLoad];
- // Do any additional setup after loading the view, typically from a nib.
- [self writeAndReadProtobuf];
- }
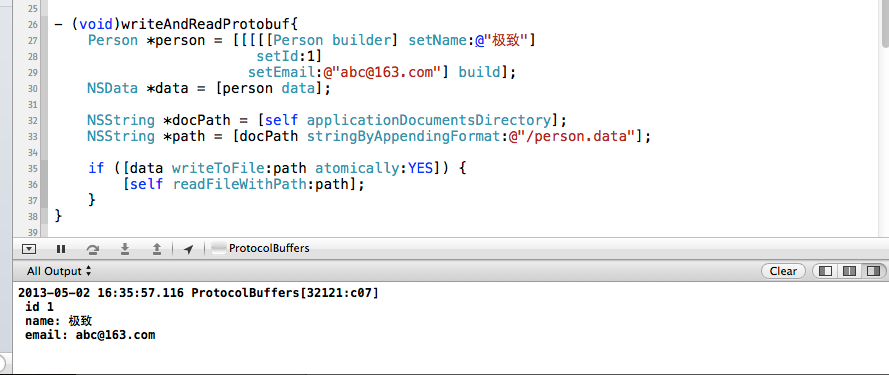
- - (void)writeAndReadProtobuf{
- Person *person = [[[[[Person builder] setName:@"极致"]
- setId:1]
- setEmail:@"abc@163.com"] build];
- NSData *data = [person data];
- NSString *docPath = [self applicationDocumentsDirectory];
- NSString *path = [docPath stringByAppendingFormat:@"/person.data"];
- if ([data writeToFile:path atomically:YES]) {
- [self readFileWithPath:path];
- }
- }
- - (NSString *)applicationDocumentsDirectory {
- NSArray *paths = NSSearchPathForDirectoriesInDomains(NSDocumentDirectory, NSUserDomainMask, YES);
- NSString *basePath = ([paths count] > 0) ? [paths objectAtIndex:0] : nil;
- return basePath;
- }
- - (void)readFileWithPath:(NSString *)path {
- NSData *data = [NSData dataWithContentsOfFile:path];
- Person *person = [Person parseFromData:data];
- if (person) {
- NSLog(@"\n id %d \n name: %@ \n email: %@ \n",person.id, person.name, person.email);
- }
- }
遇到的问题:
在执行 ./autogen.sh时出现错误: ./autogen.sh: line 10: autoreconf: command not found
解决办法:需要安装automake和autoconf:
brew install automake
brew install autoconf


 5万+
5万+

 被折叠的 条评论
为什么被折叠?
被折叠的 条评论
为什么被折叠?
 到【灌水乐园】发言


