


参考文章:SpringCloud微服务
Gitee代码示例:https://gitee.com/xscodeit/xs-springcloudalibaba-2024.git
参考视频:【2025极简版】一小时Spring Cloud Alibaba微服务入手项目开发!涵盖所有核心知识点,快速入门!_哔哩哔哩_bilibili
SpringCloud 核心组件
nacos
管理微服务注册中心和配置中心,所有微服务连接到nacos进行注册,微服务通过nacos发现其他微服务以便进行调用。微服务访问nacos获得公共yml配置。
feign
微服务之间通讯,实现如同调用类方法一样使用restful API通过url地址去调用其他微服务
gateway
方便客户端对众多微服务进行访问
sentinel
某个微服务出错后的自处理
skywalking
微服务出错后进行错误排查
seata
使得微服务的同一组事务保持一致性
项目
环境要求:
SpringBoot3.4.3,基于Spring Framework 6.x
Spring Cloud Ablibaba 2023.0.1.0
Spring Cloud 2024.0.0
JDK17为最低运行环境
SpringBoot与Spring Alibaba版本对应
| Spring Boot Version | Spring Cloud Alibaba Version | Spring Cloud Version |
| 3.0.2 | 2022.0.0.0 | Spring Cloud 2022.0.0 |
| 3.0.2 | 2022.0.0.0-RC2 | Spring Cloud 2022.0.0 |
| 3.0.0 | 2022.0.0.0-RC1 | Spring Cloud 2022.0.0 |
| 2.6.13 | 2021.0.5.0 | Spring Cloud 2021.0.5 |
| 2.6.11 | 2021.0.4.0 | Spring Cloud 2021.0.4 |
| 2.6.3 | 2021.0.1.0 | Spring Cloud 2021.0.1 |
| 2.4.2 | 2021.1 | Spring Cloud 2020.0.1 |
| 2.3.12.RELEASE | 2.2.10-RC1 | Spring Cloud Hoxton.SR12 |
| 2.3.12.RELEASE | 2.2.9.RELEASE | Spring Cloud Hoxton.SR12 |
| 2.3.12.RELEASE | 2.2.8.RELEASE | Spring Cloud Hoxton.SR12 |
| 2.3.12.RELEASE | 2.2.7.RELEASE | Spring Cloud Hoxton.SR12 |
| 2.3.2.RELEASE | 2.2.6.RELEASE | Spring Cloud Hoxton.SR9 |
| 2.2.5.RELEASE | 2.2.1.RELEASE | Spring Cloud Hoxton.SR3 |
| 2.2.X.RELEASE | 2.2.0.RELEASE | Spring Cloud Hoxton.RELEASE |
| 2.1.13.RELEASE | 2.1.4.RELEASE | Spring Cloud Greenwich.SR6 |
| 2.1.X.RELEASE | 2.1.2.RELEASE | Spring Cloud Greenwich |
| 2.0.X.RELEASE | 2.0.4.RELEASE(停止维护,建议升级) | Spring Cloud Finchley |
| 1.5.X.RELEASE | 1.5.1.RELEASE(停止维护,建议升级) | Spring Cloud Edgware |
2023.x 分支对应的是 Spring Cloud 2023 与 Spring Boot 3.2.x
2024.x分支对应的是 Spring Cloud 2024.0.0 与Spring Boot 3.4.3
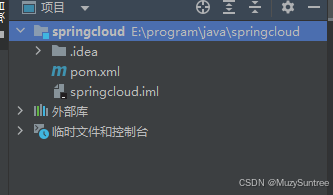
父工程搭建
创建空的maven项目后作为父工程,只保留pom.xml文件:
pom.xml文件代码:
<?xml version="1.0" encoding="UTF-8"?>
<project xmlns="http://maven.apache.org/POM/4.0.0" xmlns:xsi="http://www.w3.org/2001/XMLSchema-instance"
         xsi:schemaLocation="http://maven.apache.org/POM/4.0.0 https://maven.apache.org/xsd/maven-4.0.0.xsd">
    <modelVersion>4.0.0</modelVersion>
    <parent>
        <groupId>org.springframework.boot</groupId>
        <artifactId>spring-boot-starter-parent</artifactId>
        <version>3.4.3</version>
        <relativePath/> <!-- lookup parent from repository -->
    </parent>
    <groupId>com.example</groupId>
    <artifactId>springcloud</artifactId>
    <version>0.0.1-SNAPSHOT</version>
    <name>springcloud</name>
    <description>springcloud</description>
    <packaging>pom</packaging>

    <modules>
        <module>order</module>
        <module>stocker</module>
    </modules>

    <properties>
        <java.version>17</java.version>
        <lombok.version>1.18.36</lombok.version>
        <mybatis.version>3.0.3</mybatis.version>
        <mybatis-plus.version>3.5.7</mybatis-plus.version>
    </properties>

    <dependencyManagement>
        <dependencies>
            <dependency>
                <groupId>com.alibaba.cloud</groupId>
                <artifactId>spring-cloud-alibaba-dependencies</artifactId>
                <version>2023.0.1.0</version>
                <type>pom</type>
                <scope>import</scope>
            </dependency>
            <dependency>
                <groupId>org.springframework.cloud</groupId>
                <artifactId>spring-cloud-dependencies</artifactId>
                <version>2024.0.0</version>
                <type>pom</type>
                <scope>import</scope>
            </dependency>
        </dependencies>
    </dependencyManagement>

    <dependencies>
        <dependency>
            <groupId>org.springframework.boot</groupId>
            <artifactId>spring-boot-starter-test</artifactId>
            <scope>test</scope>
        </dependency>
    </dependencies>

    <build>
        <plugins>
            <plugin>
                <groupId>org.springframework.boot</groupId>
                <artifactId>spring-boot-maven-plugin</artifactId>
            </plugin>
        </plugins>
    </build>

</project>
modules包含子工程pom文件里的artifactId标签。
使用properties进行版本号的统一管理,dependencyManagement管理依赖,packaging设置父工程打包方式为pom。
dependencyManagement标签里面包含两个依赖:spring-cloud-alibaba-dependencies以及spring-cloud-dependencies,spring-cloud是标准,而spring-cloud-alibaba是对其具体的扩展以及实现。
dependencies :将所依赖的jar直接加到项⽬中. ⼦项⽬也会继承该依赖.创建时自动加入该jar依赖。
dependencyManagement :只是声明依赖, 并不实现Jar包引⼊. 如果⼦项⽬需要⽤到相关依赖,需要显式声明. 如果⼦项⽬没有指定具体版本, 会从⽗项⽬中读取version. 如果⼦项⽬中指定了版本号,就会使⽤⼦项⽬中指定的jar版本. 此外⽗⼯程的打包⽅式应该是pom,不是jar, 这⾥需要⼿动使⽤ packaging 来声明。
Nacos 下载与配置
在父工程pom.xml文件中,找到添加的依赖spring-cloud-alibaba-dependencies,按住ctrl键单击该依赖的artifactId中包含的spring-cloud-alibaba-dependencies,会出现一个链接跳转到一个pom文件中,ctrl+f搜索nacos,找到的第一个就是关于该依赖要求的nacos服务器版本。
<nacos.client.version>2.3.2</nacos.client.version>我的是需要2.3.2版本的nacos
github下载链接(国内无法访问):Releases · alibaba/nacos
网页中ctrl+f搜索"2.3.2 (Apr 3rd, 2024)",找到该版本的下载,点击最下面的Assets展开内容
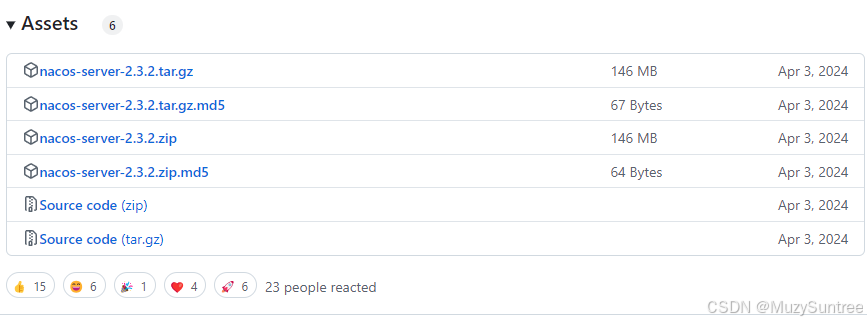
windows选择nacos-server-2.3.2.zip,点击稍等一会儿就会开始下载。
下载后开始解压zip,在解压后的目录中bin目录下,用记事本编辑startup.cmd,找到以下配置
set MODE="cluster"
修改:
set MODE="standalone"
由于nacos需要存储配置信息到mysql数据库,因此需要在mysql数据库中创建一个数据库给nacos使用。
我在mysql中创建了nacos数据库。
![]()
打开nacos运行解压目录中的conf目录,找到application.properties文件,打开后修改数据库连接配置,修改为你自己的数据库地址、端口、数据库名、编码、用户名、密码
db.url.0=jdbc:mysql://127.0.0.1:3306/nacos?characterEncoding=utf8mb4_vi_0900_ai_ci&connectTimeout=1000&socketTimeout=3000&autoReconnect=true&useUnicode=true&useSSL=false&serverTimezone=UTC
db.user.0=root
db.password.0=123456
保存后,打开mysql数据库,nacos运行解压目录中conf目录下的sql脚本;mysql-schema.sql
运行后,找到之前编辑的startup.cmd,在当前目录下按住shift键右击空白处,弹出的快捷菜单中选择"在终端中打开".
弹出的cmd窗口里,输入命令:
.\startup.cmd
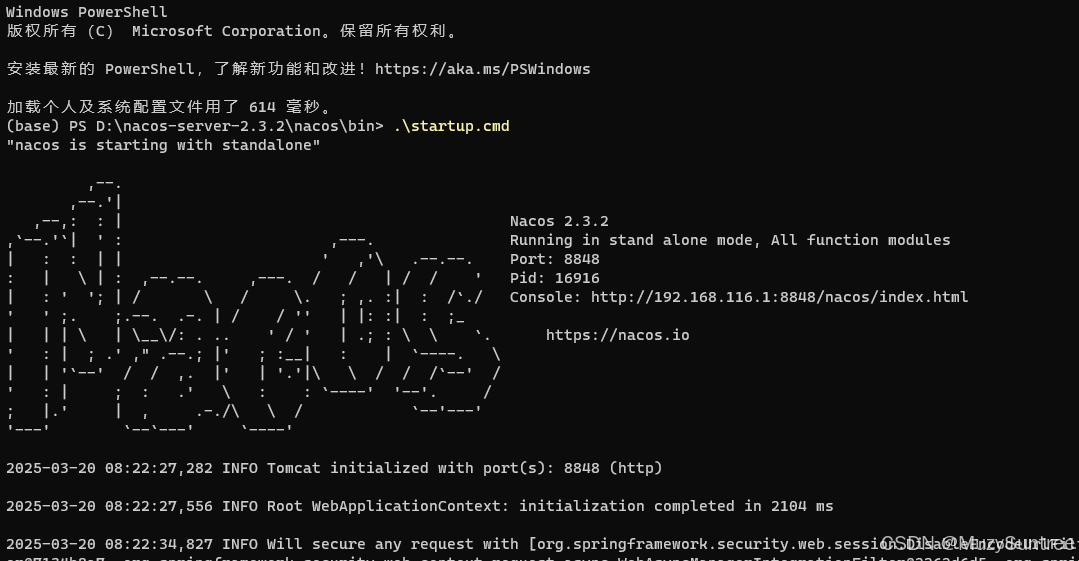
可以看到nacos监听端口为8848
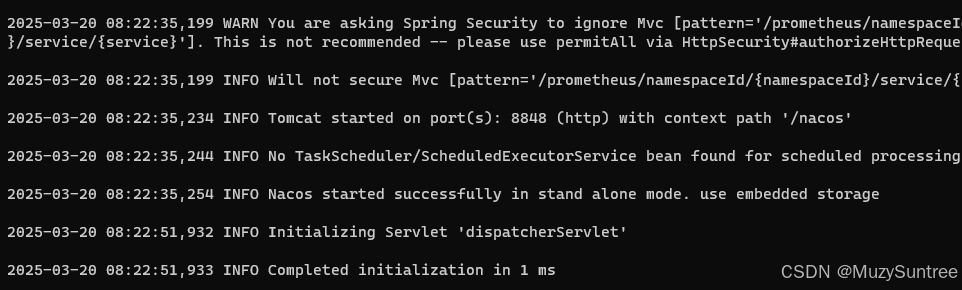
末尾出现以下显示时说明启动成功,不要关闭该cmd窗口,否则nacos服务会被关闭
浏览器中输入地址http://127.0.0.1:8848/nacos,验证服务是否搭建成功
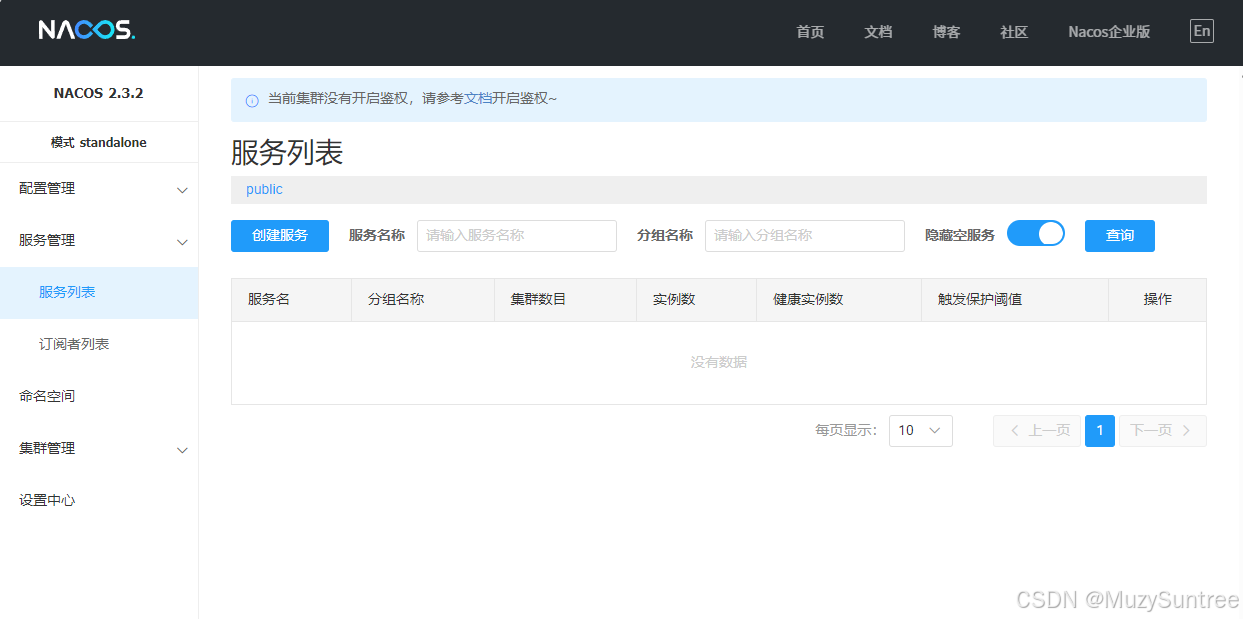
如图所见,nacos已经搭建成功
创建子项目-下单服务
选中父工程,右键新建模块,选择springboot模块
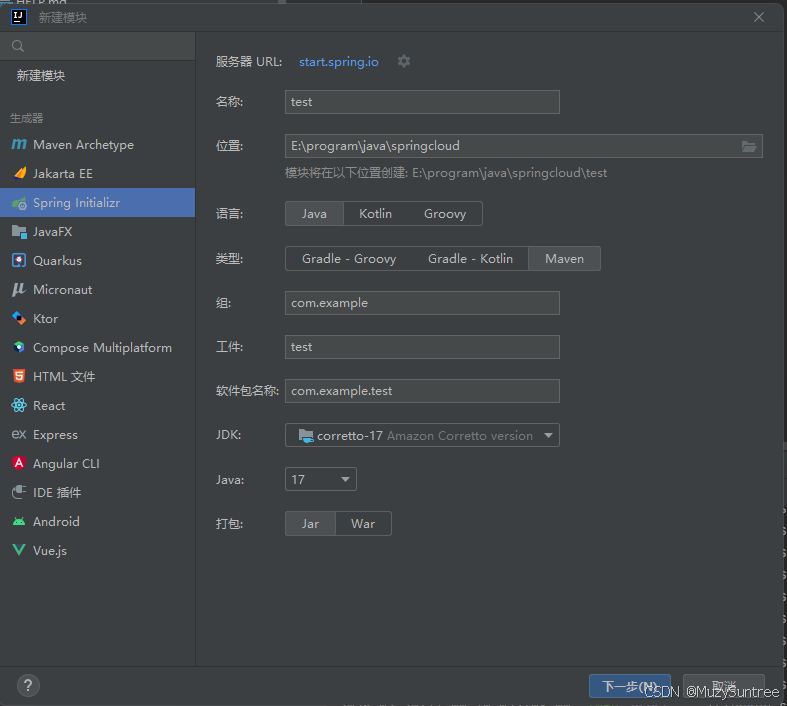
选择你想要添加的依赖,我这里测试所以只选择了spring web
修改子工程的pom.xml文件
parent标签修改为父工程的信息
<parent>
        <!-- 父工程的groupId -->
        <groupId>com.example</groupId>
        <!-- 父工程的artifactId -->
        <artifactId>springcloud</artifactId>
        <version>0.0.1-SNAPSHOT</version>
</parent>
由于子工程会继承父工程的版本和groupId,原来子工程创建后生成的groupId、name、version去掉即可。
添加nacos服务发现依赖
<dependency>
   <groupId>com.alibaba.cloud</groupId>
   <artifactId>spring-cloud-starter-alibaba-nacos-discovery</artifactId>
</dependency>
最终子工程的pom.xml代码如下;
<?xml version="1.0" encoding="UTF-8"?>
<project xmlns="http://maven.apache.org/POM/4.0.0" xmlns:xsi="http://www.w3.org/2001/XMLSchema-instance"
         xsi:schemaLocation="http://maven.apache.org/POM/4.0.0 https://maven.apache.org/xsd/maven-4.0.0.xsd">
    <modelVersion>4.0.0</modelVersion>
    <parent>
        <groupId>com.example</groupId>
        <artifactId>springcloud</artifactId>
        <version>0.0.1-SNAPSHOT</version>
        <relativePath/> <!-- lookup parent from repository -->
    </parent>
    <artifactId>test</artifactId>
    <description>test</description>

    <dependencies>
        <dependency>
            <groupId>org.springframework.boot</groupId>
            <artifactId>spring-boot-starter</artifactId>
        </dependency>
        <dependency>
            <groupId>org.springframework.boot</groupId>
            <artifactId>spring-boot-starter-web</artifactId>
        </dependency>
        <dependency>
            <groupId>org.springframework.boot</groupId>
            <artifactId>spring-boot-starter-test</artifactId>
            <scope>test</scope>
        </dependency>
        <dependency>
            <groupId>com.alibaba.cloud</groupId>
            <artifactId>spring-cloud-starter-alibaba-nacos-discovery</artifactId>
        </dependency>
    </dependencies>

    <build>
        <plugins>
            <plugin>
                <groupId>org.springframework.boot</groupId>
                <artifactId>spring-boot-maven-plugin</artifactId>
            </plugin>
        </plugins>
    </build>

</project>
resource中的application.properties重命名为application.yml,然后内容为以下:
spring:
  application:
    name: test-server
  cloud:
    nacos:
      discovery:
        server-addr: 127.0.0.1:8848
server:
  port: 8082
name设置子工程的服务名称
server-addr设置nacos的地址端口
port设置的是子工程的端口
springboot启动主类中添加注解@EnableDiscoveryClient,代码如下
package com.example.stocker;

import org.springframework.boot.SpringApplication;
import org.springframework.boot.autoconfigure.SpringBootApplication;
import org.springframework.cloud.client.discovery.EnableDiscoveryClient;

@SpringBootApplication
@EnableDiscoveryClient
public class StockerApplication {

    public static void main(String[] args) {
        SpringApplication.run(StockerApplication.class, args);
    }

}
创建controller进行接口测试,否则子工程启动后会直接结束,我创建了一个testController.java。
package com.example.test.controller;

import org.springframework.http.ResponseEntity;
import org.springframework.web.bind.annotation.GetMapping;
import org.springframework.web.bind.annotation.RestController;
import org.springframework.web.bind.annotation.RequestMapping;

@RestController
@RequestMapping("test")
public class testController {
    @GetMapping("test")
    public ResponseEntity<String> test(){
        return ResponseEntity.ok("test");
    }
}
此时在浏览器中刷新nacos网页
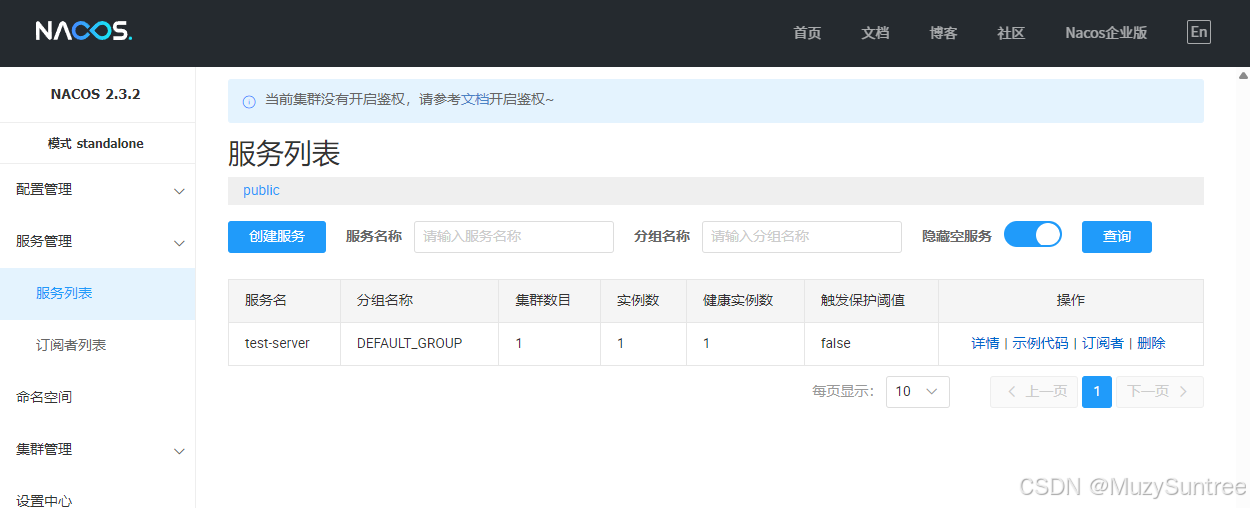
可以看到子工程的服务成功在nacos中被注册了,列表中显示了我们在子工程中yml中配置成的微服务服务名称
Feign微服务远程调用
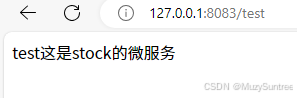
我用以上创建子工程的步奏再创建了一个stock微服务以供测试远程调用。以下是该微服务的controller层代码
package com.example.stocker.controller;

import org.springframework.web.bind.annotation.GetMapping;
import org.springframework.web.bind.annotation.RequestMapping;
import org.springframework.web.bind.annotation.RestController;
import org.springframework.web.bind.annotation.RequestMapping;

@RestController
@RequestMapping("/stock")
public class stockerController {
    @GetMapping("test")
    public String stock(){
        String r = "这是stock的微服务";
        return r;
    }
}
在之前创建的test微服务中,pom.xml中需要添加两个依赖:
<dependency>
   <groupId>org.springframework.cloud</groupId>
   <artifactId>spring-cloud-loadbalancer</artifactId>
</dependency>
<dependency>
    <groupId>org.springframework.cloud</groupId>
    <artifactId>spring-cloud-starter-openfeign</artifactId>
</dependency>
loadbalaance:Feign组件必须要的负载均衡(Load Balancing)
openfeign:Feign远程调用接口组件
新建一个包,名叫FeignService,包里创建一个接口StockFeign。
package com.example.test.FeignService;

import org.springframework.cloud.openfeign.FeignClient;
import org.springframework.web.bind.annotation.RequestMapping;

@FeignClient(name = "stocker-server", path = "stock")
public interface StockFeign {
    @RequestMapping("test")
    String test();
}
注解中name为要调用的微服务yml配置文件中的spring.application.name中的值,路径为stock的接口。
在controller中引入该接口。
package com.example.test.controller;

import com.example.test.FeignService.StockFeign;
import org.springframework.beans.factory.annotation.Autowired;
import org.springframework.http.ResponseEntity;
import org.springframework.web.bind.annotation.GetMapping;
import org.springframework.web.bind.annotation.RestController;
import org.springframework.web.bind.annotation.RequestMapping;

@RestController
@RequestMapping("test")
public class testController {
    @Autowired
    StockFeign stockFeign;

    @GetMapping("test")
    public ResponseEntity<String> test(){
        return ResponseEntity.ok("test"+stockFeign.test());
    }
}
主程序函数上需要添加注解@EnableFeignClients,否则springboot是无法注入Feign接口类的。
package com.example.test;

import org.springframework.boot.SpringApplication;
import org.springframework.boot.autoconfigure.SpringBootApplication;
import org.springframework.cloud.client.discovery.EnableDiscoveryClient;
import org.springframework.cloud.openfeign.EnableFeignClients;

@SpringBootApplication
@EnableDiscoveryClient
@EnableFeignClients
public class TestApplication {

    public static void main(String[] args) {
        SpringApplication.run(TestApplication.class, args);
    }

}
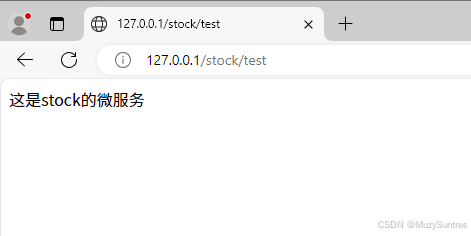
现在运行两个微服务,浏览器访问
访问成功,能够实现Feign远程调用
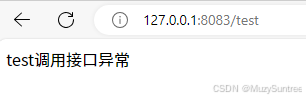
可以在调用接口处添加try catch来抛出错误输出异常进行处理,比如当要调用的微服务未上线或者无法连接时,就抛出错误。
package com.example.test.controller;

import com.example.test.FeignService.StockFeign;
import feign.FeignException;
import org.springframework.beans.factory.annotation.Autowired;
import org.springframework.http.ResponseEntity;
import org.springframework.web.bind.annotation.GetMapping;
import org.springframework.web.bind.annotation.RestController;

@RestController
@RequestMapping("test")
public class testController {
    @Autowired
    StockFeign stockFeign;

    @GetMapping("test")
    public ResponseEntity<String> test(){
//          String r = stockFeign.test();
        String r = new String();
        try{
            r = stockFeign.test();
        }catch (FeignException.FeignServerException e){
            r = "调用接口异常";
        }
        return ResponseEntity.ok("test"+ r);
    }
}
关闭stock微服务后,test输出结果:
nacos配置中心管理
nacos可以添加配置文件,子工程可以通过远程读取在nacos上的配置文件进行管理,并且在nacos上修改配置项后可以立即让子工程进行配置更新。
子工程pom.xml添加依赖:
<dependency>
   <groupId>com.alibaba.cloud</groupId>
   <artifactId>spring-cloud-starter-alibaba-nacos-config</artifactId>
</dependency>
yml文件更改:
spring:
  application:
    name: test-server
  cloud:
    nacos:
      discovery:
        server-addr: 127.0.0.1:8848
      config:
        server-addr: 127.0.0.1:8848
  config:
    import:
      - optional:nacos:test.yml
server:
  port: 8083
nacos.conifg设置nacos配置中心的地址
config设置从nacos上读取哪个配置文件,这个名称由你在nacos上面创建的配置文件名决定,由数组组成,前面加-,配置文件名称前必须加nacos:
optional表示在nacos中没有该yml配置文件也可以,不会报错
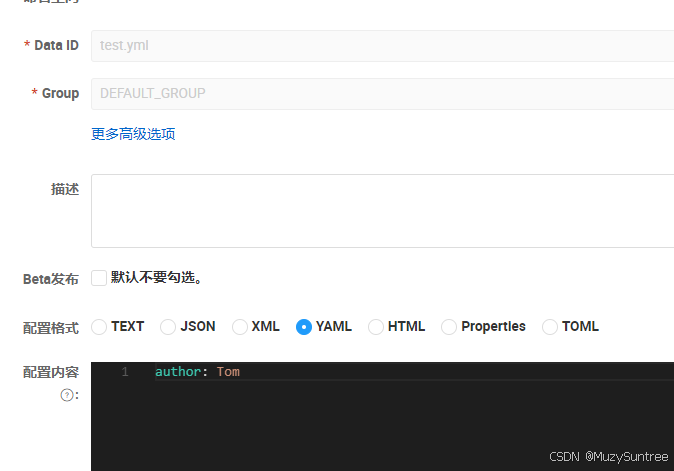
开始在nacos上面创建配置文件
配置管理->配置列表-》创建配置
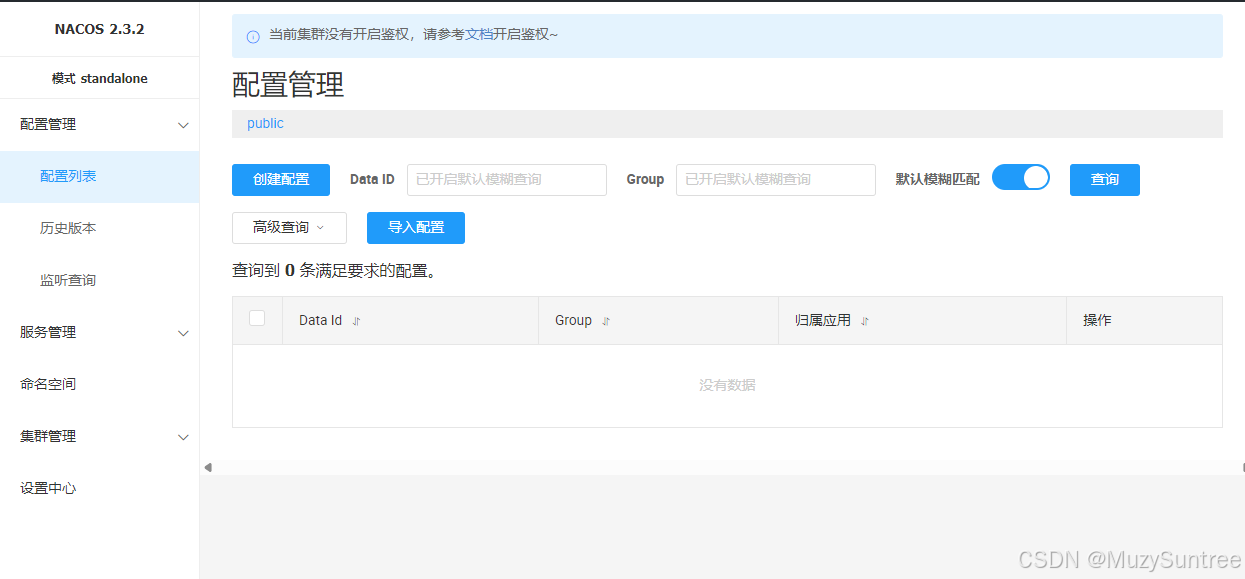
选择YAML配置格式,DataID为你的配置文件名
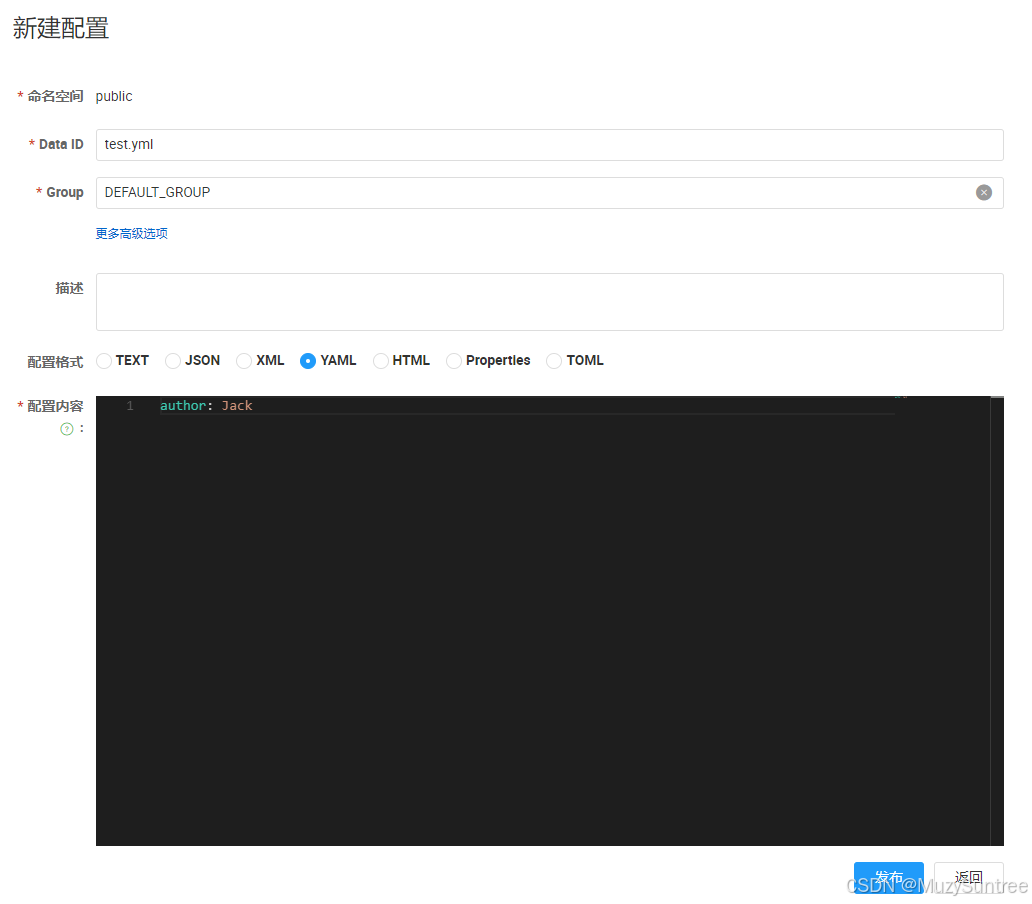
这里添加了配置项author,值为Jack
在要读取配置项的接口类中声明变量,使用Value注入。并使用@RefreshScope注解,使其当nacos中的配置文件的设置被更改后能够自动刷新配置项值。
package com.example.test.controller;

import com.example.test.FeignService.StockFeign;
import feign.FeignException;
import org.springframework.beans.factory.annotation.Autowired;
import org.springframework.beans.factory.annotation.Value;
import org.springframework.cloud.context.config.annotation.RefreshScope;
import org.springframework.http.ResponseEntity;
import org.springframework.web.bind.annotation.GetMapping;
import org.springframework.web.bind.annotation.RestController;
import org.springframework.web.bind.annotation.RequestMapping;

@RestController
@RefreshScope
@RequestMapping("test")
public class testController {
    @Autowired
    StockFeign stockFeign;
    @Value("${author}")
    String author;

    @GetMapping("test")
    public ResponseEntity<String> test(){
        return ResponseEntity.ok("author: "+author);
    }
}
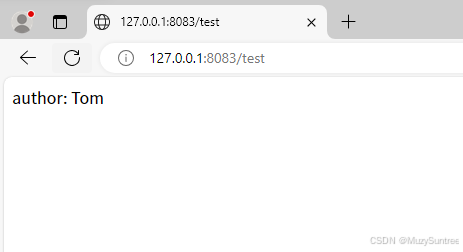
启动项目后,浏览器访问接口,查看是否成功获取配置文件的项目值。
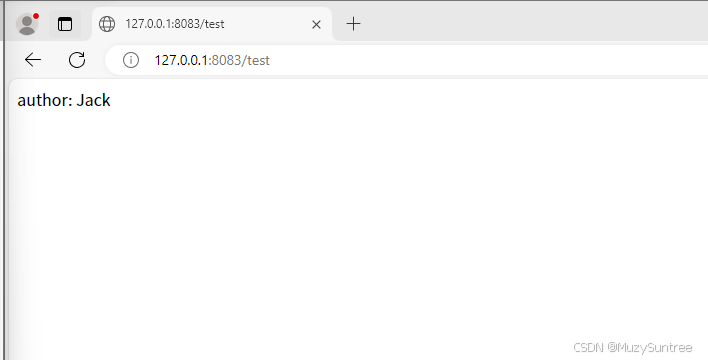
读取到了配置项,现在测试是否能够实时读取已更改的配置项
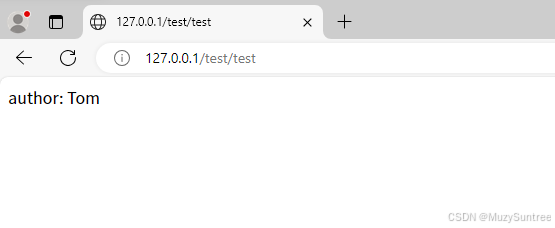
在nacos中修改配置author的值为Tom,并且发布
刷新浏览器:
修改成功
Gateway网关路由
在父工程中新建新的模块,选择Spring Initializr,取名Gateway,不选择任何依赖,直接创建。
在新建的gateway中pom文件中添加以下依赖
<!--网关组件依赖-->
        <dependency>
            <groupId>org.springframework.cloud</groupId>
            <artifactId>spring-cloud-starter-gateway</artifactId>
        </dependency>
        <!--服务配置-->
        <dependency>
            <groupId>com.alibaba.cloud</groupId>
            <artifactId>spring-cloud-starter-alibaba-nacos-config</artifactId>
        </dependency>
        <!--服务发现-->
        <dependency>
            <groupId>com.alibaba.cloud</groupId>
            <artifactId>spring-cloud-starter-alibaba-nacos-discovery</artifactId>
        </dependency>
        <!--负责路由分发-->
        <dependency>
            <groupId>org.springframework.cloud</groupId>
            <artifactId>spring-cloud-starter-loadbalancer</artifactId>
        </dependency>
最终pom代码如下:
<?xml version="1.0" encoding="UTF-8"?>
<project xmlns="http://maven.apache.org/POM/4.0.0" xmlns:xsi="http://www.w3.org/2001/XMLSchema-instance"
         xsi:schemaLocation="http://maven.apache.org/POM/4.0.0 https://maven.apache.org/xsd/maven-4.0.0.xsd">
    <modelVersion>4.0.0</modelVersion>
    <version>0.0.1-SNAPSHOT</version>
    <parent>
        <groupId>com.example</groupId>
        <version>0.0.1-SNAPSHOT</version>
        <artifactId>springcloud</artifactId>
    </parent>
    <artifactId>Gateway</artifactId>
    <dependencies>
        <dependency>
            <groupId>org.springframework.boot</groupId>
            <artifactId>spring-boot-starter</artifactId>
        </dependency>

        <dependency>
            <groupId>org.springframework.boot</groupId>
            <artifactId>spring-boot-starter-test</artifactId>
            <scope>test</scope>
        </dependency>
        <!--网关组件依赖-->
        <dependency>
            <groupId>org.springframework.cloud</groupId>
            <artifactId>spring-cloud-starter-gateway</artifactId>
        </dependency>
        <!--服务配置-->
        <dependency>
            <groupId>com.alibaba.cloud</groupId>
            <artifactId>spring-cloud-starter-alibaba-nacos-config</artifactId>
        </dependency>
        <!--服务发现-->
        <dependency>
            <groupId>com.alibaba.cloud</groupId>
            <artifactId>spring-cloud-starter-alibaba-nacos-discovery</artifactId>
        </dependency>
        <!--负责路由分发-->
        <dependency>
            <groupId>org.springframework.cloud</groupId>
            <artifactId>spring-cloud-starter-loadbalancer</artifactId>
        </dependency>
    </dependencies>

    <build>
        <plugins>
            <plugin>
                <groupId>org.springframework.boot</groupId>
                <artifactId>spring-boot-maven-plugin</artifactId>
            </plugin>
        </plugins>
    </build>

</project>
application.yml文件:
spring:
  application:
    name: gateway-server
  cloud:
    nacos:
      discovery:
        server-addr: 127.0.0.1:8848
      config:
        server-addr: 127.0.0.1:8848
  config:
    import:
      - optional:nacos:gateway.yml
server:
  port: 80
在nacos中新建配置文件gateway.yml,代码如下:
spring:
  cloud:
    gateway:
      routes:
        - id: stock_route   #路由唯一标识
          uri:
            lb://stocker-server   #需要转发的地址 lb:使用nacos中的本地负载
          #断言规则 用于路由规则的匹配
          predicates:
            - Path=/stock/**
        - id: test_route
          uri:
            lb://test-server
          predicates:
            - Path=/test/**
路由信息配置放在nacos服务器上方便进行修改,相比放在本地yml文件中,不需要修改后重启网关 ,导致重启期间整个分布式微服务系统失效
现在可以通过访问网关的某个服务,直接访问到该微服务,而不需要关心该微服务的地址端口。对于前端而言,后端各种分散的微服务统一的被网关被视为了一个整体。
访问效果如下:
Seata分布式事务
Springboot的@Transacational功能可以实现在事务提交之前发生异常时,进行事务回滚,从而避免数据库执行时因异常打断而出现数据不一致的情况。比如用户花钱购买商品,先从数据库余额中扣除钱,然后在订单中添加该商品,但执行完扣钱的操作后,该事务因为某些原因发生了异常,导致抛出错误不能执行完整个事务,最后订单也没有添加商品。为了避免出现类似问题,通过在事务实现方法上添加注解@Transacational,当抛出了异常后,就撤销之前对数据库进行的所有操作,实现数据库回滚。
但在分布式服务中,由于事务可能是分散在不同的微服务中的,在这种情况下@Transacational是不能实现该操作的,因此需要引入Seata来代替。
由于分布式程序基本上都会用到该功能,因此直接在父工程上引入依赖,让其所有子工程都能继承引入到该依赖。
父工程的pom.xml中引入依赖:
<dependency>
   <groupId>com.alibaba.cloud</groupId>
   <artifactId>spring-cloud-starter-alibaba-seata</artifactId>
</dependency>
我在这里引入该依赖时发现idea给出了黄色警告,提示它有一个间接引入依赖有安全漏洞风险,建议我强制更新,于是为了消除黄色警告比较好看一点,我也引入了以下依赖,你也可以不用引入。
<dependency>
   <groupId>com.google.guava</groupId>
   <artifactId>guava</artifactId>
   <version>32.0.0-jre</version>
</dependency>
下载seata服务器
通过按住ctrl键单击刚刚在pom.xml依赖中添加的spring-cloud-starter-alibaba-seata,ctrl+f搜索seata,最后一个匹配项可以找到该依赖所需的seata版本,我的是2.0.0
<dependency>
      <groupId>io.seata</groupId>
      <artifactId>seata-spring-boot-starter</artifactId>
      <version>2.0.0</version>
      <scope>compile</scope>
</dependency>github中下载seata2.0.0:SEATA下载地址
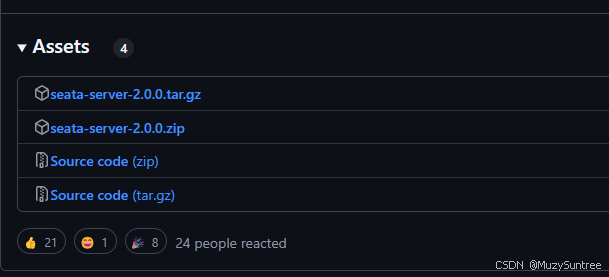
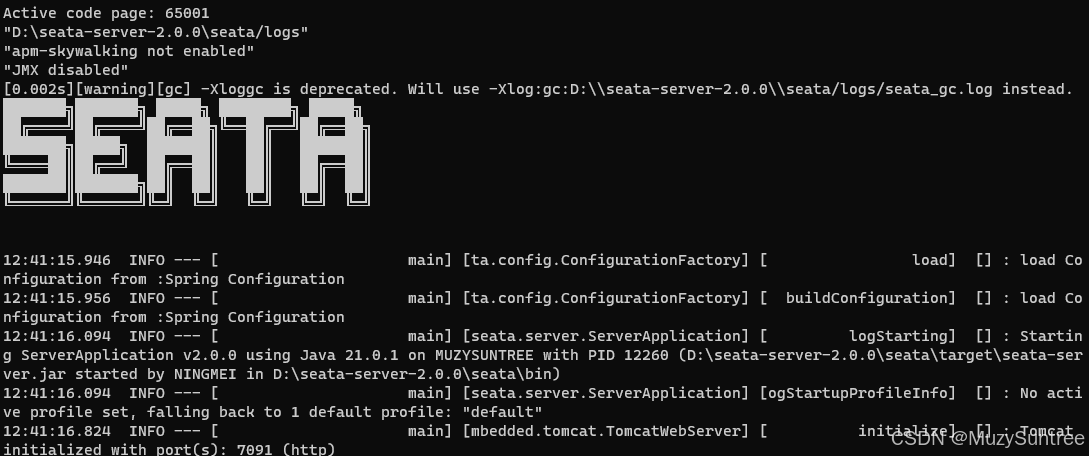
下载seata-server-2.0.0.zip,下载好之后解压,在bin目录中双击seata-server.bat文件运行。
我创建了两个子工程,order、store两个,每个子工程建立了对应mysql数据库,一个是模拟下单服务,一个是模拟仓库服务。下单后就添加订单记录,仓库数据库相应减少对应数量的商品。
要使用seata的数据库都必须添加undo_log数据表,seata基于该数据表实现了事务回滚。undo_log的sql代码:
CREATE TABLE `undo_log` (
	`id` BIGINT(20) NOT NULL AUTO_INCREMENT,
	`branch_id` BIGINT(20) NOT NULL,
	`xid` VARCHAR(100) NOT NULL COLLATE 'utf8_general_ci',
	`context` VARCHAR(128) NOT NULL COLLATE 'utf8_general_ci',
	`rollback_info` LONGBLOB NOT NULL,
	`log_status` INT(11) NOT NULL,
	`log_created` DATETIME NOT NULL,
	`log_modified` DATETIME NOT NULL,
	`ext` VARCHAR(100) NULL DEFAULT NULL COLLATE 'utf8_general_ci',
	PRIMARY KEY (`id`) USING BTREE,
	UNIQUE INDEX `ux_undo_log` (`xid`, `branch_id`) USING BTREE
)
COLLATE='utf8_general_ci'
ENGINE=InnoDB
AUTO_INCREMENT=7
;
order子工程的下单接口:
package com.example.order.controller;

import com.example.order.Feign.StockerFeign;
import com.example.order.entity.Order;
import com.example.order.entity.RequestOrderStore;
import com.example.order.service.OrderService;
import feign.FeignException;
import io.seata.spring.annotation.GlobalTransactional;
import org.springframework.beans.factory.annotation.Autowired;
import org.springframework.beans.factory.annotation.Value;
import org.springframework.cloud.context.config.annotation.RefreshScope;
import org.springframework.http.HttpStatus;
import org.springframework.http.ResponseEntity;
import org.springframework.web.bind.annotation.*;

@RestController
@RequestMapping("order")
@RefreshScope
public class orderController {
    @Autowired
    StockerFeign stockerFeign;

    @Autowired
    OrderService orderService;

    @GetMapping("/add/{id}/{num}")
    @GlobalTransactional
    public String order(@PathVariable Long id,@PathVariable Integer num){
        Order order = new Order();
        order.setGoods(id);
        order.setCount(num);
        orderService.save(order);
        RequestOrderStore requestOrderStore = new RequestOrderStore();
        requestOrderStore.setId(order.getGoods());
        requestOrderStore.setNum(order.getCount());
        try{
            boolean r = stockerFeign.stock(requestOrderStore);
            return r?"调用成功":"调用失败";
        }catch (FeignException e){
            throw new StoreProcessingException("sotre调用异常,事务已回滚");
        }

    }

    @GetMapping("test")
    public String test(){
        return "test";
    }

    @ExceptionHandler(StoreProcessingException.class)
    public ResponseEntity<String> handleStoreProcessingException(StoreProcessingException e){
        return new ResponseEntity<>(e.getMessage(), HttpStatus.INTERNAL_SERVER_ERROR);
    }
}

class StoreProcessingException extends RuntimeException{
    public StoreProcessingException(String message){
        super(message);
    }
}
在需要事务回滚的函数上面添加注解@GlobalTransactional。
yml配置
为了方便运行时配置和统一管理,我将关于seata的配置放到了子工程在nacos上对应的yaml配置文件中。
seata:
  application-id: ${spring.application.name}
  tx-service-group: ${spring.application.name}-group
  service:
    vgroup-mapping:
      order-server-group: default
    grouplist:
      default: 127.0.0.1:8091
vgroup-mapping的order-server-group必须改成你的spring.application.name的值加上 -group,比如我的order子工程spring.application.name是order-server。
grouplist中的ip地址必须是你的seata服务器地址,这里一般默认是8091端口。
现在两个子工程都启动,order执行下单操作后,通过Feign远程调用store子工程的减少库存数量接口。当我把store子工程关闭后,order这边调用减少库存数量接口时出现RuntimeException异常并抛出,order数据表中的订单没有被添加,seata效果成功。
Sentinel熔断限流
下载最新版sentinel服务器:Releases · alibaba/Sentinel
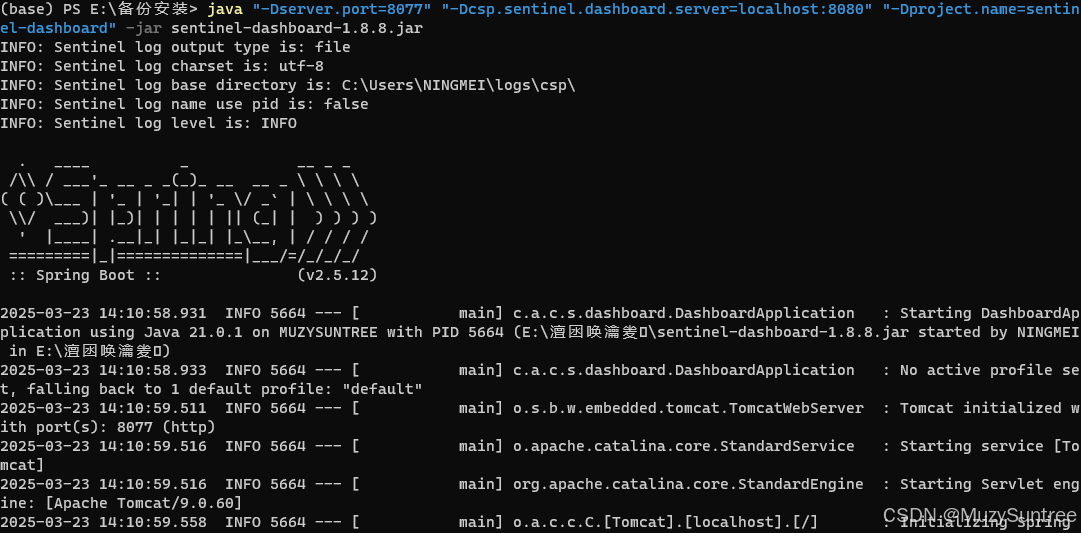
下载后的文件目录里通过cmd使用以下命令运行jar包,我下载的目前最新版是1.8.8
java "-Dserver.port=8080" "-Dcsp.sentinel.dashboard.server=localhost:8080" "-Dproject.name=sentinel-dashboard" -jar sentinel-dashboard-1.8.8.jar
-Dserver.port=8080指的是你要开启的sentinel端口。-jar 参数后面填你的jar包名
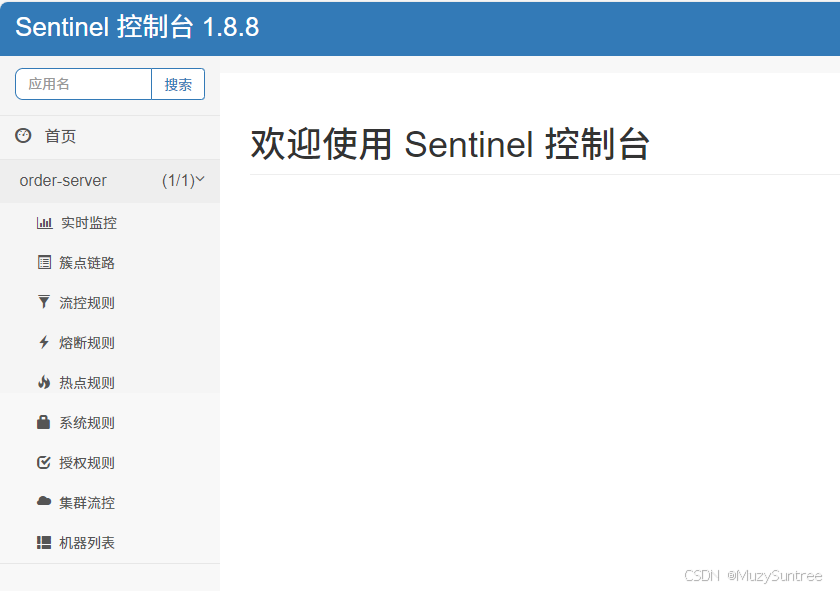
浏览器中访问http://127.0.0.1:8077/,账户密码都是sentinel

在需要进行熔断降级的微服务中添加依赖:
<dependency>
            <groupId>com.alibaba.cloud</groupId>
            <artifactId>spring-cloud-starter-alibaba-sentinel</artifactId>
</dependency>
在nacos配置中心对应微服务的yml配置文件中配置,指定sentinel服务器的地址端口
spring:
cloud:
sentinel:
transport:
dashboard: 127.0.0.1:8077
启动微服务后,刷新浏览器中sentinel的页面,发现sentinel的左边目录中出现了微服务的标志。
点击簇点链路,会发现列表为空,这是因为sentinel内部为懒加载,你的接口必须在微服务启动后至少被访问一次,sentinel才会识别并登记该接口。在浏览器上访问一下某个接口。
@GetMapping("test")
    @SentinelResource(value = "testResource", blockHandler = "handleBlock")
    public String test() {
        return "test";
    }

    public String handleBlock(BlockException e){
        return "访问受到限制";
    }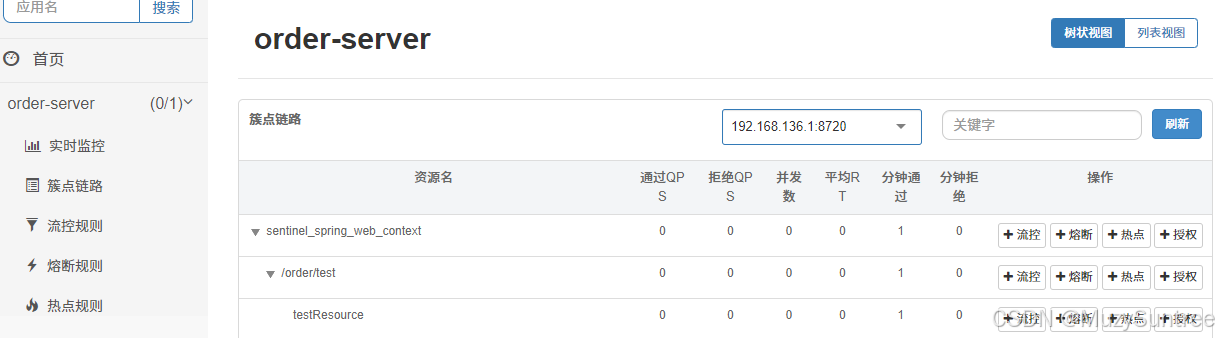
此时可以对test接口进行配置,比如点击流控,弹出的窗口中设置QPS(每秒访问次数),一秒钟超过设置的数值,sentinel将会对该接口进行封闭不允许访问,我在代码中设置了回调handleBlock函数,sentinel在封闭接口期间,再次遇到访问请求时只会回复"访问受到限制"。直到一秒之后过去,sentinel才会再次开启该接口,由此实现流量控制。
RocketMQ
关于介绍的参考文档:
下载rocketMQ 5.1.4
下载地址:下载 | RocketMQ
解压后,修改bin目录中的runbroker.cmd为以下内容:
@echo off
rem Licensed to the Apache Software Foundation (ASF) under one or more
rem contributor license agreements.  See the NOTICE file distributed with
rem this work for additional information regarding copyright ownership.
rem The ASF licenses this file to You under the Apache License, Version 2.0
rem (the "License"); you may not use this file except in compliance with
rem the License.  You may obtain a copy of the License at
rem
rem     http://www.apache.org/licenses/LICENSE-2.0
rem
rem Unless required by applicable law or agreed to in writing, software
rem distributed under the License is distributed on an "AS IS" BASIS,
rem WITHOUT WARRANTIES OR CONDITIONS OF ANY KIND, either express or implied.
rem See the License for the specific language governing permissions and
rem limitations under the License.

if not exist "%JAVA_HOME%\bin\java.exe" echo Please set the JAVA_HOME variable in your environment, We need java(x64)! & EXIT /B 1
set "JAVA=%JAVA_HOME%\bin\java.exe"

setlocal

set BASE_DIR=%~dp0
set BASE_DIR=%BASE_DIR:~0,-1%
for %%d in (%BASE_DIR%) do set BASE_DIR=%%~dpd

set CLASSPATH=.;%BASE_DIR%conf;%BASE_DIR%lib\*;%CLASSPATH%

rem ===========================================================================================
rem  JVM Configuration
rem ===========================================================================================
set "JAVA_OPT=%JAVA_OPT% -server -Xms2g -Xmx2g --add-exports=java.base/sun.nio.ch=ALL-UNNAMED"
set "JAVA_OPT=%JAVA_OPT% -XX:+UseG1GC -XX:G1HeapRegionSize=16m -XX:G1ReservePercent=25 -XX:InitiatingHeapOccupancyPercent=30 -XX:SoftRefLRUPolicyMSPerMB=0 -XX:SurvivorRatio=8"
rem set "JAVA_OPT=%JAVA_OPT% -verbose:gc -Xloggc:%USERPROFILE%\mq_gc.log -XX:+PrintGCDetails -XX:+PrintGCDateStamps -XX:+PrintGCApplicationStoppedTime -XX:+PrintAdaptiveSizePolicy"
set "JAVA_OPT=%JAVA_OPT% -verbose:gc -Xloggc:%USERPROFILE%\mq_gc.log -XX:+PrintGCDetails"
rem set "JAVA_OPT=%JAVA_OPT% -XX:+UseGCLogFileRotation -XX:NumberOfGCLogFiles=5 -XX:GCLogFileSize=30m"
set "JAVA_OPT=%JAVA_OPT% -XX:-OmitStackTraceInFastThrow"
set "JAVA_OPT=%JAVA_OPT% -XX:+AlwaysPreTouch"
set "JAVA_OPT=%JAVA_OPT% -XX:MaxDirectMemorySize=15g"
set "JAVA_OPT=%JAVA_OPT% -XX:-UseLargePages -XX:-UseBiasedLocking"
set "JAVA_OPT=%JAVA_OPT% %JAVA_OPT_EXT% -cp %CLASSPATH%"

"%JAVA%" %JAVA_OPT% %*
修改runserver.cmd为以下内容:
@echo off
rem Licensed to the Apache Software Foundation (ASF) under one or more
rem contributor license agreements.  See the NOTICE file distributed with
rem this work for additional information regarding copyright ownership.
rem The ASF licenses this file to You under the Apache License, Version 2.0
rem (the "License"); you may not use this file except in compliance with
rem the License.  You may obtain a copy of the License at
rem
rem     http://www.apache.org/licenses/LICENSE-2.0
rem
rem Unless required by applicable law or agreed to in writing, software
rem distributed under the License is distributed on an "AS IS" BASIS,
rem WITHOUT WARRANTIES OR CONDITIONS OF ANY KIND, either express or implied.
rem See the License for the specific language governing permissions and
rem limitations under the License.


if not exist "%JAVA_HOME%\bin\java.exe" echo Please set the JAVA_HOME variable in your environment, We need java(x64)! & EXIT /B 1
set "JAVA=%JAVA_HOME%\bin\java.exe"

setlocal

set BASE_DIR=%~dp0
set BASE_DIR=%BASE_DIR:~0,-1%
for %%d in (%BASE_DIR%) do set BASE_DIR=%%~dpd

set CLASSPATH=.;%BASE_DIR%conf;%BASE_DIR%lib\*;%CLASSPATH%

set "JAVA_OPT=%JAVA_OPT% -server -Xms2g -Xmx2g -Xmn1g -XX:MetaspaceSize=128m -XX:MaxMetaspaceSize=320m"
rem set "JAVA_OPT=%JAVA_OPT% -XX:+UseConcMarkSweepGC -XX:+UseCMSCompactAtFullCollection -XX:CMSInitiatingOccupancyFraction=70 -XX:+CMSParallelRemarkEnabled -XX:SoftRefLRUPolicyMSPerMB=0 -XX:+CMSClassUnloadingEnabled -XX:SurvivorRatio=8 -XX:-UseParNewGC"
set "JAVA_OPT=%JAVA_OPT% -XX:+UseG1GC -XX:SoftRefLRUPolicyMSPerMB=0 -XX:SurvivorRatio=8"
set "JAVA_OPT=%JAVA_OPT% -verbose:gc -Xloggc:"%USERPROFILE%\rmq_srv_gc.log" -XX:+PrintGCDetails"
set "JAVA_OPT=%JAVA_OPT% -XX:-OmitStackTraceInFastThrow"
set "JAVA_OPT=%JAVA_OPT% -XX:-UseLargePages"
set "JAVA_OPT=%JAVA_OPT% %JAVA_OPT_EXT% -cp "%CLASSPATH%""

"%JAVA%" %JAVA_OPT% %*
在conf目录下修改broker.conf为以下内容,记得更改storePathRootDir和storePathCommitLog的路径到一个有足够空间的磁盘,否则发送生产消息时,broker服务器会提示磁盘空间不足:
# Licensed to the Apache Software Foundation (ASF) under one or more
# contributor license agreements.  See the NOTICE file distributed with
# this work for additional information regarding copyright ownership.
# The ASF licenses this file to You under the Apache License, Version 2.0
# (the "License"); you may not use this file except in compliance with
# the License.  You may obtain a copy of the License at
#
#     http://www.apache.org/licenses/LICENSE-2.0
#
#  Unless required by applicable law or agreed to in writing, software
#  distributed under the License is distributed on an "AS IS" BASIS,
#  WITHOUT WARRANTIES OR CONDITIONS OF ANY KIND, either express or implied.
#  See the License for the specific language governing permissions and
#  limitations under the License.

brokerClusterName = DefaultCluster
# 将以下路径改为你自己的消息存储路径
storePathRootDir=D:/rocketmq-store
storePathCommitLog=D:/rocketmq-store/commitlog
brokerName = broker-a
brokerId = 0
deleteWhen = 04
fileReservedTime = 48
brokerRole = ASYNC_MASTER
flushDiskType = ASYNC_FLUSH
cmd运行nameserver:
mqnamesrv.cmd
出现以下信息表示nameserver启动成功
The Name Server boot success. serializeType=JSON, address 0.0.0.0:9876
cmd运行brokerserver:
mqbroker.cmd -n 127.0.0.1:9876 -c .\broker.conf
出现以下信息表示brokerserver启动成功
The broker[broker-a, 172.21.144.234:10911] boot success. serializeType=JSON and name server is 127.0.0.1:9876
在nacos中配置gateway网关路由:
spring:
  cloud:
    gateway:
      routes:
        - id: stock_route   #路由唯一标识
          uri:
            lb://stocker-server   #需要转发的地址 lb:使用nacos中的本地负载
          #断言规则 用于路由规则的匹配
          predicates:
            - Path=/stock/**
        - id: test_route
          uri:
            lb://test-server
          predicates:
            - Path=/test/**
        - id: order_route
          uri:
            lb://order-server
          predicates:
            - Path=/order/**
        - id: praise_route
          uri:
            lb://order-server
          predicates:
            - Path=/praise/**
在需要用到rocketMQ的微服务的pom.xml配置文件中添加依赖:
<!-- RocketMQ依赖 -->
<dependency>
    <groupId>com.alibaba.cloud</groupId>
    <artifactId>spring-cloud-starter-stream-rocketmq</artifactId>
</dependency>
生产者的yml配置文件:
spring:
    cloud:
        rocketmq:
                    binder:
                      name-server: 127.0.0.1:9876
                    bindings:
                      praise-output:
                        producer:
                          group: test
生产消息类:
package com.example.stocker.entity;

import lombok.Data;

@Data
public class PraiseMessage {
    private Integer itemId;
}
以下是生产者发送消息到两个通道,由消费者分别接收。
生产者触发接口:
package com.example.order.controller;

import com.example.order.entity.PraiseMessage;
import org.springframework.beans.factory.annotation.Autowired;
import org.springframework.cloud.stream.function.StreamBridge;
import org.springframework.messaging.Message;
import org.springframework.messaging.support.MessageBuilder;
import org.springframework.web.bind.annotation.GetMapping;
import org.springframework.web.bind.annotation.RequestMapping;
import org.springframework.web.bind.annotation.RequestParam;
import org.springframework.web.bind.annotation.RestController;

@RestController
@RequestMapping("praise")
public class MQProcudeController {
    private static final String BINDING_NAME = "praise-output";
    @Autowired
    private StreamBridge streamBridge;

    @GetMapping("/rocketmq")
    public boolean praise(@RequestParam Integer itemId){
        System.out.println("itemId:"+itemId);
        PraiseMessage message = new PraiseMessage();
        message.setItemId(itemId);
        Message<PraiseMessage> praiseMessage = MessageBuilder.withPayload(message).build();
        return streamBridge.send(BINDING_NAME, praiseMessage);
    }

    @GetMapping("/rocketmq2")
    public boolean praise2(@RequestParam Integer itemId){
        System.out.println("itemId:"+itemId);
        PraiseMessage message = new PraiseMessage();
        message.setItemId(itemId);
        Message<PraiseMessage> praiseMessage = MessageBuilder.withPayload(message).build();
        return streamBridge.send("praise-output2", praiseMessage);
    }
}
消费者的yml配置文件
spring:
  application:
    name: stocker-server
  cloud:
    function:
      # 对应监听类中注册了Bean的函数名consumer和consumer2
      definition: consumer;consumer2
    stream:
      bindings:
        # 规则是 <bean名称>-in-<函数的第几个参数>,in代表输入
        consumer-in-0:
          destination: PRAISE-TOPIC-01
          content-type: application/json
          group: praise-consumer-group-PRAISE-TOPIC-01
        consumer2-in-0:
          destination: PRAISE-TOPIC-02
          content-type: application/json
          group: praise-consumer-group-PRAISE-TOPIC-02
      rocketmq:
        binder:
          name-server: 127.0.0.1:9876
        bindings:
          # <Bean名称>-in-<函数的第几个参数>
          consumer-in-0:
            consumer:
              # 拉取周期,4秒
              pullInterval: 4000
              # 每次拉取几条消息,设置为4条
              pullBatchSize: 4
          consumer2-in-0:
            consumer:
              pullInterval: 4000
              pullBatchSize: 4
    nacos:
      discovery:
        server-addr: 127.0.0.1:8848
      config:
        server-addr: 127.0.0.1:8848
  config:
    import:
      - nacos:stock-server.yml
  datasource:
    url: jdbc:mysql://localhost:3306/spring_cloud_store?useUnicode=true&characterEncoding=utf8&serverTimezone=Asia/Shanghai
    username: root
    password: 123456
    driver-class-name: com.mysql.cj.jdbc.Driver

server:
  port: 8082
消费者的service事务接口:
package com.example.stocker.service.impl;

public interface PraiseService {
    void praiseItem(Integer itemId);
}
消费者的service事务实现类:
package com.example.stocker.service.impl.impl;

import com.example.stocker.service.impl.PraiseService;
import org.springframework.stereotype.Service;

@Service
public class PraiseServiceImpl implements PraiseService {

    @Override
    public void praiseItem(Integer itemId) {
        System.out.println("点赞记录");
    }
}
消费者的监听类:
package com.example.stocker.listener;

import com.example.stocker.entity.PraiseMessage;
import com.example.stocker.service.impl.PraiseService;
import com.example.stocker.service.impl.PraiseService2;
import org.springframework.context.annotation.Bean;
import org.springframework.context.annotation.Configuration;
import org.springframework.messaging.Message;

import java.util.function.Consumer;

@Configuration
public class ListenerAutoConfiguration {

    @Bean
    public Consumer<Message<PraiseMessage>> consumer(PraiseService praiseService) {
        return msg -> {
            Integer itemId = msg.getPayload().getItemId();
            System.out.println("Received from PRAISE-TOPIC-01: " + itemId);
            praiseService.praiseItem(itemId);
        };
    }

    @Bean
    public Consumer<Message<PraiseMessage>> consumer2(PraiseService2 praiseService2) {
        return msg -> {
            Integer itemId = msg.getPayload().getItemId();
            System.out.println("Received from PRAISE-TOPIC-02: " + itemId);
            praiseService2.praiseItem(itemId);
        };
    }
}
实验结果,访问接口:

消费者输出:
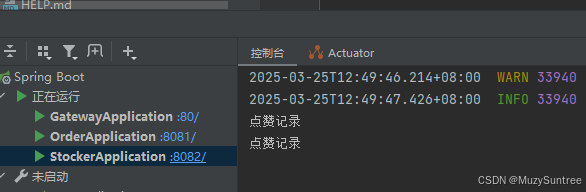
消费者成功接收到消息


 3988
3988

 被折叠的 条评论
为什么被折叠?
被折叠的 条评论
为什么被折叠?
 到【灌水乐园】发言


