


检查brew状态
brew doctor
若出现问题可参考 在Mac上搭建MongoDB环境_macbook安装mongodb-CSDN博客
安装homebrew过程中若出现443错误 可在hosts文件中添加
sudo vim /etc/hosts199.232.96.133 raw.githubusercontent.comMysql
参考 M1 Mac安装MySQL教程;my.cnf文件配置;环境变量配置;完全卸载MySQL教程,亲测有效_mac下载mysql教程-CSDN博客
安装mysql后 配置环境变量
环境变量配置
cd ~
vim ./.bash_profile
按i键,进入INSERT模式,输入以下两行代码:
export PATH=$PATH:/usr/local/mysql/bin
export PATH=$PATH:/usr/local/mysql/support-files
alias mysql=/usr/local/mysql/bin/mysql
保存引入.bash_profile文件使配置生效
配置my.cnf文件
在windows下mysql中,安装目录修改my.ini文件就会对默认字符集进行配置。在mac下默认没有配置文件,需要手动创建my.cnf文件来配置。
sudo vim /etc/my.cnf
系统提示输入电脑密码,之后进入输入模式,按i键,输入以下内容
# Example MySQL config file for medium systems.
  #
  # This is for a system with little memory (32M - 64M) where MySQL plays
  # an important part, or systems up to 128M where MySQL is used together with
  # other programs (such as a web server)
  #
  # MySQL programs look for option files in a set of
  # locations which depend on the deployment platform.
  # You can copy this option file to one of those
  # locations. For information about these locations, see:
  # http://dev.mysql.com/doc/mysql/en/option-files.html
  #
  # In this file, you can use all long options that a program supports.
  # If you want to know which options a program supports, run the program
  # with the "--help" option.
  # The following options will be passed to all MySQL clients
  [client]
  default-character-set=utf8
  #password   = your_password
  port        = 3306
  socket      = /tmp/mysql.sock
  # Here follows entries for some specific programs
  # The MySQL server
  [mysqld]
  character-set-server=utf8
  init_connect='SET NAMES utf8'
  port        = 3306
  socket      = /tmp/mysql.sock
  skip-external-locking
  key_buffer_size = 16M
  max_allowed_packet = 1M
  table_open_cache = 64
  sort_buffer_size = 512K
  net_buffer_length = 8K
  read_buffer_size = 256K
  read_rnd_buffer_size = 512K
  myisam_sort_buffer_size = 8M
# Don't listen on a TCP/IP port at all. This can be a security enhancement,
# if all processes that need to connect to mysqld run on the same host.
# All interaction with mysqld must be made via Unix sockets or named pipes.
# Note that using this option without enabling named pipes on Windows
# (via the "enable-named-pipe" option) will render mysqld useless!
#
#skip-networking

  # Replication Master Server (default)
  # binary logging is required for replication
  log-bin=mysql-bin

    # binary logging format - mixed recommended
    binlog_format=mixed

      # required unique id between 1 and 2^32 - 1
      # defaults to 1 if master-host is not set
      # but will not function as a master if omitted
      server-id   = 1

    # Replication Slave (comment out master section to use this)
    #
    # To configure this host as a replication slave, you can choose between
    # two methods :
    #
    # 1) Use the CHANGE MASTER TO command (fully described in our manual) -
    #    the syntax is:
    #
    #    CHANGE MASTER TO MASTER_HOST=<host>, MASTER_PORT=<port>,
    #    MASTER_USER=<user>, MASTER_PASSWORD=<password> ;
    #
    #    where you replace <host>, <user>, <password> by quoted strings and
    #    <port> by the master's port number (3306 by default).
    #
    #    Example:
    #
    #    CHANGE MASTER TO MASTER_HOST='125.564.12.1', MASTER_PORT=3306,
    #    MASTER_USER='joe', MASTER_PASSWORD='secret';
    #
    # OR
    #
    # 2) Set the variables below. However, in case you choose this method, then
    #    start replication for the first time (even unsuccessfully, for example
    #    if you mistyped the password in master-password and the slave fails to
    #    connect), the slave will create a master.info file, and any later
    #    change in this file to the variables' values below will be ignored and
    #    overridden by the content of the master.info file, unless you shutdown
    #    the slave server, delete master.info and restart the slaver server.
    #    For that reason, you may want to leave the lines below untouched
    #    (commented) and instead use CHANGE MASTER TO (see above)
    #
    # required unique id between 2 and 2^32 - 1
    # (and different from the master)
    # defaults to 2 if master-host is set
    # but will not function as a slave if omitted
    #server-id       = 2
    #
    # The replication master for this slave - required
    #master-host     =   <hostname>
    #
    # The username the slave will use for authentication when connecting
    # to the master - required
    #master-user     =   <username>
    #
    # The password the slave will authenticate with when connecting to
    # the master - required
    #master-password =   <password>
    #
    # The port the master is listening on.
    # optional - defaults to 3306
    #master-port     =  <port>
    #
    # binary logging - not required for slaves, but recommended
    #log-bin=mysql-bin

      # Uncomment the following if you are using InnoDB tables
      #innodb_data_home_dir = /usr/local/mysql/data
      #innodb_data_file_path = ibdata1:10M:autoextend
      #innodb_log_group_home_dir = /usr/local/mysql/data
      # You can set .._buffer_pool_size up to 50 - 80 %
      # of RAM but beware of setting memory usage too high
      #innodb_buffer_pool_size = 16M
      #innodb_additional_mem_pool_size = 2M
      # Set .._log_file_size to 25 % of buffer pool size
      #innodb_log_file_size = 5M
      #innodb_log_buffer_size = 8M
      #innodb_flush_log_at_trx_commit = 1
      #innodb_lock_wait_timeout = 50

        [mysqldump]
        quick
        max_allowed_packet = 16M

          [mysql]
          no-auto-rehash
          # Remove the next comment character if you are not familiar with SQL
          #safe-updates
          default-character-set=utf8

        [myisamchk]
        key_buffer_size = 20M
        sort_buffer_size = 20M
        read_buffer = 2M
        write_buffer = 2M

          [mysqlhotcopy]
          interactive-timeout
按esc键 输入:wq!,按回车键退出。
修改配置文件权限
sudo chmod 664 /etc/my.cnf
重启mysql
alias mysql=/usr/local/mysql/bin/mysql
查看mysql文件地址
which mysql登录mysql
mysql -u root -p
查看成功配置
进入mysql后
show variables like "character%";
退出mysql
exit多版本mysql配置
https://blog.51cto.com/liyingdi/1693418
安装mysql
# 安装 mysql5.7 和 mysql8.0
brew install mysql@5.7
brew install mysql@8.0
创建配置文件
# 复制默认的配置文件创建各自版本的独立配置文件

cp /usr/local/etc/my.cnf /usr/local/etc/my57.cnf

cp /usr/local/etc/my.cnf /usr/local/etc/my80.cnf
my57.cnf文件 配置仅做参考 详细配置可参见上文配置
# Default Homebrew MySQL server config
[mysqld]
# Only allow connections from localhost
bind-address = 0.0.0.0
default_authentication_plugin = mysql_native_password
sql_mode = NO_ENGINE_SUBSTITUTION
port = 33065
# pid文件路径
pid-file = /usr/local/var/run/mysqld57.pid
# sock文件路径 nginx 会用得到
socket = /usr/local/var/run/mysqld57.sock
# mysql的数据目录
datadir = /usr/local/var/mysql_57
my80.cnf文件
# Default Homebrew MySQL server config
[mysqld]
# Only allow connections from localhost
bind-address = 0.0.0.0
mysqlx-bind-address = 0.0.0.0
default_authentication_plugin = mysql_native_password
sql_mode = NO_ENGINE_SUBSTITUTION
port = 33068
# pid文件路径
pid-file = /usr/local/var/run/mysqld80.pid
# sock文件路径 nginx 会用得到
socket = /usr/local/var/run/mysqld80.sock
# mysql的数据目录
datadir = /usr/local/var/mysql_80
初始化mysql的data目录
# 初始化 mysql5.7的数据目录
/usr/local/opt/mysql@5.7/bin/mysqld --defaults-file=/usr/local/etc/my57.cnf --initialize --explicit_defaults_for_timestamp

# 初始化 mysql8.0的数据目录
/usr/local/opt/mysql@8.0/bin/mysqld --defaults-file=/usr/local/etc/my80.cnf --initialize --explicit_defaults_for_timestamp

# 初始化目录成功后 控制台会打印一个root的临时密码,可以用mysql命令登录。

# 登录并修改密码
mysql -u root --host 127.0.0.1 --port 33065 -p

# 在mysql中修改密码 方式1
SET PASSWORD = PASSWORD('your_new_password');

# 在mysql中修改密码 方式2
ALTER USER 'root'@'localhost' IDENTIFIED BY 'your_new_password';

# 密码修改成功 退出
exit
编辑brew的services文件
mysql5.7 services文件
/usr/local/Cellar/mysql@5.7/5.7.44_1/homebrew.mysql@5.7.service
具体文件位置因人而异
[Unit]
Description=Homebrew generated unit for mysql@5.7

[Install]
WantedBy=default.target

[Service]
Type=simple
ExecStart=/usr/local/opt/mysql@5.7/bin/mysqld_safe --defaults-file\=/usr/local/etc/my57.cnf --datadir\=/usr/local/var/mysql_57
Restart=always
WorkingDirectory=/usr/local/var/mysql_57
/usr/local/Cellar/mysql@5.7/5.7.44_1/homebrew.mxcl.mysql@5.7.plist
<?xml version="1.0" encoding="UTF-8"?>
<!DOCTYPE plist PUBLIC "-//Apple//DTD PLIST 1.0//EN" "http://www.apple.com/DTDs/PropertyList-1.0.dtd">
<plist version="1.0">
<dict>
   <key>KeepAlive</key>
   <true/>
   <key>Label</key>
   <string>homebrew.mxcl.mysql@5.7</string>
   <key>LimitLoadToSessionType</key>
   <array>
   	<string>Aqua</string>
   	<string>Background</string>
   	<string>LoginWindow</string>
   	<string>StandardIO</string>
   	<string>System</string>
   </array>
   <key>ProgramArguments</key>
   <array>
   	<string>/usr/local/opt/mysql@5.7/bin/mysqld_safe</string>
   	<string>--defaults-file=/usr/local/etc/my57.cnf</string>
   	<string>--datadir=/usr/local/var/mysql_57</string>
   </array>
   <key>RunAtLoad</key>
   <true/>
   <key>WorkingDirectory</key>
   <string>/usr/local/var/mysql_57</string>
</dict>
</plist>
mysql8.0 services文件
/usr/local/Cellar/mysql@8.0/8.0.35/homebrew.mysql@8.0.service
[Unit]
Description=Homebrew generated unit for mysql@8.0

[Install]
WantedBy=default.target

[Service]
Type=simple
ExecStart=/usr/local/opt/mysql@8.0/bin/mysqld_safe --defaults-file\=/usr/local/etc/my80.cnf --datadir\=/usr/local/var/mysql_80
Restart=always
WorkingDirectory=/usr/local/var/mysql_80
/usr/local/Cellar/mysql@8.0/8.0.35/homebrew.mxcl.mysql@8.0.plist
<?xml version="1.0" encoding="UTF-8"?>
<!DOCTYPE plist PUBLIC "-//Apple//DTD PLIST 1.0//EN" "http://www.apple.com/DTDs/PropertyList-1.0.dtd">
<plist version="1.0">
<dict>
   <key>KeepAlive</key>
   <true/>
   <key>Label</key>
   <string>homebrew.mxcl.mysql@8.0</string>
   <key>LimitLoadToSessionType</key>
   <array>
   	<string>Aqua</string>
   	<string>Background</string>
   	<string>LoginWindow</string>
   	<string>StandardIO</string>
   	<string>System</string>
   </array>
   <key>ProgramArguments</key>
   <array>
   	<string>/usr/local/opt/mysql@8.0/bin/mysqld_safe</string>
   	<string>--defaults-file=/usr/local/etc/my80.cnf</string>
   	<string>--datadir=/usr/local/var/mysql_80</string>
   </array>
   <key>RunAtLoad</key>
   <true/>
   <key>WorkingDirectory</key>
   <string>/usr/local/var/mysql_80</string>
</dict>
</plist>
启动服务
# 启动 mysql5.7
brew services start mysql@5.7

# 启动 mysql8.0
brew services start mysql@8.0

# 查看启动状态
ps -ef | grep mysql
使用默认mysql.sock
某些软件使用 mysql 命令的时候不能指定自定义参数 比如 DBeaver 的导出导入数据库功能,会使用 mysqldump 命令,但是使用了默认的/tmp/mysql.sock。
但是我们安装多版本 mysql 的时候,指定了自定义的 sock 文件位置,所以在我们需要用到 /tmp/mysql.sock 的时候需要手动创建一个链接。
比如我们现在需要对 mysql5.7 进行导入导出,它会提示 /tmp/mysql.sock 的错误,我们直接用链接方式解决。
# -- 删除默认的 sock 文件
rm /tmp/mysql.sock
# -- 创建 mysql5.7 的 sock 文件链接
ln -s /usr/local/var/run/mysqld57.sock /tmp/mysql.sock
然后我们就可以正常使用 DBeaver 的导出导入数据库功能了,如果想要操作 mysql8.0 只需要把 sock 文件链接到 mysql8.0 的 sock 文件即可。
mysql启动相关问题 参见 https://blog.51cto.com/u_4052845/788492
查看mysql版本
mysql --version查看mysql运行状态
service mysqld status[root@XXX ~]# service mysqld status
Redirecting to /bin/systemctl status mysqld.service
● mysqld.service - MySQL Server
Loaded: loaded (/usr/lib/systemd/system/mysqld.service; enabled; vendor preset: disabled)
Active: active (running) since XXX XXXX-XX-XX XX:XX:XX EDT; XXh XXmin ago
Docs: man:mysqld(8)
http://dev.mysql.com/doc/refman/en/using-systemd.html
Process: 1521 ExecStartPre=/usr/bin/mysqld_pre_systemd (code=exited, status=0/SUCCESS)
Main PID: 1836 (mysqld)
Status: "Server is operational"
Tasks: 38 (limit: 22839)
Memory: 535.8M
CGroup: /system.slice/mysqld.service
└─1836 /usr/sbin/mysqld
X月 XX XX:XX:XX localhost.localdomain systemd[1]: Starting MySQL Server...
X月 XX XX:XX:XX localhost.localdomain systemd[1]: Started MySQL Server.
出现上述文字说明mysql开机自动开启成功
远程访问mysql
Linux 通常作为服务器操作系统,一般希望能使用远程使用 MySQL。不过,Linux 上有防火墙,默认会阻止远程对 MySQL 的连接。实际上,它会阻止所有的远程连接。对于笔者的 RedHat Enterprise Linux 9 x86_64,默认的防火墙为 firewalld,而不是 iptables。(很多早期的 Linux,使用的防火墙是 iptables,但 RedHat 从 RHEL 7 开始就用 firewalld 取代了 iptables。)
永久关闭防火墙
systemctl stop firewalldsystemctl mask firewalldfirewall-cmd --reload单独开放3306端口
firewall-cmd --zone=public --add-port=3306/tcp --permanentfirewall-cmd --reload查看端口生效
firewall-cmd --zone=public --query-port=3306/tcp查看所有开放端口
firewall-cmd --zone=public --list-portsmysql远程授权访问
create user 'root'@'%' identified with mysql_native_password by '密码';grant all privileges on *.* to 'root'@'%' with grant option;flush privileges;密码 要改成自己设置的实际的密码。
mysql安装完成后设置软连接
sudo ln -sv /usr/local/mysql-8.0.30-macos12-x86_64/bin/mysql /usr/local/bin
sudo ln -sv /usr/local/mysql-8.0.30-macos12-x86_64/bin/mysqldump /usr/local/bin
- MySql版本问题sql_mode=only_full_group_by 的解决方案
mysql版本问题
sql_mode=only_full_group_by解决方案
sudo vim /etc/etc/my.cnf

# 添加下面内容,重启MySql
[mysqld]
sql_mode='STRICT_TRANS_TABLES,NO_ZERO_IN_DATE,NO_ZERO_DATE,ERROR_FOR_DIVISION_BY_ZERO,NO_ENGINE_SUBSTITUTION'
redis
安装redis
brew install redis查看安装目录
which redis检查版本
redis-server -v
redis-cli -v
后台运行redis
brew services start redisphp安装redis扩展
采用pecl命令进行安装; pecl命令,在使用brew 安装php时,已经为我们安装上了,这里我们直接使用即可。
查看php具体版本号
which php
which pecl
如若为指向brew安装后的目录,可以使用如下命令,重新进行软关联
cd /usr/local/bin
ln -s ../Cellar/php@7.1/7.1.26/bin/php php
ln -s ../Cellar/php@7.1/7.1.26/bin/pecl pecl重新软关联后,记得退出客户终端,然后在进入,运行php -v查看版本号
修改pecl下载目录、缓存目录权限,不然有可能会失败
pecl config-show
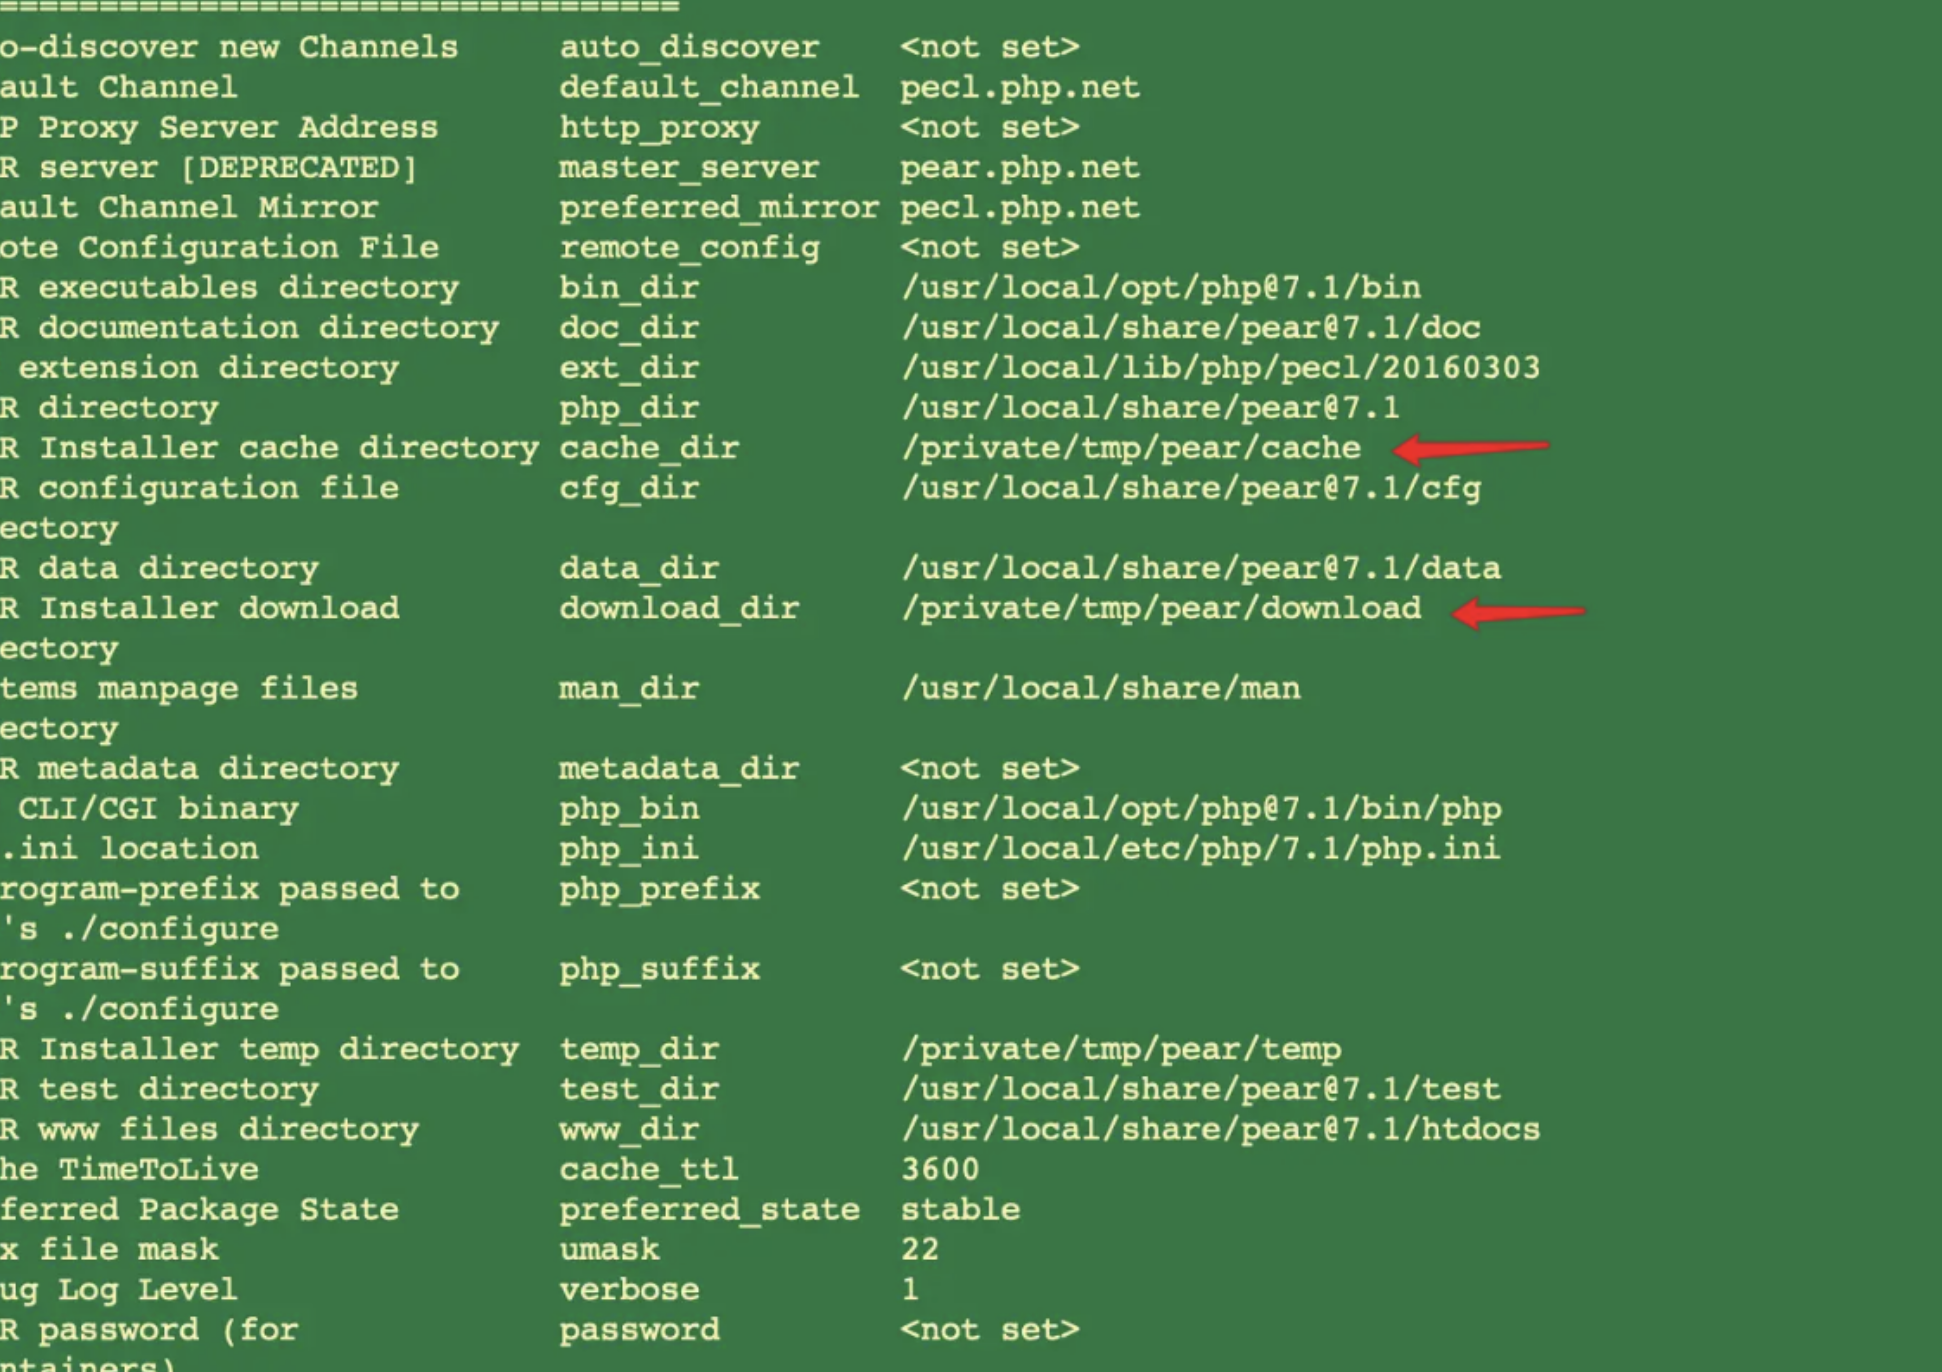
sudo chown -R 自己账号:分组 目录
sudo chown -R messia:wheel /private/tmp/pear/
安装igbinary
pecl install igbinary会遇到No releases available for package "pecl.php.net/igbinary"
检查igbinary包
pecl search igbinary主要检查openssl可能出现问题
php -r "print_r(openssl_get_cert_locations());"
先到证书位置查看
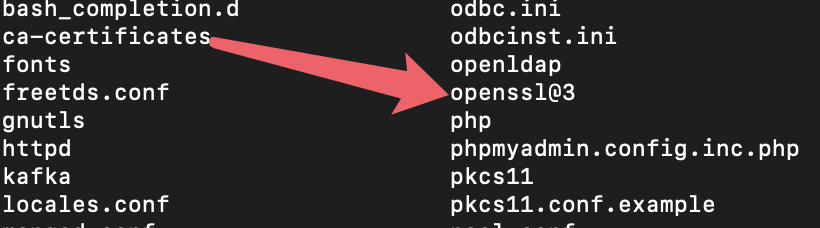
若本机存在证书文件 复制一份到openssl 其他文件没有则创建 记得改用户权限
若没有证书 则重新下载
wget -c https://curl.haxx.se/ca/cacert.pem /usr/local/openssl/cert.pem --no-check-certificate重新下载后
可能遇到权限问题
![]()
可以看到pecl指向一文件位置软连接
找到位置看到没有该文件 新建文件夹
mkdir pecl修改文件夹用户权限

安装成功
安装lzf
pecl install lzf
安装成功
安装zstd
pecl install zstd
安装成功
安装msgpack
pecl install msgpack
安装成功
更新pecl
pecl channel-update pecl.php.net
安装redis
pecl install redis选择需要的扩展

安装成功
手动安装包
如果你确定扩展应该存在,可以直接从PECL官网或者GitHub搜索相关扩展,并按照官方指引手动安装。
# redis
缺少igbinary 安装redis的扩展依赖
pecl install igbinary
安装开始
pecl install https://pecl.php.net/get/redis-5.3.7.tgz
cd /private/tmp/pear/download
sudo tar -zxvf redis-5.3.7.tgz
sudo mv redis-5.3.7.tgz redis
cd redis
sudo phpize
sudo ./configure
sudo make && sudo make install
# memcache
需要zlib支持
brew install zlib
安装开始
pecl install memcache
cd /private/tmp/pear/download
sudo tar -zxvf memcache-8.0.tgz
sudo mv memcache-8.0.tgz memcache
cd memcache
sudo phpize
sudo ./configure --with-zlib-dir=/opt/homebrew/Cellar/zlib/1.2.12/
sudo make && sudo make install
# swoole
需要openssl支持
brew install openssl
开始安装
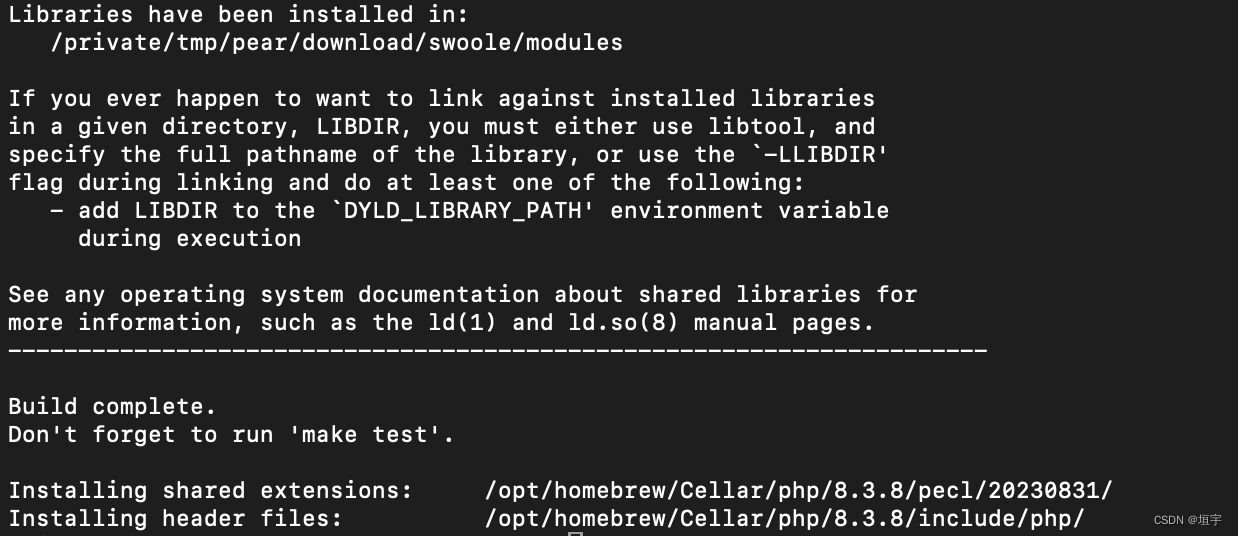
pecl install swoole
1、缺少openssl/ssh.h时 添加 --with-openssl-dir
或者 /opt/homebrew/Cellar/php/8.1.7/include/php/ext/swoole 创建软连接
enable openssl support? [no] : yes --with-openssl-dir=/opt/homebrew/Cellar/openssl@3/3.0.3
2、缺少pcre2.h时 创建软连接
ln -s /opt/homebrew/Cellar/pcre2/10.40/include/pcre2.h /opt/homebrew/Cellar/php/8.1.7/include/php/ext/pcre/pcre2.h
确认模块安装成功
php -m|grep r启动redis服务
redis-server开机自动启动redis
brew services start redis检查redis是否启动成功
ps -ef | grep -E 'php|nginx|redis'pkg-config
configure: error: The pkg-config script could not be found or is too old.  Make sure it
is in your PATH or set the PKG_CONFIG environment variable to the full
path to pkg-config.
解决方法
brew install pkg-config设置环境变量
由于 Mac 下默认自带 PHP 环境,这里修改默认的 PHP 版本。
sudo vim ~/.zshrc在文件底部添加如下配置信息。
alias php="/usr/local/php80/bin/php"安装swoole
pecl安装
pecl install swoole手动安装
下载链接 swoole-src: Coroutine-based concurrency library for PHP
phpize
./configure --with-openssl-dir=/opt/homebrew/Cellar/openssl@3/3.3.1/ #openssl地址切换成自己的地址
sudo make && sudo make install
安装成功
引入扩展
php -i|grep php.ini
添加
extension=swoole.so
或在conf.d添加ext-swoole.ini文件 添加如下

注:文件位置为自己的
启动php
sudo php-fpm
mongodb
使用homebrew安装
MongoDB官方已经不支持通过Homebrew直接安装,但你可以使用第三方tap来安装。打开终端
brew tap mongodb/brew
#添加 MongoDB 的官方 Homebrew tap

brew install mongodb-community
#通过 Homebrew 安装 MongoDB 社区版
查看mongo shell
brew list | grep mongo
设置环境变量
echo 'export PATH="/usr/local/opt/mongodb-community/bin:$PATH"' >> ~/.zshrc
MongoDB的bin目录到PATH: 找到MongoDB的安装目录,并将其bin目录添加到你的PATH环境变量中。通常,如果你是通过Homebrew安装的MongoDB,它的bin目录可能位于/usr/local/opt/mongodb-community/bin。
若不清楚具体地址 可使用终端命令行
which MongoDBpwd
export PATH="/path/to/mongo/bin:$PATH"
然后将这行添加到你的shell配置文件中(.bash_profile、.bashrc、.zshrc等),保存文件,并重新加载配置或重启你的终端。
启动mongoDB服务
brew services start mongodbbrew services start mongodb/brew/mongodb-community
关闭mongodb服务
brew services stop mongodb
brew services stop mongodb-community
注:如果你的MongoDB是通过mongodb-community包安装的,执行下面的命令
查找占用端口的进程
lsof -i :27017
或
netstat -anp | grep 27017
nginx
安装nginx
brew install nginx测试修改成功
sudo nginx -t配置文件
文件位置:/etc/nginx/conf.d
server {
    listen       80;
    server_name  localhost;

    access_log  /var/log/nginx/log/host.access.log  main;
    root   /usr/share/nginx/html;  #原本这个设置是在下面localtion里面的

    location / {
        index  index.php index.html index.htm;
    }

    error_page   500 502 503 504  /50x.html;
    location = /50x.html {
        root   /usr/share/nginx/html;
    }

    location ~* \.php$ {
        fastcgi_index   index.php;
        fastcgi_pass    127.0.0.1:9000;
        include         fastcgi_params;
        fastcgi_param   SCRIPT_FILENAME    $document_root$fastcgi_script_name;  #网上很多人说这个地方有的没配置,但是我是按照php官方的来配置的,就有这个
        fastcgi_param   SCRIPT_NAME        $fastcgi_script_name;
    }


}
nginx主配置文件
user  www-data www-data;     #用户组,要和php-fpm里面一致
worker_processes  1;

error_log  /var/log/nginx/error.log warn;
pid        /var/run/nginx.pid;


events {
    worker_connections  1024;
}


http {
    include       /etc/nginx/mime.types;
    default_type  application/octet-stream;

    log_format  main  '$remote_addr - $remote_user [$time_local] "$request" '
                      '$status $body_bytes_sent "$http_referer" '
                      '"$http_user_agent" "$http_x_forwarded_for"';

    access_log  /var/log/nginx/access.log  main;

    sendfile        on;
    #tcp_nopush     on;

    keepalive_timeout  65;

    #gzip  on;

    include /etc/nginx/conf.d/*.conf;   #注意看这里,引用虚拟机配置文件
}
nginx虚拟主机
server{
        listen 80;
        server_name  localhost;
        root         /usr/share/nginx/html;
        index index.php;
        location ~ .*.php?$ {
            fastcgi_pass  127.0.0.1:9000;
            fastcgi_index index.php;
            include fastcgi.conf;
            index index.php index.html;
          }
        if (!-e $request_filename) {
         rewrite ^/(.*)$ /index.php?s=$1 last;
        }
}
server {
#监听端口
listen 80;
#虚拟主机域名
server_name www.test.com;
#网站根目录
root /Users/aaa/wroot/test;
#定义路径下默认访问的文件名
index index.php index.html;
location / {
try_files $uri $uri/ /index.php?$query_string;
#打开目录浏览功能,可以列出整个目录
#autoindex on;
}
access_log /usr/local/var/log/www.test.com-access.log main;
error_log /usr/local/var/log/www.test.com-error.log error;
# pass the PHP scripts to FastCGI server listening on 127.0.0.1:9000
location ~ \.php$ {
fastcgi_pass 127.0.0.1:9000;
fastcgi_index index.php;
include fastcgi_params;
fastcgi_param SCRIPT_FILENAME $document_root$fastcgi_script_name;
}
}
效果和上面两种一样,这种可以配合框架使用,自动分离出模块控制器和方法
独立运行的二级栏目解析
以前用apache解析二级栏目,只需要在对应的目录下添加.htaccess文件,在文件中配置规则,nginx不支持.htaccess。所以直接在对应的主机文件里配置
location /a {
    index index.php index.html;
    try_files $uri $uri/ /a/index.php?query_string;
}
其他类似配置 参加 https://juejin.cn/post/6844903802361888782
php-fpm配置
sudo cp /private/etc/php-fpm.conf.default /private/etc/php-fpm.conf进入php-fpm.d目录
cd /private/etc/php-fpm.d
sudo cp www.conf.default www.conf
cd ..
sudo vim php-fpm.conf
设置pid文件位置

修改完毕重启服务
php-fpm安装php后 php php-fpm的存放目录
php目录 /usr/local/Cellar/php@7.1/版本号/bin
php-fpm目录 /usr/local/Cellar/php@7.1/版本号/sbin
配置目录 /usr/local/etc/php/7.1
mac系统自带了php 安装目录位置
php /usr/bin/php
php-fpm /user/sbin/php-fpm
将自带的php更换为安装的php版本
方法一
brew link --force php@7.1会遇到权限问题 解决办法
$ sudo mkdir /usr/local/sbin
$ sudo chown -R whoami:admin /usr/local/sbin
$ brew link php71
设置环境变量
echo 'export PATH="/usr/local/opt/php@7.1/bin:$PATH"' >> ~/.bash_profile
echo 'export PATH="/usr/local/opt/php@7.1/sbin:$PATH"' >> ~/.bash_profile
方法二
cd /usr/local/bin
ln -s ../Cellar/php@7.1/7.1.26/bin/php php
手动创建php-fpm软连接
ln -s /usr/local/Cellar/php\@7.1/7.1.26/sbin/php-fpm /usr/local/bin/php-fpm使用命令查看
php -v
php-fpm -v
版本一致说明修改成功
开机自动启动php-fpm
<?xml version="1.0" encoding="UTF-8"?>
<!DOCTYPE plist PUBLIC "-//Apple Computer//DTD PLIST 1.0//EN" "http://www.apple.com/DTDs/PropertyList-1.0.dtd">
<plist version="1.0">
<dict>
	<key>Label</key>
	<string>org.phpfpm</string>
	<key>RunAtLoad</key>
	<true/>
	<key>Program</key>
	<string>/usr/local/sbin/php-fpm</string>
</dict>
</plist>
查看路径命令
whereis php-fpmfind / -name php-fpmwhich php-fpm配置开机自动启动
sudo chown messia:wheel ~/Library/LaunchAgents/org.php.php-fpm.plist
sudo chmod +x ~/Library/LaunchAgents/org.php.php-fpm.plist
launchctl load -w ~/Library/LaunchAgents/org.php.php-fpm.plist
检查是否成功
launchctl list | grep phpphpmysqladmin
brew install phpmyadmin
目录文件
/usr/local/share/phpmyadmin
To enable phpMyAdmin in Apache, add the following to httpd.conf and
restart Apache:
    Alias /phpmyadmin /usr/local/share/phpmyadmin
    <Directory /usr/local/share/phpmyadmin/>
        Options Indexes FollowSymLinks MultiViews
        AllowOverride All
        <IfModule mod_authz_core.c>
            Require all granted
        </IfModule>
        <IfModule !mod_authz_core.c>
            Order allow,deny
            Allow from all
        </IfModule>
    </Directory>
Then open http://localhost/phpmyadmin
The configuration file is /usr/local/etc/phpmyadmin.config.inc.php
==> Summary
🍺  /usr/local/Cellar/phpmyadmin/5.2.0: 3,553 files, 44.7MB
修改配置文件
vim /usr/local/share/phpmyadmin/config.inc.php// $i++;
/* Authentication type */
// $cfg['Servers'][$i]['auth_type'] = 'cookie';
/* Server parameters */
// $cfg['Servers'][$i]['host'] = 'localhost';
// $cfg['Servers'][$i]['compress'] = false;
// $cfg['Servers'][$i]['AllowNoPassword'] = false;
$i++;
$cfg['Servers'][$i]['host'] = '127.0.01';
$cfg['Servers'][$i]['port'] = '3306';
$cfg['Servers'][$i]['socket'] = '';
$cfg['Servers'][$i]['connect_type'] = 'tcp';
$cfg['Servers'][$i]['extension'] = 'mysqli';
$cfg['Servers'][$i]['auth_type'] = 'cookie';
$cfg['Servers'][$i]['AllowNoPassword'] = false;
配置nginx
修改/etc/hosts
127.0.0.1 pma.monnys11.net
cd /usr/local/etc/nginx/serversecho '
server {
listen 80;
root /usr/local/share/phpmyadmin;
index index.html index.htm index.php;
# Make site accessible from http://localhost/
server_name pma.monnys11.net;
client_max_body_size 8M;
location / {
# First attempt to serve request as file, then
# as directory, then fall back to displaying a 404.
try_files $uri $uri/ =404;
# Uncomment to enable naxsi on this location
# include /etc/nginx/naxsi.rules
}
location ~ \.php$ {
try_files $uri =404;
# fastcgi_pass unix:/var/run/php/php7.2-fpm.sock;
fastcgi_pass 127.0.0.1:9000;
fastcgi_index index.php;
fastcgi_max_temp_file_size 0;
fastcgi_buffer_size 4K;
fastcgi_buffers 64 4k;
fastcgi_param SCRIPT_FILENAME $document_root$fastcgi_script_name;
include fastcgi_params;
}
}
' > pma
重启nginx php
brew services restart php
brew services restart nginx
其他相关命令
查看指定时间段文件信息
# 设置时间范围
start_time=$(date -j -f "%Y-%m-%d %H:%M:%S" "2023-04-01 00:00:00" +%s)
end_time=$(date -j -f "%Y-%m-%d %H:%M:%S" "2023-04-02 00:00:00" +%s)

# 使用log命令查看launchd的日志
log show --start $start_time --end $end_time --predicate 'process == "launchd"'


 1182
1182


 被折叠的 条评论
为什么被折叠?
被折叠的 条评论
为什么被折叠?
 到【灌水乐园】发言


