


文章目录
1 概述
从最基础的ByteBuf开始讲解netty的内存分配,是为了后续更清楚地了解netty内存池的分配技术。目标是,了解各种ByteBuf本质上是什么?
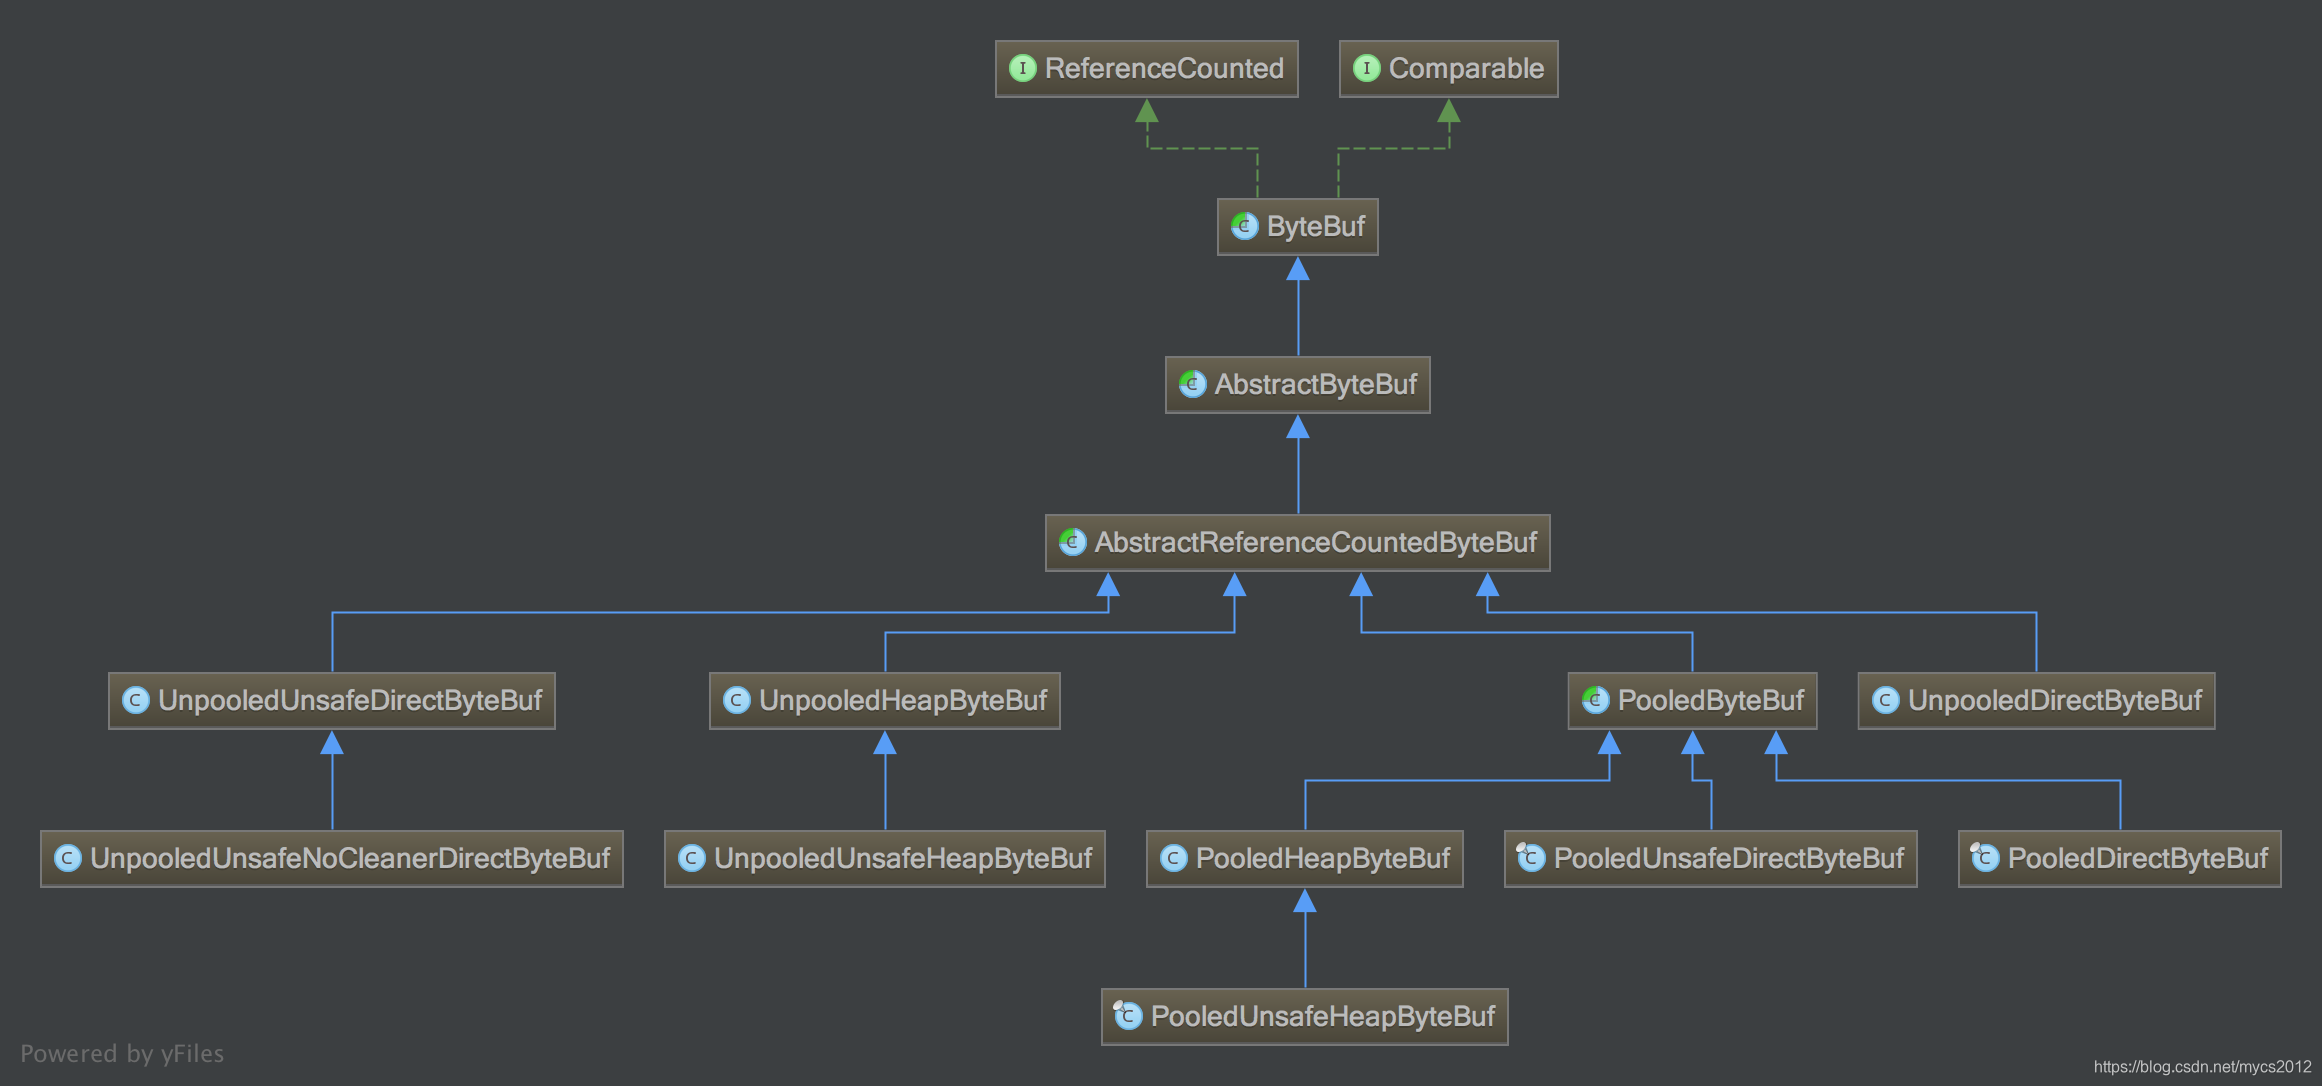
netty提供了众多的ByteBuf实现,而在我们该系列文章中,我们按内存分配的算法来分类,分为非池化ByteBuf和池化的ByteBuf。而两个主力的非池化字节缓冲UnpooledHeapByteBuf和UnpooledDirectByteBuf,正是本文的主角。为了更有条理地了解它们,我们先看继承关系:
1.1 ByteBuf和AbstractByteBuf讲解
netty ByteBuf对nio ByteBuffer进行了改良,引入读写下标readerIndex和writerIdnex,分别用于读写的控制。它们有如下关系:
0 <= readerIndex <= writerIndex <= capacity
本文将主要考察非池化字节缓存的分配、读写和释放。读写方法以如下两个API为例:
–ByteBuf writeBytes(byte[] src, int srcIndex, int length),将指定字节数组写入到本ByteBuf中;
–ByteBuf readBytes(byte[] dst, int dstIndex, int length),将该ByteBuf内容读取到指定字节数组。
读写的主逻辑,都在AbstractByteBuf类中,采用模板方法的设计模式,留真正进行内存读写的方法延迟到子类实现(因为各种ByteBuf读写的内存区域不同,读写方式也就有差异),比如writeBytes:
public ByteBuf writeBytes(byte[] src, int srcIndex, int length) {
  ensureWritable(length);
  setBytes(writerIndex, src, srcIndex, length);
  writerIndex += length;
  return this;
}
可以看到,writerIndex下标检查和移动,都在AbstractByteBuf进行,因为这些都是公共的相同的操作。而真正写内存setBytes是个抽象方法:
public abstract ByteBuf setBytes(int index, byte[] src, int srcIndex, int length);
readBytes也是类似:
public ByteBuf readBytes(byte[] dst, int dstIndex, int length) {
  checkReadableBytes(length);
  getBytes(readerIndex, dst, dstIndex, length);
  readerIndex += length;
  return this;
}
真正读内存的getBytes是个抽象方法:
public abstract ByteBuf getBytes(int index, byte[] dst, int dstIndex, int length);
setBytes和getBytes的实现,将在后面UnpooledHeapByteBuf和UnpooledDirectByteBuf的讲解中进行分析。
1.2 引用计数器
从类的继承关系图,可以看到ByteBuf实现了ReferenceCounted接口,这个接口主要用于对ByteBuf进行引用计数。这个功能非常重要,是netty内存池实现的基础组件之一。它主要有两个方法:
–retain()将引用计数器加1;
–release()将引用计数器减去1。
其功能的实现主要在AbstractReferenceCountedByteBuf中。
AbstractReferenceCountedByteBuf
它有一个refCnt属性,用于引用计数:
private volatile int refCnt = 2;
这里netty为了使用位运算提高效率,将refCnt数值保存为偶数,真正的引用个数,需要转换得到。比如2代表有一个引用,4代表2个引用,6代表3个引用,8代表4个引用,10代表5个引用等等…,如果检查到refCnt为奇数,会直接报错。
刚创建时refCnt=2,所以一个ByteBuf一创建,就有了一个引用了。
每次调用release()减少一个引用,同时检查引用个数是否已经等于0,如果等于0了,就调用deallocate()方法释放内存,并且释放内存有重试机制,一次释放不掉,会不断地进行重试,直到成功释放。而deallocate()也是个抽象方法,由子类决定如何释放:
/**
* Called once {@link #refCnt()} is equals 0.
*/
protected abstract void deallocate();
关于对象引用计数对象的使用的一些最佳实践,见netty文档:Reference counted objects
讲完这些基础后,再来看看本文的主角UnpooledHeapByteBuf和UnpooledDirectByteBuf,就容易得多。
2 非池化堆内存UnpooledHeapByteBuf
堆内的字节缓冲,本质上是字节数组的封装。它的声明周期和字节数组的创建、使用、释放对应,所以它的主要属性就是这个字节数组:
byte[] array;
而它的可用容量capacity,就是该数组的长度。我们看看这个数组是怎么分配的,从构造器开始:
public UnpooledHeapByteBuf(ByteBufAllocator alloc, int initialCapacity, int maxCapacity) {
  // 省略其他代码
  setArray(allocateArray(initialCapacity));
  setIndex(0, 0);
}
主要是通过allocateArray方法创建一个字节数组,然后通过setArray赋值给array属性:
protected byte[] allocateArray(int initialCapacity) {
	return new byte[initialCapacity];
}
setArray也简单直接,为了一探究竟也给出源码:
private void setArray(byte[] initialArray) {
	array = initialArray;
	tmpNioBuf = null;
}
UnpooledHeapByteBuf的读写
说完分配之后我们看读写。读写的主体流程,上文已有讲解,并留了setBytes/getBytes两个抽象方法,到本节进行实现分析。先来看看写字节缓冲用到的setBytes是怎么把字节流设置到UnpooledHeapByteBuf:
1、做下标检查
2、通过数组拷贝直接将源字节流,拷贝到UnpooledHeapByteBuf对象的array属性中。如下:
@Override
public ByteBuf setBytes(int index, byte[] src, int srcIndex, int length) {
  checkSrcIndex(index, length, srcIndex, src.length);
  System.arraycopy(src, srcIndex, array, index, length);
  return this;
}
再来看看getBytes,也是数组拷贝,只是数据的源头变成了UnpooledHeapByteBuf的字节数组array:
public ByteBuf getBytes(int index, byte[] dst, int dstIndex, int length) {
  checkDstIndex(index, length, dstIndex, dst.length);
  System.arraycopy(array, index, dst, dstIndex, length);
  return this;
}
UnpooledHeapByteBuf的释放
上文讲解引用计数器时,提到了如果计数器为0了,就会调用deallocate()方法进行释放,具体如何释放,是这个子类实现的。现在来看看在UnpooledHeapByteBuf中的释放,其本质是去掉指向字节数组的引用,这样它就可以被GC掉,达到释放的目的:
@Override
protected void deallocate() {
  freeArray(array);
  array = EmptyArrays.EMPTY_BYTES;
}

protected void freeArray(byte[] array) {
  // NOOP
}
2.1 UnpooledUnsafeHeapByteBuf
UnpooledUnsafeHeapByteBuf和UnpooledHeapByteBuf的不同之处,在于前者是通过Unsafe来分配字节数组的:
protected byte[] allocateArray(int initialCapacity) {
  return PlatformDependent.allocateUninitializedArray(initialCapacity);
}
最终,会调用到jdk.internal.misc.Unsafe类的allocateUninitializedArray方法,通过该方法创建字节数组性能会更高一些。另外,通过allocateUninitializedArray来分配数组也是有条件的,jdk版本必须是Jdk9(included)以上,并且数组的大小要大于1024字节,要不然还是直接创建byte数组并返回。jdk9的Unsafe类参考:jdk.internal.misc.Unsafe。
UnpooledUnsafeHeapByteBuf后续对字节数组的读写,也通过Unsafe类来进行,不过这时使用的Unsafe类就是我们用得较多的sun.misc.Unsafe类,通过这种方式进行字节数组的读写,据说性能也会高些。
除此之外,UnpooledUnsafeHeapByteBuf和UnpooledHeapByteBuf没有其他差别。
3 非池化的直接内存UnpooledDirectByteBuf
UnpooledDirectByteBuf其实是对java.nio.DirectByteBuffer的封装,所以它的主要属性有java.nio.ByteBuffer和一个代表容量从capacity:
private ByteBuffer buffer;
private int capacity;
调用其构造器进行创建时,就会创建java.nio.DirectByteBuffer,从而分配到位于堆外的直接内存。关于java.nio.DirectByteBuffer的内存分配和使用,可以参考:java.nio.DirectByteBuffer的分配与回收源码剖析。
这里还是照例给出UnpooledDirectByteBuf创建DirectByteBuffer的调用点:
    public UnpooledDirectByteBuf(ByteBufAllocator alloc, int initialCapacity, int maxCapacity) {
				// 省略...
        this.alloc = alloc;
        setByteBuffer(allocateDirect(initialCapacity));
    }
在allocateDirect方法中,分配直接内存:
protected ByteBuffer allocateDirect(int initialCapacity) {
  return ByteBuffer.allocateDirect(initialCapacity);
}

==============java.nio.ByteBuffer中================
public static ByteBuffer allocateDirect(int capacity) {
  return new DirectByteBuffer(capacity);
}
组合了nio的ByteBuffer后,UnpooledDirectByteBuf的读写都转换为ByteBuffer的读写,比如setBytes:
public ByteBuf setBytes(int index, byte[] src, int srcIndex, int length) {
  checkSrcIndex(index, length, srcIndex, src.length);
  ByteBuffer tmpBuf = internalNioBuffer();
  tmpBuf.clear().position(index).limit(index + length);
  tmpBuf.put(src, srcIndex, length);
  return this;
}
先检查下标,然后通过internalNioBuffer()方法创建出一个tmpBuf,这个tmpBuf和源ByteBuffer共享原来的内存段,但是有独立的下标。对tmpBuf进行写入,变更会反映到源ByteBuffer。注意,setBytes不会改变netty的writerIndex,下标的修改在父类writeBytes方法中,见前文。
getBytes也是转换为对nio ByteBuffer的读取,只展示关键代码:
  tmpBuf.clear().position(index).limit(index + length);
  tmpBuf.get(dst, dstIndex, length);
而UnpooledDirectByteBuf的释放,是通过反射调用java.nio.DirectByteBuffer的cleaner对象的clean()方法完成的,具体怎么释放,可以参考:java.nio.DirectByteBuffer的分配与回收源码剖析
3.1 UnpooledUnsafeDirectByteBuf
UnpooledUnsafeDirectByteBuf和非Unsafe版本UnpooledDirectByteBuf,都是通过new DirectByteBuffer(capacity)来创建直接内存。不同之处在于,前者会将分配到的直接内存的起始地址存起来:
long memoryAddress;

final void setByteBuffer(ByteBuffer buffer, boolean tryFree) {
  // 省略...
  memoryAddress = PlatformDependent.directBufferAddress(buffer);
  // 省略...
}
将直接内存的起始地址存起来之后,读写就可以不通过nio ByteBuffer来进行,而是直接对内存进行读写,性能上会好一些。
除此之外,其他方面基本相同,包括释放也都是通过反射调用DirectByteBuffer的cleaner来完成。
3.2 UnpooledUnsafeNoCleanerDirectByteBuf
该类继承自UnpooledUnsafeDirectByteBuf,不过它分配直接内存时,是通过Unsafe.allocateMemory(int capacity)的调用,先分配到直接内存,拿到直接内存起始地址address,再以address为参数,反射调用DirectByteBuffer的以下构造器创建DirectByteBuffer对象:
DirectByteBuffer(long addr, int cap, Object ob)
注意,DirectByteBuffer的这个构造器,不会创建cleaner对象,这也就是该类名有NoCleaner关键字的原因。
既然没有cleaner,释放内存时也就不能通过cleaner来释放,所以释放UnpooledUnsafeNoCleanerDirectByetBuf的内存时,是直接调用Unsafe.freeMemory(long address)来完成释放的。
完~


 105
105

 被折叠的 条评论
为什么被折叠?
被折叠的 条评论
为什么被折叠?
 到【灌水乐园】发言


