


1 Netty
1 介绍
- 异步的、基于事件驱动的网络应用框架
- 在TCP协议下,面向Clients端的高并发应用
- 本质是一个NIO框架,适用于服务器通讯相关的多种应用场景
2、应用场景
- 互联网:分布式系统的远程服务调用、异步高性能的通信框架、被RPC使用,如阿里的Dubbo——Netty用于实现进程节点之间的内部通信
- 游戏:使用TCP/IP、HTTP协议栈,实现账号登录服务器、地图服务器通信
- 大数据:Avro的RPC框架,默认采用 Netty 进行跨界点通信
3、IO模型
-
利用XX通道发送和接收数据
-
3种:
-
BIO:同步阻塞
-
一个连接处理一个线程
-
场景:连接数目小且固定
-
-
-
NIO:同步非阻塞
-
一个连接处理多给请求
-
场景:连接数目多且连接短,如聊天服务器、弹幕系统、服务器间通讯
-
-
AIO:异步非阻塞
- 场景:连接数多且连接较长,如相册服务器
2 BIO
1、介绍
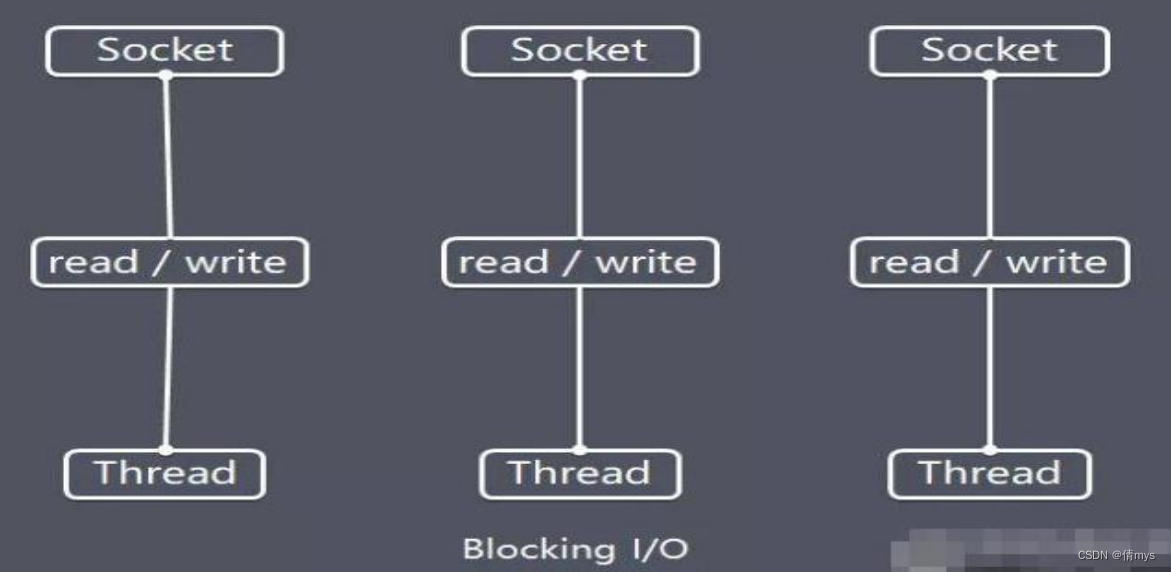
java.io包,同步阻塞,实现一个连接处理一个请求,线程池机制改善(实现多个客户连接服务器),适合连接数目小且固定的架构
2、工作机制
流程
- 服务端启动一个ServerSocket
- 客户端建立一个线程与之通讯
- 客户端发出请求后,先咨询服务器是否有线程响应,没有等待或被拒绝
- 有相应,客户端等待请求结束后继续执行
3、应用实例
- 编写一个服务端,监听8889端口,当有客户端连接时,启动一个线程与之通讯
- 使用线程池机制改善,可以连接多个客户端
- 客户端以telnet方式发送数据
public class BIOServer {
public static void main(String[] args) throws Exception{
// 线程池机制
// 思路
// 1.创建一个线程池
// 2.如果有多个客户端连接,就创建一个线程与之通讯
// 1.创建线程池
ExecutorService newCachedThreadPool = Executors.newCachedThreadPool();
// 创建ServerSocket
ServerSocket serverSocket = new ServerSocket(8889);
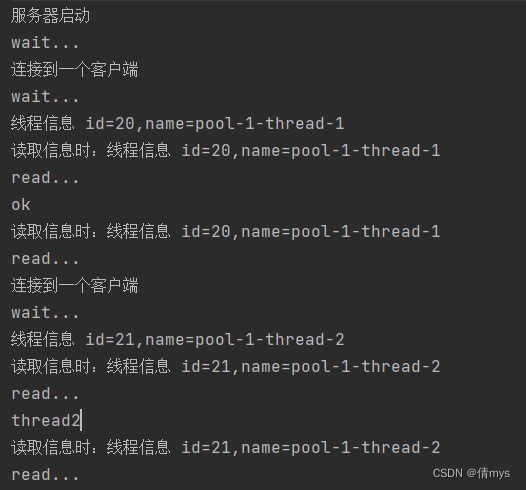
System.out.println("服务器启动");
while (true) {
// 监听,等待客户端连接
System.out.println("wait...");
final Socket socket = serverSocket.accept();
System.out.println("连接到一个客户端");
//2.创建一个线程与之通讯
newCachedThreadPool.execute(new Runnable() {
@Override
public void run() {
handler(socket);
}
});
}
}
// handler,与客户端通讯
public static void handler(Socket socket) {
try {
System.out.println("线程信息 id=" + Thread.currentThread().getId() + ",name=" + Thread.currentThread().getName());
byte[] bytes = new byte[1024];
// 通过socket获取输入流
InputStream inputStream = socket.getInputStream();
// 循环读取客户端发送的数据
while (true) {
System.out.println("读取信息时:线程信息 id=" + Thread.currentThread().getId() + ",name=" + Thread.currentThread().getName());
System.out.println("read...");
int read = inputStream.read(bytes);
if (read != 1) {
// 输出客户端发送的数据
System.out.println(new String(bytes, 0, read));
} else {
break;
}
}
} catch (Exception e) {
} finally {
System.out.println("关闭和client连接");
try {
socket.close();
} catch (Exception e) {
e.printStackTrace();
}
}
}
}
telnet 127.0.0.1 8889
4、问题分析
- 每个请求需要创建独立的线程进行业务处理
- 并发数大时需要创建大量线程来处理连接,系统资源占用大
- 连接建立后,如果当前线程暂时没有数据可读,则线程就阻塞 在 Read 操作上,造成线程资源浪费
3 NIO
1、介绍
-
non-blocking IO,同步非阻塞,java.nio包下
-
三大核心部分:Channel(通道)、Buffer(缓冲区)、Selector(选择器)
-
NIO是面向缓冲区或块编程的
-
非阻塞模式:如果当前没有数据可用,可继续做其他事情
-
HTTP2.0使用了多路复用技术,做到一个连接处理多个请求
2、BIO vs. VIO
- BIO 是流方式处理数据,NIO是块方式处理数据,效率跟高
- BIO是阻塞的,NIO是非阻塞的
- BIO基于字节流和字符流操作,NIO基冲区【数据从通道读取到缓冲区,从缓冲区写入到通道;Selector选择器用于监听多个通道的事件,如连接请求、数据到达,实现单个线程可以监听多个客户端通道】
3、NIO三大核心原理
Selector & Channel & Buffer
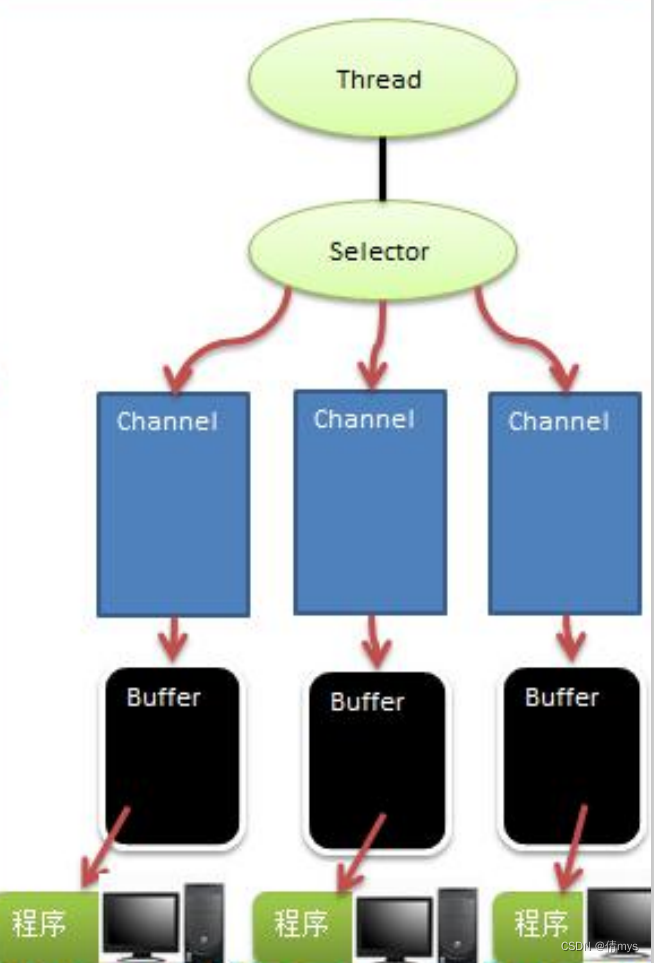
- 一个Channel对应一个Buffer
- 一个Selector对应一个线程,一个线程对应多个 Channel
- 将Channel注册到该Selector
- 程序切换到哪个Channel由事件决定
- Selector根据不同的事件在Channel上切换
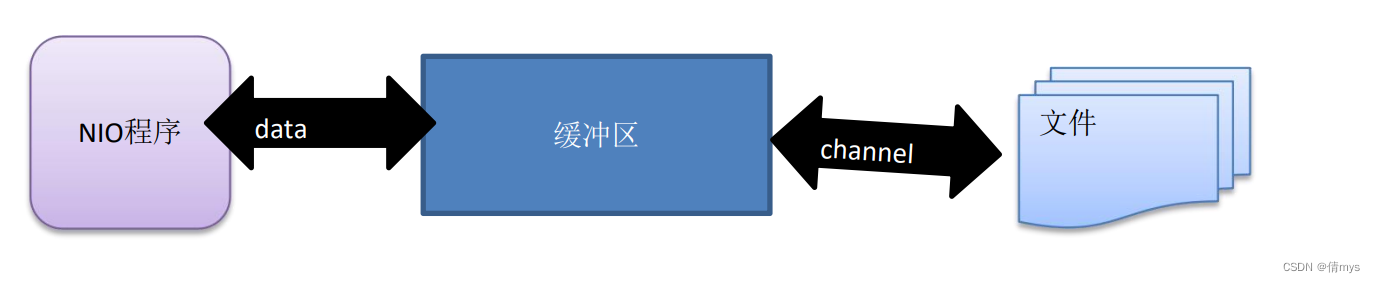
- Buffer是一个内存块,底层是一个数组
- 数据的读写通过Buffer,BIO中要么是输入流,要么是输出流,不能双向,读写需要用flip切换
- Channel是双向的,可以返回底层操作系统的情况
4、Buffer缓冲区
4.1 介绍
-
一个可读写的数据内存块
-
一个容器对象(含数组),对象提供了一组方法
-
缓冲区内置一些机制,能够跟踪和记录缓冲区的状态变化情况
-
Channel从文件、网络读取数据,但读写数据都必须经过Buffer
4.2 Buffer类及其子类
Buffer类是一个顶层父类,抽象类,类的层级关系:
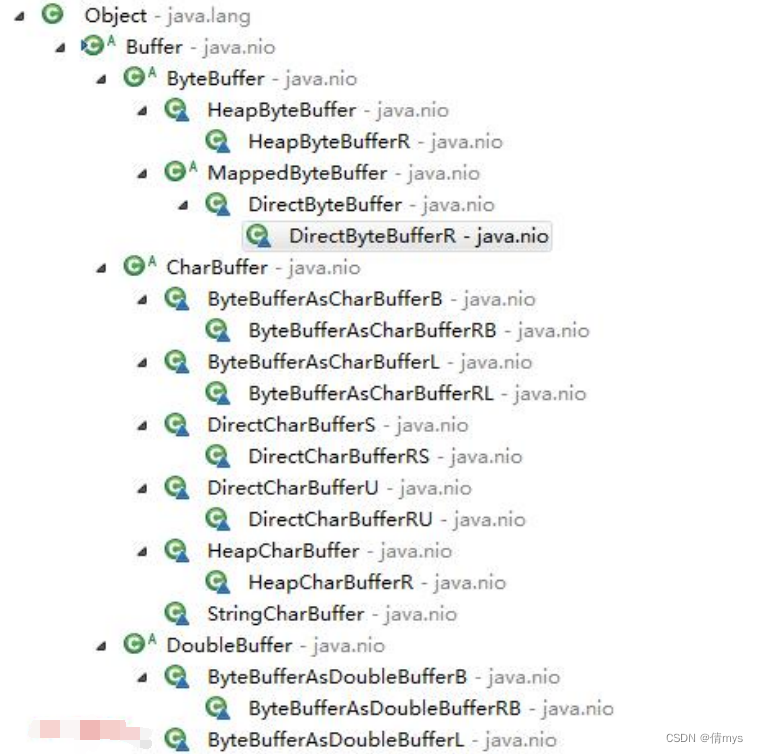
常用Buffer子类
- ByteBuffer——存储字节数据到缓冲区【最常用】
- ShortBuffer——字符串
- CharBuffer——字符
- IntBuffer——整数
- LongBuffer——长整数
- DoubleBuffer——小数
- FloatBuffer——小数
Buffer类的四个属性【重要】
- Capacity:可容纳的最大数据量,创建时指定,不能修改
- Limit:缓冲区的当前终点,不能超过该位置
- Position:下一个要被读写的元素索引
- Mark:标记
Buffer类相关方法
** 表示常用
** public final int capacity( )//返回此缓冲区的容量
** public final int position( )//返回此缓冲区的位置
** public final Buffer position (int newPositio)//设置此缓冲区的位置
** public final int limit( )//返回此缓冲区的限制
** public final Buffer limit (int newLimit)//设置此缓冲区的限制
public final Buffer mark( )//在此缓冲区的位置设置标记
public final Buffer reset( )//将此缓冲区的位置重置为以前标记的位置
** public final Buffer clear( )//清除此缓冲区, 即将各个标记恢复到初始状态,但是数据并没有真正擦除, 后面操作会覆盖
** public final Buffer flip( )//反转此缓冲区
public final Buffer rewind( )//重绕此缓冲区
public final int remaining( )//返回当前位置与限制之间的元素数
** public final boolean hasRemaining( )//告知在当前位置和限制之间是否有元素
** public abstract boolean isReadOnly( );//告知此缓冲区是否为只读缓冲区
//JDK1.6时引入的api
** public abstract boolean hasArray();//告知此缓冲区是否具有可访问的底层实现数组
** public abstract Object array();//返回此缓冲区的底层实现数组
public abstract int arrayOffset();//返回此缓冲区的底层实现数组中第一个缓冲区元素的偏移量
public abstract boolean isDirect();//告知此缓冲区是否为直接缓冲区
ByteBuffer的主要方法
public abstract class ByteBuffer {
//缓冲区创建相关api
** public static ByteBuffer allocateDirect(int capacity)//创建直接缓冲区
** public static ByteBuffer allocate(int capacity)//设置缓冲区的初始容量
public static ByteBuffer wrap(byte[] array)//把一个数组放到缓冲区中使用
//构造初始化位置offset和上界length的缓冲区
public static ByteBuffer wrap(byte[] array,int offset, int length)
//缓存区存取相关API
** public abstract byte get( );//从当前位置position上get,get之后,position会自动+1
** public abstract byte get (int index);//从绝对位置get
** public abstract ByteBuffer put (byte b);//从当前位置上添加,put之后,position会自动+1
** public abstract ByteBuffer put (int index, byte b);//从绝对位置上put
}
案例
public class BasicBuffer {
    public static void main(String[] args) {
        // 创建Buffer,大小为5,可以存放5个int
        IntBuffer intBuffer = IntBuffer.allocate(5);
        // 向buffer存数据
        for (int i = 0; i < intBuffer.capacity(); i ++) {
            intBuffer.put(i * 2);
        }
        // 从buffer读取数据
        intBuffer.flip(); // buffer读写切换
        while (intBuffer.hasRemaining()) {
            System.out.println(intBuffer.get());
        }
    }
}
5、Channel通道
5.1 介绍
-
NIO通道类似流
-
通道可同时读写(流只能读或写)
-
可实现异步读写数据
-
可从缓冲区读数据,也可将数据写到缓冲区

-
-
NIO的stream是单向的,只能读或写;NIO的Channel是双向的,可同时读写
-
Channel是一个接口:
public interface Channel extends Closeable{} -
常用的Channel类
- FileChannel:文件数据的读写
- DatagramChannel:UDP数据读写
- ServerSocketChennel:TCP数据读写
- SocketChannel:TCP数据读写
5.2 FileChannel类
主要对本地文件进行IO操作,常见方法:
public int read(ByteBuffer dst) // 从通道读取数据并放到缓冲区中
public int write(ByteBuffer src) // 把缓冲区的数据写到通道中
public long transferFrom(ReadableByteChannel src, long position, long count) // 从目标通道中复制数据到当前通道
public long transferTo(long position, long count, WritableByteChannel target) // 把数据从当前通道复制给目标通道
5.3 应用实例
-
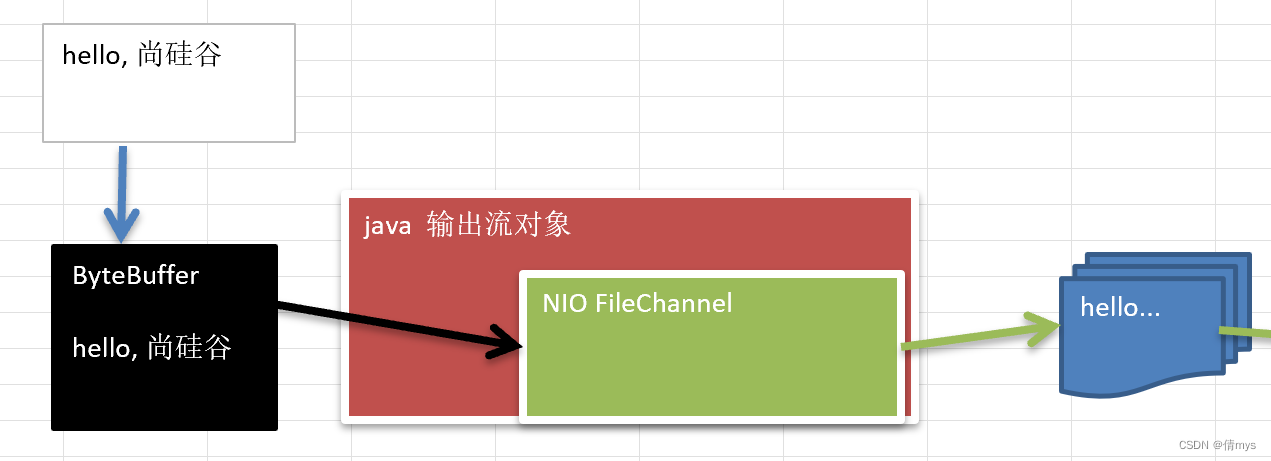
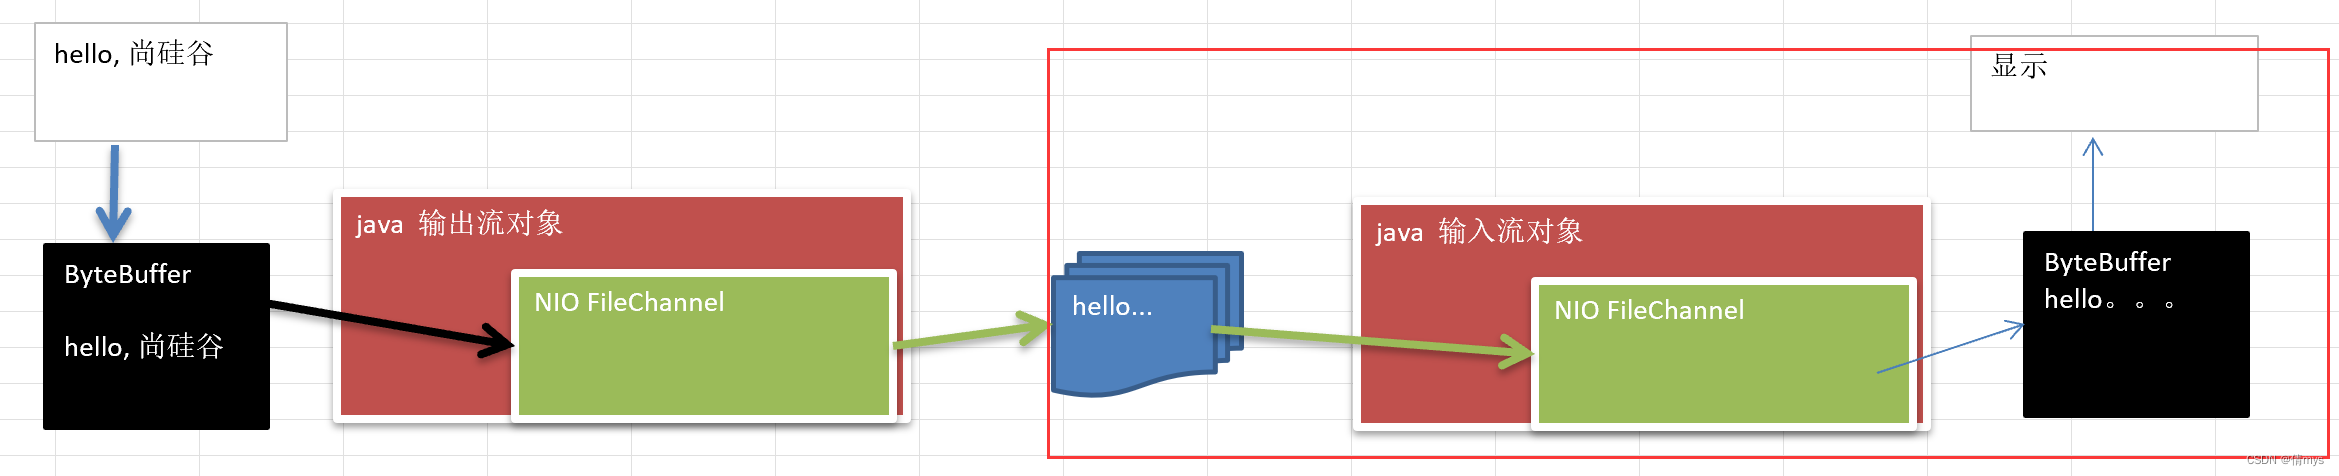
1、本地文件写数据
-
使用ByteBuffer缓存和FileChannel通道,将数据写入到文件中
-
文件不存在就创建
-
```java
public class NIOFileChannel1 {
    public static void main(String[] args) throws Exception{
        String str= "hello";
        // 创建一个输出流
        FileOutputStream fileOutputStream = new FileOutputStream("d:\\file\\file01.txt");
        // 通过fileOutStream获取对应的FileChannel(fileChannel的真实类型是FileChannelImpl)
        FileChannel fileChannel = fileOutputStream.getChannel();
        // 创建缓冲区ByteBuffer
        ByteBuffer byteBuffer = ByteBuffer.allocate(1024);

        // 将str放入缓冲区
        byteBuffer.put(str.getBytes());
        // 对byteBuffer进行flip
        byteBuffer.flip();
        // 将byteBuffer数据写到FileChannel
        fileChannel.write(byteBuffer);
        fileOutputStream.close();
    }
}
```
-
2、本地文件读数据
-
使用ByteBuffer缓存和FileChannel通道,将数据读入程序并在控制套打印
-
假定文件已经存在
public class NIOFileChannel2{
    public static void main(String[] args) throws Exception{
        // 创建文件输入流
        File file = new File("d:\\file\\file01.txt");
        FileInputStream fileInputStream = new FileInputStream(file);
        FileChannel fileChannel = fileInputStream.getChannel();
        // 创建缓冲区
        ByteBuffer byteBuffer = ByteBuffer.allocate((int) file.length());
        // 将通道的数据读入到yteBuffer
        fileChannel.read(byteBuffer);
        // 将byteBuffer字节数据转成string
        System.out.println(new String(byteBuffer.array()));
        fileInputStream.close();
    }
}
-
-
3、使用一个Buffer完成文件读取
-
使用FileChannel通道和方法read、write,完成文件的拷贝
-
拷贝一个文本文件到项目下
public class NIOFileChannel03 {
    public static void main(String[] args) throws Exception{
        FileInputStream fileInputStream = new FileInputStream("1.txt");
        FileChannel fileChannel01 = fileInputStream.getChannel();

        FileOutputStream fileOutputStream = new FileOutputStream("2.txt");
        FileChannel fileChannel02 = fileOutputStream.getChannel();

        ByteBuffer byteBuffer = ByteBuffer.allocate(512);
        while (true) {
            // 重要操作:清空数据
            byteBuffer.clear();

            int read = fileChannel01.read(byteBuffer); // 从通道读取数据到缓冲区
            if (read == -1) { // 读完
                break;
            }
            byteBuffer.flip(); // 读写切换
            fileChannel02.write(byteBuffer); // 从缓冲区写数据到通道
        }
        // 关闭流
        fileInputStream.close();
        fileOutputStream.close();
    }
}
-
-
4、拷贝文件transferFrom 方法
-
使用FileChannel通道和方法transferForm完成文件的拷贝
-
拷贝一张图片
public class BIOFileChannel04 {
    public static void main(String[] args) throws Exception{
        FileInputStream fileInputStream = new FileInputStream("d:\\file\\a.jpg");
        FileOutputStream fileOutputStream = new FileOutputStream("d:\\file\\b.jpg");

        // 获取对应的channel
        FileChannel sourceCh = fileInputStream.getChannel();
        FileChannel destCh = fileOutputStream.getChannel();
        // 使用transForm完成拷贝
        destCh.transferFrom(sourceCh, 0, sourceCh.size());
        // 关闭通道
        fileInputStream.close();
        fileOutputStream.close();
        sourceCh.close();
        destCh.close();
    }
}
-
5.4 Buffer和Channel的注意细节
- ByteBuffer 支持类型化的put 和 get, put 放入的是什么数据类型,get就应该使用 相应的数据类型来取出,否则可能有 BufferUnderflowException 异常
public static void main(String[] args) {
    // 创建Buffer
    ByteBuffer buffer = ByteBuffer.allocate(64);
    // 类型化方式放入数据
    buffer.putInt(100);
    buffer.putLong(9);
    buffer.putChar('好');
    buffer.putShort((short) 4);
    // 取出
    buffer.flip();
    System.out.println(buffer.getInt());
    System.out.println(buffer.getLong());
    System.out.println(buffer.getChar());
    System.out.println(buffer.getShort());
}
-
可以将一个普通Buffer 转成只读Buffer
public static void main(String[] args) { ByteBuffer buffer = ByteBuffer.allocate(64); for (int i = 0; i < 64; i ++) { buffer.put((byte) i); } buffer.flip(); // 得到一个只读Buffer ByteBuffer readOnlyBuffer = buffer.asReadOnlyBuffer(); System.out.println(readOnlyBuffer.getClass()); // 读取 while (readOnlyBuffer.hasRemaining()) { System.out.println(readOnlyBuffer.get()); } readOnlyBuffer.put((byte) 100); // ReadOnlyBufferException } -
NIO 还提供了 MappedByteBuffer, 可以让文件直接在内存(堆外的内存)中进 行修改, 而如何同步到文件由NIO 来完成
// MappedBuffer:可以让文件直接在内存(堆外内存)修改,操作系统不需要再修改一次 public static void main(String[] args) throws Exception{ RandomAccessFile randomAccessFile = new RandomAccessFile("1.txt", "rw"); FileChannel channel = randomAccessFile.getChannel(); /** * 参数1:FileChannel.MapMode.READ_WRITE 读写模式 * 参数2:可以直接修改的起始位置 * 参数3:映射到内存的大小 * 实际类型:DirectByteBuffer */ MappedByteBuffer mappedByteBuffer = channel.map(FileChannel.MapMode.READ_WRITE, 0, 5); mappedByteBuffer.put(0, (byte) 'H'); mappedByteBuffer.put(2, (byte) '2'); randomAccessFile.close(); } -
NIO 还支持 通过多个 Buffer (即 Buffer 数组) 完成读写操作,即 Scattering 和 Gathering
public class ScatteringAndGathering {
    public static void main(String[] args) throws Exception{
        // 使用ServerSocketChannel SocketChannel网络
        ServerSocketChannel serverSocketChannel = ServerSocketChannel.open();
        InetSocketAddress inetSocketAddress = new InetSocketAddress(7000);
        // 绑定buffer数组,并启动
        serverSocketChannel.socket().bind(inetSocketAddress);

        // 创建buffer数组
        ByteBuffer[] byteBuffers = new ByteBuffer[2];
        byteBuffers[0] = ByteBuffer.allocate(5);
        byteBuffers[1] = ByteBuffer.allocate(3);
        // 等待客户端连接(telnet)
        SocketChannel socketChannel = serverSocketChannel.accept();
        int messageLength = 8; // 从客户端接收8个字节
        // 循环读取
        while (true) {
            int byteRead = 0;
            while (byteRead < messageLength) {
                long l = socketChannel.read(byteBuffers);
                byteRead += l; // 累计读取的字节数
                System.out.println("byteRead = " + byteRead);
                // 使用流打印,看看当前这个buffer的position和limit
                Arrays.asList(byteBuffers).stream().map(buffer -> "position=" + buffer.position() + ", limit= " + buffer.limit()).forEach(System.out :: println);
            }
            // 将所有的buffer进行flip
            Arrays.asList(byteBuffers).forEach(buffer -> buffer.flip());
            // 将数据读取显示到客户端
            long byteWrite = 0;
            while (byteWrite < messageLength) {
                long l = socketChannel.write(byteBuffers);
                byteWrite += l;
            }
            // 将所有的buffer进行clear
            Arrays.asList(byteBuffers).forEach(buffer -> buffer.clear());
            System.out.println("byteRead=" + byteRead + " byteWrite=" + byteWrite + " messageLength" + messageLength);
        }
    }
}
6、Selector选择器
6.1 介绍
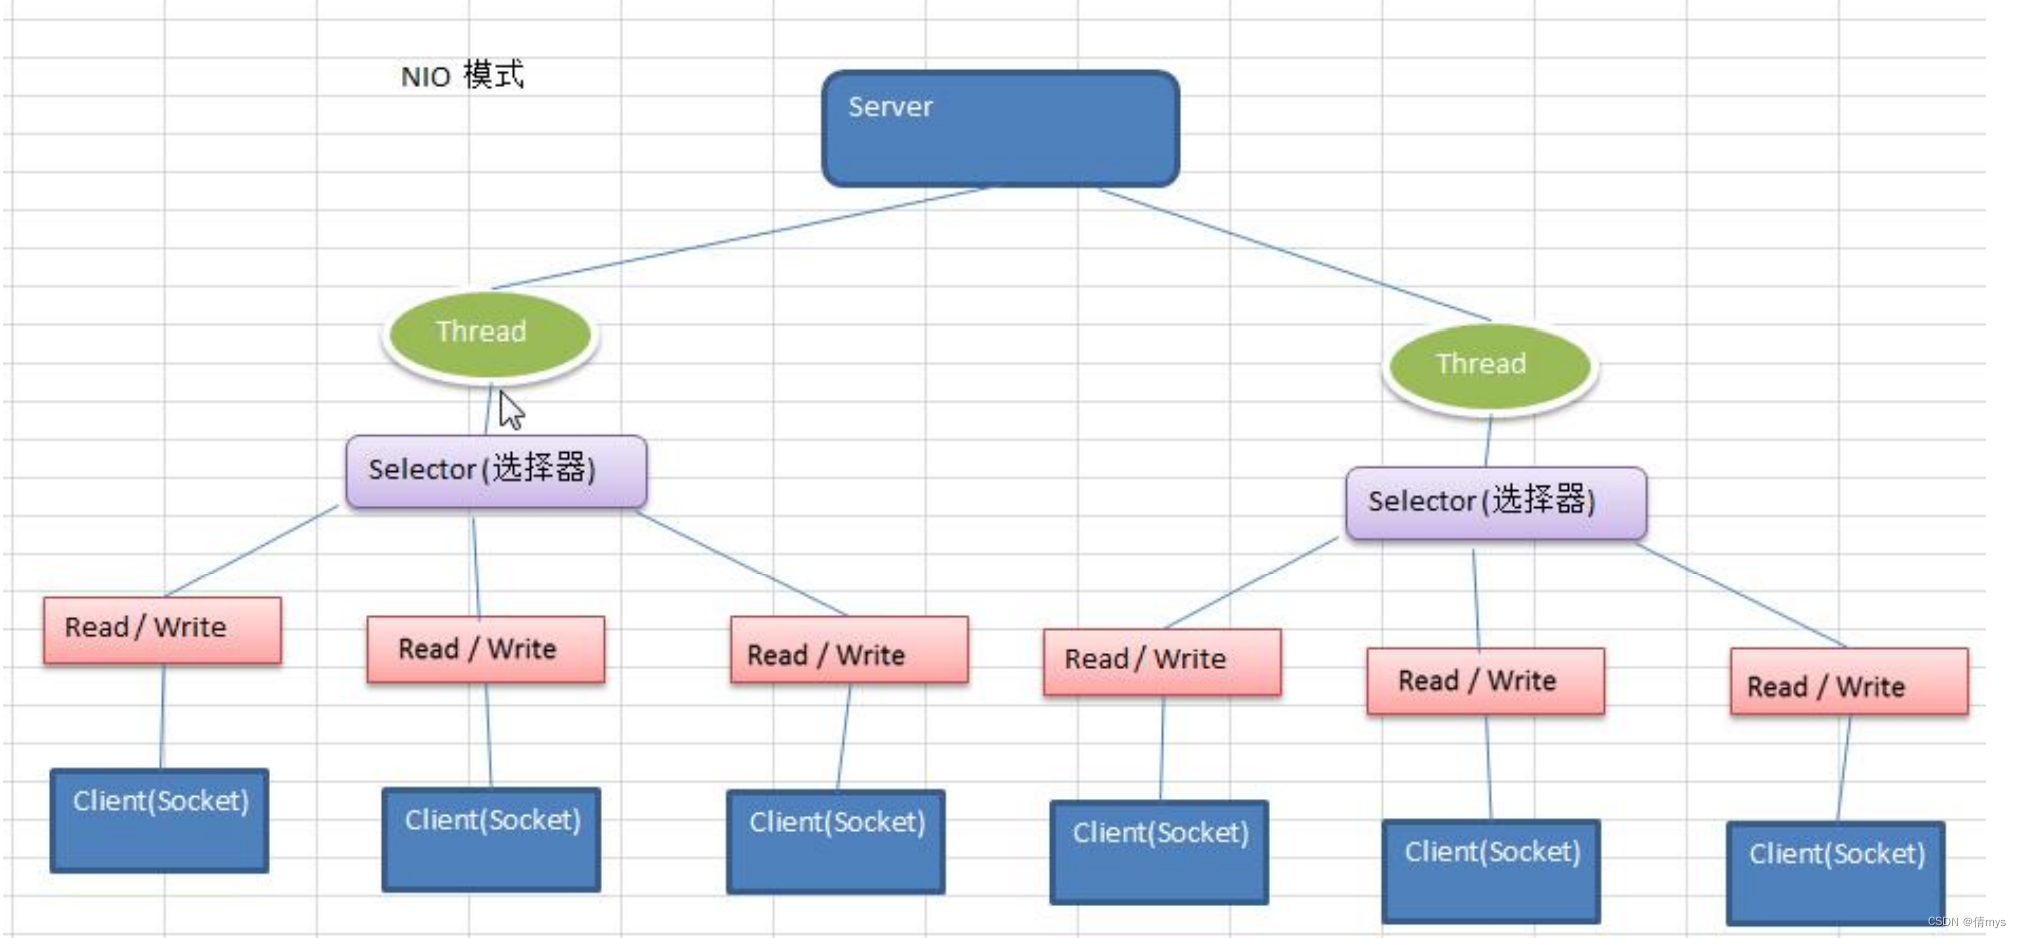
- 可以用一个线程,处理多个客户端连接,就会使用到Selector(选择器)
- Selector 能够检测多个注册的通道上是否有事件发生(注意:多个Channel以事件的方式可以注册到同一个Selector),如果有事件发生,便获取事件然后针对每个事件进行相应的处理——只用一个单线程去管理多个 通道,也就是管理多个连接和请求
- 只有在连接/通道真正有读写事件发生时,才会进行读写,就大大地减少 了系统开销,并且不必为每个连接都创建一个线程,不用去维护多个线程
- 避免了多线程之间的上下文切换导致的开销
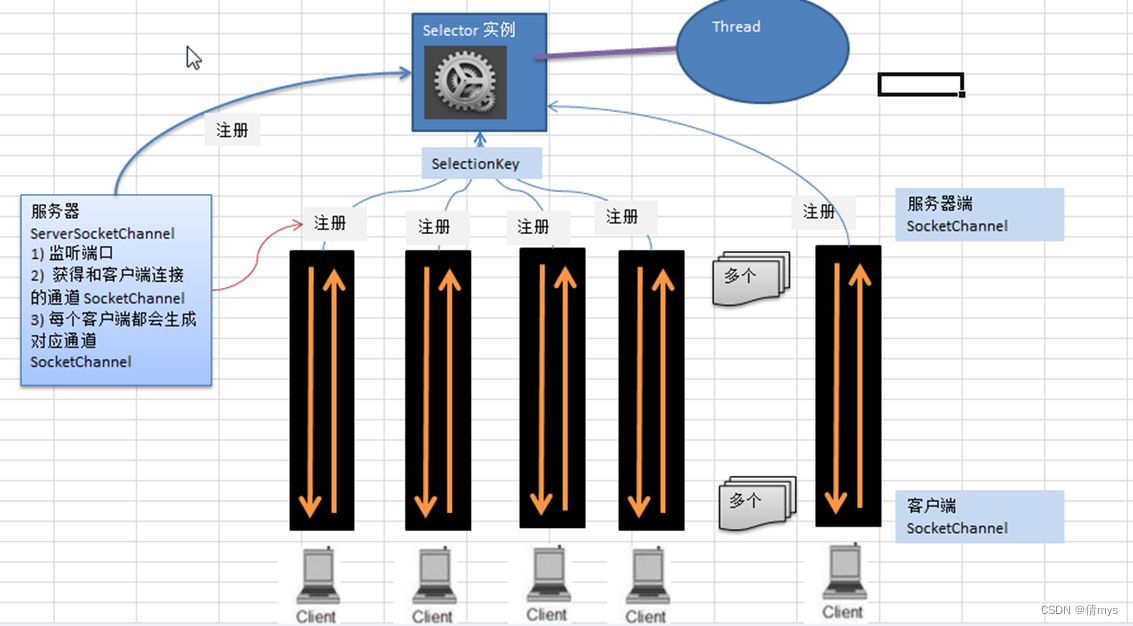
- 当客户端连接时,会通过 ServerSocketChannel 得到 SocketChannel
- Selector 进行监听 select 方法, 返回有事件发生的通道的个数
- 将socketChannel注册到Selector上, register(Selector sel, int ops), 一个 selector上可以注册多个SocketChannel
- 注册后返回一个 SelectionKey, 会和该 Selector 关联(集合)
- 进一步得到各个 SelectionKey (有事件发生)
- 在通过 SelectionKey 反向获取 SocketChannel , 方法 channel()
- 可以通过得到的 channel , 完成业务处 理
案例:实现服务器端和客户端之间的数据简单通讯(非阻塞)
NIOServer
public class NIOServer {
    public static void main(String[] args) throws Exception{
        // 创建ServerSocketChannel
        ServerSocketChannel serverSocketChannel = ServerSocketChannel.open();
        // 得到Selector对象
        Selector selector = Selector.open();
        // 绑定一个端口,在服务端监听
        serverSocketChannel.socket().bind(new InetSocketAddress(6666));
        // 设置为非阻塞
        serverSocketChannel.configureBlocking(false);
        // 把serverSocketChannel注册到Selector关心的事件 OP_ACCEPT
        serverSocketChannel.register(selector, SelectionKey.OP_ACCEPT);
        // 循环等待客户端连接
        while (true) {
            // 等待1s,如果没有事件发送,返回
            if (selector.select(1000) == 0) {
                System.out.println("服务器等待了1s,无连接");
                continue;
            }
            // 如果返回的>0,获取相关SelectionKey集合
            // 1. 如果>0,表示获取到关注的事件
            // 2. selector.selectedKeys()返回关注事件的集合,通过selectionKeys反向获取通道
            Set<SelectionKey> selectionKeys = selector.selectedKeys();
            // 遍历
            Iterator<SelectionKey> keyIterator = selectionKeys.iterator();
            while (keyIterator.hasNext()) {
                // 获取到SelectionKey
                SelectionKey key = keyIterator.next();
                // 根据key对应的通道发生的事件做相应处理
                if (key.isAcceptable()) { // 如果是OP_ACCEPT,有新的客户端连接,使用该客户端生成一个SocketChannel
                    SocketChannel socketChannel = serverSocketChannel.accept();
                    System.out.println("客户端连接成功,生成一个socketChannel " + socketChannel.hashCode());
                    // 将socketChannel设置为非阻塞
                    socketChannel.configureBlocking(false);
                    // 将socketChannel注册到Selector,关注事件为OP_ACCEPT,同时给socketChannel关联一个buffer
                    socketChannel.register(selector, SelectionKey.OP_READ, ByteBuffer.allocate(1024));
                }
                if (key.isReadable()) { // 发生OP_READ
                    // 通过key反向获取对应的channel
                    SocketChannel channel = (SocketChannel) key.channel();
                    // 获取到该channel关联的buffer
                    ByteBuffer buffer = (ByteBuffer) key.attachment();
                    channel.read(buffer);
                    System.out.println("from 客户端 " + new String(buffer.array()));
                }
                // 手动从集合中移除当前的selectionKey,防止重复操作
                keyIterator.remove();
            }
        }
    }
}
NIOClient
public class NIOClient {
    public static void main(String[] args) throws Exception{
        // 得到一个网络通道
        SocketChannel socketChannel = SocketChannel.open();
        // 设置非阻塞
        socketChannel.configureBlocking(false);
        // 提供服务端的ip和端口
        InetSocketAddress inetSocketAddress = new InetSocketAddress("127.0.0.1", 6666);
        // 连接服务器
        if (!socketChannel.connect(inetSocketAddress)) {
            while (!socketChannel.finishConnect()) {
                System.out.println("连接需要时间,客户端不会阻塞,可以做其他工作");
            }
        }
        // 连接成功,发送数据
        String str = "hello";
        ByteBuffer buffer = ByteBuffer.wrap(str.getBytes());
        // 发送数据,将buffer数据写入channel
        socketChannel.write(buffer);
        System.in.read();
    }
}
6.2 相关方法
public abstract class Selector implements Closeable {
public static Selector open();//得到一个选择器对象
public int select(long timeout);//监控所有注册的通道,当其中有 IO 操作可以进行时,将对应的SelectionKey 加入到内部集合中并返回,参数用来设置超时时间
public Set<SelectionKey> selectedKeys();//从内部集合中得到所有的 SelectionKey
}
selector
selector.select();//阻塞
selector.select(1000);//阻塞1000毫秒,在1000毫秒后返回
selector.wakeup();//唤醒selector
selector.selectNow();//不阻塞,立马返还
SelectionKey:表示 Selector 和网络通道的注册关系
int OP_ACCEPT:有新的网络连接可以 accept,值为 16
int OP_CONNECT:代表连接已经建立,值为 8
int OP_READ:代表读操作,值为 1
int OP_WRITE:代表写操作,值为 4
源码:
public static final int OP_READ = 1 << 0;
public static final int OP_WRITE = 1 << 2;
public static final int OP_CONNECT = 1 << 3;
public static final int OP_ACCEPT = 1 << 4;

public abstract class SelectionKey {
public abstract Selector selector(); //得到与之关联的Selector 对象
public abstract SelectableChannel channel(); //得到与之关联的通道
public final Object attachment(); //得到与之关联的共享数据
public abstract SelectionKey interestOps(int ops); //设置或改变监听事件
public final boolean isAcceptable(); //是否可以 accept
public final boolean isReadable(); //是否可以读 read
public final boolean isWritable(); //是否可以写 write
ServerSocketChannel:在服务器端监听新的客户端 Socket 连接
public abstract class ServerSocketChannel extends AbstractSelectableChannel implements NetworkChannel{
    public static ServerSocketChannel open(); //得到一个 ServerSocketChannel 通道
    public final ServerSocketChannel bind(SocketAddress local); //设置服务器端端口号
    public final SelectableChannel configureBlocking(boolean block); //设置阻塞或非阻塞模式,取值false 表示采用非阻塞模式
    public SocketChannel accept(); // 接受一个连接,返回代表这个连接的通道对象
    public final SelectionKey register(Selector sel, int ops); //注册一个选择器并设置监听事件
}
SocketChannel:网络 IO 通道,具体负责进行读写操作
NIO 把缓冲区的数据写入通道,或者把通道里的数据读到缓冲区
public abstract class SocketChannel extends AbstractSelectableChannel implements ByteChannel, ScatteringByteChannel, GatheringByteChannel, NetworkChannel{
    public static SocketChannel open();//得到一个 SocketChannel 通道
    public final SelectableChannel configureBlocking(boolean block);//设置阻塞或非阻塞模式,取值 false 表示采用非阻塞模式
    public boolean connect(SocketAddress remote);//连接服务器
    public boolean finishConnect();//如果上面的方法连接失败,接下来就要通过该方法完成连接操作
    public int write(ByteBuffer src);//往通道里写数据
    public int read(ByteBuffer dst);//从通道里读数据
    public final SelectionKey register(Selector sel, int ops, Object att);//注册一个选择器并设置监听事件,最后一个参数可以设置共享数据
    public final void close();//关闭通道
}
7、NIO 网络编程应用实例-群聊系统
- 编写一个 NIO 群聊系统,实现服务器端和客户端之间的数据简单通讯(非阻塞),实现多人群聊
- 服务器端:可以监测用户上线、离线,并实现消息转发功能
- 客户端:通过channel 可以无阻塞发送消息给其它所有用户,同时可以接受其它用户发送的消息(由服务器转发得到)
- 编写服务器端
- 服务器启动并监听6667
- 服务器接收客户端消息,并实现转发[处理上线和离线]
- 编写客户端
- 连接服务器
- 发送消息
- 接收服务器消息
GroupChatServer
public class GroupChatServer {
    // 定义属性
    private Selector selector;
    private ServerSocketChannel listenChannel;
    private static final int PORT = 6667;

    // 构造器,初始化工作
    public GroupChatServer() {
        try {
            // 得到选择器
            selector = Selector.open();
            // ServerSocketChannel
            listenChannel = ServerSocketChannel.open();
            // 绑定端口
            listenChannel.socket().bind(new InetSocketAddress(PORT));
            // 设置非阻塞模式
            listenChannel.configureBlocking(false);
            // 将listenChannel注册到selector
            listenChannel.register(selector, SelectionKey.OP_ACCEPT);
        } catch (IOException e) {
            e.printStackTrace();;
        }
    }

    // 监听
    public void listen() {
        try {
            // 循环处理
            while (true) {
                int count = selector.select(2000);
                if (count > 0) { // 有事件处理
                    // 遍历得到selectionKey集合
                    Iterator<SelectionKey> iterator = selector.selectedKeys().iterator();
                    while (iterator.hasNext()) {
                        SelectionKey key = iterator.next();
                        // 监听到accept
                        if (key.isAcceptable()) {
                            SocketChannel accept = listenChannel.accept();
                            accept.configureBlocking(false);
                            // 注册到selector
                            accept.register(selector, SelectionKey.OP_READ);
                            // 提示
                            System.out.println(accept.getRemoteAddress() + "上线 ");
                        }
                        if (key.isReadable()) {
                            // 通道发生read事件,通道是可读状态
                            // 处理读的方法
                            readDate(key);
                        }
                        // 当前key删除,防止重复处理
                        iterator.remove();
                    }

                } else {
                    System.out.println("wait ...");
                }
            }
        } catch (IOException e) {
            e.printStackTrace();;
        }
    }

    // 读取客户端消息
    private void readDate(SelectionKey key) {
        // 定义一个socketChannel
        SocketChannel channel = null;
        try {
            channel = (SocketChannel) key.channel();
            ByteBuffer buffer = ByteBuffer.allocate(1024);
            int count = channel.read(buffer);
            if (count > 0) {
                // 把缓存区的数据转成字符串
                String msg = new String(buffer.array());
                // 输出消息
                System.out.println("from 客户端:" + msg);
                // 向其他客户端转发消息(去掉自己)
                sendInfoToOtherClients(msg, channel);
            }
        } catch (IOException e) {
            try {
                System.out.println(channel.getRemoteAddress() + "离线...");
                // 取消注册
                key.cancel();
                // 关闭通道
                channel.close();
            } catch (IOException e1) {
                e1.printStackTrace();
            }
        }
    }

    // 转发消息给其他客户(通道)
    private void sendInfoToOtherClients(String msg, SocketChannel self) throws IOException {
        System.out.println("服务器转发消息中...");
        // 遍历所有注册到selector上的socketChannel,并排除self
        for (SelectionKey key : selector.keys()) {
            // 取出对应的SocketChannel
            Channel targetChannel = key.channel();
            // 排除自己
            if (targetChannel instanceof SocketChannel && targetChannel != self) {
                // 转型
                SocketChannel dest = (SocketChannel) targetChannel;
                // 将msg存储到buffer
                ByteBuffer buffer = ByteBuffer.wrap(msg.getBytes());
                // 将buffer的数据写入通道
                dest.write(buffer);
            }
        }
    }

    public static void main(String[] args) throws Exception{
        // 创建一个服务器对象
        GroupChatServer groupChatServer = new GroupChatServer();
        groupChatServer.listen();
    }
}
GroupChatClient
public class GroupChatClient {
    // 定义属性
    private final String HOST = "127.0.0.1";
    private int PORT = 6667;
    private Selector selector;
    private SocketChannel socketChannel;
    private String username;

    // 构造器,初始化工作
    public GroupChatClient() throws IOException {
        selector = Selector.open();
        // 连接服务器
        socketChannel = SocketChannel.open(new InetSocketAddress("127.0.0.1", 6667));
        // 设置非阻塞
        socketChannel.configureBlocking(false);
        // 注册
        socketChannel.register(selector, SelectionKey.OP_READ);
        // 得到username
        String username = socketChannel.getLocalAddress().toString().substring(1);
        System.out.println(username + " is ok...");
    }

    // 向服务器发送消息
    public void sendInfo(String info) {
        System.out.println("username:" + username);
        info = username + "说:" + info;
        try {
            socketChannel.write(ByteBuffer.wrap(info.getBytes()));
        } catch (IOException e) {
            e.printStackTrace();
        }
    }

    // 从服务器端回复消息
    public void readInfo() {
        try {
            int readChannels = selector.select();
            if (readChannels > 0) {
                Iterator<SelectionKey> iterator = selector.selectedKeys().iterator();
                while (iterator.hasNext()) {
                    SelectionKey key = iterator.next();
                    if (key.isReadable()) {
                        // 得到相关的通道
                        SocketChannel sc = (SocketChannel)key.channel();
                        ByteBuffer buffer = ByteBuffer.allocate(1024);
                        // 读取
                        sc.read(buffer);
                        // 把读取的缓冲区数据转成字符串
                        String msg = new String(buffer.array());
                        System.out.println(msg.trim());
                    }
                }
                iterator.remove();
            } else {
//                        System.out.println("没有可用的通道");
            }
        } catch (IOException e) {
            e.printStackTrace();
        }
    }

    public static void main(String[] args) throws Exception{
        // 启动客户端
        GroupChatClient chatClient = new GroupChatClient();
        // 启动一个线程,每隔3s读取从服务器发送的数据
        new Thread() {
            public void run() {
                while (true) {
                    chatClient.readInfo();
                    try {
                        Thread.currentThread().sleep(3000);
                    } catch (Exception e) {
                        e.printStackTrace();
                    }
                }
            }
        }.start();
        // 发送数据给服务端
        Scanner scanner = new Scanner(System.in);
        while (scanner.hasNextLine()) {
            String s = scanner.nextLine();
            chatClient.sendInfo(s);
        }
    }
}
8、NIO与零拷贝
零拷贝参考链接:https://blog.csdn.net/m0_63435402/article/details/127558684
-
传统IO执行流程
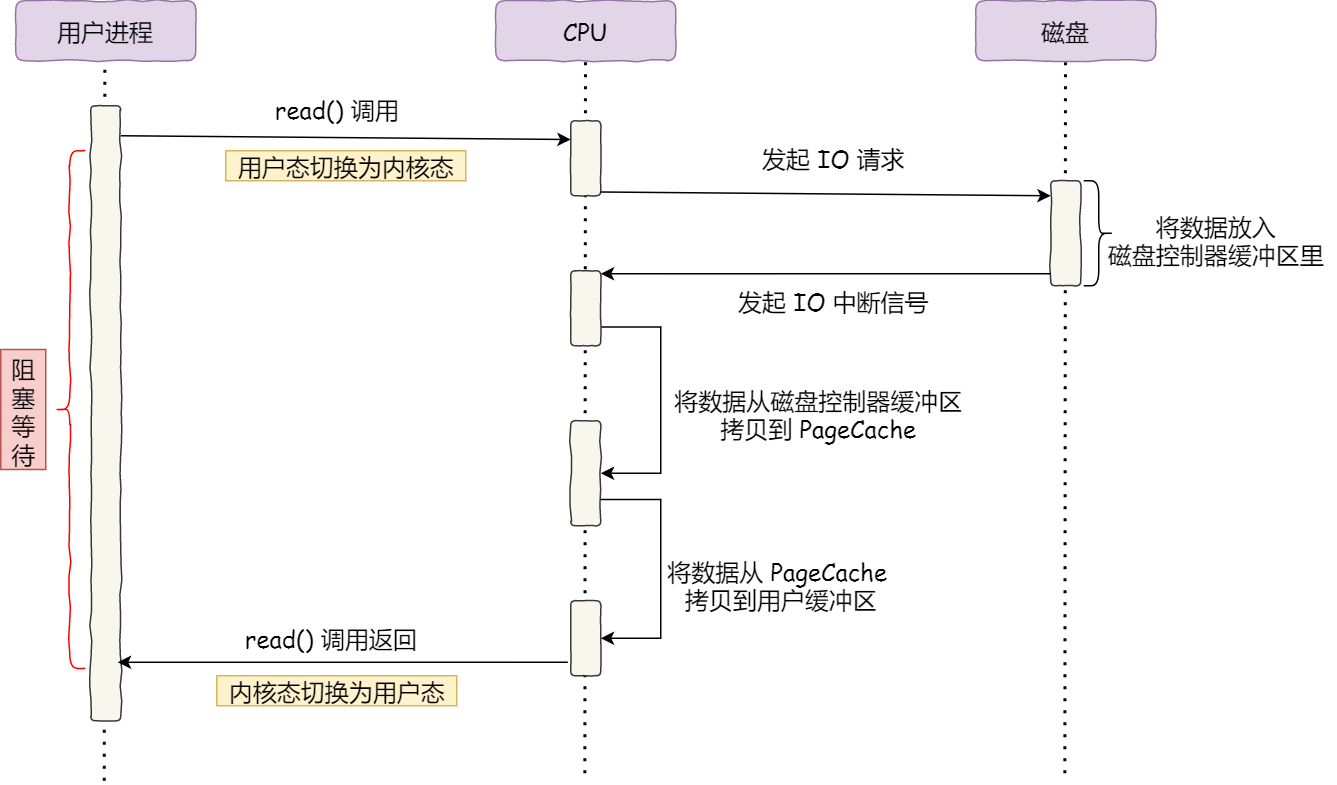
CPU全程参与数据的搬运
=》DMA:Direct Memory Access 直接内存拷贝,不使用CPU——数据搬运工作由DMA控制器处理,CPU可处理别的业务

- 用户进程调用 read 方法,向操作系统发出 I/O 请求,请求读取数据到自己的内存缓冲区中,进程进入阻塞状态;
- 操作系统收到请求后,将 I/O 请求发送 DMA,然后让 CPU 执行其他任务;
- DMA收到请求后,将 I/O 请求发送给磁盘;
- 磁盘收到 DMA 的 I/O 请求,把数据从磁盘读取到磁盘控制器的缓冲区中,当磁盘控制器的缓冲区被读满后,向 DMA 发起中断信号,告知自己缓冲区已满;
- DMA 收到磁盘的信号,将磁盘控制器缓冲区中的数据拷贝到内核缓冲区中,此时不占用 CPU,CPU 可以执行其他任务;
- 当 DMA 读取了足够多的数据,就会发送中断信号给 CPU;
- CPU 收到 DMA 的信号,知道数据已经准备好,于是将数据从内核拷贝到用户空间,系统调用返回;
-
传统文件传输

拷贝:
- DMA拷贝:把磁盘上的数据拷贝到操作系统内核的缓冲区里
- CPU拷贝:把内核缓冲区的数据拷贝到用户的缓冲区里
- CPU拷贝:把刚才拷贝到用户的缓冲区里的数据,再拷贝到内核的 socket 的缓冲区里
- DMA拷贝:把内核的 socket 缓冲区里的数据,拷贝到网卡的缓冲区里
传递一份数据,发生了4次拷贝,4次切换,优化方向:减少用户态与内核态的上下文切换和内存拷贝的次数
为什么有上下文切换?
用户空间权限不够,无法操作磁盘和网卡,需要内核去完成,进行系统调用,一次系统调用会发生2次上下文切换
「从内核的读缓冲区拷贝到用户的缓冲区里,再从用户的缓冲区里拷贝到 socket 的缓冲区里」,这个过程是没有必要的,因为文件传输的应用场景中,在用户空间并不会对数据「再加工」
-
mmap优化

用
mmap()替换read()系统调用函数,mmap()系统调用函数会直接把内核缓冲区里的数据「映射」到用户空间而不是拷贝到用户缓存区去,这样操作系统内核和用户空间就不需要进行任何数据的拷贝流程:
- DMA拷贝:应用进程调用了 mmap() 后,DMA 会把磁盘的数据拷贝到内核的缓冲区里。接着,应用进程跟操作系统内核**「共享」**这个缓冲区;
- CPU拷贝:应用进程再调用 write(),操作系统直接将内核缓冲区的数据拷贝到 socket 缓冲区中,这一切都发生在内核态,由 CPU 来搬运数据;
- DMA拷贝:把内核的 socket 缓冲区里的数据,拷贝到网卡的缓冲区里
3次拷贝
-
sendFile优化——零拷贝

Linux 内核版本 2.1 中,提供了一个专门发送文件的系统调用函数
sendfile(),可以替代前面的 read() 和 write() 这两个系统调用,这样就可以减少一次系统调用,也就减少了 2 次上下文切换的开销- DMA拷贝:通过 DMA 将磁盘上的数据拷贝到内核缓冲区里;
- SG-DMA拷贝:缓冲区描述符和数据长度传到 socket 缓冲区,这样网卡的 SG-DMA 控制器就可以直接将内核缓存中的数据拷贝到网卡的缓冲区里,此过程不需要将数据从操作系统内核缓冲区拷贝到 socket 缓冲区中,这样就减少了一次数据拷贝
SG-DMA:The Scatter-Gather Direct Memory Access,可减少通过 CPU 把内核缓冲区里的数据拷贝到 socket 缓冲区的过程
2次DMA拷贝,2次切换
总结:
| 拷贝 | 切换 | |
|---|---|---|
| 传统IO | 4次拷贝(2次DMA,2次CPU) | 4次切换 |
| mmap优化 | 3次拷贝(2次DMA,1次CPU) | 4次切换 |
| sendFile优化 | 2次拷贝(2次DMA) | 2次切换 |
NIO零拷贝案例
使用NIO 零拷贝方式传递(transferTo)一个大文件
NewIOServer
public class NewIOServer {
    public static void main(String[] args) throws Exception{
        InetSocketAddress address = new InetSocketAddress(7001);
        ServerSocketChannel serverSocketChannel = ServerSocketChannel.open();
        ServerSocket serverSocket = serverSocketChannel.socket();
        serverSocket.bind(address);

        // 创建buffer
        ByteBuffer byteBuffer = ByteBuffer.allocate(4096);
        while (true) {
            // 监听
            SocketChannel socketChannel = serverSocketChannel.accept();
            // 读取
            int readCount = 0;
            while (-1 != readCount) { // 未读完
                try {
                    readCount = socketChannel.read(byteBuffer);
                } catch (Exception e) {
//                    e.printStackTrace();
                    break;
                }
                // 倒带 position=0 mark作废
                byteBuffer.rewind();
            }
        }
    }
}
NewIOClient
public class NewIOClient {
    public static void main(String[] args) throws Exception{
        SocketChannel socketChannel = SocketChannel.open();
        socketChannel.connect(new InetSocketAddress("localhost", 7001));
        String filename = "protoc-3.6.1-win32";

        // 得到一个channel文件
        FileChannel fileChannel = new FileInputStream(filename).getChannel();
        // 准备发送
        long startTime = System.currentTimeMillis();
        // linux下一个transferTo可以完成传输
        // win下,依次调用transferTo只能发送8M,超过需要分段发送
        // transferTo底层使用了零拷贝
        long transferCount = fileChannel.transferTo(0, fileChannel.size(), socketChannel);
        System.out.println("发送的总字节数 = " + transferCount + " 耗时 = " + (System.currentTimeMillis() - startTime));
        // 关闭通道
        fileChannel.close();
    }
}
9、AIO
Asynchronous I/O,异步不阻塞IO,引入异步通道的概念,采用Proactor模式,先由操作系统完成后才通知服务端程序启动线程去处理,一般适用于连接数较多且连接时间较长的应用
IO编程有2种模式:Reactor、Proactor
NIO存在问题
- 类库和API复杂:Selector、ServerSocketChannel、 SocketChannel、ByteBuffer
- 涉及大量Java多线程编程知识
- 工作量和难度大:如客户端面临断连重连、网络闪断、半包读写、失 败缓存、网络拥塞和异常流的处理
- Bug:Epoll Bug,导致Selector空轮询
4 Netty
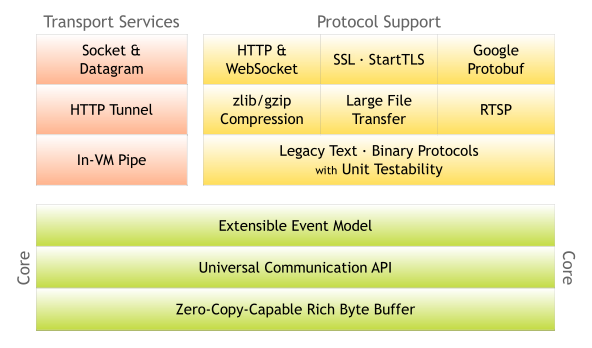
1、概述
介绍:异步的、基于事件驱动的网络应用程序框架,Elasticsearch 、Dubbo 框架内部都采用了 Netty
优点:
- 设计优雅:适用于各种传输类型的统一 API 阻塞和非阻塞 Socket;基于灵活且可扩展 的事件模型,可以清晰地分离关注点;高度可定制的线程模型 - 单线程,一个或多个 线程池
- 使用方便:详细记录的 Javadoc,用户指南和示例;没有其他依赖项
- 高性能、吞吐量更高:延迟更低;减少资源消耗;最小化不必要的内存复制
- 安全:完整的 SSL/TLS 和 StartTLS 支持
- 社区活跃、不断更新
2、高性能架构设计
线程模型
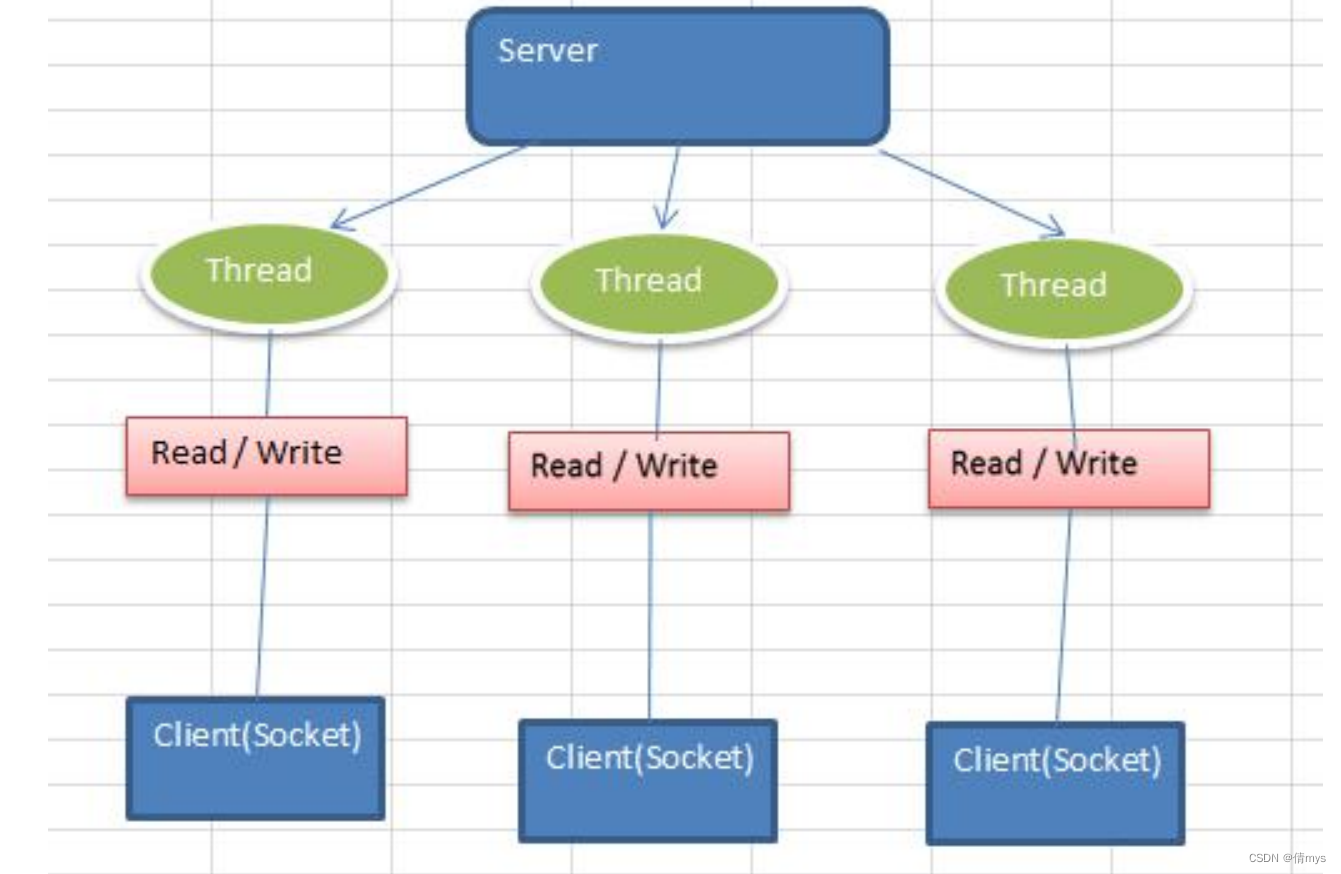
- 传统阻塞 I/O 服务模型
- Reactor 模式
- 单 Reactor 单线程
- 单 Reactor 多线程
- 主从 Reactor 多线程——改进->Netty
传统阻塞IO服务模型
黄色:对象,蓝色:线程,白色:API
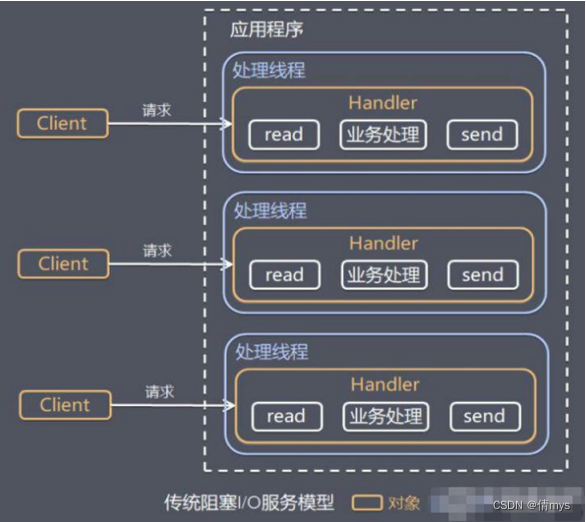
模型特点:
- 采用阻塞IO模型获取输入的数据
- 每个连接都需要独立的线程完成数据的输入,业务处理,数据返回
问题:
- 当并发数很大,就会创建大量的线程,占用很大系统资源
- 连接创建后,如果当前线程暂时没有数据可读,该线程会阻塞在read 操作,造成线程资源浪费
Reactor模式
-
基于 I/O 复用模型:多个连接共用一个阻塞对象,应用程序只需要在一个阻塞对象等待,无需阻塞等待所有连接。当某个连接有新的数据可以处理时,操作系统通知应用程序,线程从阻塞状态返回,开始进行业务处理
Reactor 对应的叫法: 1. 反应器模式 2. 分发者模式(Dispatcher) 3. 通知者模式(notifier)
-
基于线程池复用线程资源:不必再为每个连接创建线程,将连接完成后的业务处理任务分配给线程进行处理,一个线程可以处理多个连接的业务
Reactor模式基本设计思想:
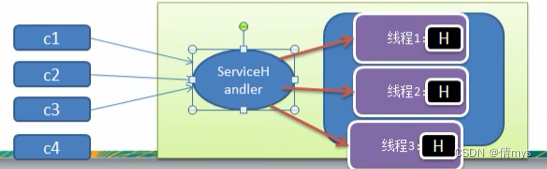
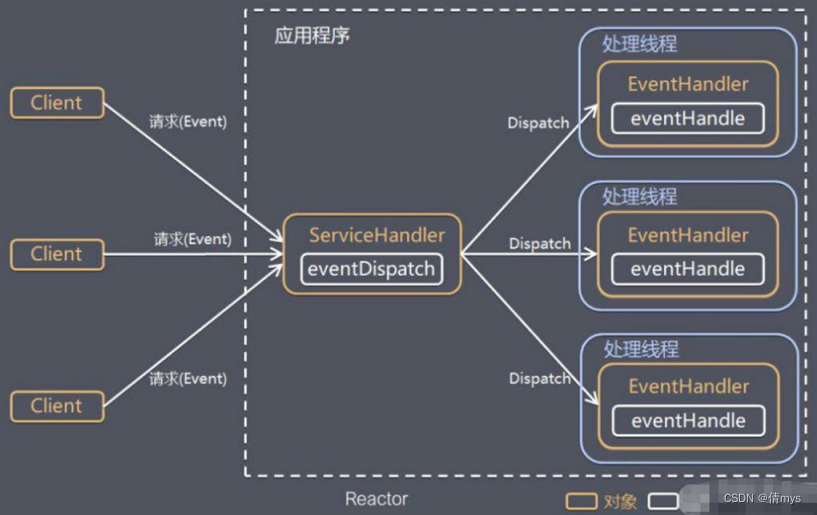
- Reactor 模式,通过一个或多个输入同时传递给服务处理器的模式 (基于事件驱动)
- 服务器端程序处理传入的多个请求, 并将它们同步分派到相应的处理线程, 因此Reactor模式也叫 Dispatcher模式
- Reactor 模式使用IO复用监听事件, 收到事件后,分发给某个线程(进程), 这就是网络服务器高并发处理关键
Reactor模式核心组成
- Reactor:在一个单独的线程中运行,负责监听和分发事件,分发给适当的处理程序来对 IO 事件做出反应
- Handlers:处理程序执行 I/O 事件要完成的实际事件
3种模式分类
根据 Reactor 的数量和处理资源池线程的数量不同,有 3 种典型的
- 单 Reactor 单线程
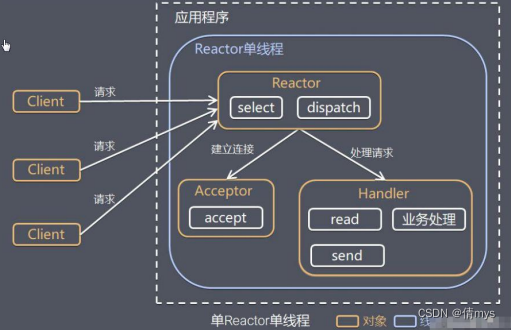
1)select可以实现应用程序通过一个阻塞对象监听多路连接请求
2)Reactor 对象通过 Select 监控客户端请求事件,收到事件后通过 Dispatch 进行分发
3)如果是建立连接请求事件,则由 Acceptor 通过 Accept 处理连接请求,然后创建一个 Handler 对象处理连接完成后的后续业务处理
4)如果不是建立连接事件,则 Reactor 会分发调用连接对应的 Handler 来响应
5)Handler 会完成 Read→业务处理→Send 的完整业务
优点:模型简单,没有多线程、进程通信、竞争的问题,全部都在一个线程中完成
缺点:性能问题,只有一个线程,无法完全发挥多核 CPU 的性能
使用场景:客户端的数量有限,业务处理非常快速,比如 Redis在业务处理的时间复杂度 O(1) 的情况
- 单 Reactor 多线程
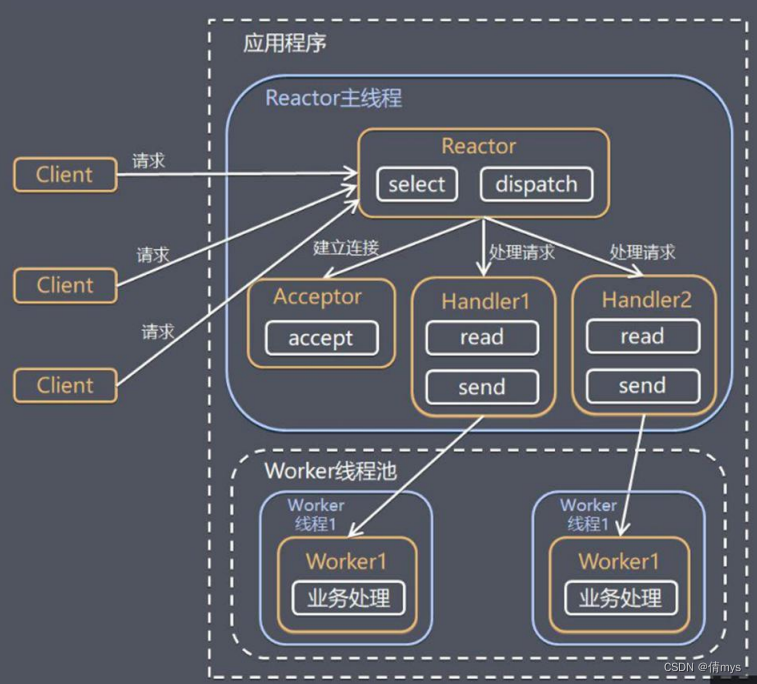
1)Reactor 对象通过select 监控客户端请求事件,收到事件后,通过dispatch进行分发
2)如果建立连接请求, 则Acceptor 通过 accept 处理连接请求, 然后创建一个Handler对象,处理完成连接后的事件
3)如果不是连接请求,则由reactor分发调用连接对应的handler 来处理
4)handler 只负责响应事件,不做具体的业务处理,通过read 读取数据后,会分发给后面的worker线程池的某个线程处理业务
5)worker 线程池会分配独立线程完成真正的业务,并将结果返回给handler
6)handler收到响应后,通过send 将结果返回给 client
优点:可以充分的利用多核cpu 的处理
缺点:多线程数据共享和访问比较复杂, reactor 处理所有事件的监听和响应,在单线程运行, 在高并发场景容易出现性能瓶颈
- 主从 Reactor 多线程
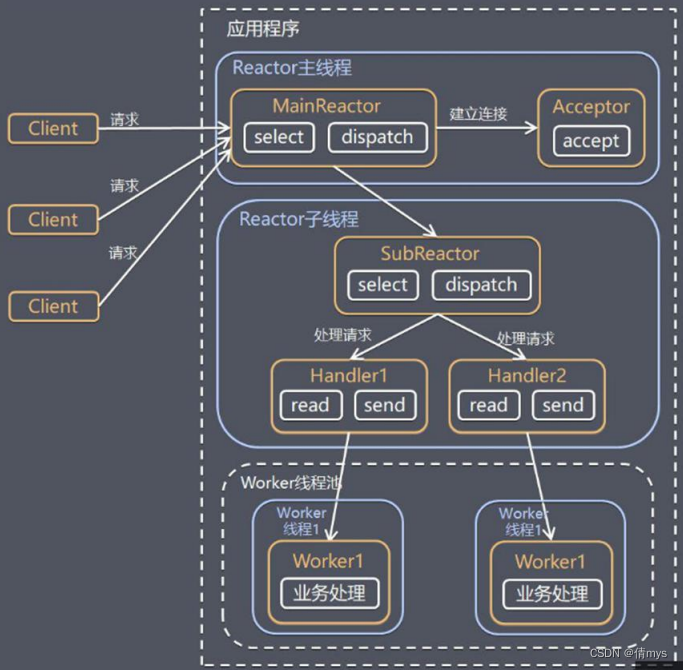
1)Reactor主线程 MainReactor 对象通过select 监听连接事件, 收到事件后,通过Acceptor 处理连接事件
2)当 Acceptor 处理连接事件后,MainReactor 将连接分配给 SubReactor
3)SubReactor 将连接加入到连接队列进行监听,并创建handler 进行事件处理
4)当有新事件发生时, SubReactor 就会调用对应的handler处理
5)handler 通过read 读取数据,分发给后面的worker 线程池处理
6)worker 线程池分配独立的worker 线程进行业务处理,并返回结果
7)handler收到响应的结果后,再通过send将结果返回给client
注意:Reactor主线程可以对应多个Reactor子线程,即MainReactor可以关联多个SubReactor
优点:父线程与子线程的数据交互简单职责明确,父线程只需要接收新连接,子线 程完成后续的业务处理;
Reactor 主线程只需要把新连接传给子线程,子线程无需返回数据
缺点:编程复杂度较高
Nginx、Memcached、Netty都使用了主从Reactor多线程
3、Netty模型
1.工作原理简单版
Netty 主要基于主从 Reactors 多线程模型的改进,其中主从 Reactor 多线程模型有多个 Reactor
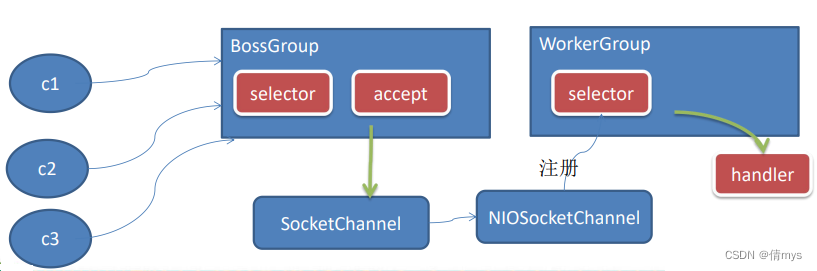
- BossGroup 线程维护Selector , 只关注Accecpt
- 当接收到Accept事件,获取到对应的 SocketChannel, 封装成 NIOScoketChannel并注册到 Worker 线程(事件循环), 并进行维护
- 当Worker线程监听到selector 中通道发生事件后,就进行处理(就由handler), 注意 handler 已经加入到通道
2.工作原理详细版
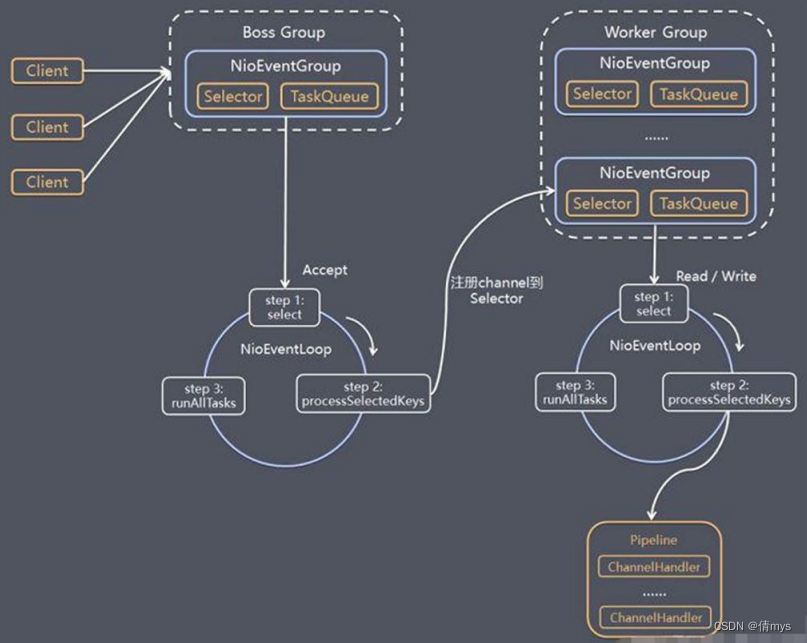
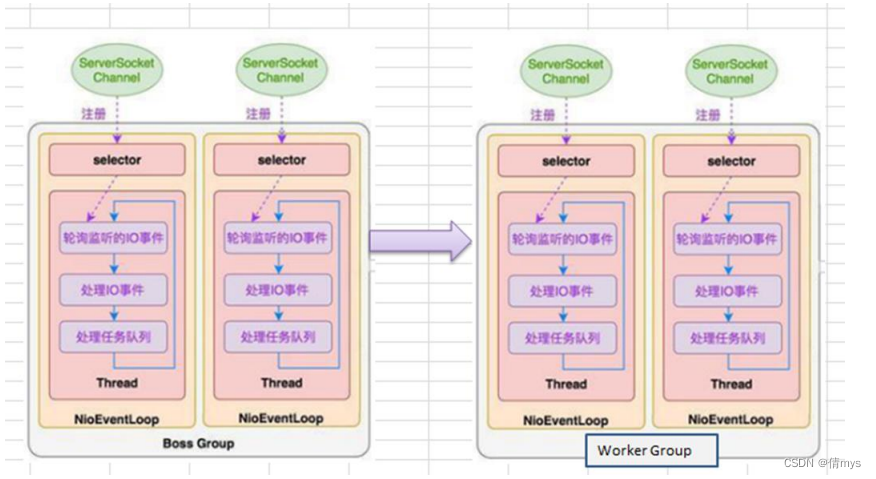
- Netty抽象出两组线程池:BossGroup 专门负责接收客户端的连接, WorkerGroup 专门负责网络的读写
-
BossGroup 和 WorkerGroup 类型都是 NioEventLoopGroup
-
NioEventLoopGroup 相当于一个事件循环组,这个组中含有多个事件循环 ,每一个事件循环是NioEventLoop
-
NioEventLoop 表示一个不断循环的执行处理任务的线程, 每个 NioEventLoop 都有一个selector , 用于监听绑定在其上的socket的网络通讯
-
NioEventLoopGroup 可以有多个线程, 即可以含有多个NioEventLoop
-
每个Boss NioEventLoop 循环执行的步骤有3步
-
轮询accept 事件
-
处理accept 事件 , 与client建立连接 , 生成NioScocketChannel , 并将其注册到某个worker NIOEventLoop 上的 selector
-
处理任务队列的任务 , 即 runAllTasks
-
-
每个 Worker NIOEventLoop 循环执行的步骤
- 轮询read, write 事件
- 处理i/o事件, 即read , write 事件,在对应NioScocketChannel 处理
- 处理任务队列的任务 , 即 runAllTasks
-
每个Worker NIOEventLoop 处理业务时,会使用pipeline(管道), pipeline中包含了channel,即通过pipeline可以获取对应的通道,通道中维护了很多的处理器
3.快速入门实例——TCP服务
- 实例要求:使用IDEA 创建Netty项目
- Netty 服务器在 6668 端口监听,客户端能发送消息给服务器 “hello, 服务器~”
- 服务器可以回复消息给客户端 “hello, 客户端~”
NettyServer
public class NettyServer {
    public static void main(String[] args) throws Exception{
        // 1.创建两个线程组BossGroup和WorkGroup
        // 2.BossGroup只处理连接请求,真正客户端业务处理由workGroup完成;两个都是无限循环
        // 3.bossGroup和workerGroup含有的子线程(NioEventLoop)个数默认是实际cpu核数*2
        NioEventLoopGroup bossGroup = new NioEventLoopGroup();
        NioEventLoopGroup workerGroup = new NioEventLoopGroup();

        try {
            // 创建服务器端启动对象,配置参数
            ServerBootstrap bootstrap = new ServerBootstrap();
            // 使用链式编程来设置参数
            bootstrap.group(bossGroup, workerGroup) // 设置两个线程组
                    .channel(NioServerSocketChannel.class) // 使用NIOSocketChannel作为服务器的通道实现
                    .option(ChannelOption.SO_BACKLOG, 128) // 设置线程队列,得到连接个数
                    .childOption(ChannelOption.SO_KEEPALIVE, true) // 设置保持活动连接状态
                	.handler(null) // 该handler对应的bossGroup,childHandler对应workerGroup
                    .childHandler(new ChannelInitializer<SocketChannel>() { // 创建一个通道初始化对象
                        // 给pipeline设置处理器
                        @Override
                        protected void initChannel(SocketChannel socketChannel) throws Exception {
                            socketChannel.pipeline().addLast(new NettyServerHandler());
                        }
                    }); // 给workGroup的EventLoop对应的管道设置处理器

            System.out.println("服务器准备好了....");
            // 启动服务器并绑定端口
            // 绑定一个端口并且同步,生成一个ChannelFuture对象
            ChannelFuture cf = bootstrap.bind(6668).sync();
            // 对关闭通道进行监听
            cf.channel().closeFuture().sync();
        }finally {
            // 关闭
            bossGroup.shutdownGracefully();
            workerGroup.shutdownGracefully();
        }
    }
}
NettyServerHandler
/**
 * 1.自定义一个handler需要继承netty规定好的某个HandlerAdapter
 * 2.需要自定义一个Handler
 */
public class NettyServerHandler extends ChannelInboundHandlerAdapter {
    /**
     * 读取实际数据(读取客户端发送的数据)
     * @param ctx 上下文对象,含有pipeline、channel、地址
     * @param msg 客户端发送的数据,默认是Object
     * @throws Exception
     */
    @Override
    public void channelRead(ChannelHandlerContext ctx, Object msg) throws Exception {
        System.out.println("server cts = " + ctx);
        // 将msg转成一个ByteBuf
        // ByteBuf是Netty提供的,不是NIO的ByteBuffer
        ByteBuf buf = (ByteBuf) msg;
        System.out.println("客户端发送的消息:" + buf.toString(CharsetUtil.UTF_8));
        System.out.println("客户端地址:" + ctx.channel().remoteAddress());
    }

    // 数据读取完毕
    @Override
    public void channelReadComplete(ChannelHandlerContext ctx) throws Exception {
        // write+flush,将数据写入缓存并刷新,一般需要对发送的数据进行编码
        ctx.writeAndFlush(Unpooled.copiedBuffer("hello, client", CharsetUtil.UTF_8));
    }

    // 处理异常,一般需要关闭通道
    @Override
    public void exceptionCaught(ChannelHandlerContext ctx, Throwable cause) throws Exception {
        ctx.close();
    }
}
NettyClient
public class NettyClient {
    public static void main(String[] args) throws Exception{
        // 客户端需要一个事件循环组
        NioEventLoopGroup group = new NioEventLoopGroup();
        try {
            // 创建客户端启动对象
            Bootstrap bootstrap = new Bootstrap();
            // 设置相关参数
            bootstrap.group(group) // 设置线程组
                    .channel(NioSocketChannel.class) // 设置客户端通道的实现类(反射)
                    .handler(new ChannelInitializer<SocketChannel>() {
                        @Override
                        protected void initChannel(SocketChannel socketChannel) throws Exception {
                            socketChannel.pipeline().addLast(new NettyClientHandler()); // 加入自己的处理器
                        }
                    });
            System.out.println("客户端 is ok");
            // 启动客户端,去连接服务器端
            ChannelFuture channelFuture = bootstrap.connect("127.0.0.1", 8889).sync();
            // 给关闭通道进行监听
            channelFuture.channel().closeFuture().sync();
        }finally {
            group.shutdownGracefully();
        }
    }
}
NettyClientHandler
public class NettyClientHandler extends ChannelInboundHandlerAdapter {
    // 通道就绪会触发该方法
    @Override
    public void channelActive(ChannelHandlerContext ctx) throws Exception {
        System.out.println("client ctx = " + ctx);
        ctx.writeAndFlush(Unpooled.copiedBuffer("hello server", CharsetUtil.UTF_8));
    }

    // 当通道有读取事件时触发
    @Override
    public void channelRead(ChannelHandlerContext ctx, Object msg) throws Exception {
        ByteBuf buf = (ByteBuf) msg;
        System.out.println("服务器回复的消息:" + buf.toString(CharsetUtil.UTF_8));
        System.out.println("服务器地址:" + ctx.channel().remoteAddress());
    }

    // 处理异常
    @Override
    public void exceptionCaught(ChannelHandlerContext ctx, Throwable cause) throws Exception {
        cause.printStackTrace();
        ctx.close();
    }
}
4.任务队列中的 Task 有 3 种典型使用场景
-
用户程序自定义的普通任务
-
用户自定义定时任务
-
非当前 Reactor 线程调用 Channel 的各种方法
例如在推送系统的业务线程里面,根据用户的标识,找到对应的 Channel 引用,然后 调用 Write 类方法向该用户推送消息,就会进入到这种场景,最终的 Write 会提交到任务队列中后被异步消费
public void channelRead(ChannelHandlerContext ctx, Object msg) throws Exception {
        // 如果此处有一个非常耗时的业务 -> 异步执行 -> 提交该channel到对应的NIOEventLoop的taskQueue中
//        Thread.sleep(10 * 1000);
//        ctx.writeAndFlush(Unpooled.copiedBuffer("server端执行完耗时业务", CharsetUtil.UTF_8));
//        System.out.println("go on ...");

        // 解决方法1:用户程序自定义的普通任务
        ctx.channel().eventLoop().execute(new Runnable() {
            @Override
            public void run() {
                try {
                    Thread.sleep(10 * 1000);
                    ctx.writeAndFlush(Unpooled.copiedBuffer("1.普通任务:server端执行完耗时业务", CharsetUtil.UTF_8));
                }catch (Exception e) {
                    System.out.println("发送异常:" + e.getMessage());
                }
            }
        });

        // 解决方法2:用户自定义定时任务 -> 该任务提交到scheduleTaskQueue中
        ctx.channel().eventLoop().schedule(new Runnable() {
            @Override
            public void run() {
                try {
                    Thread.sleep(5 * 1000);
                    ctx.writeAndFlush(Unpooled.copiedBuffer("2.定时任务:server端执行完耗时业务", CharsetUtil.UTF_8));
                }catch (Exception e) {
                    System.out.println("发送异常:" + e.getMessage());
                }
            }
        }, 5, TimeUnit.SECONDS);
    }
5.Netty模型说明
- Netty 抽象出两组线程池,BossGroup 专门负责接收客户端连接,WorkerGroup 专门负 责网络读写操作
- NioEventLoop 表示一个不断循环执行处理任务的线程,每个 NioEventLoop 都有一个 selector,用于监听绑定在其上的 socket 网络通道
- NioEventLoop 内部采用串行化设计,从消息的读取->解码->处理->编码->发送,始终由 IO 线程NioEventLoop 负责
- NioEventLoopGroup 下包含多个 NioEventLoop
- 每个 NioEventLoop 中包含有一个 Selector,一个 taskQueue
- 每个 NioEventLoop 的 Selector 上可以注册监听多个 NioChannel
- 每个 NioChannel 只会绑定在唯一的 NioEventLoop 上
- 每个 NioChannel 都绑定有一个自己的 ChannelPipeline
4、异步模型
1.基本介绍
- 当一个异步过程调用发出后,调用者不能立刻得到结果。实际处理这个调用的组件在完成后,通过状态、通知和回调来通知调用者
- Netty 中的 I/O 操作是异步的,包括 Bind、Write、Connect 等操作会简单的返回一个 ChannelFuture
- 调用者并不能立刻获得结果,而是通过 Future-Listener 机制,用户可以方便的主动获取或者通过通知机制获得 IO 操作结果
- Netty 的异步模型是建立在 future 和 callback 的之上的
- callback :回调
- Future的核心思想是:假设一个方法 fun,计算过程可能非常耗时,那么可以在调用 fun 的时候,立马返回一个 Future,后续可以通过 Future去监控方法 fun 的处理过程 (即 : Future-Listener 机制)
2.Future说明
- 表示异步的执行结果, 可以通过它提供的方法来检测执行是否完成,比如检索计算等
- ChannelFuture 是一个接口 :
public interface ChannelFuture extends Future,可以添加监听器,当监听的事件发生时,就会通知到监听器
3.工作原理图
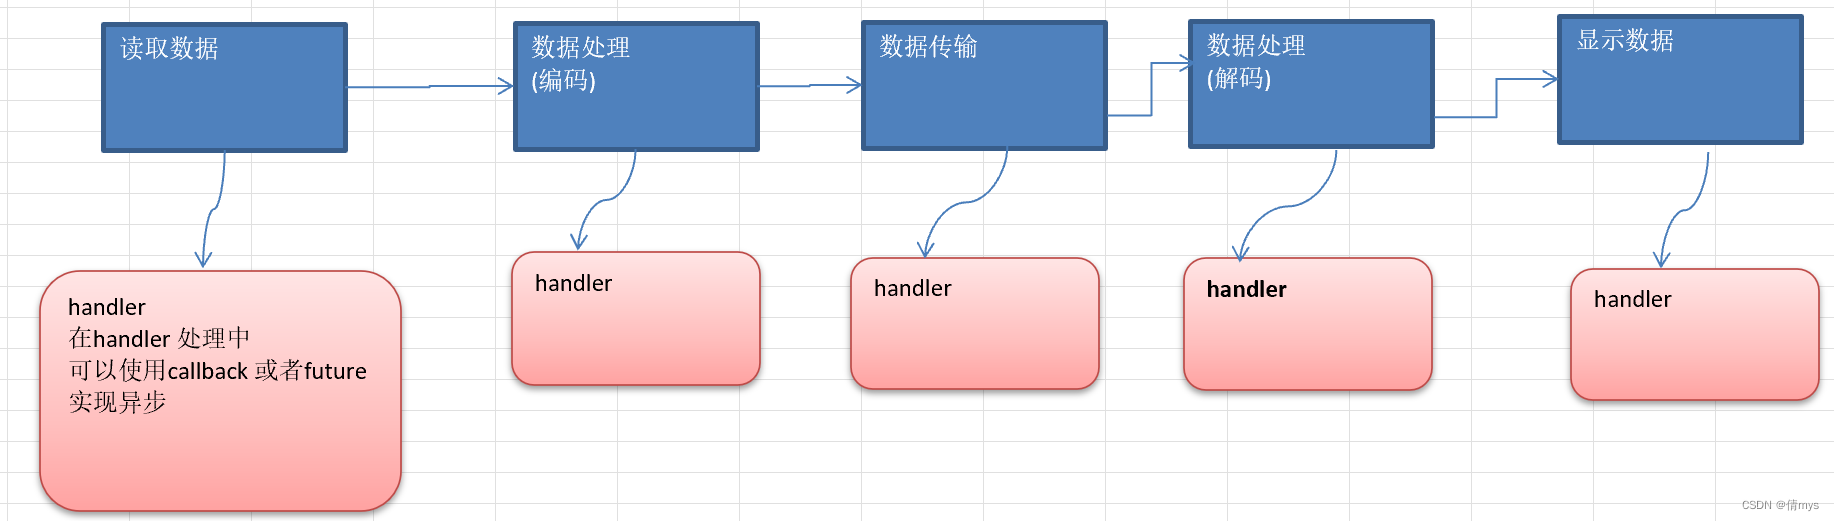
- 在使用 Netty 进行编程时,拦截操作和转换出入站数据只需要提供 callback 或利用 future 即可。这使得链式操作简单、高效, 并有利于编写可重用的、通用的代码
- Netty 框架的目标:让业务逻辑从网络基础应用编码中分离出来
4.Future-Listener 机制
当 Future 对象刚刚创建时,处于非完成状态,调用者可以通过返回的 ChannelFuture 来获取操作执行的状态,
注册监听函数来执行完成后的操作,常见有如下操作:
- isDone :判断当前操作是否完成
- isSuccess:判断已完成的当前操作是否成功
- getCause :获取已完成的当前操作失败的原因
- isCancelled :判断已完成的当前操作是否被取消
- addListener :来注册监听器,当操作已完成(isDone 方法返回完成),将会通知 指定的监听器;如果 Future 对象已完成,则通知指定的监听器
演示:绑定端口是异步操作,当绑定操作处理完,将会调用相应的监听器处理逻辑
// 给cf注册监听器
cf.addListener(new ChannelFutureListener() {
    @Override
    public void operationComplete(ChannelFuture channelFuture) throws Exception {
        if (cf.isSuccess()) {
            System.out.println("监听端口成功");
        } else {
            System.out.println("监听端口失败");
        }
    }
});
异步处理不会造成线程阻塞,线程在 I/O 操作期间可以执行别的程序,在高并发情形下会更稳定和更高的吞吐量
5.快速入门实例——HTTP服务]
- Netty 服务器在8889 端口监听,浏览器发出请求
http://localhost:8889/ - 服务器可以回复消息给客户端 "Hello! 我是服务器 " , 并 对特定请求资源进行过滤.
TestServer
public class TestServer {
    public static void main(String[] args) throws Exception{
        // 创建两个线程组
        NioEventLoopGroup bossGroup = new NioEventLoopGroup(1);
        NioEventLoopGroup workerGroup = new NioEventLoopGroup();
        try {
            // 创建服务器启动对象
            ServerBootstrap serverBootstrap = new ServerBootstrap();
            // 配置参数
            serverBootstrap.group(bossGroup, workerGroup).channel(NioServerSocketChannel.class).childHandler(new TestServerInitializer());
            // 绑定端口
            ChannelFuture channelFuture = serverBootstrap.bind(8889).sync();
            // 监听关闭通道
            channelFuture.channel().closeFuture().sync();
        } finally {
            bossGroup.shutdownGracefully();
            workerGroup.shutdownGracefully();
        }
    }
}
TestServerInitializer
public class TestServerInitializer extends ChannelInitializer<SocketChannel> {
@Override
protected void initChannel(SocketChannel socketChannel) throws Exception {
// 向管道加入处理器
// 得到管道
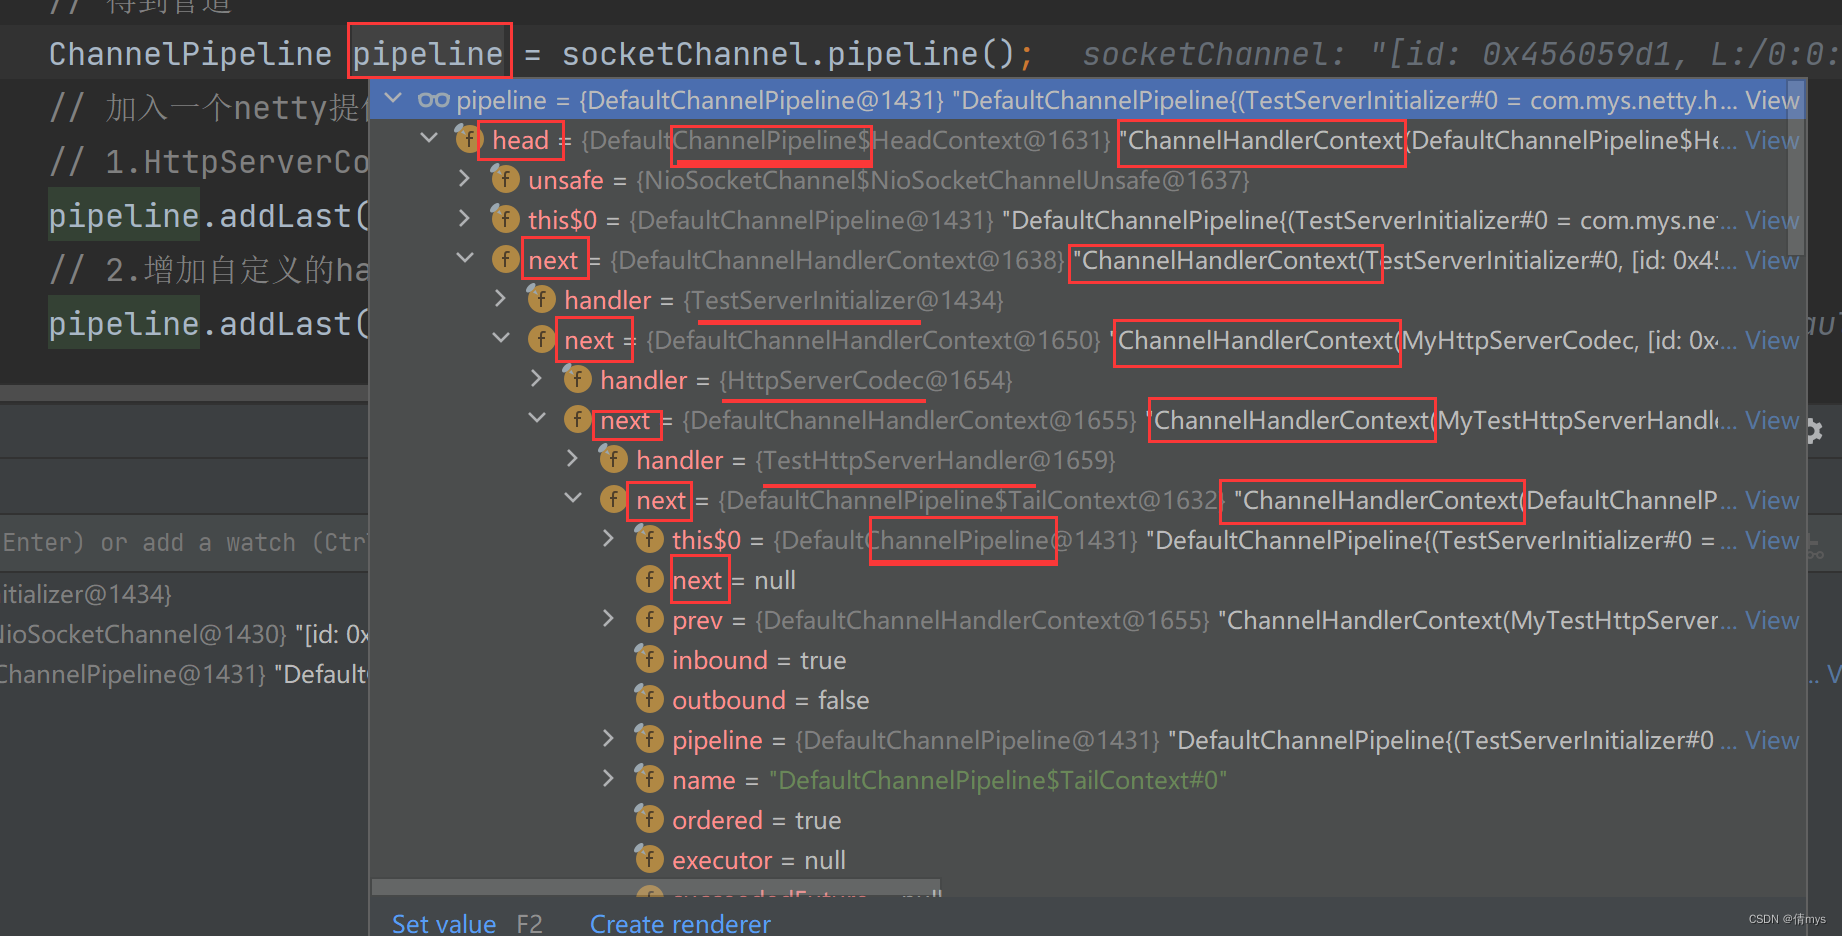
ChannelPipeline pipeline = socketChannel.pipeline();
// 加入一个netty提供的httpServerCodec [codec:coder-decoder]
// 1.HttpServerCodec:netty提供的处理http的编-解码器
pipeline.addLast("MyHttpServerCodec", new HttpServerCodec());
// 2.增加自定义的handler
pipeline.addLast("MyTestHttpServerHandler", new TestHttpServerHandler());
}
}
TestHttpServerHandler
/**
 * 1.SimpleChannelInboundHandler是ChannelInboundHandlerAdapter的子类
 * 2.HttpObject表示客户端和服务器端相互通信的数据被封装成HttpObject
 */
public class TestHttpServerHandler extends SimpleChannelInboundHandler<HttpObject> {
    // 当有读取事件时触发
    @Override
    protected void channelRead0(ChannelHandlerContext ctx, HttpObject msg) throws Exception {
        // 判断msg是否是httpRequest请求
        if (msg instanceof HttpRequest) {
            System.out.println("msg类型:" + msg.getClass());
            System.out.println("客户端地址:" + ctx.channel().remoteAddress());

            // 过滤特定资源
            HttpRequest httpRequest = (HttpRequest) msg;
            URI uri = new URI(httpRequest.uri());
            if ("/favicon.ico".equals(uri.getPath())) {
                System.out.println("请求favicon.ico 不作响应");
                return;
            }

            // 回复信息给客户端[http协议]
            ByteBuf content = Unpooled.copiedBuffer("hello 我是服务器", CharsetUtil.UTF_8);
            // 构造一个http响应 httpResponse
            FullHttpResponse response = new DefaultFullHttpResponse(HttpVersion.HTTP_1_1, HttpResponseStatus.OK, content);
            // 设置信息
            response.headers().set(HttpHeaderNames.CONTENT_TYPE, "text/plain;charset=UTF-8");
            response.headers().set(HttpHeaderNames.CONTENT_LENGTH, content.readableBytes());
            // 返回response
            ctx.writeAndFlush(response);
        }
    }
}
5、核心模块
1.Bootstrap、ServerBootstrap
一个 Netty 应用通常由一个 Bootstrap 开始,主要作用是配置整个 Netty 程序,串联各个组件,Netty 中Bootstrap 类是客户端程序的启动引导类, ServerBootstrap 是服务端启动引导类
public ServerBootstrap group(EventLoopGroup parentGroup, EventLoopGroup childGroup): 用于服务器端,设置两个 EventLooppublic B group(EventLoopGroup group):用于客户端,设置一个 EventLooppublic B channel(Class channelClass):设置一个服务器端的通道实现public B option(ChannelOption option, T value):给 ServerChannel 添加配置public ServerBootstrap childOption(ChannelOption childOption, T value):给接收到的 通道添加配置public ServerBootstrap childHandler(ChannelHandler childHandler):设置业务处理类 (自定义的 handler)public ChannelFuture bind(int inetPort):用于服务器端,设置占用的端口号public ChannelFuture connect(String inetHost, int inetPort):用于客户端,连接服务器
2.Future、ChannelFuture
Netty 中所有的 IO 操作都是异步的,不能立刻得知消息是否被正确处理。但是可以过一会等它执行完成或者直接注册一个监听,具体的实现就是通过 Future 和 ChannelFutures注册一个监听,当操作执行成功或失败时监听会自动触发注册的监听事件
- Channel channel():返回当前正在进行 IO 操作的通道
- ChannelFuture sync():等待异步操作执行完毕
3.Channel
-
Netty 网络通信的组件,能够用于执行网络 I/O 操作
-
通过Channel 可获得当前网络连接的通道的状态
-
通过Channel 可获得 网络连接的配置参数 (例如接收缓冲区大小)
-
Channel 提供异步的网络 I/O 操作(如建立连接,读写,绑定端口),异步调用意味着任何 I/O 调用都将立即返回,并且不保证在调用结束时所请求的 I/O 操作已完成
-
调用立即返回一个 ChannelFuture 实例,通过注册监听器到 ChannelFuture 上,可以 I/O 操作成功、失败或取消时回调通知调用方
-
支持关联 I/O 操作与对应的处理程序
-
不同协议、不同的阻塞类型的连接都有不同的 Channel 类型与之对应,常用的 Channel 类型:
-
NioSocketChannel,异步的客户端 TCP Socket 连接
-
NioServerSocketChannel,异步的服务器端 TCP Socket 连接
-
NioDatagramChannel,异步的 UDP 连接
-
NioSctpChannel,异步的客户端 Sctp 连接
-
NioSctpServerChannel,异步的 Sctp 服务器端连接
这些通道涵盖了 UDP 和 TCP 网络 IO 以及文件 IO
-
4.Selector
- Netty 基于 Selector 对象实现 I/O 多路复用,通过 Selector 一个线程可以监听多个连 接的 Channel 事件
- 当向一个 Selector 中注册 Channel 后,Selector 内部的机制就可以自动不断地查询 (Select) 这些注册的 Channel 是否有已就绪的 I/O 事件(例如可读,可写,网络连接 完成等),这样程序就可以很简单地使用一个线程高效地管理多个 Channel
5.ChannelHandler 及其实现类
-
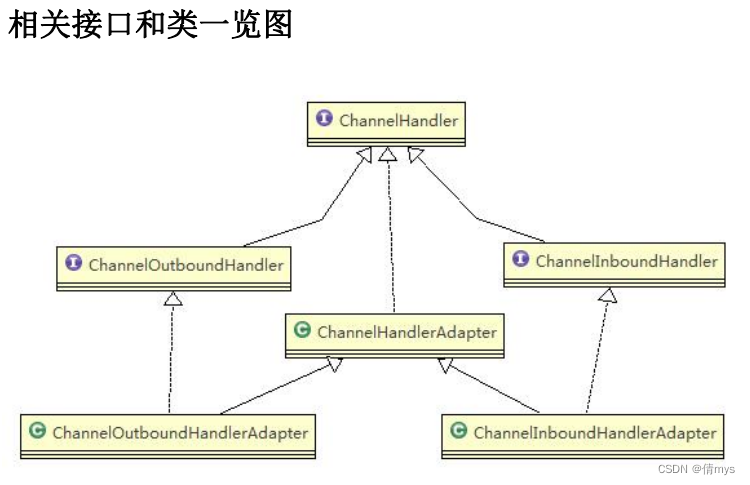
ChannelHandler 是一个接口,处理 I/O 事件或拦截 I/O 操作,并将其转发到其 ChannelPipeline(业务处理链)中的下一个处理程序
-
ChannelHandler 本身并没有提供很多方法,因为这个接口有许多的方法需要实现,方便使用期间,可以继承它的子类
-
ChannelInboundHandler 用于处理入站 I/O 事件,入站:从管道读
-
ChannelOutboundHandler 用于处理出站 I/O 操作,出站:写入管道
-
ChannelInboundHandlerAdapter 用于处理入站 I/O 事件
-
ChannelOutboundHandlerAdapter 用于处理出站 I/O 操作
-
ChannelDuplexHandler 用于处理 入站和出站事件
-
通常自定义一 个 Handler 类去继承 ChannelInboundHandlerA dapter,通过重写相应方法实现业务逻辑
public class Test extends ChannelHandlerAdapter implements ChannelInboundHandler {
    public void channelRegistered(ChannelHandlerContext channelHandlerContext) throws Exception {}
    public void channelUnregistered(ChannelHandlerContext channelHandlerContext) throws Exception {}
    // 通知就绪事件
    public void channelActive(ChannelHandlerContext channelHandlerContext) throws Exception {}
    public void channelInactive(ChannelHandlerContext channelHandlerContext) throws Exception {}
    // 读取数据事件
    public void channelRead(ChannelHandlerContext channelHandlerContext, Object o) throws Exception {}
    // 数据读取完毕
    public void channelReadComplete(ChannelHandlerContext channelHandlerContext) throws Exception {}
    public void userEventTriggered(ChannelHandlerContext channelHandlerContext, Object o) throws Exception {}
    public void channelWritabilityChanged(ChannelHandlerContext channelHandlerContext) throws Exception {}
    public void handlerAdded(ChannelHandlerContext ctx) throws Exception {}
    public void handlerRemoved(ChannelHandlerContext ctx) throws Exception {}
    // 通道发生异常事件
    public void exceptionCaught(ChannelHandlerContext ctx, Throwable cause) throws Exception {}
}
6.Pipeline和ChannelPipeline
-
ChannelPipeline 是一个 Handler 的集合,负责处理和拦截 inbound 或者 outbound 的事件和操作,相当于一个贯穿 Netty 的链。(也可以这样理解: ChannelPipeline 是 保存 ChannelHandler 的 List,用于处理或拦截 Channel 的入站 事件和出站操作)
-
ChannelPipeline 实现了一种高级形式的拦截过滤器模式,使用户可以完全控制事件的处理方式,以及 Channel 中各个 ChannelHandler 如何相互交互
-
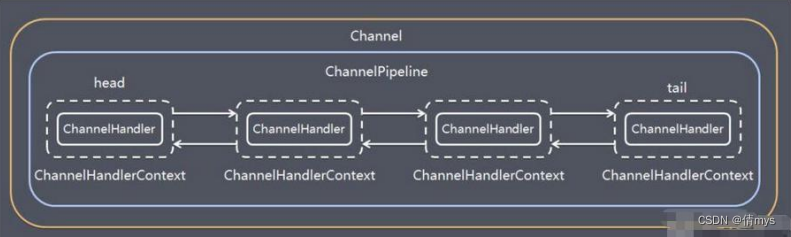
在 Netty 中每个 Channel 都有且仅有一个 ChannelPipeline 与之对应,它们的组成关系如下
-
一个 Channel 包含了一个 ChannelPipeline,而 ChannelPipeline 中又维护了一个由 ChannelHandlerContext 组成的双向链表,并且每个 ChannelHandlerContext 中又关联着一个 ChannelHandler
-
入站事件和出站事件在一个双向链表中,入站事件会从链表 head 往后传递到最后一个入站的 handler, 出站事件会从链表 tail 往前传递到最前一个出站的 handler,两种类型的 handler 互不干扰
-
-
常用方法:
- ChannelPipeline addFirst(ChannelHandler… handlers),把一个业务处理类(handler) 添加到链中的第一个位置
- ChannelPipeline addLast(ChannelHandler… handlers),把一个业务处理类(handler) 添加到链中的最后一个位置
7.ChannelHandlerContext
保存 Channel 相关的所有上下文信息,同时关联一个 ChannelHandler 对象
即ChannelHandlerContext 中 包 含 一 个 具体的事件处理器 ChannelHandler , 同时ChannelHandlerContext 中也绑定了对应的 pipeline 和 Channel 的信息,方便 对 ChannelHandler进行调用
- ChannelFuture close(),关闭通道
- ChannelOutboundInvoker flush(),刷新
- ChannelFuture writeAndFlush(Object msg) ,将数据写到 ChannelPipeline 中当前ChannelHandler 的下一个 ChannelHandler 开始处理(出站)
8.ChannelOption
Netty 在创建 Channel 实例后,一般都需要设置 ChannelOption 参数
ChannelOption.SO_BACKLOG对应 TCP/IP 协议 listen 函数中的 backlog 参数,用来初始化服务器可连接队列大小。服务端处理客户端连接请求是顺序处理的,所以同一时间只能处理一个客户端连接。多个客户端来的时候,服务端将不能处理的客户端连接请求放在队列中等待处理,backlog 参数指定 了队列的大小ChannelOption.SO_KEEPALIVE一直保持连接活动状态
9.EventLoopGroup 和其实现类 NioEventLoopGroup
- EventLoopGroup 是一组 EventLoop 的抽象,Netty 为了更好的利用多核 CPU 资源, 一般会有多个 EventLoop 同时工作,每个 EventLoop 维护着一个 Selector 实例
- EventLoopGroup 提供 next 接口,可以从组里面按照一定规则获取其中一个 EventLoop来处理任务。在 Netty 服务器端编程中,我们一般都需要提供两个 EventLoopGroup,例如:BossEventLoopGroup 和 WorkerEventLoopGroup
- 通常一个服务端口即一个 ServerSocketChannel对应一个Selector 和一个EventLoop 线程,BossEventLoop 负责接收客户端的连接并将 SocketChannel 交给 WorkerEventLoopGroup 来进行 IO 处理
- 常用方法
- public NioEventLoopGroup(),构造方法
- public Future shutdownGracefully(),断开连接,关闭线程
10.Unpooled 类
一个专门用来操作缓冲区(即Netty的数据容器)的工具类
- public static ByteBuf copiedBuffer(CharSequence string, Charset charset):通过给定的数据和字符编码返回一个 ByteBuf 对象
public class NettyByteBuf01 {
    public static void main(String[] args) {
        // 创建一个ByteBuf
        // 1.创建对象,该对象包含一个数组byte[10]
        // 2.在netty的buffer中,不需要使用flip进行反转,底层维护了一个readIndex writeIndex和capacity,将buffer分成三个阶段
        // 0——readIndex          已经读取的区域
        // readIndex——writeIndex 可读区域
        // writeIndex——capacity  可写区域
        ByteBuf buffer = Unpooled.buffer(10);
        for (int i = 0; i < 10; i++) {
            buffer.writeByte(i);
        }
        System.out.println("capacity:" + buffer.capacity());
        for (int i = 0; i < buffer.capacity(); i ++) {
//            System.out.println(buffer.getByte(i));
            System.out.println(buffer.readByte());
        }
    }
}
6、实例:群聊系统
目标:实现服务器端和客户端之间的数据简单通讯(非阻塞),多人群聊
服务器端:可以监测用户上线,离线,并实现消息转发功能
客户端:通过channel 可以无阻塞发送消息给其它所有用户,同时可以接受其它用 户发送的消息(有服务器转发得到)
GroupChatSever、GroupChatServerHandler、GroupChatClient、GroupChatClientHandler
GroupChatServer
public class GroupChatServer {
    private int port; // 监听端口
    public GroupChatServer(int port) {
        this.port = port;
    }

    // run:处理客户端请求
    public void run() throws Exception{
        NioEventLoopGroup bossGroup = new NioEventLoopGroup(1);
        NioEventLoopGroup workerGroup = new NioEventLoopGroup(); // 8个NioEventLoop
        try {
            ServerBootstrap b = new ServerBootstrap();
            b.group(bossGroup, workerGroup)
                    .channel(NioServerSocketChannel.class)
                    .option(ChannelOption.SO_BACKLOG, 128)
                    .childOption(ChannelOption.SO_KEEPALIVE, true)
                    .childHandler(new ChannelInitializer<SocketChannel>() {
                        @Override
                        protected void initChannel(SocketChannel socketChannel) throws Exception {
                            // 获取pipeLine
                            ChannelPipeline pipeline = socketChannel.pipeline();
                            // 向pipeLine里面加入解码器
                            pipeline.addLast("decoder", new StringDecoder());
                            // 向pipeLine里面加入编码器
                            pipeline.addLast("encoder", new StringEncoder());
                            // 加入自己的业务处理handler
                            pipeline.addLast(new GroupChatServerHandler());
                        }
                    });
            System.out.println("netty server start");
            ChannelFuture channelFuture = b.bind(port).sync();
            // 监听关闭
            channelFuture.channel().closeFuture().sync();
        }finally {
            bossGroup.shutdownGracefully();
            workerGroup.shutdownGracefully();
        }
    }

    public static void main(String[] args) throws Exception{
        // 启动
        new GroupChatServer(7000).run();
    }
}
GroupChatServerHandler
public class GroupChatServerHandler extends SimpleChannelInboundHandler<String> {
// 使用一个hashmap管理
// public static Map<String, Channel> channels = new HashMap<>();
// 定义一个Channel组,管理所有的Channel
// GlobalEventExecutor.INSTANCE:全局的事件执行器,是一个单例
private static ChannelGroup channelGroup = new DefaultChannelGroup(GlobalEventExecutor.INSTANCE);
SimpleDateFormat sdf = new SimpleDateFormat("yyyy-MM-dd HH:mm:ss");
// 表示建立连接,一旦连接,第一个被执行
// 将当前channel加入到channelGroup
@Override
public void handlerAdded(ChannelHandlerContext ctx) throws Exception {
Channel channel = ctx.channel();
// 将该客户加入聊天的信息推送给其他在线的客户端
// 该方法会将channelGroup中的所有channel遍历并发送消息,不需要自己遍历
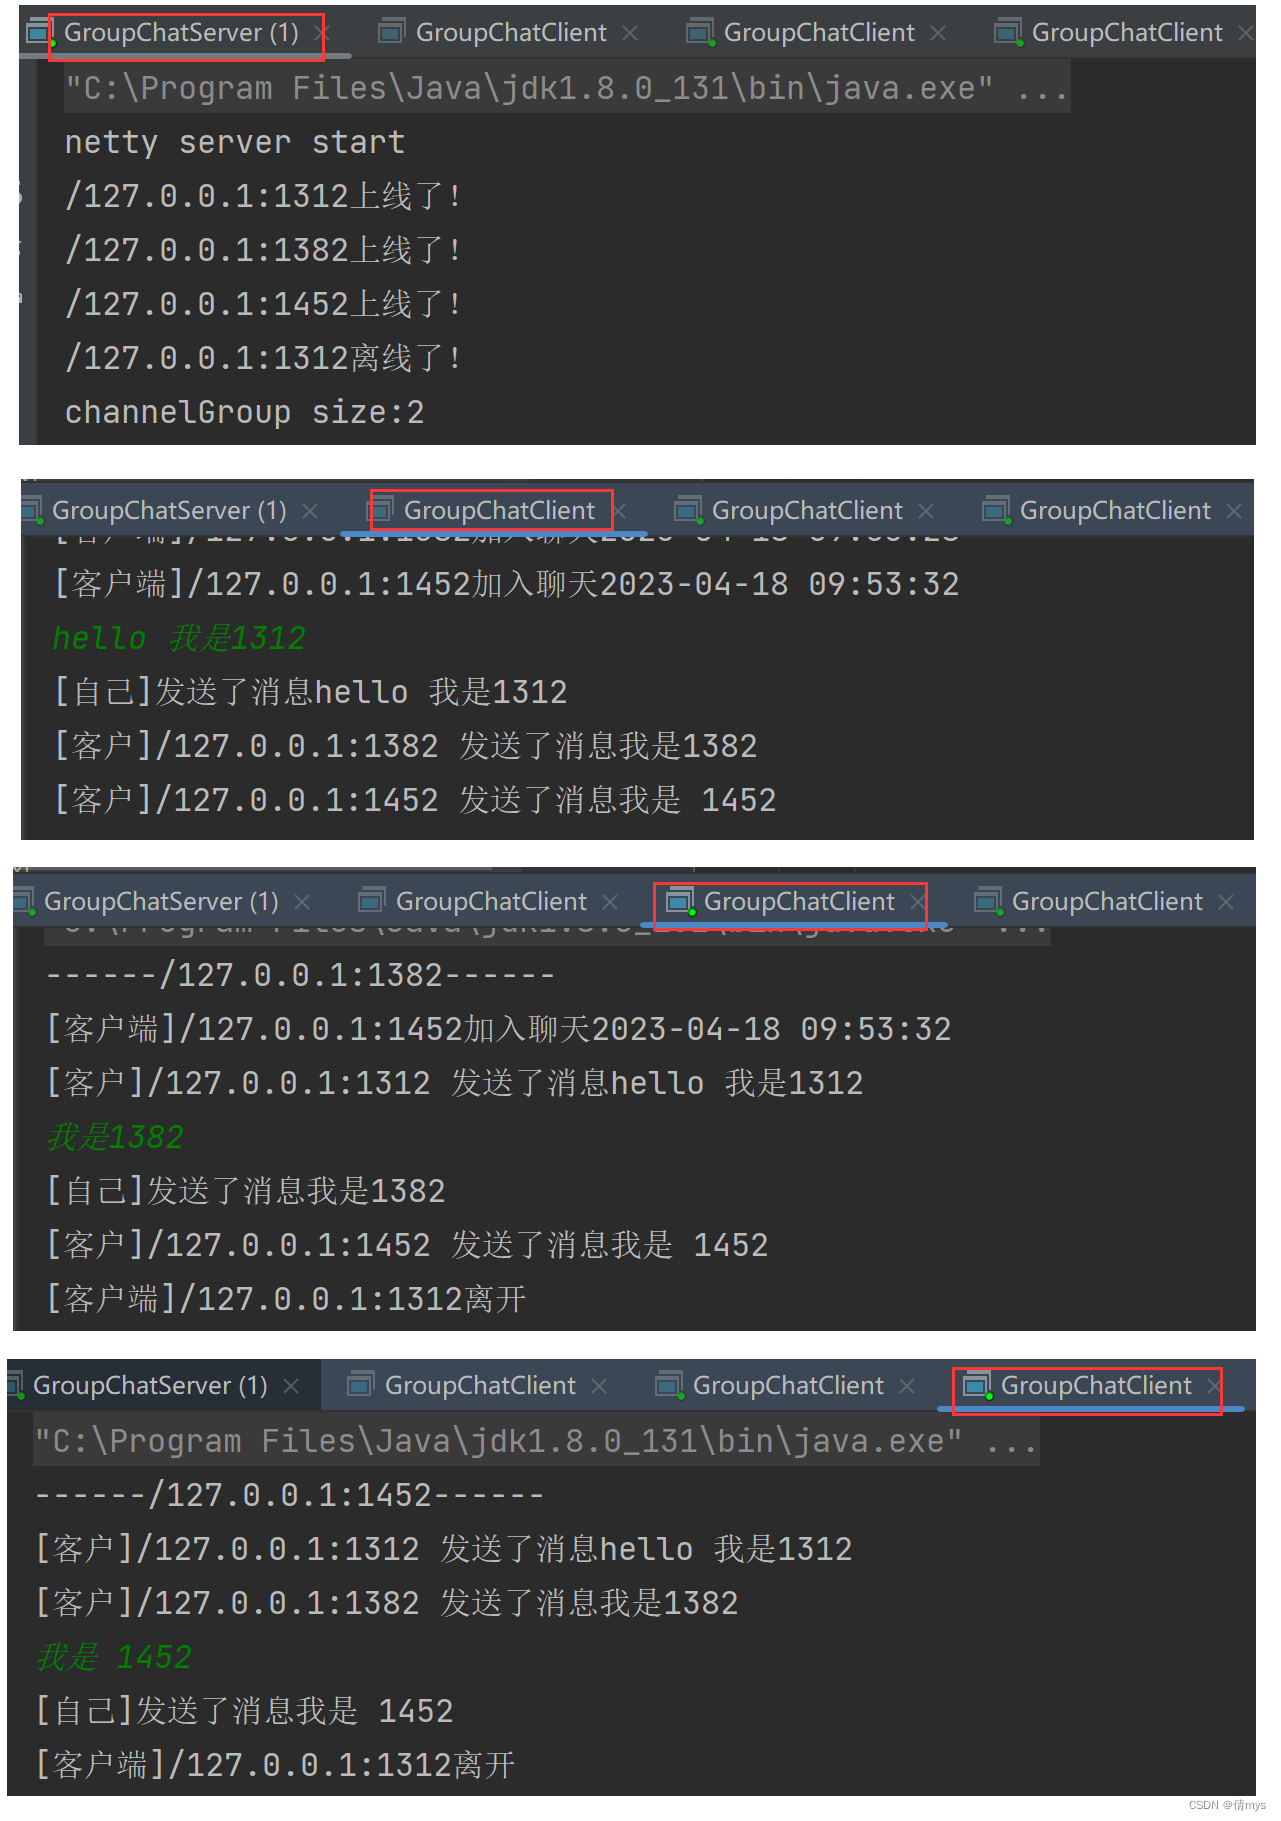
channelGroup.writeAndFlush("[客户端]" + channel.remoteAddress() + "加入聊天" + sdf.format(new Date()) + "\n");
channelGroup.add(channel);
}
// 断开连接,将xx客户离开信息推送到当前在线客户
@Override
public void handlerRemoved(ChannelHandlerContext ctx) throws Exception {
Channel channel = ctx.channel();
channelGroup.writeAndFlush("[客户端]" + channel.remoteAddress() + "离开\n");
System.out.println("channelGroup size:" + channelGroup.size());
}
// 表示channel处于活动状态,提示xxx上线
@Override
public void channelActive(ChannelHandlerContext ctx) throws Exception {
System.out.println(ctx.channel().remoteAddress() + "上线了!");
}
// 表示channel处于非活动状态,提示xxx离线
@Override
public void channelInactive(ChannelHandlerContext ctx) throws Exception {
System.out.println(ctx.channel().remoteAddress() + "离线了!");
}
// 读取数据
@Override
protected void channelRead0(ChannelHandlerContext ctx, String msg) throws Exception {
// 获取当前channel
Channel channel = ctx.channel();
// 遍历channelGroup,根据不同的情况,发送不同的消息
channelGroup.forEach(ch -> {
if (channel != ch) { // 不是当前channel,穿发消息
ch.writeAndFlush("[客户]" + channel.remoteAddress() + " 发送了消息" + msg + "\n");
} else {
// 是自己
ch.writeAndFlush("[自己]发送了消息" + msg + "\n");
}
});
}
@Override
public void exceptionCaught(ChannelHandlerContext ctx, Throwable cause) throws Exception {
// 关闭通道
ctx.close();
}
}
GroupChatClient
public class GroupChatClient {
    // 属性定义
    private final String host;
    private final int port;
    public GroupChatClient(String host, int port) {
        this.host = host;
        this.port = port;
    }

    public void run() throws Exception{
        NioEventLoopGroup group = new NioEventLoopGroup();
        try {
            Bootstrap bootstrap = new Bootstrap()
                    .group(group)
                    .channel(NioSocketChannel.class)
                    .handler(new ChannelInitializer<SocketChannel>() {
                        @Override
                        protected void initChannel(SocketChannel socketChannel) throws Exception {
                            ChannelPipeline pipeline = socketChannel.pipeline();
                            // 加入先关handler
                            pipeline.addLast("decoder", new StringDecoder());
                            pipeline.addLast("encoder", new StringEncoder());
                            pipeline.addLast(new GroupChatClientHandler());
                        }
                    });
            ChannelFuture channelFuture = bootstrap.connect(host, port).sync();
            // 得到channel
            Channel channel = channelFuture.channel();
            System.out.println("------" + channel.localAddress() + "------");
            // 客户端需要输入信息
            Scanner scanner = new Scanner(System.in);
            while (scanner.hasNextLine()) {
                String msg = scanner.nextLine();
                // 通过channel发送到服务器
                channel.writeAndFlush(msg+ "\r\n");
            }
        }finally {
            group.shutdownGracefully();
        }
    }

    public static void main(String[] args) throws Exception{
        new GroupChatClient("127.0.0.1", 7000).run();
    }
}
GroupChatClientHandler
public class GroupChatClientHandler extends SimpleChannelInboundHandler<String> {
    @Override
    protected void channelRead0(ChannelHandlerContext channelHandlerContext, String msg) throws Exception {
        System.out.println(msg.trim());
    }
}
结果
7、实例:心跳检测机制
当服务器超过3秒没有读时,就提示读空闲
当服务器超过5秒没有写操作时,就提示写空闲
当服务器超过7秒没有读或者写操作时,就提示读写空闲
读:客户端 => 服务器
MyServer
public class MyServer {
    public static void main(String[] args) throws Exception{
        NioEventLoopGroup bossGroup = new NioEventLoopGroup(1);
        NioEventLoopGroup workerGroup = new NioEventLoopGroup();
        try {
            ServerBootstrap serverBootstrap = new ServerBootstrap();
            serverBootstrap.group(bossGroup, workerGroup)
                    .channel(NioServerSocketChannel.class)
                    .handler(new LoggingHandler(LogLevel.INFO))
                    .childHandler(new ChannelInitializer<SocketChannel>() {
                        @Override
                        protected void initChannel(SocketChannel socketChannel) throws Exception {
                            ChannelPipeline pipeline = socketChannel.pipeline();
                            /*
                                加入一个netty,提供IdleStateHandler
                                说明:
                                1.IdleStateHandler是netty提供的处理空闲状态的处理器
                                2.long readerIdleTime:表示多长时间没有读,就会发送一个心跳检测包检测是否连接
                                3.long writerIdleTime:...写...
                                4.long allIdleTime:...读写...
                                5.文档说明:Triggers an IdleStateEvent when a Channel has not performed read, write, or both operation for a while.
                                6.当IdleStateEvent触发后,会传递给管道channel的下一个handler去处理
                                通过调用下一个handler的userEventTriggered,在该方法中去处理IdleStateEvent(读空闲、写空闲、读写空闲)
                             */
                            pipeline.addLast(new IdleStateHandler(13, 5, 7, TimeUnit.SECONDS));
                            // 加入一个对空闲检测进一步处理的handler
                            pipeline.addLast(new MyServerHandler());

                        }
                    });
            // 启动服务器
            ChannelFuture channelFuture = serverBootstrap.bind(7000).sync();
            // 关闭通道
            channelFuture.channel().closeFuture().sync();
        } finally {
            bossGroup.shutdownGracefully();
            workerGroup.shutdownGracefully();
        }
    }
}
MyServerHandler
public class MyServerHandler extends ChannelInboundHandlerAdapter {
    /**
     * @param ctx 上下文
     * @param evt 事件
     * @throws Exception
     */
    @Override
    public void userEventTriggered(ChannelHandlerContext ctx, Object evt) throws Exception {
        if (evt instanceof IdleStateEvent) {
            // 将evt向下转型IdleStateEvent
            IdleStateEvent event = (IdleStateEvent) evt;
            String eventType = null;
            switch (event.state()) {
                case READER_IDLE:
                    eventType = "读空闲";
                    break;
                case WRITER_IDLE:
                    eventType = "写空闲";
                    break;
                case ALL_IDLE:
                    eventType = "读写空闲";
                    break;
            }
            System.out.println(ctx.channel().remoteAddress() + "---超时---" + eventType);
            System.out.println("服务器做相应处理");
            // 如果发生空闲,关闭通道
            ctx.channel().closeFuture();
        }
    }
}
8、实例:WebSocket长连接
- 实现基于webSocket的长连接的全双工的交互
- Http协议是无状态的, 浏览器和服务 器间的请求响应一次,下一次会重新创建连接
- 改变Http协议多次请求的约束,实现长连接了,服务器可以发送消息给浏览器
- 客户端浏览器和服务器端会相互感知,比如服务器关闭了,浏览器会感知,同样浏览器关闭了,服务器会感知
MyServer
public class MyServer {
    public static void main(String[] args) throws Exception{
        NioEventLoopGroup bossGroup = new NioEventLoopGroup(1);
        NioEventLoopGroup workerGroup = new NioEventLoopGroup();
        try {
            ServerBootstrap serverBootstrap = new ServerBootstrap();
            serverBootstrap.group(bossGroup, workerGroup)
                    .channel(NioServerSocketChannel.class)
                    .handler(new LoggingHandler(LogLevel.INFO))
                    .childHandler(new ChannelInitializer<SocketChannel>() {
                        @Override
                        protected void initChannel(SocketChannel socketChannel) throws Exception {
                            ChannelPipeline pipeline = socketChannel.pipeline();
                            // 基于http协议,需要使用http的编码和解码器
                            pipeline.addLast(new HttpServerCodec());
                            // 以块方式写,添加ChunkedWriteHandler
                            pipeline.addLast(new ChunkedWriteHandler());
                            // http数据在传输过程中是分段的,HttpObjectAggregator可以将多个段聚合(所以通常浏览器发送大量数据时,会发出多次http请求)
                            pipeline.addLast(new HttpObjectAggregator(8192));
                            /*
                                1.WebSocket的数据是以帧frame的形式传递,WebSocketFrame下面有6个子类
                                2.浏览器发送请求时 ws://localhost:7000/hello 表示请求的uri
                                3.WebSocketServerProtocolHandler核心功能:通过一个状态码101,将http协议升级为ws协议,保持长连接
                             */

                            pipeline.addLast(new WebSocketServerProtocolHandler("/hello"));
                            // 自定义handler,处理业务逻辑
                            pipeline.addLast(new MyTextWebSocketFraneHandler());
                        }
                    });
            // 启动服务器
            ChannelFuture channelFuture = serverBootstrap.bind(7000).sync();
            // 关闭通道
            channelFuture.channel().closeFuture().sync();
        } finally {
            bossGroup.shutdownGracefully();
            workerGroup.shutdownGracefully();
        }
    }
}
MyTextWebSocketFraneHandler
// TextWebSocketFrame 表示一个文本帧frame
public class MyTextWebSocketFraneHandler extends SimpleChannelInboundHandler<TextWebSocketFrame> {
    @Override
    protected void channelRead0(ChannelHandlerContext ctx, TextWebSocketFrame msg) throws Exception {
        System.out.println("服务器端收到消息" + msg.text());
        // 回复消息
        ctx.channel().writeAndFlush(new TextWebSocketFrame("服务器时间" + LocalDateTime.now() + " " + msg.text()));
    }

    // web客户端连接后,触发方法
    @Override
    public void handlerAdded(ChannelHandlerContext ctx) throws Exception {
        // id表示唯一的值,LongText是唯一的  ShortText不唯一
        System.out.println("handlerAdded被调用 " + ctx.channel().id().asLongText());
        System.out.println("handlerAdded被调用 " + ctx.channel().id().asShortText());
    }

    @Override
    public void handlerRemoved(ChannelHandlerContext ctx) throws Exception {
        System.out.println("handlerRemoved被调用 " + ctx.channel().id().asLongText());
    }

    @Override
    public void exceptionCaught(ChannelHandlerContext ctx, Throwable cause) throws Exception {
        System.out.println("异常发生 " + cause.getMessage());
        ctx.close();
    }
}
hello.html
<!DOCTYPE html>
<html lang="en">
<head>
    <meta charset="UTF-8">
    <title>Title</title>
</head>
<body>
<script>
    var socket;
    // 判断当前浏览器是否支持websocket
    if (window.WebSocket) {
        socket = new WebSocket("ws://localhost:7000/hello");
        // 相当于channelRead0,ev收到服务器货送的消息
        socket.onmessage = function (ev) {
            var rt = document.getElementById("responseText");
            rt.value = rt.value + "\n" + ev.data;
        }
        // 相当于连接开启
        socket.onopen = function (ev) {
            var rt = document.getElementById("responseText");
            rt.value = "连接开启...";
        }
        // 相当于连接关闭
        socket.onclose = function (ev) {
            var rt = document.getElementById("responseText");
            rt.value = rt.value + "\n" + "连接关闭...";
        }
    } else {
        alert("当前浏览器不支持websocket")
    }

    // 发送消息到服务器
    function send(message) {
        // 先判断socket是否创建好
        if (!window.socket) {
            return;
        }
        if (socket.readyState === WebSocket.OPEN) {
            // 通过socket发送消息
            socket.send(message);
        } else {
            alert("连接没有开启");
        }
    }

</script>
<form onsubmit="return false">
    <textarea name="message" style="height: 300px; width: 300px"></textarea>
    <input type="button" value="发送消息" onclick="send(this.form.message.value)">
    <textarea id="responseText" style="height: 300px; width: 300px"></textarea>
    <input type="button" value="清空内容" onclick="document.getElementById('responseText').value=''">
</form>
</body>
</html>
9、编解码器机制

-
数据在网络中传输的都是二进制字节码数据,在发送 数据时就需要编码,接收数据时就需要解码
-
codec(编解码器) 的组成部分有两个:decoder(解码器)和 encoder(编码器)
- encoder 负责把业务数据转换成字节码数据
- decoder 负责把字节码数据转换成业务数据
-
本身的编码解码
- StringEncoder,对字符串数据进行编码
- ObjectEncoder,对 Java 对象进行编码
- StringDecoder, 对字符串数据进行解码
- ObjectDecoder,对 Java 对象进行解码
-
问题分析:Netty本身自带的 ObjectDecoder 和 ObjectEncoder 可以用来实现 POJO 对象或各种业务对象 的编码和解码,底层使用的仍是 Java 序列化技术 , 而Java 序列化技术本身效率就不高
- 无法跨语言
- 序列化后的体积太大,是二进制编码的 5 倍多
- 序列化性能太低
=> Protobuf
10、Protobuf机制
1.介绍
-
Google发布的一种轻便高效的结构化数据存储格式,可以用于结构化数据串行化,或者说序列化
-
适合做数据存储或 RPC[远程过程调用 remote procedure call ] 数据交换格式
-
目前很多公司 http+json => tcp+protobuf
-
Protobuf 是以 message 的方式来管理数据
-
支持跨平台、跨语言,即[客户端和服务器端可以是不同的语言编写的]
-
高性能,高可靠性
-
流程:
-
Protobuf 将类的定义使用**.proto 文件**进行描述[在idea 中编写 .proto 文件时,会自动提示是否下载 .ptotot 编写插件,可 以让语法高亮]
-
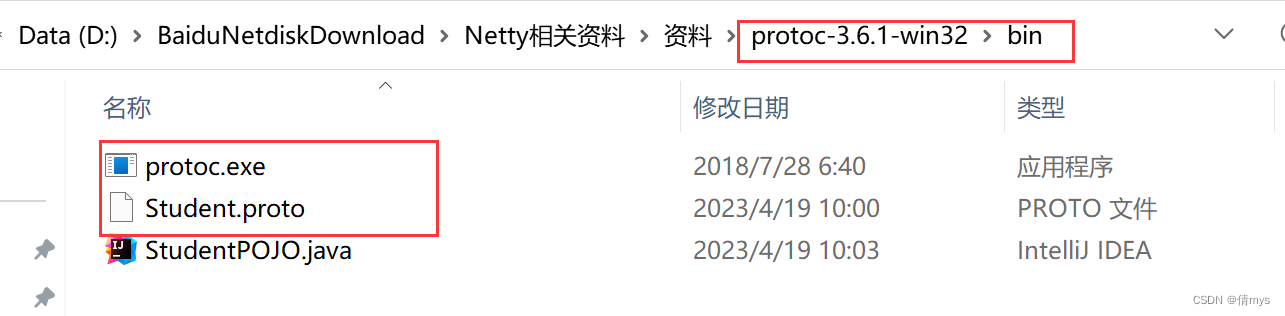
通过 protoc.exe 编译器根据.proto 自动生成.java 文件

-
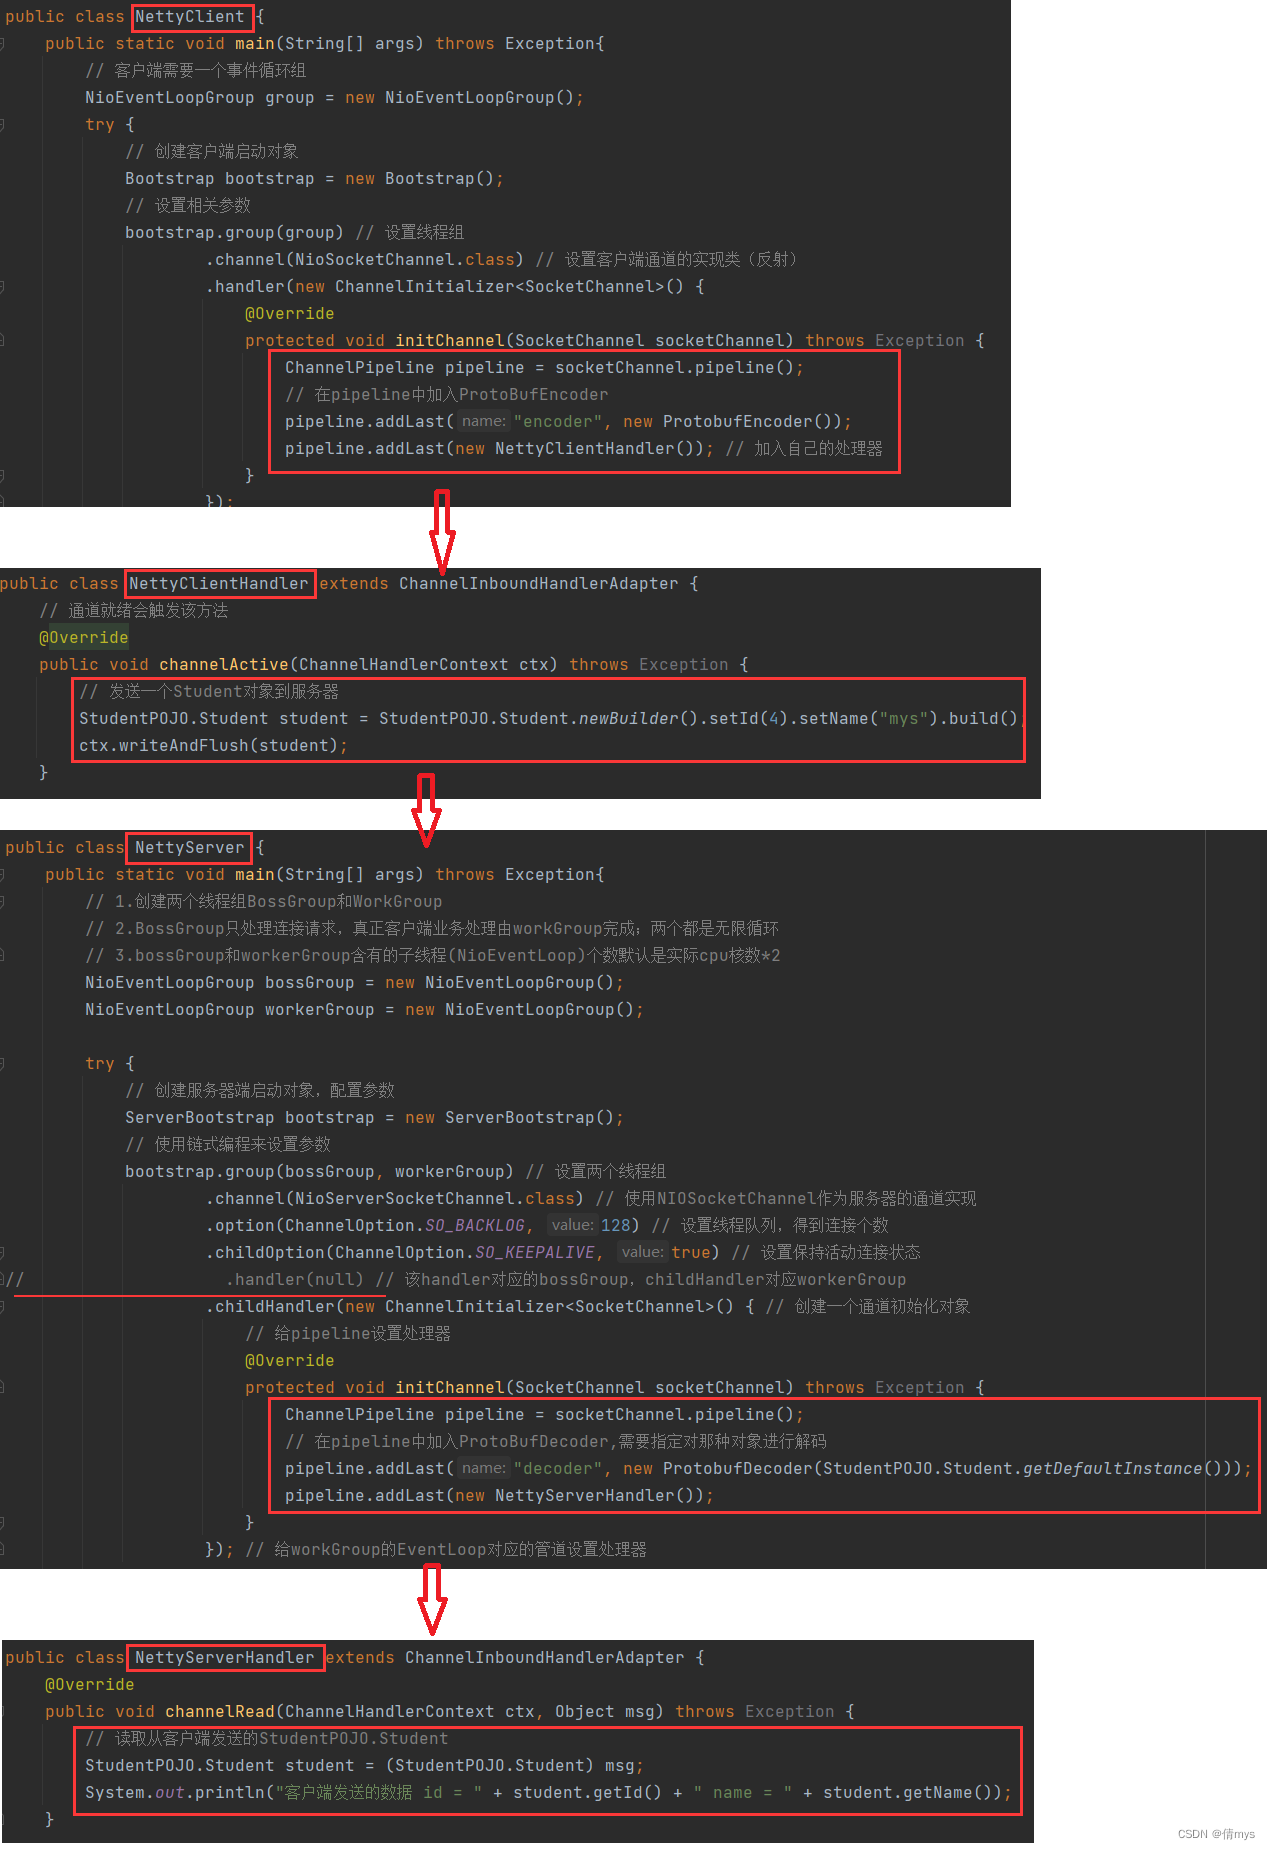
2.快速入门实例1
- 客户端可以发送一个Student PoJo 对象到服务器 (通过 Protobuf 编码)
- 服务端能接收Student PoJo 对象,并显示信息(通过 Protobuf 解码)
(1))写一个Student.proto
syntax = "proto3"; // 版本
option java_outer_classname = "StudentPOJO"; // 生成的外部类名,也是文件名
// protobuf使用message管理数据
message Student { // 会在StudentPOJO外部类生成一个内部类Student,即真正发送的POJO对象
  int32 id = 1; // Student类中有一个属性名id,类型int32(protobuf类型) 1表示属性序号,不是值
  string name =2;
}
(2)在控制台输入命令,生成StudentPOJO.java
将Student.proto复制到有protoc.exe的目录下,在该目录下打开控制台,输入命令:protoc.exe --java_out=. Student.proto,生成了一个StudentPOJO.java
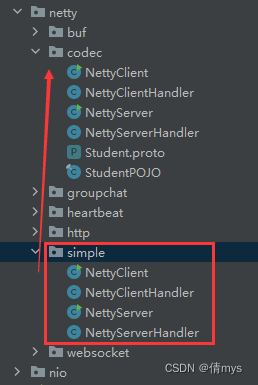
(3)使用前面netty.simple项目的Server和Client,修改代码
2.快速入门实例2
- 客户端可以随机发送Student PoJo/ Worker PoJo 对 象到服务器 (通过 Protobuf 编码)
- 服务端能接收Student PoJo/ Worker PoJo 对象(需要 判断是哪种类型),并显示信息(通过 Protobuf 解码)
(1)编写Student.proto
syntax = "proto3";
option optimize_for = SPEED; // 加快解析
option java_package = "com.mys.netty.codec2"; // 指定生成到哪个包下
option java_outer_classname = "MyDataInfo"; // 外部类名

// protobuf可以使用message管理其他message
message MyMessage {
  // 定义一个枚举类型
  enum DataType {
    StudentType = 0; // proto3要求enum编号从0开始
    WorkerType = 1;
  }
  // 用data_type标识传的是哪个类型
  DataType data_type = 1;
  // 表示每次枚举类型最多只能出现其中一个,节省空间
  oneof dataBody {
    Student student = 2;
    Worker worker = 3;
  }
}
message Student {
  int32 id = 1;
  string name = 2;
}
message Worker {
  string name = 1;
  int32 age = 2;
}
(2)使用protoc.exe生成MyDataInfo.java
与实例1步骤一样
(3)复制实例1的server、client,修改代码
NettyClientHandler
public void channelActive(ChannelHandlerContext ctx) throws Exception {
    // 随机发送Student或Worker对象
    int random = new Random().nextInt(3);
    MyDataInfo.MyMessage myMessage = null;
    if (0 == random) { // 发送Student对象
        myMessage = MyDataInfo.MyMessage.newBuilder().setDataType(MyDataInfo.MyMessage.DataType.StudentType).setStudent(MyDataInfo.Student.newBuilder().setId(5).setName("student").build()).build();
    } else { // 发送worker对象
        myMessage = MyDataInfo.MyMessage.newBuilder().setDataType(MyDataInfo.MyMessage.DataType.WorkerType).setWorker(MyDataInfo.Worker.newBuilder().setAge(20).setName("worker").build()).build();
    }
    ctx.writeAndFlush(myMessage);
}
NettyServerHandler
public class NettyServerHandler extends SimpleChannelInboundHandler<MyDataInfo.MyMessage> {
    @Override
    protected void channelRead0(ChannelHandlerContext ctx, MyDataInfo.MyMessage msg) throws Exception {
        MyDataInfo.MyMessage.DataType dataType = msg.getDataType();
        // 根据dataType显示不同的信息
        if (dataType == MyDataInfo.MyMessage.DataType.StudentType) {
            MyDataInfo.Student student = msg.getStudent();
            System.out.println("student id = " + student.getId() + " name = " + student.getName());
        } else if (dataType == MyDataInfo.MyMessage.DataType.WorkerType) {
            MyDataInfo.Worker worker = msg.getWorker();
            System.out.println("worker age = " + worker.getAge() + " name = " + worker.getName());
        } else {
            System.out.println("传输的类型不正确");
        }
    }
11、编解码器和handler调用机制
-
Netty的主要组件有Channel、EventLoop、ChannelFuture、 ChannelHandler、ChannelPipeline
-
ChannelHandler:处理入站和出站数据的应用程序逻辑的容器
-
实现ChannelInboundHandler接口(或ChannelInboundHandlerAdapter),可以接收入站事件和数据,这些数据会被业务逻辑处理
-
当要给客户端发送响应时,也可以从ChannelInboundHandler冲刷数据
-
业务逻辑通常写在一个或多个ChannelInboundHandler中
-
ChannelOutboundHandler原理一样,处理出站数据
-
ChannelPipeline提供了ChannelHandler链的容器,客户端发送给服务端的数据会通过pipeline中的一系列ChannelOutboundHandler
-
当Netty发送或者接受一个消息的时候,就将会发生一次数据转换。入站消息会被解码,出站消息会被编码
-
编解码器都实现了ChannelInboundHadnler或ChannelOutboundHandler接口,channelRead方法被重写
-
入站为例,将已经解码的字节转发 给ChannelPipeline中的下一个ChannelInboundHandler
入站——InBoundHandler ——服务端 => 客户端——解码decode
出站——OutBoundHandler——客户端 => 服务端——编码encode
- 解码器-ByteToMessageDecoder
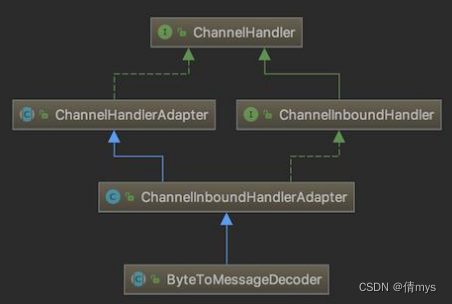
由于不可能知道远程节点是否会一次性发送一个完整的信息, tcp有可能出现粘包拆包的问题, 这个类会对入站数据进行缓冲, 直到它准备好被处理

每次入站从ByteBuf中读取4字节,将其解码为一个int,然后将它添加到下一个List中。 当没有更多元素可以被添加到该List中时,它的内容将会被发送给下一个ChannelInboundHandler。 int在被添加到List中时,会被自动装箱为Integer。在调用readInt()方法前必须验证所输入的ByteBuf是否具有足够的数据
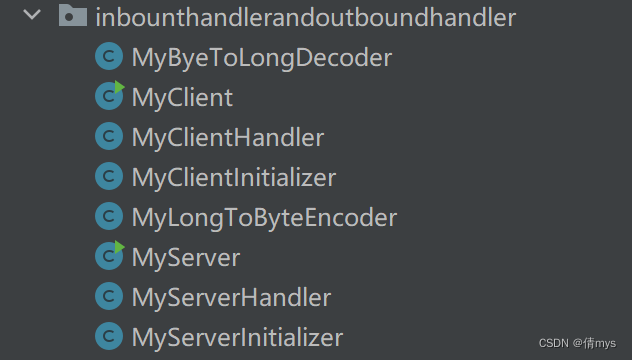
12、handler链的调用机制实例
使用自定义的编码器和解码器来说明Netty的handler 调用机制
客户端发送long -> 服务器
服务端发送long -> 客户端
MyServer
public class MyServer {
    public static void main(String[] args) throws Exception{
        NioEventLoopGroup bossGroup = new NioEventLoopGroup(1);
        NioEventLoopGroup workerGroup = new NioEventLoopGroup();
        try {
            ServerBootstrap serverBootstrap = new ServerBootstrap();
            serverBootstrap.group(bossGroup, workerGroup)
                    .channel(NioServerSocketChannel.class)
                    .childHandler(new MyServerInitializer()); // 自定义一个初始化类
            ChannelFuture channelFuture = serverBootstrap.bind(7000).sync();
            channelFuture.channel().closeFuture().sync();
        } finally {
            bossGroup.shutdownGracefully();
            workerGroup.shutdownGracefully();
        }
    }
}
MyServerInitializer
public class MyServerInitializer extends ChannelInitializer<SocketChannel> {
    @Override
    protected void initChannel(SocketChannel ch) throws Exception {
        ChannelPipeline pipeline = ch.pipeline();
        // 入站的handler,进行解码 MyByeToLongDecoder
        pipeline.addLast(new MyByeToLongDecoder());
        // 出站的编码器
        pipeline.addLast(new MyLongToByteEncoder());
        // 自定义handler处理业务逻辑
        pipeline.addLast(new MyServerHandler());
    }
}
MyServerHandler
public class MyServerHandler extends SimpleChannelInboundHandler<Long> {
    @Override
    protected void channelRead0(ChannelHandlerContext ctx, Long msg) throws Exception {
        System.out.println("从客户端" + ctx.channel().remoteAddress() + "读取到long" + msg);
        // 给客户端发送一个long
        ctx.writeAndFlush(98756L);
    }

    @Override
    public void exceptionCaught(ChannelHandlerContext ctx, Throwable cause) throws Exception {
        cause.printStackTrace();
        ctx.close();
    }
}
MyByteToLongDecoder
public class MyByeToLongDecoder extends ByteToMessageDecoder {
    // ctx 上下文  in 入站的ByteBuf  out List集合,将解码后的数据传给下一个handler
    @Override
    protected void decode(ChannelHandlerContext ctx, ByteBuf in, List<Object> out) throws Exception {
        // decode会根据接收的数据被调用多次,直到确定没有新的元素被添加到List或ByteBuf,没有更多的可读字节为止
        //如果list out 不为空,就会将list的内容传递给下一个channelInBoundHandler处理,该处理器的方法也会被调用多次
        System.out.println("MyByeToLongDecoder decoder 被调用");
        if (in.readableBytes() >= 8) { // long有8个字节
            out.add(in.readLong());
        }
    }
}
MyClient
public class MyClient {
    public static void main(String[] args) throws Exception{
        NioEventLoopGroup group = new NioEventLoopGroup();
        try {
            Bootstrap bootstrap = new Bootstrap();
            bootstrap.group(group).channel(NioSocketChannel.class).handler(new MyClientInitializer());
            ChannelFuture channelFuture = bootstrap.connect("localhost", 7000).sync();
            channelFuture.channel().closeFuture().sync();
        } finally {
            group.shutdownGracefully();
        }
    }
}
MyClientInitializer
public class MyClientInitializer extends ChannelInitializer<SocketChannel> {
    @Override
    protected void initChannel(SocketChannel ch) throws Exception {
        ChannelPipeline pipeline = ch.pipeline();
        // 出站之前,加入一个handler,对数据进行编码
        pipeline.addLast(new MyLongToByteEncoder());
        // 入站的解码器
        pipeline.addLast(new MyByeToLongDecoder());
        // 再加入一个自定义handler,处理业务逻辑
        pipeline.addLast(new MyClientHandler());
    }
}
MyClientHandler
public class MyClientHandler extends SimpleChannelInboundHandler<Long> {
    @Override
    protected void channelRead0(ChannelHandlerContext ctx, Long msg) throws Exception {
        System.out.println("服务器的ip = " + ctx.channel().remoteAddress());
        System.out.println("收到服务器消息 = " + msg);
    }

    // 重写channelActive发送数据
    @Override
    public void channelActive(ChannelHandlerContext ctx) throws Exception {
        System.out.println("MyClientHandler 发送数据");
        ctx.writeAndFlush(123456L);
        /*
            该处理器的前一个handler是MyLongToByteEncoder,其父类是MessageToByteEncoder
            编写 Encoder 是要注意传入的数据类型和处理的数据类型一致
    public void write(ChannelHandlerContext ctx, Object msg, ChannelPromise promise) throws Exception {
        ByteBuf buf = null;
        try {
            // 判断当前msg 是不是应该处理的类型,如果是就处理,不是就跳过encode
            if (acceptOutboundMessage(msg)) {
                @SuppressWarnings("unchecked")
                I cast = (I) msg;
                buf = allocateBuffer(ctx, cast, preferDirect);
                try {
                    encode(ctx, cast, buf);
                } finally {
                    ReferenceCountUtil.release(cast);
                }
                if (buf.isReadable()) {
                    ctx.write(buf, promise);
                } else {
                    buf.release();
                    ctx.write(Unpooled.EMPTY_BUFFER, promise);
                }
                buf = null;
            } else {
                ctx.write(msg, promise);
            }
        }
         */
    }
}
MyLongToByteEncoder
public class MyLongToByteEncoder extends MessageToByteEncoder<Long> {
    @Override
    protected void encode(ChannelHandlerContext ctx, Long msg, ByteBuf out) throws Exception {
        System.out.println("MyLongToByteEncoder encode被调用");
        System.out.println("msg = " + msg);
        out.writeLong(msg);
    }
}
- 不论解码器handler还是编码器handler,接收的消息类型必须与待处理的消息类型一致, 否则该handler不会被执行
- 在解码器进行数据解码时,需要判断缓存区(ByteBuf)的数据是否足够 ,否则接收到的数据会和期望结果不同
解码器-ReplayingDecoder
-
public abstract class ReplayingDecoder extends ByteToMessageDecoder -
使用这个类,不必调用 readableBytes()方法。参数S指定了用户状态管理的类型,其中Void代表不需要状态 管理
  public class MyByteToLongDecoder2 extends ReplayingDecoder<Void> {
      @Override
      protected void decode(ChannelHandlerContext ctx, ByteBuf in, List<Object> out) throws Exception {
          System.out.println("MyByteToLongDecoder2 被调用");
          // ReplayingDecoder不需要判断数据是否足够读取,内部会进行判断处理
          out.add(in.readLong());
      }
  }
- 局限性
- 并不是所有的 ByteBuf 操作都被支持,如果调用了一个不被支持的方法,将会抛出一个 UnsupportedOperationException
- 在某些情况下可能稍慢于 ByteToMessageDecoder,例如网络缓慢并且消息格 式复杂时,消息会被拆成了多个碎片,速度变慢
其他解码器
- LineBasedFrameDecoder:在Netty内 部也有使用,使用行尾控制字符(\n或\r\n) 作为分隔符来解析数据
- DelimiterBasedFrameDecoder:使用自定义的特殊字符作为消息的分隔符
- HttpObjectDecoder:一个HTTP数据的解码器
- LengthFieldBasedFrameDecoder:通过指定 长度来标识整包消息,可以自动的处理黏包和半包消息
其他编码器
- ObjectEncoder
- SocksMessageEncoder
- ZlibEncoder
- Bzip2Encoder
13、Log4j整合到Netty
-
添加依赖 pom.xml
<dependency> <groupId>log4j</groupId> <artifactId>log4j</artifactId> <version>1.2.17</version> </dependency> <dependency> <groupId>org.slf4j</groupId> <artifactId>slf4j-api</artifactId> <version>1.7.25</version> </dependency> <dependency> <groupId>org.slf4j</groupId> <artifactId>slf4j-log4j12</artifactId> <version>1.7.25</version> <scope>test</scope> </dependency> <dependency> <groupId>org.slf4j</groupId> <artifactId>slf4j-simple</artifactId> <version>1.7.25</version> <scope>test</scope> </dependency> -
配置Log4j resources/log4j.properties
log4j.rootLogger=DEBUG, stdout
log4j.appender.stdout=org.apache.log4j.ConsoleAppender
log4j.appender.stdout.layout=org.apache.log4j.PatternLayout
log4j.appender.stdout.layout.ConversionPattern=[%p] %C{1} - %m%n
14、TCP粘包和拆包
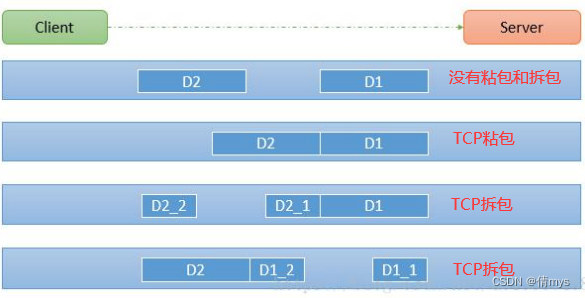
TCP是面向连接的,面向流的,提供高可靠性服务。收发两端(客户端和服务器端) 都要有一一成对的socket,因此,发送端为了将多个发给接收端的包,更有效的发给对方,使用了优化方法(Nagle算法),将多次间隔较小且数据量小的数据,合并成一个大的数据块,然后进行封包。这样做虽然提高了效率,但是接收端就难于分辨出完整的数据包了,因为面向流的通信是无消息保护边界的
图解:客户端给服务器发送数据包D1、D2,服务端读取到的字节数可能上图存在四种情况
粘包和拆包具体实例
MyServer
public class MyServer {
    public static void main(String[] args) throws Exception{
        NioEventLoopGroup bossGroup = new NioEventLoopGroup(1);
        NioEventLoopGroup workerGroup = new NioEventLoopGroup();
        try {
            ServerBootstrap serverBootstrap = new ServerBootstrap();
            serverBootstrap.group(bossGroup, workerGroup)
                    .channel(NioServerSocketChannel.class)
                    .childHandler(new MyServerInitializer()); // 自定义一个初始化类
            ChannelFuture channelFuture = serverBootstrap.bind(7000).sync();
            channelFuture.channel().closeFuture().sync();
        } finally {
            bossGroup.shutdownGracefully();
            workerGroup.shutdownGracefully();
        }
    }
}
MyServerInitializer
public class MyServerInitializer extends ChannelInitializer<SocketChannel> {
    @Override
    protected void initChannel(SocketChannel ch) throws Exception {
        ChannelPipeline pipeline = ch.pipeline();
        pipeline.addLast(new MyServerHandler());
    }
}
MyServerHandler
public class MyServerHandler extends SimpleChannelInboundHandler<ByteBuf> {
    private int count;

    @Override
    protected void channelRead0(ChannelHandlerContext ctx, ByteBuf msg) throws Exception {
        byte[] buffer = new byte[msg.readableBytes()];
        msg.readBytes(buffer);
        String message = new String(buffer, Charset.forName("utf-8"));

        System.out.println("服务器收到的数据:" + message);
        System.out.println("服务器收到的消息量:" + (++count));

        // 服务端回送数据给客户端
        ByteBuf responseByteBuf = Unpooled.copiedBuffer(UUID.randomUUID().toString() + " ", Charset.forName("utf-8"));
        ctx.writeAndFlush(responseByteBuf);
    }

    @Override
    public void exceptionCaught(ChannelHandlerContext ctx, Throwable cause) throws Exception {
        cause.printStackTrace();
        ctx.close();
    }
}
MyClient
public class MyClient {
    public static void main(String[] args) throws Exception{
        NioEventLoopGroup group = new NioEventLoopGroup();
        try {
            Bootstrap bootstrap = new Bootstrap();
            bootstrap.group(group).channel(NioSocketChannel.class).handler(new MyClientInitializer());
            ChannelFuture channelFuture = bootstrap.connect("localhost", 7000).sync();
            channelFuture.channel().closeFuture().sync();
        } finally {
            group.shutdownGracefully();
        }
    }
}
MyClientInitializer
public class MyClientInitializer extends ChannelInitializer<SocketChannel> {
    @Override
    protected void initChannel(SocketChannel ch) throws Exception {
        ChannelPipeline pipeline = ch.pipeline();
        pipeline.addLast(new MyClientHandler());
    }
}
MyClientHandler
public class MyClientHandler extends SimpleChannelInboundHandler<ByteBuf> {
    private int count;
    @Override
    protected void channelRead0(ChannelHandlerContext ctx, ByteBuf msg) throws Exception {
        byte[] buffer = new byte[msg.readableBytes()];
        msg.readBytes(buffer);
        String message = new String(buffer, Charset.forName("utf-8"));
        System.out.println("客户端接收到的消息:" + message);
        System.out.println("客户端接收到的消息数量;:" + (++count));
    }
    @Override
    public void channelActive(ChannelHandlerContext ctx) throws Exception {
        // 使用客户端发送10调数据
        for (int i = 0; i < 10; ++ i) {
            ByteBuf byteBuf = Unpooled.copiedBuffer("hello server " + i, Charset.forName("utf-8"));
            ctx.writeAndFlush(byteBuf);
        }
    }
    @Override
    public void exceptionCaught(ChannelHandlerContext ctx, Throwable cause) throws Exception {
        cause.printStackTrace();
        ctx.close();
    }
}
粘包和拆包解决方案
-
使用自定义协议 + 编解码器来解决
-
关键就是要解决服务器端每次读取数据长度的问题, 这个问题解决,就不会出现服务器多读或少读数据的问题,从而避免的TCP 粘包、拆包
MessageProtocol
/**
 * 协议包
 */
public class MessageProtocol {
    private int len; // 关键
    private byte[] content;

	getter setter
}
MyClient
public class MyClient {
    public static void main(String[] args) throws Exception{
        NioEventLoopGroup group = new NioEventLoopGroup();
        try {
            Bootstrap bootstrap = new Bootstrap();
            bootstrap.group(group).channel(NioSocketChannel.class).handler(new MyClientInitializer());
            ChannelFuture channelFuture = bootstrap.connect("localhost", 7000).sync();
            channelFuture.channel().closeFuture().sync();
        } finally {
            group.shutdownGracefully();
        }
    }
}
MyClientHandler
public class MyClientHandler extends SimpleChannelInboundHandler<MessageProtocol> {
    private int count;
    @Override
    protected void channelRead0(ChannelHandlerContext ctx, MessageProtocol msg) throws Exception {
        int len = msg.getLen();
        byte[] content = msg.getContent();
        System.out.println("客户端接收到消息如下");
        System.out.println("长度=" + len);
        System.out.println("内容=" + new String(content, Charset.forName("utf-8")));
        System.out.println("客户端接收消息数量=" + (++count));
    }

    @Override
    public void channelActive(ChannelHandlerContext ctx) throws Exception {
        // 使用客户端发送10调数据
        for (int i = 0; i < 3; ++ i) {
            String msg = "hello server";
            byte[] count = msg.getBytes(Charset.forName("utf-8"));
            int len = msg.getBytes(Charset.forName("utf-8")).length;
            // 创建协议包对象
            MessageProtocol messageProtocol = new MessageProtocol();
            messageProtocol.setLen(len);
            messageProtocol.setContent(count);
            ctx.writeAndFlush(messageProtocol);
        }
    }

    @Override
    public void exceptionCaught(ChannelHandlerContext ctx, Throwable cause) throws Exception {
        System.out.println("异常消息:" + cause.getMessage());
        ctx.close();
    }
}
MyClientInitializer
public class MyClientInitializer extends ChannelInitializer<SocketChannel> {
    @Override
    protected void initChannel(SocketChannel ch) throws Exception {
        ChannelPipeline pipeline = ch.pipeline();
        pipeline.addLast(new MyMessageEncoder());
        pipeline.addLast(new MyMessageDecoder());
        pipeline.addLast(new MyClientHandler());
    }
}
MyMessageDecoder
public class MyMessageDecoder extends ReplayingDecoder<Void> {
    @Override
    protected void decode(ChannelHandlerContext ctx, ByteBuf in, List<Object> out) throws Exception {
        System.out.println("MyMessageDecoder decode 被调用");
        //需要将得到二进制字节码-> MessageProtocol 数据包(对象)
        int length = in.readInt();
        byte[] content = new byte[length];
        in.readBytes(content);
        //封装成 MessageProtocol 对象,放入 out, 传递下一个handler业务处理
        MessageProtocol messageProtocol = new MessageProtocol();
        messageProtocol.setLen(length);
        messageProtocol.setContent(content);
        out.add(messageProtocol);

    }
}
MyMessageEncoder
public class MyMessageEncoder extends MessageToByteEncoder<MessageProtocol> {
    @Override
    protected void encode(ChannelHandlerContext ctx, MessageProtocol msg, ByteBuf out) throws Exception {
        System.out.println("MyMessageEncoder encode 被调用");
        out.writeInt(msg.getLen());
        out.writeBytes(msg.getContent());
    }
}
MyServer
public class MyServer {
    public static void main(String[] args) throws Exception{
        NioEventLoopGroup bossGroup = new NioEventLoopGroup(1);
        NioEventLoopGroup workerGroup = new NioEventLoopGroup();
        try {
            ServerBootstrap serverBootstrap = new ServerBootstrap();
            serverBootstrap.group(bossGroup, workerGroup)
                    .channel(NioServerSocketChannel.class)
                    .childHandler(new MyServerInitializer()); // 自定义一个初始化类
            ChannelFuture channelFuture = serverBootstrap.bind(7000).sync();
            channelFuture.channel().closeFuture().sync();
        } finally {
            bossGroup.shutdownGracefully();
            workerGroup.shutdownGracefully();
        }
    }
}
MyServerHandler
public class MyServerHandler extends SimpleChannelInboundHandler<MessageProtocol> {
    private int count;
    @Override
    protected void channelRead0(ChannelHandlerContext ctx, MessageProtocol msg) throws Exception {
        // 接收数据并处理
        int len = msg.getLen();
        byte[] content = msg.getContent();
        System.out.println("服务器收到消息:" );
        System.out.println("len = " + len);
        System.out.println("content = " + new String(content, Charset.forName("utf-8")));
        System.out.println("服务器收到的数量:" + (++count));
        // 服务端回送数据给客户端
        String responseContent = UUID.randomUUID().toString();
        int responseLen = responseContent.getBytes("utf-8").length;
        byte[]  responseContent2 = responseContent.getBytes("utf-8");
        //构建一个协议包
        MessageProtocol messageProtocol = new MessageProtocol();
        messageProtocol.setLen(responseLen);
        messageProtocol.setContent(responseContent2);
        ctx.writeAndFlush(messageProtocol);
    }
    @Override
    public void exceptionCaught(ChannelHandlerContext ctx, Throwable cause) throws Exception {
        cause.printStackTrace();
        ctx.close();
    }
}
MyServerInitializer
public class MyServerInitializer extends ChannelInitializer<SocketChannel> {
    @Override
    protected void initChannel(SocketChannel ch) throws Exception {
        ChannelPipeline pipeline = ch.pipeline();
        pipeline.addLast(new MyMessageDecoder());
        pipeline.addLast(new MyMessageEncoder());
        pipeline.addLast(new MyServerHandler());
    }
}


 365
365


 被折叠的 条评论
为什么被折叠?
被折叠的 条评论
为什么被折叠?
 到【灌水乐园】发言


