


本章开始将基于element-ui+vue2+bootstrap4开发后台管理系统
准备工作:
1、安装脚手架
Vue——安装@vue/cli(Vue脚手架)的三种方式_nanchen的博客-CSDN博客
2、使用vue ui安装四个插件:vuex,router,axios,element-ui
调出脚手架的控制台,输入:
vue ui
3、引用bootstrap4
官方网址:bootstrap4
这里可以通过npm或者link的方式进行引用,这里使用link引入
 打开脚手架
打开脚手架

找到public中的index.html引入以下代码:
<link rel="stylesheet" href="https://cdn.jsdelivr.net/npm/bootstrap@4.6.1/dist/css/bootstrap.min.css" >可以测试一下是否引入成功
<div class="alert alert-primary" role="alert">
  A simple primary alert—check it out!
</div>
效果如下:

4、删除多余的部分
安装完vue-ui中的router时会在views中出现home、about页面以及多余的HelloWord.vue等,对其进行删除
5、封装路由
进行封装
import Vue from 'vue'
import VueRouter from 'vue-router'
import routes from '../common/config/router.js'
Vue.use(VueRouter)
const router = new VueRouter({
	mode:'history',
    routes
})
export default router
新建一个common文件夹在里面再次新建一个config文件夹,在config文件夹中新建router.js文件
router.js
const routes = [
    {
      path: '/',
      name: 'layout',
      /* component: () => import('@/views/layout.vue') */
      component:'layout',
    },
    {
        // 这里就不用写path以及name,下面的函数已经给封装好了
      /* component: () => import('@/views/Login.vue') */
      component:'Login',
    },
    {
      path: '*',
      redirect:{name:'layout'},
    }
  ]
  function createRoute(arr) {
      for(let i = 0;i<arr.length;i++){
        //   如果对象中没有component那么就返回
          if(!arr[i].component)return
        //   获取到每个对象中的component
          let val = getValue(arr[i].component)
          /* 自动生成name和path */
          arr[i].name  = arr[i].name || val.replace(/\//g, '_')
          arr[i].path = arr[i].path || `/${val}`
          /* 简化component */
          let componentFun = import(`@/views/${arr[i].component}.vue`)
          arr[i].component = () => componentFun
          if(arr[i].children && arr[i].children.length>0){
              createRoute(arr[i].children)
          }
      }
  }
  /* str=login/index 如果路径或nama中最后有index 则不需要写index*/
//   用来封装children中的路径
  function getValue(str){
      let index = str.lastIndexOf('/')
      let val = str.substring(index+1,str.length)
      if(val === 'index'){
          return str.substring(index,0)
      }
      return str
  }
  let getRoutes = function(){
      createRoute(routes)
      return routes
  }
  export default getRoutes()
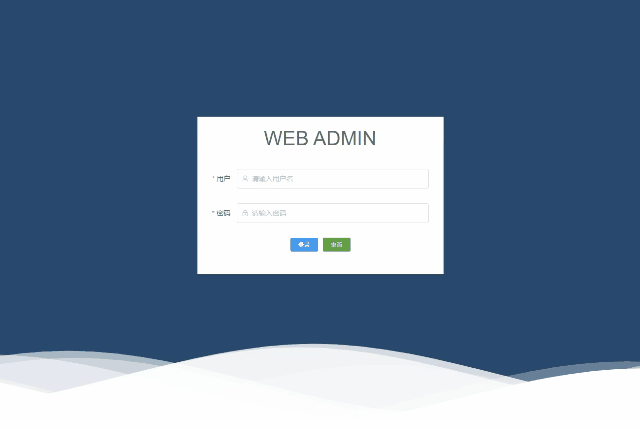
6、布局Login登陆页面,并解决跨域来请求数据
<template>
  <div class="box">
    <div class="wrapper">
      <h1>WEB ADMIN</h1>
      <el-form
        label-width="auto"
        :model="form"
        :rules="rules"
        ref="form"
        v-loading="isloading"
      >
        <el-form-item label="用户" prop="username">
          <el-input v-model="form.username" placeholder="请输入用户名">
            <i slot="prefix" class="el-input__icon el-icon-user"></i>
          </el-input>
        </el-form-item>
        <el-form-item label="密码" prop="password">
          <el-input
            v-model="form.password"
            placeholder="请输入密码"
            show-password
          >
            <i slot="prefix" class="el-input__icon el-icon-lock"></i>
          </el-input>
        </el-form-item>
        <el-row>
          <el-button type="primary" size="mini" @click="login">登录</el-button>
          <el-button type="success" size="mini" @click="resetForm('form')"
            >重置</el-button
          >
        </el-row>
      </el-form>
    </div>
  </div>
</template>

<script>
export default {
  name: "Login",
  data() {
    return {
      form: {
        username: "",
        password: "",
      },
      isloading: false,
      rules: {
        username: [
          {
            required: true,
            message: "请输入用户名",
            trigger: "blur",
          },
          {
            min: 3,
            max: 18,
            message: "长度在 3 到 18 个字符",
            trigger: "blur",
          },
        ],
        password: [
          {
            required: true,
            message: "请输入密码",
            trigger: "blur",
          },
          {
            min: 3,
            max: 18,
            message: "长度在 3 到 18 个字符",
            trigger: "blur",
          },
        ],
      },
    };
  },
  methods: {
    login() {
      });
    },
  },
};
</script>

<style scoped="scoped">
.box {
  width: 100%;
  height: 100%;
  position: absolute;
  bottom: 0;
  top: 0;
  overflow: hidden;
  background-color: #2b4b6b;
}

.wrapper {
  width: 500px;
  height: 320px;
  background-color: #fff;
  margin-left: -250px;
  position: absolute;
  top: 50%;
  left: 50%;
  margin-top: -200px;
}

.wrapper {
  padding: 0 30px;
}

.wrapper h1 {
  color: #666;
  text-align: center;
  padding: 20px 0 30px 0;
}


</style>
跨域:
module.exports = {
  lintOnSave: false,
  devServer: {
  	host: "localhost",
  	port: 8080, // 端口号
  	https: false, // https:{type:Boolean}
  	open: true, //配置自动启动浏览器
  	proxy: {
  		'/admin': { //代理api
  			target: 'xxxxxxxxxxxx',//服务器api地址
  			ws: true,// proxy websockets
  			changeOrigin: true,//是否跨域
  			pathRewrite: { //重写路径
  				'^/api': '/api'
  			}
  		}
  	}
  }
}
效果如下:

7、SVG
添加波浪动画效果

代码如下:
<div class="svg">
      <svg
        class="waves"
        viewBox="0 24 150 28"
        preserveAspectRatio="none"
        shape-rendering="auto"
      >
        <defs>
          <path
            id="gentle-wave"
            d="M-160 44c30 0 58-18 88-18s 58 18 88 18 58-18 88-18 58 18 88 18 v44h-352z"
          />
        </defs>
        <g class="parallax">
          <use
            xlink:href="#gentle-wave"
            x="48"
            y="0"
            fill="rgba(255,255,255,0.8"
          />
          <use
            xlink:href="#gentle-wave"
            x="48"
            y="1"
            fill="rgba(255,255,255,0.7"
          />
          <use
            xlink:href="#gentle-wave"
            x="48"
            y="2"
            fill="rgba(255,255,255,0.6)"
          />
          <use
            xlink:href="#gentle-wave"
            x="48"
            y="3"
            fill="rgba(255,255,255,0.5)"
          />
          <use
            xlink:href="#gentle-wave"
            x="48"
            y="4"
            fill="rgba(255,255,255,0.4)"
          />
          <use
            xlink:href="#gentle-wave"
            x="48"
            y="5"
            fill="rgba(255,255,255,0.3)"
          />
          <use
            xlink:href="#gentle-wave"
            x="48"
            y="6"
            fill="rgba(255,255,255,0.2)"
          />
          <use xlink:href="#gentle-wave" x="48" y="7" fill="#fff" />
        </g>
      </svg>
    </div>
css样式
.waves {
  position: absolute;
  left: 0;
  bottom: 0;
  width: 100%;
  height: 15vh;
  margin-bottom: -7px; /*Fix for safari gap*/
  min-height: 200px;
  max-height: 300px;
}

.content {
  position: relative;
  height: 20vh;
  text-align: center;
  background-color: white;
}

/* Animation */

.parallax > use {
  animation: move-forever 25s cubic-bezier(0.55, 0.5, 0.45, 0.5) infinite;
}
.parallax > use:nth-child(1) {
  animation-delay: -2s;
  animation-duration: 7s;
}
.parallax > use:nth-child(2) {
  animation-delay: -3s;
  animation-duration: 10s;
}
.parallax > use:nth-child(3) {
  animation-delay: -4s;
  animation-duration: 13s;
}
.parallax > use:nth-child(4) {
  animation-delay: -5s;
  animation-duration: 20s;
}
.parallax > use:nth-child(5) {
  animation-delay: -6s;
  animation-duration: 25s;
}
.parallax > use:nth-child(6) {
  animation-delay: -7s;
  animation-duration: 30s;
}
.parallax > use:nth-child(7) {
  animation-delay: -8s;
  animation-duration: 3s;
}
@keyframes move-forever {
  0% {
    transform: translate3d(-90px, 0, 0);
  }
  100% {
    transform: translate3d(85px, 0, 0);
  }
}
/*Shrinking for mobile*/
@media (max-width: 768px) {
  .waves {
    height: 40px;
    min-height: 40px;
  }
  .content {
    height: 30vh;
  }
}
效果:


 800
800


 被折叠的 条评论
为什么被折叠?
被折叠的 条评论
为什么被折叠?
 到【灌水乐园】发言


