


微信测试公众号推送服务
1、完成效果😃
❓:为什么先说完成的效果呢?
🙋:就像射箭🏹找不到箭靶🧿,那每天拉弓的意义在哪呢?
先来了解一下本次练习要实现的效果、结果。
通过代码编写,项目部署,能达到让用户关注改公众号后,每天定时推送(你想要的消息),例如:天气预报推送、生日推送、疫情相关数据推送(感染人数、风险地区)
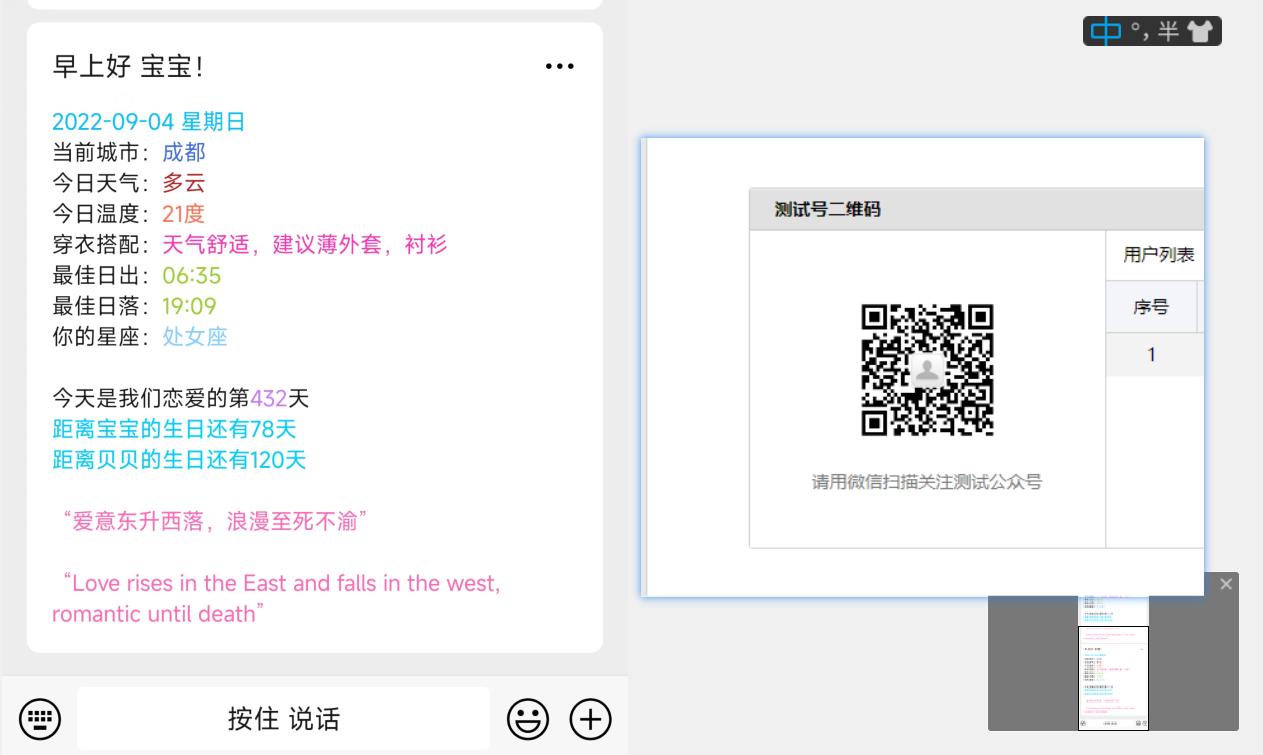
上面二维码是楼主自己做的,感兴趣的话可以扫码体验体验
2、能学习到的一些知识点
完成此练习的前提:1、拥有java代码基础 2、有一台云服务器或者永不关机的电脑💻(才能实现每天定点推送)(看网上说使用github也能实现定时推送)
本练习使用 JAVA 语言实现,知识点包括:
- SpringBoot框架的基本使用(aop相关、定时任务相关)
- 相关工具包使用(Hutool工具包)
- 第三方接口对接(微信公众号、腾讯地图、天气api、天行数据每日一句、英语翻译api)
3、开始
3.1、注册微信测试公众号
https://mp.weixin.qq.com/debug/cgi-bin/sandbox?t=sandbox/login
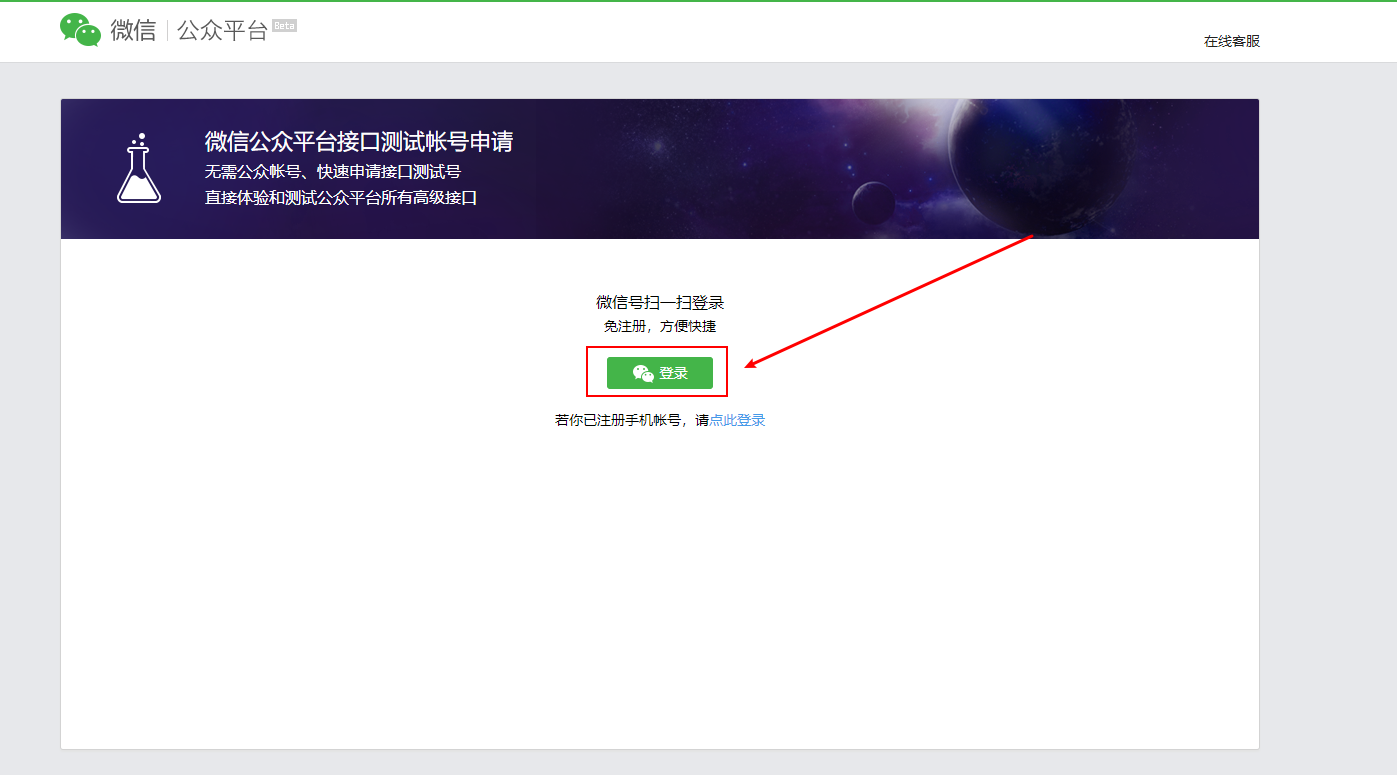
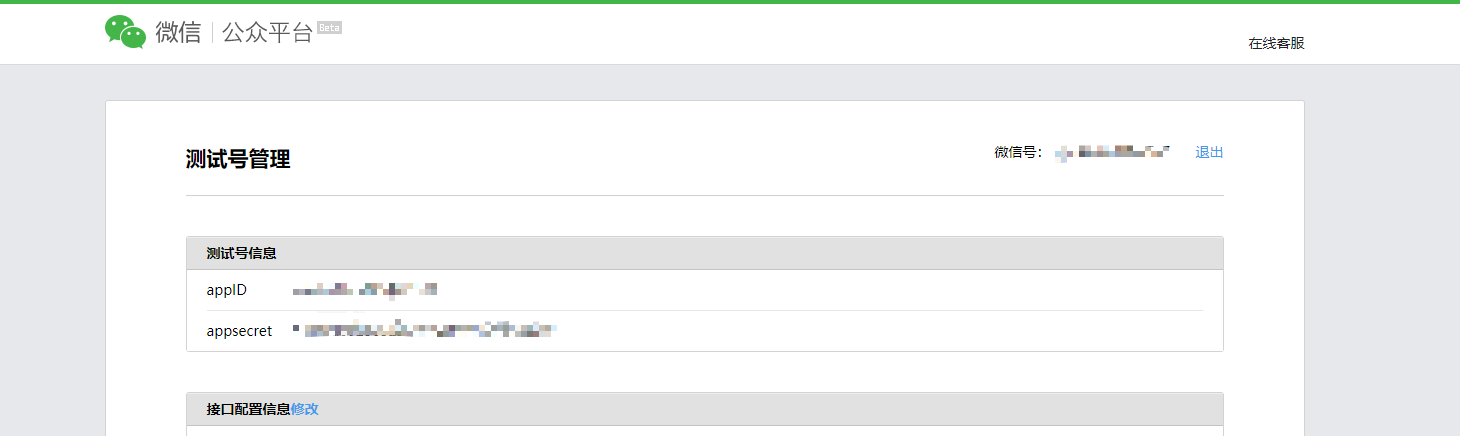
点击此链接,使用微信扫码登录后,会自动创建一个测试公众号,重点注意appID、appsecret(等会要用)记住自己的就行,我这里打码为了账号安全
3.2、分类
分为两种:(这个分类是我自己取的名字,不是微信官方的)
1、固定类推送消息
❓:固定类推送?什么意思?
🙋:就是对每一个关注者都推送几乎相同的东西,不太通用,例如上面图片中的星座,每个关注者可能是不同的,固定类就相当于把它写死
❓:固定类推送有什么好处/优劣吗?
🙋:代码相对简单、适用于只给一个人推送消息
2、通用类推送消息
🙋:通用类就是会对每一个关注者发送的消息会有不同。比如星座,用户关注后,公众号怎么知道关注者的星座,需要关注者自行设置生日,然后存储到数据库中,再发送消息模板时,读取关注者的生日,才能知道其星座(如果没懂,可以扫码关注最上面的二维码体验体验)
🙋:代码相对复杂一些、有通用性
3.3、创建SpringBoot项目
maven依赖:
<parent>
        <groupId>org.springframework.boot</groupId>
        <artifactId>spring-boot-starter-parent</artifactId>
        <version>2.4.3</version>
</parent>
<dependencies>
    <dependency>
        <groupId>org.springframework.boot</groupId>
        <artifactId>spring-boot-starter-web</artifactId>
    </dependency>

    <!-- https://mvnrepository.com/artifact/com.github.binarywang/weixin-java-mp -->
    <!-- 微信测试公众号三方对接包 -->
    <dependency>
        <groupId>com.github.binarywang</groupId>
        <artifactId>weixin-java-mp</artifactId>
        <version>3.3.0</version>
    </dependency>

    <!--Hutool工具包-->
    <dependency>
        <groupId>cn.hutool</groupId>
        <artifactId>hutool-all</artifactId>
        <version>5.7.16</version>
    </dependency>
    <!--lombok-->
    <dependency>
        <groupId>org.projectlombok</groupId>
        <artifactId>lombok</artifactId>
    </dependency>

    <!-- springboot测试-->
    <dependency>
        <groupId>org.springframework.boot</groupId>
        <artifactId>spring-boot-test</artifactId>
    </dependency>
    <dependency>
        <groupId>org.springframework</groupId>
        <artifactId>spring-test</artifactId>
    </dependency>
    <dependency>
        <groupId>junit</groupId>
        <artifactId>junit</artifactId>
        <version>4.12</version>
    </dependency>
</dependencies>
3.3、小试牛刀🔪
先来做个最简单的推送,明白其过程,后面自然就通
将你注册的测试公众号的appiD和appsecret写上去,解耦
wx:
  appID: 你的appID
  appsecret: 你的appsecret
写一个类,类名随便
@Component
public class SendController {
@Value("${wx.appID}")
private String appID;
@Value("${wx.appsecret}")
private String appsecret;
public void push(){
//1,配置
WxMpInMemoryConfigStorage wxStorage = new WxMpInMemoryConfigStorage();
wxStorage.setAppId(appID);
wxStorage.setSecret(appsecret);
WxMpService wxMpService = new WxMpServiceImpl();
wxMpService.setWxMpConfigStorage(wxStorage);
//2,推送消息
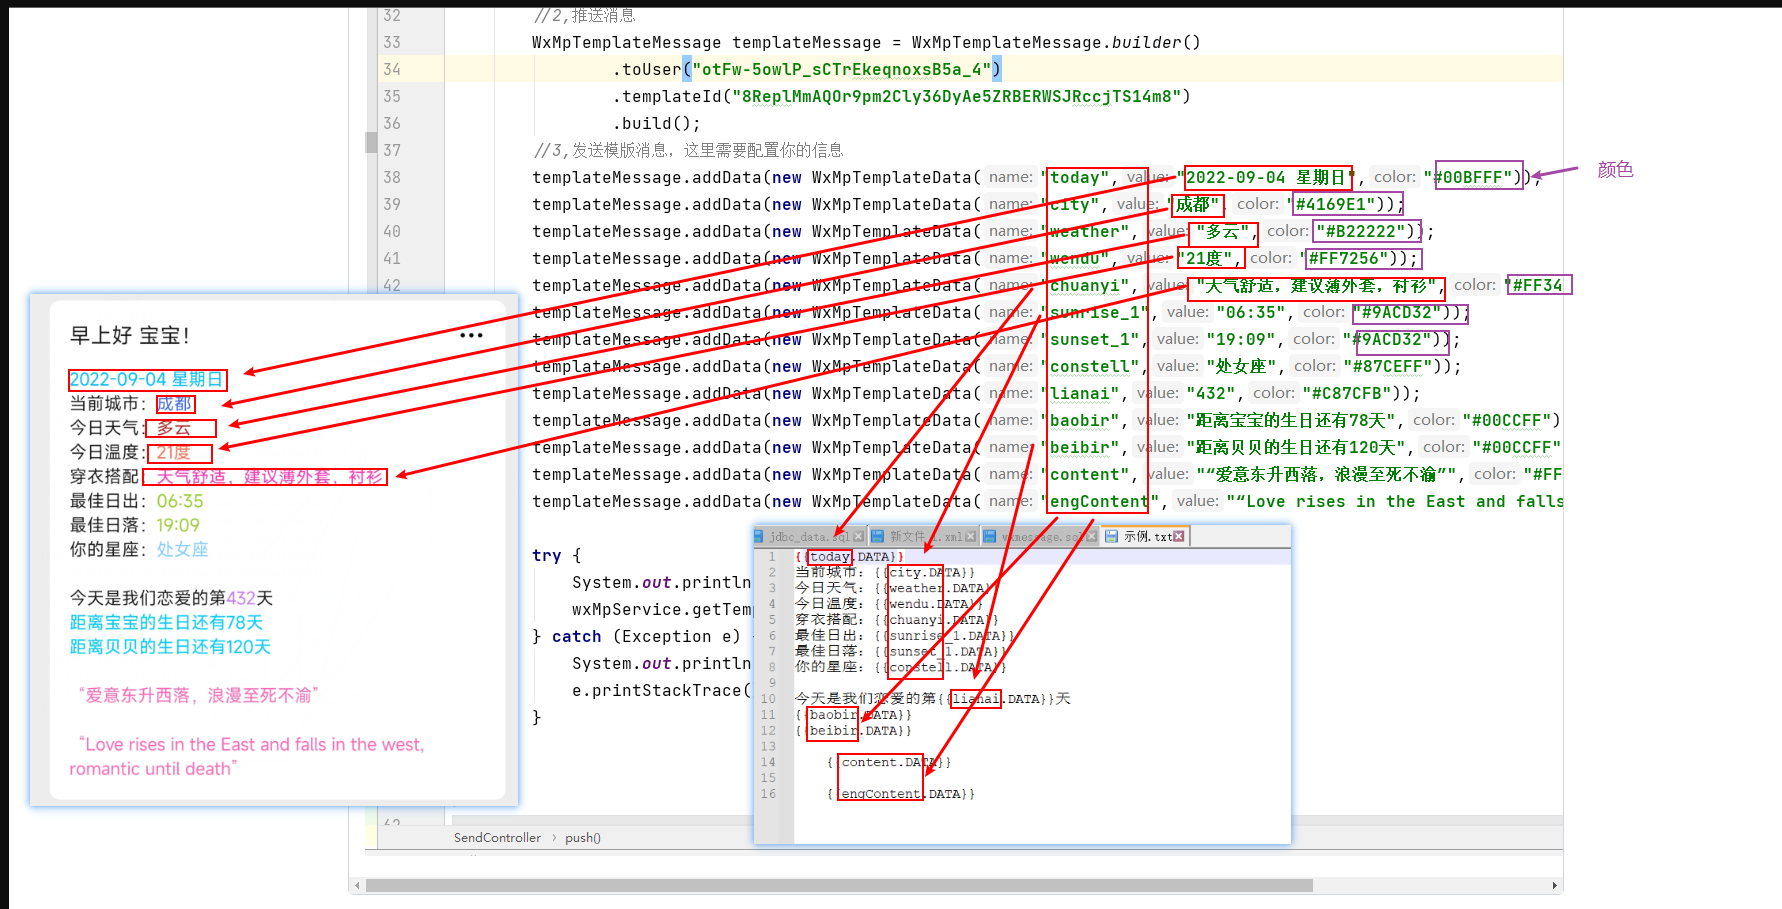
WxMpTemplateMessage templateMessage = WxMpTemplateMessage.builder()
.toUser("用户列表微信号")
.templateId("模板id")
.build();
//3,发送模版消息,这里需要配置你的信息
templateMessage.addData(new WxMpTemplateData("today","2022-09-04 星期日","#00BFFF"));
templateMessage.addData(new WxMpTemplateData("city","成都","#4169E1"));
try {
System.out.println(templateMessage.toJson());
wxMpService.getTemplateMsgService().sendTemplateMsg(templateMessage);
} catch (Exception e) {
System.out.println("推送失败:" + e.getMessage());
e.printStackTrace();
}
}
}
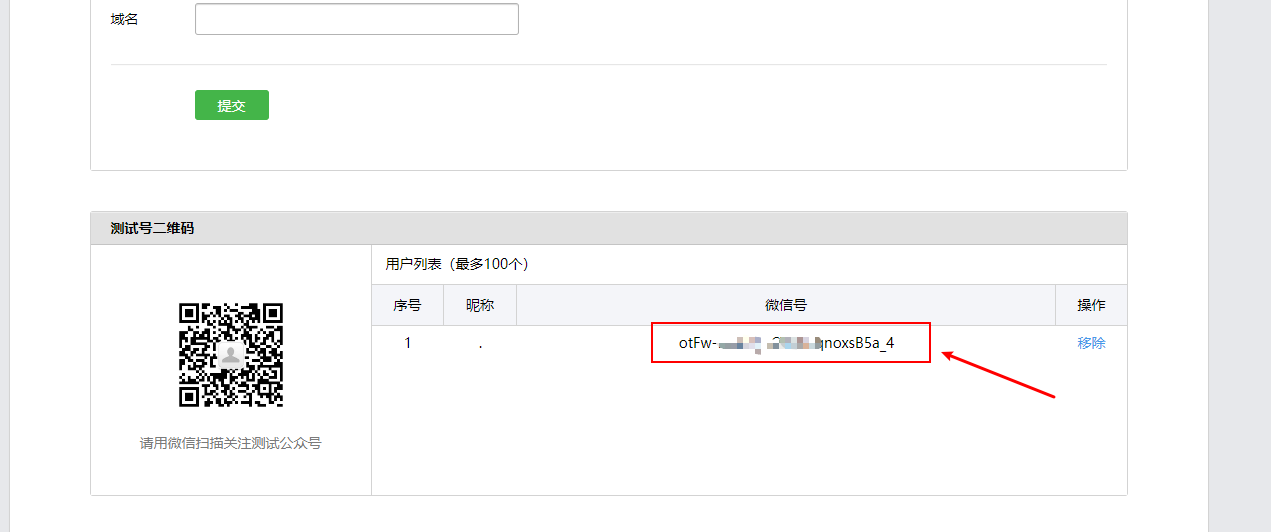
❓:你可能疑惑 “用户列表微信号”、“模板id”是什么?
🙋:用户微信号就是指你要发给谁?
在刚刚创建好的测试公众号的页面上,会有一个二维码,用户在关注你的公众号之后,就会出现关注者的微信号,代码里面填一个就行
❓:模板id又是什么?
🙋:首先的创建一个模板,才能有模板id
❓:怎么创建呢?
🙋:在测试公众号页面,往下拉可以看到创建模板
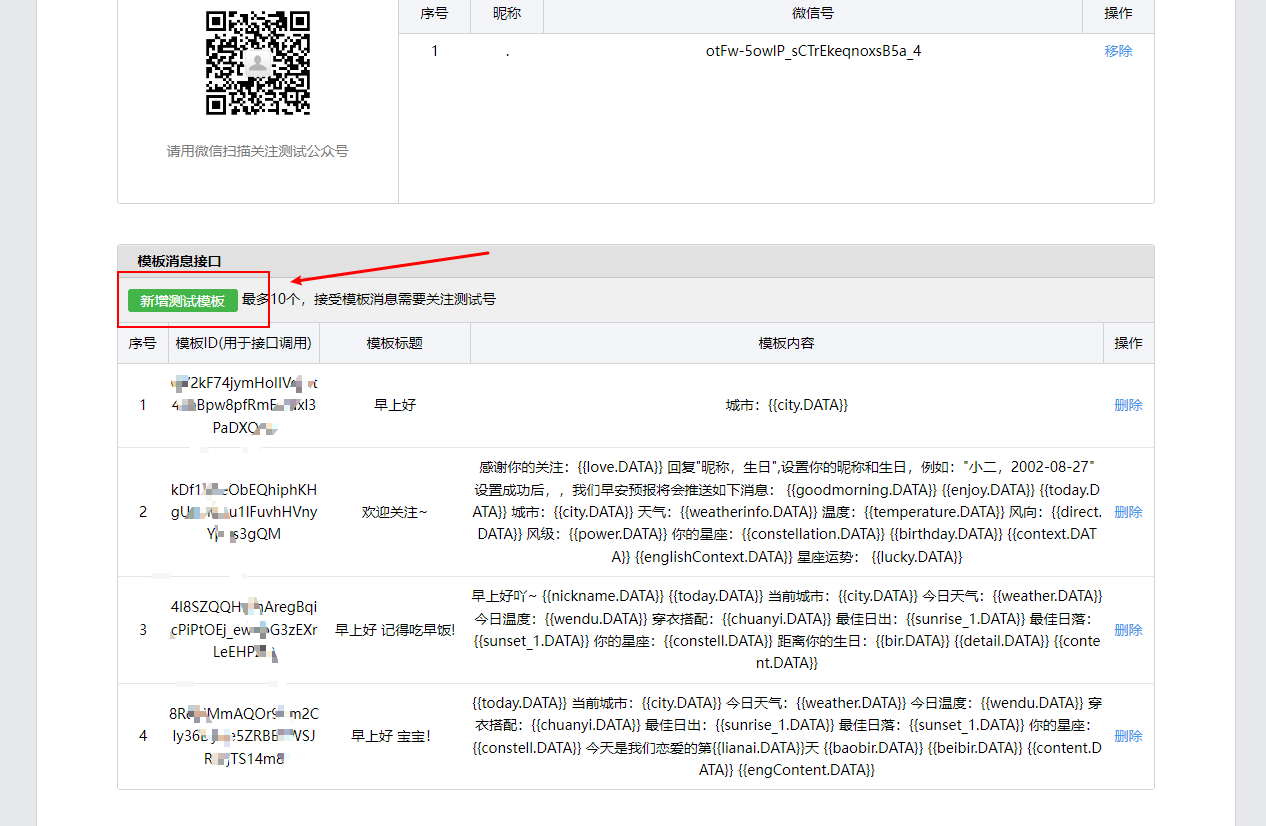
在doc目录下有示例模板文件,在模板文件中数据域必须以.DATA结尾,模板内容写什么,就会推送什么内容给用户
写测试类测试
@RunWith(SpringRunner.class)
@SpringBootTest(classes = {cn.simon.WxTianqiApplication.class})
public class SendTest {

    @Autowired
    private SendController sendController;

    @Test
    public void testSend(){
        sendController.push();
    }
}
如果测试成功,我想你的手机已经收到了消息。那么恭喜你,已经大部分完成了这个微信公众号推送,可以说相当于是完成了80%
3.4、再接再厉😎
如果你已经成功完成上面步骤,那么接下来,只需要将地址,天气,日期,星座改成动态内容即可。即对接第三方接口。
日期格式代码:
/**
*	将今日日期转换成yyyy-MM-dd E:2022-09-09 星期四
*/
public static String format(){
        SimpleDateFormat myFmt3 = new SimpleDateFormat("yyyy-MM-dd E");
        Date now = new Date();
        return myFmt3.format(now);
}
对接天气接口代码:
接口地址是中华万年历的天气API
请求方式:GET
请求地址:
http://wthrcdn.etouch.cn/WeatherApi?city=城市名
返回数据:
1.数据包括温度、湿度、风力、风向、日出时间、日落时间
2.支持一些天气指数和穿衣建议等
3.返回数据为xml,所以我们要处理解析xml
请求示例:
http://wthrcdn.etouch.cn/WeatherApi?city=上海
返回结果示例:
<resp>
  <city>上海</city>
  <updatetime>16:46</updatetime>
  <wendu>28</wendu>
  <fengli>
    <![CDATA[ 1级 ]]>
  </fengli>
  <shidu>43%</shidu>
  <fengxiang>东南风</fengxiang>
  <sunrise_1>04:49</sunrise_1>
  <sunset_1>18:57</sunset_1>
.....
</resp>
实战:
1、利用Hutool的 HttpUtil 发送请求
public void getAll(){
        String url = "http://wthrcdn.etouch.cn/WeatherApi";
        HashMap<String, Object> param = new HashMap<>();
        param.put("city","成都");
        String response = HttpUtil.get(url, param);
        System.out.println(response);
}
2、再可以利用Hutool的 XmlUtil 对返回的xml解析
Document document = XmlUtil.parseXml(xml);
        String city = (String) XmlUtil.getByXPath("//resp/city", document, XPathConstants.STRING);
将xml字符串传入parseXml方法中得到Document对象中,再利用getByXPath方法能直接将想要的
内容
如果你想要的内容在xml节点里有多个,类似这样
<resp>
    ......
    <zhishus>
        <zhishu>
          <name>穿衣指数</name>
          <value>薄款春夏装</value>
          <detail>天气舒适,建议穿着薄款,透气的衣物。推荐:长T、长裙、长裤等。</detail>
        </zhishu>
        <zhishu>
          <name>紫外线强度</name>
          <value>紫外线较弱</value>
          <detail>紫外线强度弱,外出记得涂防晒霜,避免皮肤受到太阳辐射的危害。</detail>
        </zhishu>
        <zhishu>
          <name>护肤指数</name>
          <value>常规护肤</value>
          <detail>空气适宜,请根据皮肤类型,选择适合的常规护肤品。</detail>
        </zhishu>
        <zhishu>
          <name>洗车指数</name>
          <value>较适宜洗车</value>
          <detail>今明两日天气较好,可以放心洗车。</detail>
        </zhishu>
    </zhishus>
</resp>
而我想要其中一个detail节点内容
那么只能利用循环了
List<String> details = new ArrayList<String>();
try {
    org.dom4j.Document parseText = DocumentHelper.parseText(xml);
    Element rootElement = parseText.getRootElement();
    Element element = rootElement.element("zhishus");
    //遍历某个子节点,如resultcode
    for (Iterator i = element.elementIterator("zhishu"); i.hasNext(); ){
        Element  next = (Element) i.next();
        Element detail = next.element("detail");
        String text = detail.getText();
        details.add(text);
    }
} catch (DocumentException e) {
    e.printStackTrace();
}
计算距离生日天数代码:
/**
*  计算距离生日还有多少天
* @param addtime:参数:生日日期 例如:2022-09-09
*/
public static int getBirthDay(String addtime) {
    int days = 0;
    try {
        SimpleDateFormat myFormatter = new SimpleDateFormat("yyyy-MM-dd");
        String clidate = addtime;
        Calendar cToday = Calendar.getInstance(); // 存今天
        Calendar cBirth = Calendar.getInstance(); // 存生日
        cBirth.setTime(myFormatter.parse(clidate)); // 设置生日
        cBirth.set(Calendar.YEAR, cToday.get(Calendar.YEAR)); // 修改为本年
        if (cBirth.get(Calendar.DAY_OF_YEAR) < cToday.get(Calendar.DAY_OF_YEAR)) {
            // 生日已经过了,要算明年的了
            days = cToday.getActualMaximum(Calendar.DAY_OF_YEAR) - cToday.get(Calendar.DAY_OF_YEAR);
            days += cBirth.get(Calendar.DAY_OF_YEAR);
        } else {
            // 生日还没过
            days = cBirth.get(Calendar.DAY_OF_YEAR) - cToday.get(Calendar.DAY_OF_YEAR);
        }
    } catch (ParseException e) {
        e.printStackTrace();
    }
    return days;
}
定时任务:
需在启动类上加注解@EnableScheduling // 表示开启定时任务
@EnableScheduling
在需要执行定时任务的方法上注解@Scheduled
@Scheduled(cron = "0 30 9 * * ? ")
public void push(){
    //每天定时9点半执行逻辑
}
3.5、更上一层😀
如果想实现通用类推送消息,需要跟用户交互,思路:用户关注后,主动推送消息(消息内容就是叫用户回复消息),设置生日,昵称等信息,然后存到库中,然后每次发送消息时,从库中读取出来
1.用户关注后,主动推送消息你已经会了,略
2.用户发送消息后,我们要拿到用户发送的内容
用户发送消息后,我们要拿到用户发送的内容,将内容存到数据库中(包括关注用户id)
微信公众号有一系列的接口,比如我们要用到的接受消息接口,你就可以拿到用户给你发的消息内容

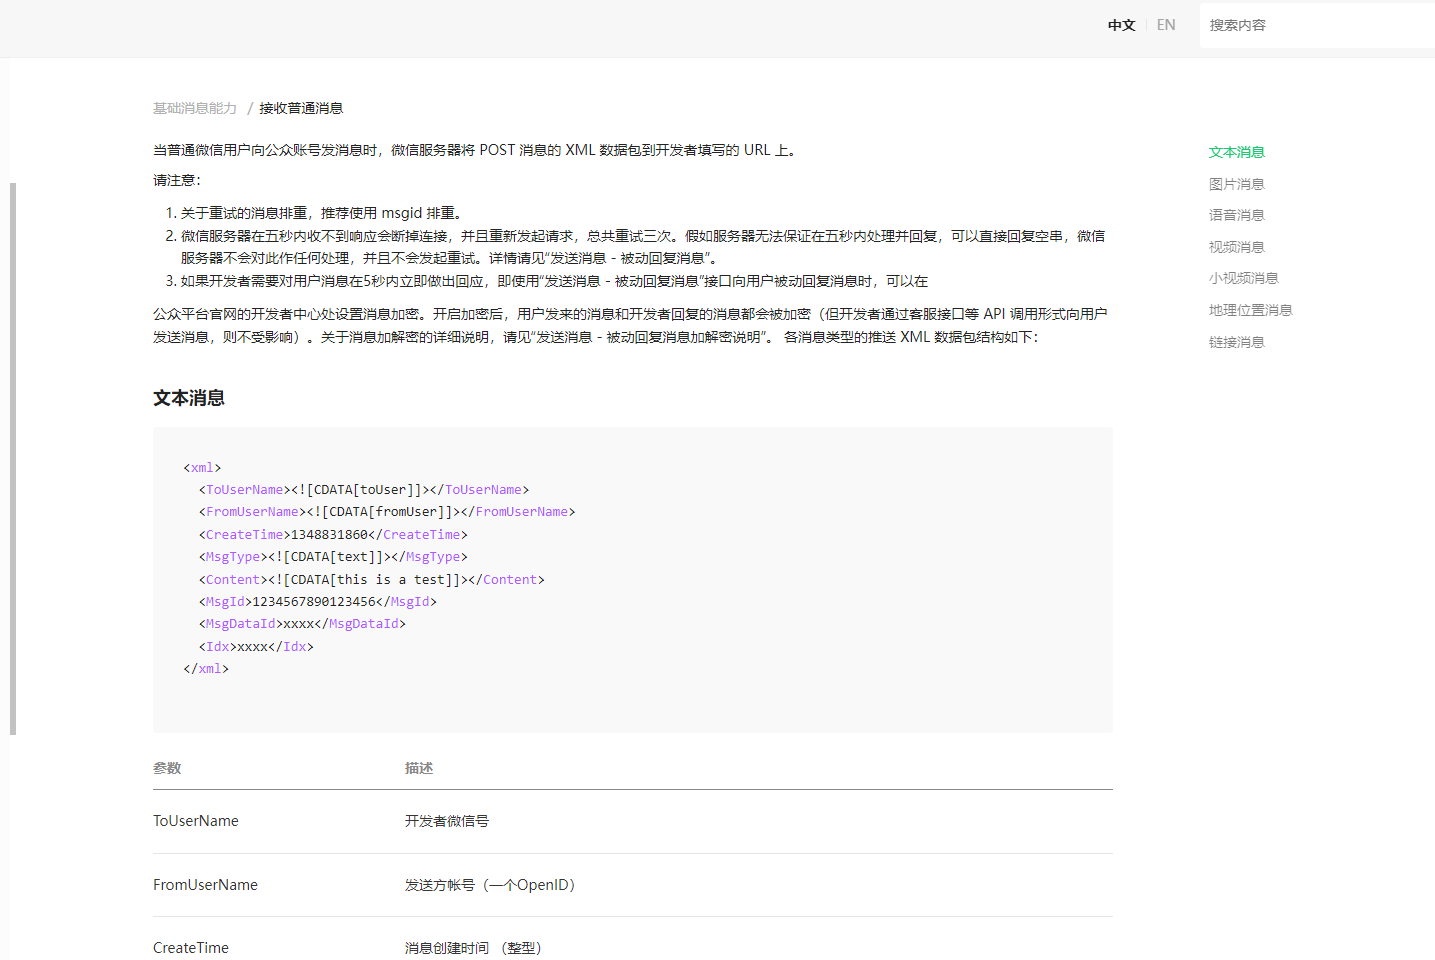
查看接口文档发现:
当关注用户给你发送消息后,微信服务器会用post请求来请求你的URL,会将xml数据包放入输入流中,这里有方法可以将request对象中的xml读取出来
/**
* dom4j 解析 xml 转换为 map
* @param request
* @return
* @throws Exception
*/
public static Map<String, String> parseXml(HttpServletRequest request) throws Exception {
    // 将解析结果存储在HashMap中
    Map<String, String> map = new HashMap<String, String>();
    // 从request中取得输入流
    InputStream inputStream = request.getInputStream();
    // 读取输入流
    SAXReader reader = new SAXReader();
    Document document = reader.read(inputStream);
    // 得到xml根元素
    Element root = document.getRootElement();
    // 得到根元素的所有子节点
    List<Element> elementList = root.elements();

    // 遍历所有子节点
    for (Element e : elementList) {
        map.put(e.getName(), e.getText());
    }
    // 释放资源
    inputStream.close();
    return map;
}
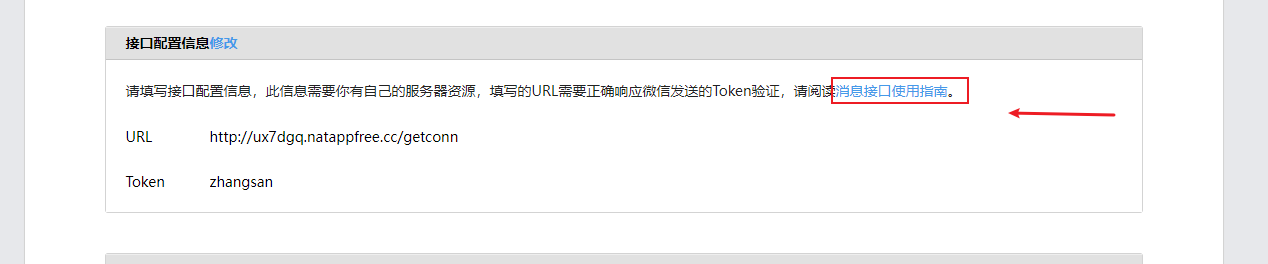
❓:微信服务器怎么知道我的URL是多少呢?
🙋:在公众号页面可以看到填写URL选项
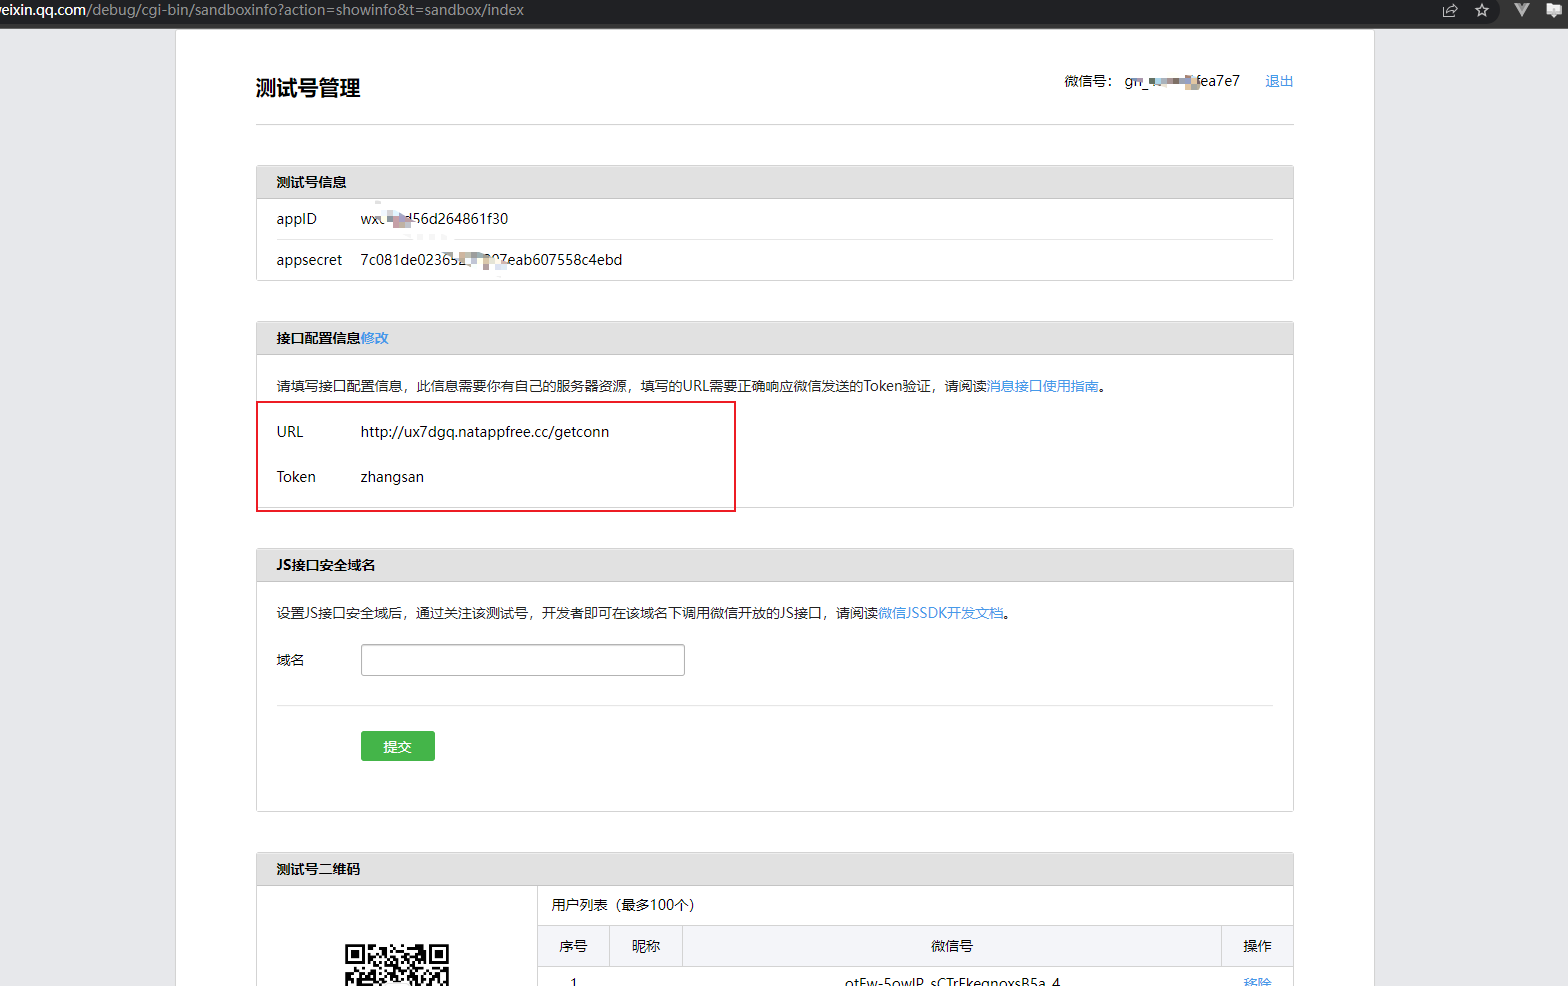
其中的URL便是映射到你的接口地址
TOKEN是随便写什么都可以,但是必须保证在验签时与之相同
❓:验签是什么意思?
🙋:你可以点开公众号页面的消息接口使用指南
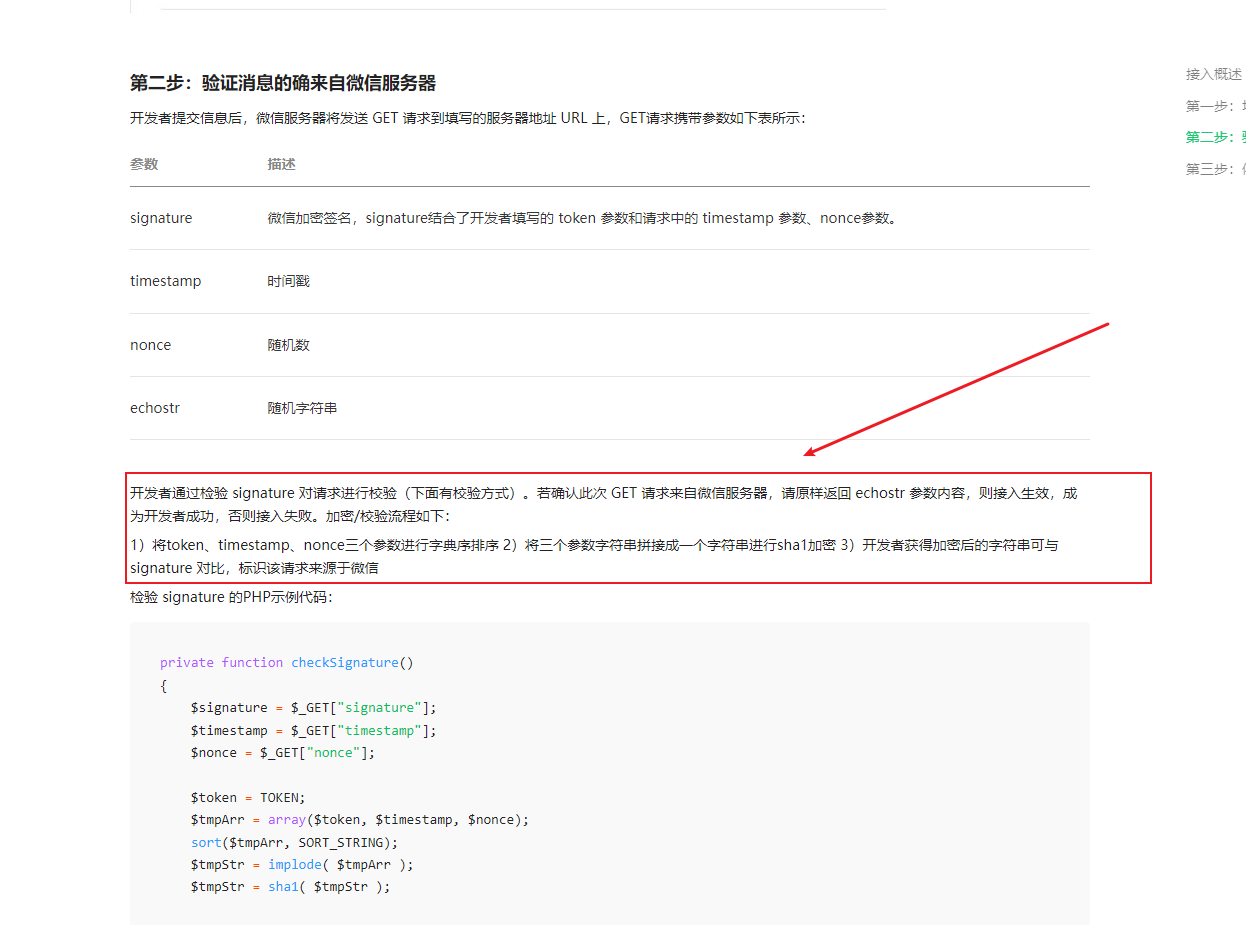
如图所示,微信服务器会以GET请求发送4个参数,如果加密对比相同,返回echostr随机字符串即可验签成功,如果验签失败,是不能配置URL选项的,由于你的URL必须能在公网上访问,所以在开发时可以使用内网穿透
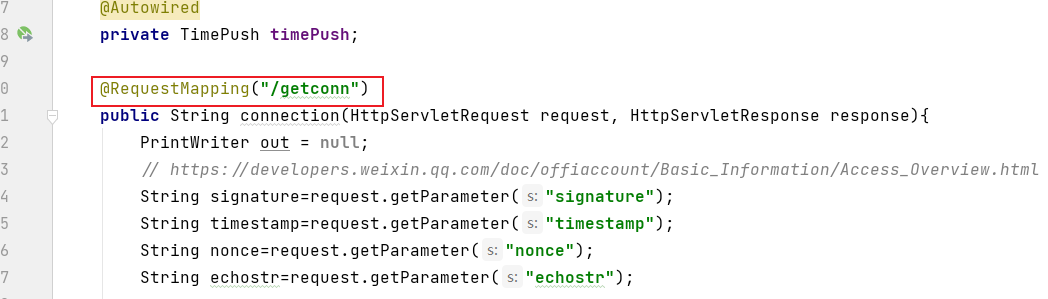
@RequestMapping("/getconn")
public String connection(HttpServletRequest request, HttpServletResponse response){
    PrintWriter out = null;
    // https://developers.weixin.qq.com/doc/offiaccount/Basic_Information/Access_Overview.html
    String signature=request.getParameter("signature");
    String timestamp=request.getParameter("timestamp");
    String nonce=request.getParameter("nonce");
    String echostr=request.getParameter("echostr");

    boolean isCheck = CheckOutUtil.checkSignature(signature, timestamp, nonce);
    if(isCheck){
        logger.info("验签成功!");
        return echostr;
    }
    if(!isCheck){
        logger.info("验签失败!");
        return null;
    }
}
CheckOutUtil工具类能完成验签功能
/**
 * @author :Simon
 * @date :Created in 2022/8/24 23:12
 * @description:签名认证工具类
 * @modified By:
 * @version: v1.0
 */
public class CheckOutUtil {
    // 与接口配置信息中的Token要一致
    private static String token = "zhangsan";

    /**
     * 验证签名
     *
     * @param signature
     * @param timestamp
     * @param nonce
     * @return
     */
    public static boolean checkSignature(String signature, String timestamp, String nonce) {
        String[] arr = new String[] { token, timestamp, nonce };
        // 将token、timestamp、nonce三个参数进行字典序排序
        // Arrays.sort(arr);
        sort(arr);
        StringBuilder content = new StringBuilder();
        for (int i = 0; i < arr.length; i++) {
            content.append(arr[i]);
        }
        MessageDigest md = null;
        String tmpStr = null;

        try {
            md = MessageDigest.getInstance("SHA-1");
            // 将三个参数字符串拼接成一个字符串进行sha1加密
            byte[] digest = md.digest(content.toString().getBytes());
            tmpStr = byteToStr(digest);
        } catch (NoSuchAlgorithmException e) {
            e.printStackTrace();
        }
        content = null;
        // 将sha1加密后的字符串可与signature对比,标识该请求来源于微信

        return tmpStr != null ? tmpStr.equals(signature.toUpperCase()) : false;
    }

    /**
     * 将字节数组转换为十六进制字符串
     *
     * @param byteArray
     * @return
     */
    private static String byteToStr(byte[] byteArray) {
        String strDigest = "";
        for (int i = 0; i < byteArray.length; i++) {
            strDigest += byteToHexStr(byteArray[i]);
        }
        return strDigest;
    }

    /**
     * 将字节转换为十六进制字符串
     *
     * @param mByte
     * @return
     */
    private static String byteToHexStr(byte mByte) {
        char[] Digit = { '0', '1', '2', '3', '4', '5', '6', '7', '8', '9', 'A', 'B', 'C', 'D', 'E', 'F' };
        char[] tempArr = new char[2];
        tempArr[0] = Digit[(mByte >>> 4) & 0X0F];
        tempArr[1] = Digit[mByte & 0X0F];
        String s = new String(tempArr);
        return s;
    }
    public static void sort(String a[]) {
        for (int i = 0; i < a.length - 1; i++) {
            for (int j = i + 1; j < a.length; j++) {
                if (a[j].compareTo(a[i]) < 0) {
                    String temp = a[i];
                    a[i] = a[j];
                    a[j] = temp;
                }
            }
        }
    }
}
具体的解析完xml后,你就可以完成任何想完成的事情
Map<String, String> map = CheckOutUtil.parseXml(request);
System.out.println(map);
String event = map.get("Event");
String msgType = map.get("MsgType");
String fromUserName = map.get("FromUserName");
String toUserName = map.get("ToUserName");
部署相关可以查看DEPLOY.md
试试看吧!如果你还有更多疑惑和问题,或者有更多见解的地方,可以加我q,我会解答你的疑惑
qq:2830224482
Github开源:https://github.com/nanxinghai/wxPush
         a[i] = a[j];
                a[j] = temp;
            }
        }
    }
}
}
具体的解析完xml后,你就可以完成任何想完成的事情

```java
Map<String, String> map = CheckOutUtil.parseXml(request);
System.out.println(map);
String event = map.get("Event");
String msgType = map.get("MsgType");
String fromUserName = map.get("FromUserName");
String toUserName = map.get("ToUserName");
部署相关可以查看DEPLOY.md
试试看吧!如果你还有更多疑惑和问题,或者有更多见解的地方,可以加我q,我会解答你的疑惑
qq:2830224482
Github开源:https://github.com/nanxinghai/wxPush


 2763
2763


 被折叠的 条评论
为什么被折叠?
被折叠的 条评论
为什么被折叠?
 到【灌水乐园】发言


