MyBatis-Plus3.5.2 学习指南

技术栈
技术类型 技术名称
数据源 HikariDataSource
数据库 h2/MySQL 8
数据持久化技术 MyBatis-Plus 3.5.2
Java后端框架 SpringBoot 2.7.5
代码编辑器 旗舰版 IDEA2022.2
依赖管理工具 Maven 3.6.3

1. 序言

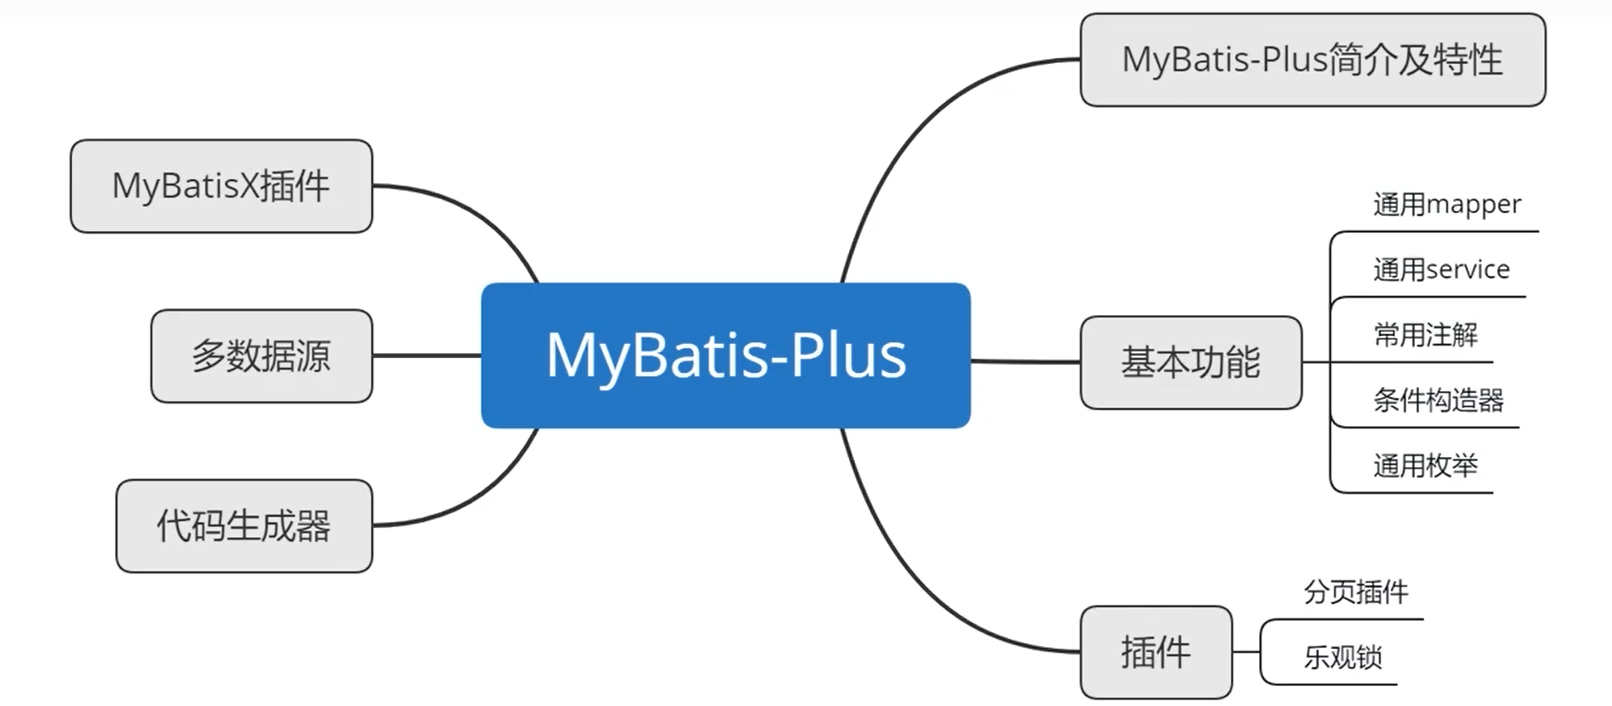
1.1 MyBatis-Plus 的思维导图

MyBatis-Plus思维导图
MyBatis-Plus思维导图

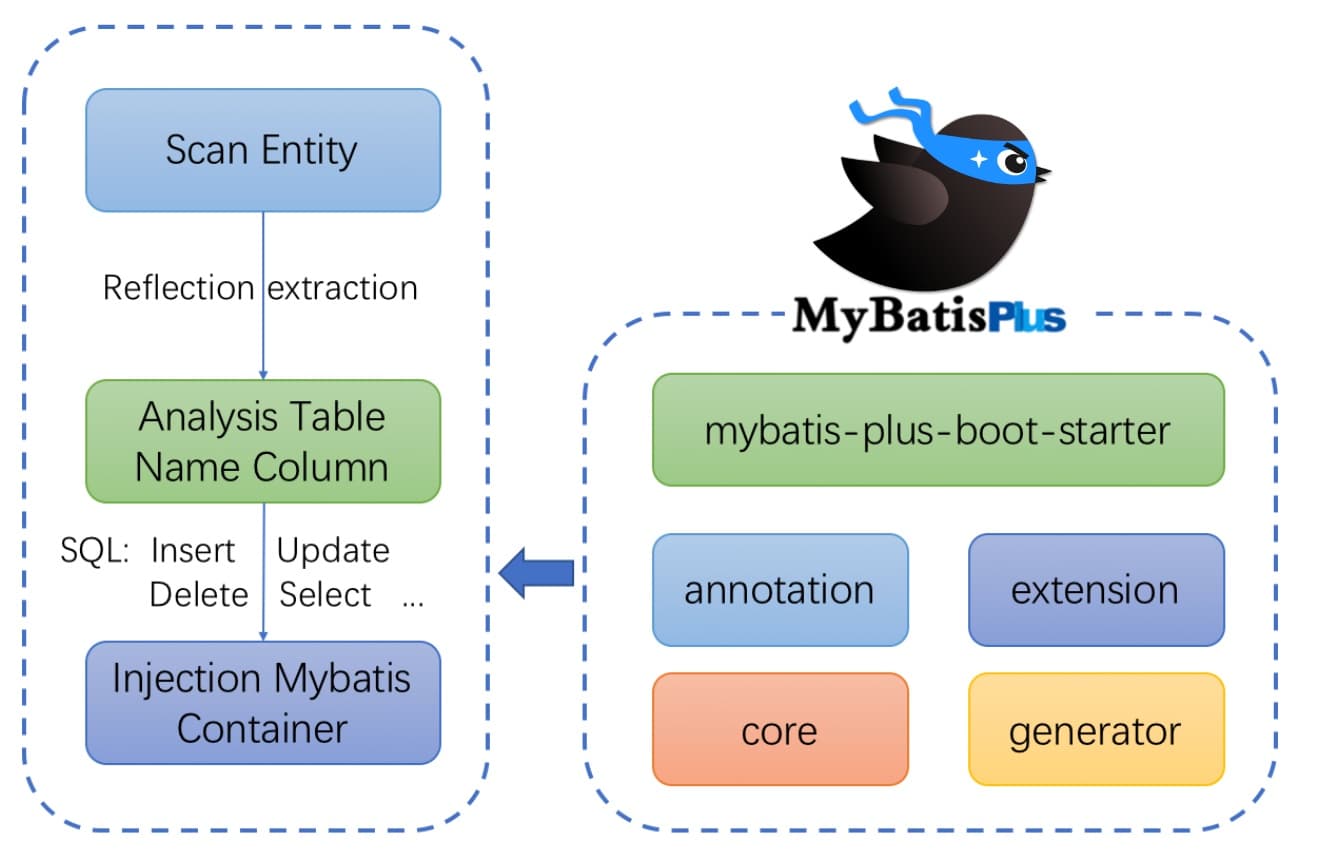
1.2 MyBatis-Plus 的工作原理

MyBatis-Plus工作原理
MyBatis-Plus工作原理

2. 入门案例

2.1 创建数据库

2.1.1 设计数据表Usr表

id name age email
1 Jone 18 [email protected]
2 Jack 20 [email protected]
3 Tom 28 [email protected]
4 Sandy 21 [email protected]
5 Billie 24 [email protected]

2.1.2 数据库 Schema 脚本

DROP TABLE IF EXISTS user;

CREATE TABLE user
(
    id INT NOT NULL COMMENT '主键ID',
    name VARCHAR(30NULL DEFAULT NULL COMMENT '姓名',
    age INT NULL DEFAULT NULL COMMENT '年龄',
    email VARCHAR(50NULL DEFAULT NULL COMMENT '邮箱',
    PRIMARY KEY (id)
);

2.1.3 数据库 Data 脚本

DELETE FROM user;
INSERT INTO user (idname, age, email) VALUES
(1'Jone'18'[email protected]'),
(2'Jack'20'[email protected]'),
(3'Tom'28'[email protected]'),
(4'Sandy'21'[email protected]'),
(5'Billie'24'[email protected]');

2.2 初始化 Spring Boot 过程

2.2.1 添加相关依赖

数据层技术=内置默认数据库H2 +数据持久层技术mybatis-plus+内置的数据源HikariDataSource

<!--pom.xml配置-->
  <!--数据持久化技术-->
        <dependency>
            <groupId>com.baomidou</groupId>
            <artifactId>mybatis-plus-boot-starter</artifactId>
            <version>3.5.2</version>
        </dependency>
        <!--jdbc规范,没有配置相关jdbc会报错(可以选择添加)-->
        <dependency>
            <groupId>org.springframework.boot</groupId>
            <artifactId>spring-boot-starter-data-jpa</artifactId>
        </dependency>
       <!--SpringBoot默认内置h2数据库(可以更换为其它类型的数据库)-->
        <dependency>
            <groupId>com.h2database</groupId>
            <artifactId>h2</artifactId>
            <scope>runtime</scope>
        </dependency>
        <!--lombok-->
        <dependency>
            <groupId>org.projectlombok</groupId>
            <artifactId>lombok</artifactId>
            <optional>true</optional>
        </dependency>
        <!--web,为了使用内置数据库h2的管理工具-->
        <dependency>
            <groupId>org.springframework.boot</groupId>
            <artifactId>spring-boot-starter-web</artifactId>
        </dependency>
        <!--测试-->
        <dependency>
            <groupId>org.springframework.boot</groupId>
            <artifactId>spring-boot-starter-test</artifactId>
            <scope>test</scope>
            <exclusions>
                <exclusion>
                    <groupId>org.junit.vintage</groupId>
                    <artifactId>junit-vintage-engine</artifactId>
                </exclusion>
            </exclusions>
        </dependency>
        <!--使用junit相关API--->
        <dependency>
            <groupId>junit</groupId>
            <artifactId>junit</artifactId>
            <scope>test</scope>
        </dependency>

2.2.2 修改配置文件

# application.yml配置
## 配置数据源
spring:
  datasource:
    url: jdbc:h2:~/test
    hikari:
      username: sa
      password: 123456
      driver-class-name: org.h2.Driver
   ## h2相关配置
    h2:
    console:
      ### 开启h2管理工具
      enabled: true
      ### 设置h2访问路径(http://localhost:端口/h2)
      path: /h2

## 配置mybatis-plus
mybatis-plus:
  configuration:
    log-impl: org.apache.ibatis.logging.stdout.StdOutImpl ### 开启日志

2.2.3 测试开发环境

步骤一:运行引导类Application.java

步骤二:在浏览器中输入:http://localhost:端口/h2,进入h2可是化管理工具。

步骤三:在h2可视化管理工具中执行相关SQL脚本

2.3 编码开发

2.3.1 编写实体类

package com.example.entity;

import lombok.Data;

@Data
public class User {
    private Long id;
    private String name;
    private Integer age;
    private String email;
}

2.3.2 编写 Mapper 接口

package com.example.mapper;

import com.baomidou.mybatisplus.core.mapper.BaseMapper;
import com.example.entity.User;
import org.apache.ibatis.annotations.Mapper;

@Mapper
public interface UserMapper extends BaseMapper<User{

}

小提示:

    另外一种方法是在引导类前加个@MapperScanner 注解指定需要扫描的 Mapper 接口所在的包,就可以不在每个 Mapper 接口上加@Mapper 注解了。

    若采用这种方法,IDEA 在 userMapper 处报错,因为找不到注入的对象,因为类是动态创建的,但是程序可以正确的执行。为了避免报错,可以在 mapper 接口上添加 @Repository 注解或者@Mapper 注解。

2.3.3 编写测试类

package com.example;

import com.example.entity.User;
import com.example.mapper.UserMapper;
import org.junit.Assert;
import org.junit.jupiter.api.Test;
import org.junit.runner.RunWith;
import org.springframework.beans.factory.annotation.Autowired;
import org.springframework.boot.test.context.SpringBootTest;
import org.springframework.test.context.junit4.SpringRunner;

import java.util.List;

@RunWith(SpringRunner.class)
@SpringBootTest
public class ApplicationTests 
{
    @Autowired
    private UserMapper userMapper;

    @Test
    void testSelect() {
        System.out.println(("----- selectAll method test ------"));
        List<User> userList = userMapper.selectList(null);
        Assert.assertEquals(5, userList.size());
        userList.forEach(System.out::println);
    }

}

2.3.4 控制台输出信息

	----- selectAll method test ------
Creating a new SqlSession
SqlSession [org.apache.ibatis.session.defaults.DefaultSqlSession@544e6b] was not registered for synchronization because synchronization is not active
JDBC Connection [HikariProxyConnection@393528546 wrapping conn0: url=jdbc:h2:~/test user=SA] will not be managed by Spring
==>  Preparing: SELECT id,name,age,email FROM user
==> Parameters: 
<==    Columns: ID, NAME, AGE, EMAIL
<==        Row: 1, Jone, 18, [email protected]
<==        Row: 2, Jack, 20, [email protected]
<==        Row: 3, Tom, 28, [email protected]
<==        Row: 4, Sandy, 21, [email protected]
<==        Row: 5, Billie, 24, [email protected]
<==      Total: 5
Closing non transactional SqlSession [org.apache.ibatis.session.defaults.DefaultSqlSession@544e6b]
 
User(id=1, name=Jone, age=18, [email protected])
User(id=2, name=Jack, age=20, [email protected])
User(id=3, name=Tom, age=28, [email protected])
User(id=4, name=Sandy, age=21, [email protected])
User(id=5, name=Billie, age=24, [email protected])    

3. 基本 CRUD

3.1 BaseMapper接口

MyBatis-Plus 中的基本 CRUD 在内置的BaseMapper中都已得到了实现,我们可以直接使用,接口如 下:

package com.baomidou.mybatisplus.core.mapper;
public interface BaseMapper<Textends Mapper<T{
 /**
  * 插入一条记录
  * @param entity 实体对象
  */

  int insert(T entity);

 //____________________________________________delete____________________________________________________
 /**
  * 根据 ID 删除
  * @param id 主键ID
  */

  int deleteById(Serializable id);
 /**
  * 根据实体(ID)删除
  * @param entity 实体对象
  * @since 3.4.4
  */

   int deleteById(T entity);
 /**
  * 根据 columnMap 条件,删除记录
  * @param columnMap 表字段 map 对象
  */

  int deleteByMap(@Param(Constants.COLUMN_MAP) Map<String, Object> columnMap);
 /**
  * 根据 entity 条件,删除记录
  * @param queryWrapper 实体对象封装操作类(可以为 null,里面的 entity 用于生成 where
语句)
  */

  int delete(@Param(Constants.WRAPPER) Wrapper<T> queryWrapper);
 /**
  * 删除(根据ID 批量删除)
  * @param idList 主键ID列表(不能为 null 以及 empty)
  */

  int deleteBatchIds(@Param(Constants.COLLECTION) Collection<? extends Serializable> idList);

 //____________________________________________update____________________________________________________
 /**
  * 根据 ID 修改
  * @param entity 实体对象
  */

  int updateById(@Param(Constants.ENTITY) T entity);
 /**
  * 根据 whereEntity 条件,更新记录
  * @param entity    实体对象 (set 条件值,可以为 null)
  * @param updateWrapper 实体对象封装操作类(可以为 null,里面的 entity 用于生成
where 语句)
  */

  int update(@Param(Constants.ENTITY) T entity, @Param(Constants.WRAPPER) Wrapper<T> updateWrapper);

 //____________________________________________select____________________________________________________
 /**
  * 根据 ID 查询
  * @param id 主键ID
  */

  selectById(Serializable id);
 /**
  * 查询(根据ID 批量查询)
  * @param idList 主键ID列表(不能为 null 以及 empty)
  */

  List<T> selectBatchIds(@Param(Constants.COLLECTION) Collection<? extends Serializable> idList);
 /**
  * 查询(根据 columnMap 条件)
  * @param columnMap 表字段 map 对象
  */

  List<T> selectByMap(@Param(Constants.COLUMN_MAP) Map<String, Object>columnMap);

 //____________________________________________条件查询__________________________________________________
 /**
  * 根据 entity 条件,查询一条记录
  * <p>查询一条记录,例如 qw.last("limit 1") 限制取一条记录, 注意:多条数据会报异常
</p>
  * @param queryWrapper 实体对象封装操作类(可以为 null)
  */

   default T selectOne(@Param(Constants.WRAPPER) Wrapper<T> queryWrapper) {
    List<T> ts = this.selectList(queryWrapper);
    if (CollectionUtils.isNotEmpty(ts)) {
      if (ts.size() != 1) {
        throw ExceptionUtils.mpe("One record is expected, but the query result is multiple records");
     }
      return ts.get(0);
   }
    return null;
 }
 /**
  * 根据 Wrapper 条件,查询总记录数
  * @param queryWrapper 实体对象封装操作类(可以为 null)
  */

  Long selectCount(@Param(Constants.WRAPPER) Wrapper<T> queryWrapper);
  /**
  * 根据 entity 条件,查询全部记录
  * @param queryWrapper 实体对象封装操作类(可以为 null)
  */

  List<T> selectList(@Param(Constants.WRAPPER) Wrapper<T> queryWrapper);
  /**
  * 根据 Wrapper 条件,查询全部记录
  * @param queryWrapper 实体对象封装操作类(可以为 null)
  */

  List<Map<String, Object>> selectMaps(@Param(Constants.WRAPPER) Wrapper<T> queryWrapper);
  /**
  * 根据 Wrapper 条件,查询全部记录
  * <p>注意: 只返回第一个字段的值</p>
  * @param queryWrapper 实体对象封装操作类(可以为 null)
  */

  List<Object> selectObjs(@Param(Constants.WRAPPER) Wrapper<T> queryWrapper);
  /**
  * 根据 entity 条件,查询全部记录(并翻页)
  * @param page     分页查询条件(可以为 RowBounds.DEFAULT)
  * @param queryWrapper 实体对象封装操作类(可以为 null)
  */

  <P extends IPage<T>> selectPage(P page, @Param(Constants.WRAPPER) Wrapper<T> queryWrapper);
  /**
  * 根据 Wrapper 条件,查询全部记录(并翻页)
  * @param page     分页查询条件
  * @param queryWrapper 实体对象封装操作类
  */

  <P extends IPage<Map<String, Object>>> selectMapsPage(P page,@Param(Constants.WRAPPER) Wrapper<T> queryWrapper);
}

3.2 插入

//添加
@Test
void testInsert(){
    User user = new User();
    user.setName("Helen");
    user.setAge(18);
    user.setEmail("[email protected]");
    //INSERT INTO user ( id, name, age, email ) VALUES ( ?, ?, ?, ? )
    int result = userMapper.insert(user);
    System.out.println(result);
    //1475754982694199298
    System.out.println(user);
}

注意:最终执行的结果,所获取的 id 为 1475754982694199298 这是因为 MyBatis-Plus 在实现插入数据时,会默认基于雪花算法的策略生成 id(详情参考:主键策略

3.3 删除

3.3.1 通过 id 删除记录

    @Test
    void testDeleteById(){
        //通过id删除用户信息
        //DELETE FROM user WHERE id=?
        int result = userMapper.deleteById(8L);
        System.out.println(result);
    }

  • 0
    点赞
  • 1
    收藏
    觉得还不错? 一键收藏
  • 1
    评论
1.5-第六版.ec 1.bat 24位转单色位图模块.ec 3.46.ec 33个皮肤模块.ec 3D旋转迅雷信息框模块.ec 69msn.ec 78个皮肤模块.ec ACCESS到高级表格.ec Access操作.ec ACCSEE记录显示到超级列表框模块.ec ACSII加解密模块2.0.ec AD.ec ADO方式填充树型框.ec anchors.ec API操作模块.ec ASP网络验证商业模块2.3.ec Base64编解码.ec BASE64编解码模块.ec Bios信息.ec BMP滤镜模块.ec BoyChong-神2多方式取IP模块.ec BoyChong专用常用模块2.ec BPL专用更新模块.ec CALL残雪专用.ec cards.ec change.ec coolp.ec Cool皮肤模块.ec copy_dir.ec CPU占用率检测模块.ec cs.ec DES加密模块 1.0.ec DIY热键框模块.ec DLL注入模块.ec DOS命令模块.ec E.M.O_11.ec EC.EC ecom.ec EdbServer1.0客户端.ec EDB、高级表格、XLS互换.ec edb到html-1.0.ec EDB数据库客户端模块 1.0.ec edb数据库转Excel模块 1.0.ec edb数据库转Excel模块 1.3.ec edb转xls.ec eOgre.ec EtfAPI.ec ETimeFly API模块.ec Excel功能模块.ec EXE→SWF转换模块.ec ExportEdb.ec E库多条件查询模块.ec E库模糊查询模块.ec E电子琴.ec E语言驱动保护模块1[1].1.ec fhhs.ec files.txt FlyFox_hotkey.ec ForceSample.ec freemark模块_取文件.ec g.ec gdiplus类模块.ec GetPic.ec GetStringSize.ec Hex-Dec.ec hide.ec hotkey30.ec HTTP.ec http_ec.ec HTTP访问模块 .ec Http访问模块.ec HTTP访问模块1.0.ec HTTP访问模块1.1.ec IC卡读写模块 1.0.ec Idoit内存皮肤模块.ec internet2.ec IPbox2.ec IP地址编辑框2.0.ec jb8.ec jingjian.ec kernel模块.EC LED液晶控件模块(红色增强版).ec Link22.ec MD5取数据摘要.EC MDB到超级列表框.ec mmqrOICQ.ec mp3信息模块.ec MVA保护壳.ec NT系统服务.ec OCX控件高级注册.ec ODBC方式填充树型框.ec PGBEAPICopy.ec powerdll.ec ProcessInfo.ec ProgressBar.ec qp编解码.ec QQ登录.ec QQ通讯协议模块.ec RAR压缩.ec RAR压缩模块 1.0.ec RC4 加密算法 1.0.ec RC4-林子深.EC RC4.EC RC4加密算法.ec RegEx.ec RegEx1.ec rhmisc.ec runtime.ec RUN加减模块1.0+名.ec SAVEPIC.EC SetIEProxy.ec setuser.ec sev.ec SHELL32.EC ShutDown.ec SH_RAR.EC SIMIXP.EC simixp1.0.ec simixp1.01.ec simixp1.02.ec simixp3.0.ec simixp4.0.ec SkinSharp易皮肤模块.ec Skin_Vision.ec SMTP.EC sockhook.e SPEED.EC spell.ec SQL.ec Sqlite数据库加强.ec Sqlite表管理.ec SQL到文本.ec SQL基本语句.ec sql操作模块.ec SQL数据库操作模块.ec SQL数据库最新操作模块.ec Star.ec StarlightExtinction.ec status.ec status2.ec strawhat.ec Super-EC 4.0.ec Super-EC-验证.ec Super-EC.ec Super-EC.ec1 Super-EC1.ec Super-EC3.7破解版.ec Super-EC4.05破解版.ec Super-EC4.0破解版.ec Super-EC4.26.ec Super-EC4.2破解版.ec super-ec4.5.ec Super-EC4.50.ec Super-EC4.505.ec Super-EC4.55.ec Super-EC46.ec Super-EC_v2.3破解版.ec Super-EC_v2.56破解版.ec Super-EC_v2.5破解版.ec Super-EC_v2.6破解版.ec Super-EC_v2.7破解版.ec Super-EC_v2.8破解版.ec Super-EC_v2.95破解版.ec Super-EC_v2.9破解版.ec Super-EC_v3.01破解版.ec Super-EC_v3.02破解版.ec Super-EC_v3.0破解版.ec Super-EC_v3.11破解版.ec Super-EC_v3.16破解版.ec Super-EC_v3.1破解版.ec Super-EC_v3.23破解版.ec Super-EC_v3.25破解版.ec Super-EC_v3.28b破解版.ec Super-EC_v3.28破解版.ec Super-EC_v3.2破解版.ec Super-EC_v3.31破解版.ec Super-EC_v3.35破解版.ec Super-EC_v3.3破解版.ec Super-EC_v3.4破解版.ec Super-EC_v3.51破解版.ec Super-EC_v3.52破解版.ec Super-EC_v3.5破解版.ec Super-EC_v3.65破解版.ec Super-EC_v3.6破解版.ec Super-EC超级模块3[1].25.ec Super4.26-EC.ec SysResInfo.ec taskbar.ec TCP服务器.ec tcsxk.ec TESTECOM.EC tip.ec Tooltip26.ec Tooltip261.ec Tooltip27.ec Tooltip272Alpha版.ec Tooltip30版[易语言3.0以上版本].ec Tooltip31版[易语言3.0以上版本].ec Trackbar.ec TTS.EC TWnet.CN.EC UiwH8yxQ.ec URL编码解码.ec USB.ec USER32.EC user32模块.EC user模块.EC USUAL.EC VERSION.EC Vista风格化.ec VPN.ec w de jiasu (1).ec w de jiasu (2).ec W.y.k_!易模块1.10.ec W.y.k_!萧筱.ec WBCZ.EC WBFH.EC wf.ec WF1.EC WinAPI_窗口与组件.ec windowsXP界面模拟模块1.0.ec windowsXP界面模拟模块1.01.ec windowsXP界面模拟模块1.02.ec windowsXP界面模拟模块1.03.ec windowsXP界面模拟模块3.0.ec windowsXP界面模拟模块4.0版.ec Windows消息函数.ec winsys.ec WYSQL客户端.ec W[1].y.k_!萧筱.ec xlAbout.ec XP-OK.EC XP.EC XP_EC.EC XP单选框1.1.ec XP完美模拟专家.EC XP按钮1.1.ec XP界面模拟模块3.1版.ec XP皮肤1.6.ec XP选择框1.1.ec xSpeed.ec YYJ.ec YYJJ.ec ZCL_多线程类1.01.ec ZCL_控件类库1.01.ec ZCL_文件读写1.01.ec ZCL_核库函数1.01.ec zip.ec zip压缩.ec zyJson.ec [YY][IS]查找模块.ec _易语言皮肤模块.EC 代码编辑器部分模块.ec 传世注册.ec 保存图片(1.0).EC 保存图片1.0.ec 保存扩展界面设置.ec 保存模块.ec 保护.ec 保证显示.ec 冰川多媒体播放模块 1.0.ec 创建任意目录 1.0.0.2.ec 创建多级目录-西风.ec 创建多级目录.ec 创建快捷方式1.0-西风.ec 创建快捷方式模块2.2.ec 创建快捷方式正.ec 创建数据库模块 1.0 .ec 创建时钟事件.ec 办公组件密码管理模块.ec 变速模块(1.0).EC 变速模块.ec 大强工作室关于窗口.ec 安全关机.ec 常用API.ec 常用功能.ec 常用模块1.2.ec 常用软件性能优化模块.ec 弹出下载窗口.ec 弹出网页广告.ec 成组随机数.ec 打印数据1.20-绿营.ec 打印模块.ec 打印预览1.1.ec 打印预览1.3.ec 打印预览1.33.ec 打印预览2.41(注册表配置).ec 打印预览2.42(外部文件配置).ec 打印预览2.44(注册表配置).ec 打印预览2.45(注册表配置).ec 打印预览模块 1.0.ec 打开外部关联文件及调用系统关于窗口模块 1.0.ec 打开多文件对话框.ec 按列排序超级列表框1.ec 播放音频.ec 操作外部列表框.ec 操作外部组合框.ec 操作外部超级列表框1.0.ec 斑马模块.ec 本土化易模块(已加到果子).ec 本土化易模块.ec 查找窗口内所有组件句柄.ec 查找窗口或进程并关闭.ec 查杀程序.ec 比较大小.ec 淡淡网络共享代码.ec 爱信api模块.ec 爱萧模块.ec 百度回贴模块.ec 磁性窗口2.0.ec 磁性窗口模块V1.0.ec 磁盘操作.ec 磁盘格式化模块 1.0.ec 磁盘相关.ec 程序内存的读写.ec 程序是否运行.EC 程序是否运行2.EC 程序自杀.ec 窗口-控件锚点.ec 窗口动画效果模块 V1.0.ec 窗口化游戏.ec 窗口句柄&进程名互取.ec 窗口句柄查询.ec 窗口外形任我设.ec 窗口总在最前.ec 窗口整容师(1.0).EC 窗口整容师(1.1).ec 窗口整容师1.0.EC 窗口整容师1.1.ec 窗口热键.ec 窗口贴边隐藏模块.ec 窗口透明模块.ec 编码转换大全.ec 编辑标准格式公文2.0.ec 编辑框禁止字符1.0.ec 编辑框辅助功能.ec 编辑框高亮模块.ec 菜单加图片模块 1.0.ec 菜单的一些修改操作.ec 菜单项加图片.ec 表格公式模块.ec 超文本浏览框功能扩展模块1.2.ec 超级下载接口模块.ec 超级信息框.ec 超级列表框交替色.ec 超级列表框列宽尺寸自动调整.ec 超级列表框到文件.ec 超级列表框功能扩展2.2.ec 超级列表框单列排序.ec 超级列表框存为网页.ec 超级列表框导出EXECL.ec 超级列表框打印预览1.33.ec 超级列表框扩展模块.ec 超级列表框排序.ec 超级列表框提速模块.ec 超级列表框操作类.ec 超级列表框数据库排序.ec 超级列表框斩月模块.ec 超级列表框显示ACCESS表中数据.ec 超级列表框模糊查找.ec 超级列表框背景.ec 超级列表框补丁1.0.ec 超级列表框补助.ec 超级列表框选中项存为Excel文件.ec 超级列表框选择框状态被改变.ec 超级打印预览0716a.ec 超级模块(2.1).ec 超级模块4.1正式破解版.ec 超级模块8.0正式.ec 超级模拟msn模块(1.0).ec 超级表达式计算.ec 超速读取网页源码.ec 部品管理模块.ec
MyBatis-Plus是一个MyBatis的增强工具,在MyBatis的基础上进行了扩展,提供了更加便捷的CRUD操作、分页、乐观锁、逻辑删除等功能。而MyBatis-Plus的代码生成器则是MyBatis-Plus中的一个子模块,用于生成基于MyBatis-Plus的CRUD代码。 MyBatis-Plus的代码生成器是一个基于Velocity模板引擎的代码生成器,支持生成Java、XML、SQL脚本等文件。使用MyBatis-Plus的代码生成器可以快速生成CRUD代码,减少手动编写代码的工作量。 下面是使用MyBatis-Plus3.5.2代码生成器生成代码的步骤: 1. 添加MyBatis-Plus的依赖 在pom.xml文件中添加以下依赖: ```xml <dependency> <groupId>com.baomidou</groupId> <artifactId>mybatis-plus-generator</artifactId> <version>3.5.2</version> </dependency> ``` 2. 编写代码生成器配置文件 在src/main/resources目录下创建generator.properties文件,编写代码生成器的配置信息,例如: ```properties # 数据库配置 jdbc.driver=com.mysql.jdbc.Driver jdbc.url=jdbc:mysql://localhost:3306/mybatis_plus?useUnicode=true&characterEncoding=utf-8&serverTimezone=GMT%2B8 jdbc.username=root jdbc.password=root # 代码生成器配置 outputDir=D:/code-generator author=MyBatis-Plus fileOverride=true openDir=false ``` 其中,jdbc.driver、jdbc.url、jdbc.username、jdbc.password是数据库的配置信息,outputDir是生成文件的输出目录,author是代码的作者,fileOverride是是否覆盖已有文件,openDir是是否打开输出目录。 3. 编写代码生成器模板文件 在src/main/resources/templates目录下创建模板文件,例如entity.java.vm、mapper.xml.vm、service.java.vm、serviceImpl.java.vm等,编写模板文件的内容。 模板文件中使用Velocity的语法,可以使用变量、条件语句、循环语句等,例如: ```java package ${packageName}; import com.baomidou.mybatisplus.annotation.TableName; import lombok.Data; /** * ${tableComment} */ @Data @TableName("${tableName}") public class ${entityName} { #foreach($column in $table.columns) /** * ${column.columnComment} */ private ${column.javaType} ${column.fieldName}; #end } ``` 在模板文件中,$packageName、$tableComment、$tableName、$entityName、$table.columns等都是变量,会根据生成器配置文件和数据库表的信息动态替换为具体的值。 4. 运行代码生成器 编写好配置文件和模板文件后,就可以运行代码生成器了。在Java代码中使用CodeGenerator类,并传入配置文件和模板文件的路径,即可启动代码生成器,例如: ```java public class MybatisPlusGenerator { public static void main(String[] args) { String configFile = "generator.properties"; String templatePath = "/templates/%s.vm"; AutoGenerator generator = new AutoGenerator(); // 全局配置 GlobalConfig globalConfig = new GlobalConfig(); globalConfig.setAuthor(PropertyUtil.getProperty(configFile, "author")); globalConfig.setFileOverride(Boolean.parseBoolean(PropertyUtil.getProperty(configFile, "fileOverride"))); globalConfig.setOpen(Boolean.parseBoolean(PropertyUtil.getProperty(configFile, "openDir"))); globalConfig.setOutputDir(PropertyUtil.getProperty(configFile, "outputDir")); generator.setGlobalConfig(globalConfig); // 数据源配置 DataSourceConfig dataSourceConfig = new DataSourceConfig(); dataSourceConfig.setDbType(DbType.MYSQL); dataSourceConfig.setDriverName(PropertyUtil.getProperty(configFile, "jdbc.driver")); dataSourceConfig.setUrl(PropertyUtil.getProperty(configFile, "jdbc.url")); dataSourceConfig.setUsername(PropertyUtil.getProperty(configFile, "jdbc.username")); dataSourceConfig.setPassword(PropertyUtil.getProperty(configFile, "jdbc.password")); generator.setDataSource(dataSourceConfig); // 包配置 PackageConfig packageConfig = new PackageConfig(); packageConfig.setParent(PropertyUtil.getProperty(configFile, "package")); generator.setPackageInfo(packageConfig); // 自定义配置 InjectionConfig injectionConfig = new InjectionConfig() { @Override public void initMap() { } }; injectionConfig.setFileOutConfigList(getFileOutConfigList(templatePath)); generator.setCfg(injectionConfig); // 配置模板 TemplateConfig templateConfig = new TemplateConfig(); templateConfig.setXml(null); generator.setTemplate(templateConfig); // 策略配置 StrategyConfig strategyConfig = new StrategyConfig(); strategyConfig.setNaming(NamingStrategy.underline_to_camel); strategyConfig.setColumnNaming(NamingStrategy.underline_to_camel); strategyConfig.setEntityLombokModel(true); strategyConfig.setRestControllerStyle(true); strategyConfig.setInclude(PropertyUtil.getProperty(configFile, "tableNames").split(",")); generator.setStrategy(strategyConfig); generator.execute(); } private static List<FileOutConfig> getFileOutConfigList(String templatePath) { List<FileOutConfig> fileOutConfigList = new ArrayList<>(); fileOutConfigList.add(new FileOutConfig(templatePath) { @Override public String outputFile(TableInfo tableInfo) { return String.format("%s/%s%s", PropertyUtil.getProperty("generator.properties", "outputDir"), tableInfo.getEntityName(), this.getSuffix()); } }); return fileOutConfigList; } } ``` 在代码中,使用AutoGenerator类配置全局配置、数据源配置、包配置、自定义配置、模板配置、策略配置等,然后调用execute()方法即可生成代码。 总结:使用MyBatis-Plus的代码生成器可以快速生成基于MyBatis-Plus的CRUD代码,减少手动编写代码的工作量,提高开发效率。需要注意的是,生成的代码只是基础代码,需要根据具体业务进行修改和优化。

“相关推荐”对你有帮助么?

  • 非常没帮助
  • 没帮助
  • 一般
  • 有帮助
  • 非常有帮助
提交
评论 1
添加红包

请填写红包祝福语或标题

红包个数最小为10个

红包金额最低5元

当前余额3.43前往充值 >
需支付:10.00
成就一亿技术人!
领取后你会自动成为博主和红包主的粉丝 规则
hope_wisdom
发出的红包
实付
使用余额支付
点击重新获取
扫码支付
钱包余额 0

抵扣说明:

1.余额是钱包充值的虚拟货币,按照1:1的比例进行支付金额的抵扣。
2.余额无法直接购买下载,可以购买VIP、付费专栏及课程。

余额充值