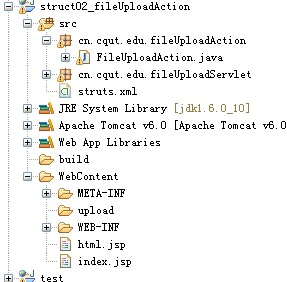
上次用了servlet上传文件,这回用struct2试试呢!
废话少说。开始。。
先看看结构图

第一步:当然是添加必要的包了,这里就不必说了。
第二步:写index.jsp
   <form enctype="multipart/form-data" action="fileUpload"  method="post" >
    	  用Structs2 Action 上传文件:<br/>
               用户名:<input type="text" name="usename"> <br/>
               上传文件:<input type="file" name="upload"><br/>
              上传文件: <input type="file" name="upload"><br/>
              <input type="submit" value="提交"/>
     </form>
注意<form enctype="multipart/form-data" method="post" >
第三步:写fileUpload类
在包cn.cqut.edu.fileUploadAction写一个类FileUpload
package cn.cqut.edu.fileUploadAction;

import java.io.File;
import java.io.FileInputStream;
import java.io.FileOutputStream;
import java.util.Date;

import org.apache.struts2.ServletActionContext;

import com.opensymphony.xwork2.ActionSupport;

public class FileUploadAction{

	private File[] upload;
	private String[] uploadContentType;
	private String[] uploadFileName;
	private String savePath ;

	public String execute() throws Exception{
		System.out.println("FileUploadAction ------> excult");
		String path = this.getSavePath() ;
		for (int i = 0; i < upload.length; i++) {
			String name = new Date().getTime() +"_"+ this.getUploadFileName()[i];
			FileInputStream in = new FileInputStream(this.getUpload()[i]) ;
			FileOutputStream out = new FileOutputStream(path + "\\" + name) ;
			byte[] b = new byte[in.available()] ;
			in.read(b) ;
			out.write(b) ;
			out.close() ;
			in.close() ;
			System.out.println("上传成功");
		}
		return "success" ;
	}

	public File[] getUpload() {
		return upload;
	}

	public void setUpload(File[] upload) {
		this.upload = upload;
	}

	public String[] getUploadContentType() {
		return uploadContentType;
	}

	public void setUploadContentType(String[] uploadContentType) {
		this.uploadContentType = uploadContentType;
	}

	public String[] getUploadFileName() {
		return uploadFileName;
	}

	public void setUploadFileName(String[] uploadFileName) {
		this.uploadFileName = uploadFileName;
	}

	public String getSavePath() {
		savePath = ServletActionContext.getServletContext().getRealPath("//upload");
		return savePath;
	}

	public void setSavePath(String savePath) {
		this.savePath = savePath;
	}

}
注意
private File[] upload;
private String[] uploadContentType;
private String[] uploadFileName;
三个变量必须命名规则:XXContentType ,XXFileName的XX是File[] XX;
private String savePath ;为保存路径;
第四步:配置src路径下的structs.xml
<!DOCTYPE struts PUBLIC
        "-//Apache Software Foundation//DTD Struts Configuration 2.0//EN"
        "http://struts.apache.org/dtds/struts-2.0.dtd">
<struts>
    <constant name="struts.multipart.saveDir" value="C:\\debug"></constant>

    <package name="default" extends="struts-default">
        <action name="fileUpload" class="cn.cqut.edu.fileUploadAction.FileUploadAction">
            <result name="success">/html.jsp</result>
            <param name="savePath">/upload</param>
        </action>
    </package>
</struts>
constant全局变量 为保存上传文件的临时路径,上传成功后。系统会自动上传路径下的临时文件。我这里把临时文件放在了C:\debug这个路径下。而真正保存的路径是
savePath ;
第五步:配置web.xml
添加
<filter>
        <filter-name>struts2</filter-name>
        <filter-class>org.apache.struts2.dispatcher.ng.filter.StrutsPrepareAndExecuteFilter</filter-class>
    </filter>

    <filter-mapping>
        <filter-name>struts2</filter-name>
        <url-pattern>/*</url-pattern>
    </filter-mapping>
这样就大功告成了,运行试试吧
不要忘记了文件存放的路径哦


 2848
2848

 被折叠的 条评论
为什么被折叠?


