


 本文介绍了如何在WriteTextPage页面中添加一个显示章节列表的按钮,利用ModalNavigationDrawer实现抽屉功能,并处理了参数设置如DrawerState、gesturesEnabled以及如何通过ViewModel关联数据库操作,以便快速跳转章节。
好的,又有新的需求了,现在我想在WriteTextPage页面添加一个显示章节列表的按钮,这样,我就能快速跳转到我想去的章节,不至于返回主页面再重新进入小说章节列表页面找。
那么我们首先要做的,就是给页面添加抽屉功能。
1、ModalNavigationDrawer的使用
在新版的Scaffold中,已经将Drawer功能独立出去了,所以如果你再打开Scaffold定义的文件中,是找不到drawer相关的属性的。
那么我们先看下官方代码:
fun ModalNavigationDrawer(
    drawerContent: @Composable () -> Unit,
    modifier: Modifier = Modifier,
    drawerState: DrawerState = rememberDrawerState(DrawerValue.Closed),
    gesturesEnabled: Boolean = true,
    scrimColor: Color = DrawerDefaults.scrimColor,
    content: @Composable () -> Unit
)
从变量名字上基本也能猜个七七八八:
drawerContent: 放抽屉里面的东西,可以是布局啥的
drawerState: 抽屉的状态,打开还是关闭
gesturesEnabled: 手势使能,能不能侧滑拖出抽屉
scrimColor: 底色,抽屉拖出来时的一个页面覆盖颜色
content: 放抽屉以外的内容
从上面的变量使用中就能知道,我们只需要写成这样就行:
ModalNavigationDrawer(
        drawerState = drawerState,
        gesturesEnabled = drawerState.isOpen,
        drawerContent = {})
 {
        Scaffold(){}

}
注意Scaffold是ModalNavigationDrawer的content
Scaffold位置直接将我们原来的布局复制进去就行,其他参数,我们再说说。
2、参数设置
2.1 drawerState
在有了上面的框架之后,我们首先要解决的是抽屉的状态drawerState,它的声明如下:
val drawerState = rememberDrawerState(DrawerValue.Closed)可以看到,这里我给它的初值是关闭。
那我们要如何控制抽屉的开闭呢?
需要调用两个函数:
drawerState.close()
drawerState.open()
不幸的是,这两个函数是两个挂起函数,不能直接在主线程中运行,所以还需要协程的支持:
val scope = rememberCoroutineScope()并在onClick或者clickable函数中调用:
scope.launch {drawerState.close()}注意,这里必须是在onClick或者clickable函数中调用,此外的地方要用我们上篇讲的LaunchedEffect来调用挂起函数。
这样我们就可以在某个控件的点击函数中控制抽屉的开闭了。
2.2 gesturesEnabled
这个参数其实很简单,true就是可以使用侧滑手势,而且在抽屉打开的情况下可以点击屏幕上的非操作区来关闭抽屉,看图:
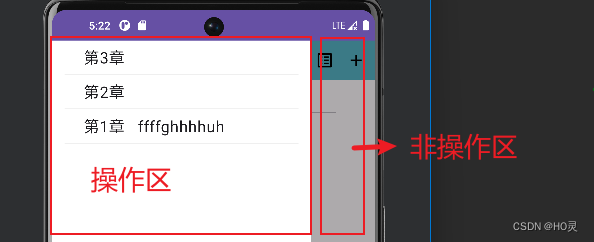
当你设置为false的时候,所有手势都被禁止,包括点非操作区来关闭抽屉
所以,如果我只想让它不能侧滑唤出抽屉,又想能通过点击非操作区关闭抽屉呢?
gesturesEnabled = drawerState.isOpen
这样就完美解决了上述的需求,只有在抽屉打开的情况下手势才能生效。
2.3 drawerContent
这块就比较简单了,但是要注意一个细节,如果在这里直接添加LazyColumn,它会默认占满整个抽屉,不会出现非操作区,所以我们要在外面给它包一个BOX:
drawerContent = {
            Box(
                modifier = Modifier
                    .width(330.dp)
                    .background(Color.White)
            ) {
                LazyColumn(modifier = Modifier.fillMaxSize()){
                    items(chaptersDrawer){
                        ConstraintLayout(modifier = Modifier
                            .fillMaxWidth()
                            .clickable {
                                chapterId.value =  it.chapterId
                                titleText.value = it.chapterName
                                contentText.value = it.chapterText
                                scope.launch {
                                    drawerState.close()
                                }
                            })
                        {
                            val (chapterNumberDrawer, chapterNameDrawer, chapterDividerDrawer) = createRefs()

                            Text(text = "第" + it.chapterId.toString() +"章",
                                modifier = Modifier.constrainAs(chapterNumberDrawer){
                                    top.linkTo(parent.top, margin = 8.dp)
                                    start.linkTo(parent.start, margin = 40.dp)
                                },
                                fontSize = 20.sp)
                            Text(text = it.chapterName,
                                modifier = Modifier.constrainAs(chapterNameDrawer){
                                    baseline.linkTo(chapterNumberDrawer.baseline)
                                    start.linkTo(chapterNumberDrawer.end, margin = 16.dp)
                                },
                                fontSize = 20.sp)
                            Divider(color = colorResource(id = R.color.gray),
                                modifier = Modifier.padding(start = 16.dp, end = 16.dp)
                                    .constrainAs(chapterDividerDrawer){
                                        start.linkTo(parent.start)
                                        end.linkTo(parent.end)
                                        top.linkTo(chapterNumberDrawer.bottom, margin = 8.dp)
                                    }
                            )

                        }
                    }
                }
            }

        }
其中的宽度自己设置就好,我觉得330dp挺合适。
从代码中也可以看到,已经添加了切换章节的功能,我只需要在点击函数中将几个变量重新赋值,即可完成对写小说区域的刷新,从而在视觉上实现切换章节的效果。
内容其实是一个很简单的布局,但是此时又会涉及到一个item的参数,这时候就又需要我们在页面初始化的时候进行数据库查询,获取对应的chaptersDrawer,所以这时候就再次用到了LaunchedEffect:
if (initialState.value) {
        chapterId.value = chapterIdTrans!!
        LaunchedEffect(key1 = Any(), block = {
            val chapter = viewModel.getChapterById(fictionId, chapterId.value)
            if (chapter != null) {
                chapterName = chapter.chapterName
                chapterText = chapter.chapterText

            } else {
                chapterName = "null"
                chapterTextNumber = 999
                chapterText = ""
            }
            initialState.value = false

            titleText.value = chapterName
            contentText.value = chapterText
        })
}注意:可以看到这次我给加了一层判断,这是因为drawer中的控件进行交互时会使LaunchedEffect这个函数被调用,为了防止每次点击都会调用这个函数,所以加了判断。
这样的话基本就完成了!
3、 ViewModel的关联使用
当你用viewModel的时候,你可能会遇到有的操作是在一个viewModel里写着,但是你现在用的viewModel里并没有这个操作,比如:
我想在WriteTextViewModel中更新fictionDatabase,这时候需要用到updateBook这个数据库操作函数,但是这个函数我写在了FictionNameViewModel中,那我要如何调用呢?
方法1:在对应页面中直接声明对应的viewModel
val viewModel: FictionNameViewModel = viewModel(factory = AppViewModelProvider.Factory)这样就可以直接使用了,但是感觉一个页面内声明很对ViewModel不太好,所以我又尝试了新的方法。
方法2:在一个viewModel中声明多个Repository
class WriteTextViewModel(private val writeTextRepository: WriteTextRepository,
                         private val chapterListRepository: ChapterListRepository,
                         private val fictionNameRepository: FictionNameRepository
) : ViewModel()
通过这种方式将数据库操作连接在一起,随后自己在viewModel中写新函数。
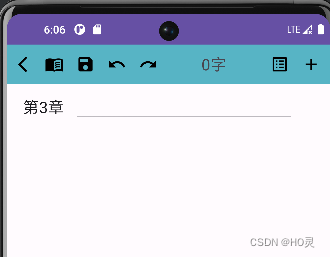
这个方法要注意还需要在AppViewModelProvider中添加对应的变量:
initializer {
            WriteTextViewModel(fictionApplication().container.writeTextRepository,
                fictionApplication().container.chapterListRepository,
                fictionApplication().container.fictionNameRepository
            ) }
实现图:


 被折叠的 条评论
为什么被折叠?
被折叠的 条评论
为什么被折叠?
 到【灌水乐园】发言


