


Sonar or SonarQube is an open source platform for continuous inspection of code quality. It's a critical part of developer's daily development environment.
Official website: https://www.sonarqube.org/
Document: https://docs.sonarqube.org/display/SONAR/Documentation
Requirement
Running Sonar need JVM (Oracle JRE or OpenJDK) and Database(MySQL. Oracle, PostgreSQL or MS SQL Server). Latest version sonar require Java (Oracle JRE 8 onwards or OpenJDK 8 onwards).
Installation
Download zip installer
Find the link on https://www.sonarqube.org/.Create DB account for Sonar
I'm using Oracle11g, and for other database we follow the same approach.
Create an account sonar/oracle with full privileges.
CREATE TABLESPACE SONAR DATAFILE '<your_location>\SONAR.DBF' SIZE 50M AUTOEXTEND ON NEXT 10M MAXSIZE UNLIMITED;
CREATE USER sonar IDENTIFIED BY oracle DEFAULT TABLESPACE SONAR QUOTA UNLIMITED ON SONAR;
GRANT ALL PRIVILEGES TO sonar;
Install DB driver
Download Oracle jdbc driver from http://www.oracle.com/technetwork/apps-tech/jdbc-112010-090769.html.
Put jdbc jar into <sonar_home>/extensions/jdbc-driver/oracle/.
Change sonar configuration
Update <sonar_home>/conf/sonar.properties.
#--------------------------------------------------------------------------------------------------
# DATABASE
#
# IMPORTANT: the embedded H2 database is used by default. It is recommended for tests but not for
# production use. Supported databases are MySQL, Oracle, PostgreSQL and Microsoft SQLServer.

# User credentials.
# Permissions to create tables, indices and triggers must be granted to JDBC user.
# The schema must be created first.
#sonar.jdbc.username=
#sonar.jdbc.password=
sonar.jdbc.username=sonar
sonar.jdbc.password=oracle

...

#----- Oracle 11g/12c
# - Only thin client is supported
# - Only versions 11.2.x and 12.x of Oracle JDBC driver are supported
# - The JDBC driver must be copied into the directory extensions/jdbc-driver/oracle/
# - If you need to set the schema, please refer to http://jira.sonarsource.com/browse/SONAR-5000
#sonar.jdbc.url=jdbc:oracle:thin:@localhost:1521/XE
sonar.jdbc.url=jdbc:oracle:thin:@localhost:1521/orcl

...

#--------------------------------------------------------------------------------------------------
# WEB SERVER
# Web server is executed in a dedicated Java process. By default heap size is 512Mb.
# Use the following property to customize JVM options.
#    Recommendations:
#
#    The HotSpot Server VM is recommended. The property -server should be added if server mode
#    is not enabled by default on your environment:
#    http://docs.oracle.com/javase/8/docs/technotes/guides/vm/server-class.html
#
#    Startup can be long if entropy source is short of entropy. Adding
#    -Djava.security.egd=file:/dev/./urandom is an option to resolve the problem.
#    See https://wiki.apache.org/tomcat/HowTo/FasterStartUp#Entropy_Source
#
#sonar.web.javaOpts=-Xmx512m -Xms128m -XX:+HeapDumpOnOutOfMemoryError
sonar.web.javaOpts=-server -Xmx256m -Xms128m -XX:+HeapDumpOnOutOfMemoryError

# Same as previous property, but allows to not repeat all other settings like -Xmx
#sonar.web.javaAdditionalOpts=

# Binding IP address. For servers with more than one IP address, this property specifies which
# address will be used for listening on the specified ports.
# By default, ports will be used on all IP addresses associated with the server.
#sonar.web.host=0.0.0.0
sonar.web.host=0.0.0.0

# Web context. When set, it must start with forward slash (for example /sonarqube).
# The default value is root context (empty value).
#sonar.web.context=
sonar.web.context=/sonar

# TCP port for incoming HTTP connections. Default value is 9000.
#sonar.web.port=9000
sonar.web.port=9000

...
Startup
My OS is window,
> <sonar_home>\bin\windows-x86-64\StartSonar.batYou can choose your OS according directory.
Login Sonar
Now Sonar URL is http://<host>:9000/sonar.
- At this moment you can access the sonar without any account, because you have not set security & authentication yet. And any users can connect sonar server to do code analysis without account.
- You can login with admin/admin as administration to set security & authentication settings and create users with different roles.
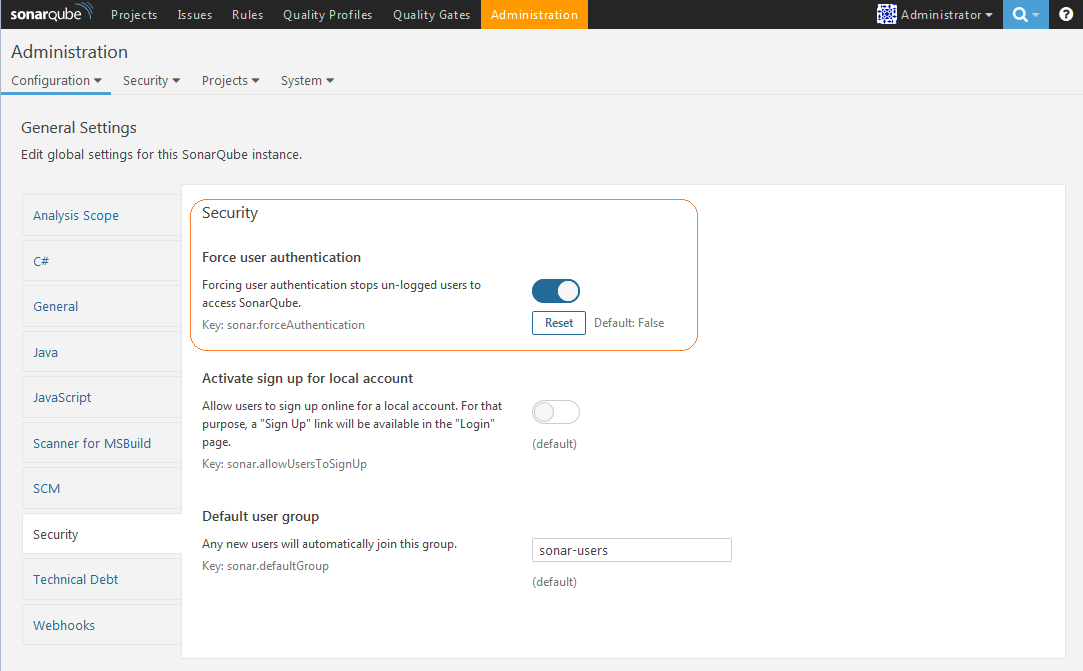
Security Settings
Enable Authentication
Administration >>> Configuration >>> General Settings >>> Force user authentication. Set to True.
Create new account
Administration >>> Security >>> Users.
- Create User.
- Add a group to this user
- Grant the group or user sufficient privileges, and give Execute Analysis permission at least if you want to use this account to execute code analysis on client side.
Code Analysis
Maven
Edit <user_home>\.m2\settings.xml or <maven_home>\conf\settings.xml, add
  <pluginGroups>
	<pluginGroup>org.sonarsource.scanner.maven</pluginGroup>
  </pluginGroups>

  ...

  <profiles>
	<profile>
		<id>sonar</id>
		<activation>
			<activeByDefault>true</activeByDefault>
		</activation>
		<properties>
			<sonar.host.url>http://${host}:9000/sonar</sonar.host.url>
			<sonar.login>${username}</sonar.login>
			<sonar.password>${password}</sonar.password>
		</properties>
	</profile>
  </profiles>
Run
> mvn sonar:sonar


 2264
2264

 被折叠的 条评论
为什么被折叠?
被折叠的 条评论
为什么被折叠?
 到【灌水乐园】发言


