


文章目录
- 零、学习目标
- 一、在Idea设置SpringBoot热部署
- 二、Web入门
- 1.了解组件
- 2.控制器
- 3.路由映射
- (1)@RequestMapping注解主要负责URL的路由映射。它可以添加在Controller类或者具体的方法上。
- (2)如果添加在Controller类上,则这个Controller中的所有路由映射都将会加上此映射规则,如果添加在方法上,则只对当前方法生效。
- (3)@RequestMapping注解包含很多属性参数来定义HTTP的请求映射规则。常用的属性参数如下:
- (4)value:请求URL的路径,支持URL模板、正则表达式method: HTTP请求方法
- (5)consumes:请求的媒体类型(Content-Type),如application/jsonproduces:响应的媒体类型
- (7)params,headers:请求的参数及请求头的值
- --------------------------------------------------------- 以下是相关的RequestMapping
- (8)RequestMapping的value属性用于匹配URL映射,value支持简单表达式@RequestMapping(" /user")
- (9)@RequestMapping支持使用通配符匹配URL,用于统一映射某些URL规则类似的请求: @RequestMapping("/getJson/*.json"),当在浏览器中请求/getJson/a.json或者/getJson/b.json时都会匹配到后台的Json方法
- (10)@RequestMapping的通配符匹配非常简单实用,支持“*”“?”“**”等通配符
- (11)符号“星号”匹配任意字符,符号两个星号“**”匹配任意路径,符号“?”匹配单个字符。有通配符的优先级低于没有通配符的,比如/user/add.json比/user/*.json优先匹配。
- (12)有“**”通配符的优先级低于有“*”通配符的。
- --------------------------------------------------------- 以下是相关的method
- (13)HTTP请求Method有GET、POST、PUT、DELETE等方式。HTTP支持的全部Method
- (14)@RequestMapping注解提供了method参数指定请求的Method类型,包括RequestMethod.GET、RequestMethod.POST、RequestMethod.DELETE、RequestMethod.PUT等值,分别对应HTTP请求的Method
- (15)Method匹配也可以使用@GetMapping、@PostMapping等注解代替。
- 4.参数传递
- -- 实验1.
- (1)@RequestParam将请求参数绑定到控制器的方法参数上,接收的参数来自HTTP请求体或请求url的QueryString,当请求的参数名称与Controller的业务方法参数名称一致时,@RequestParam可以省略
- (2) @PathVaraible:用来处理动态的URL,URL的值可以作为控制器中处理方法的参数
- (3) @RequestBody接收的参数是来自requestBody中,即请求体。一般用于处理非Content-Type: application/x-www-form-urlencoded编码格式的数据,比如: `applicationjson`、`application/xml`等类型的数据
- (4) get请求的一些例子
- post请求例子和基本格式
零、学习目标
–在Idea设置SpringBoot热部署
–web基础开发1、2、3、4
一、在Idea设置SpringBoot热部署
1.在已经创建好的项目设置热部署
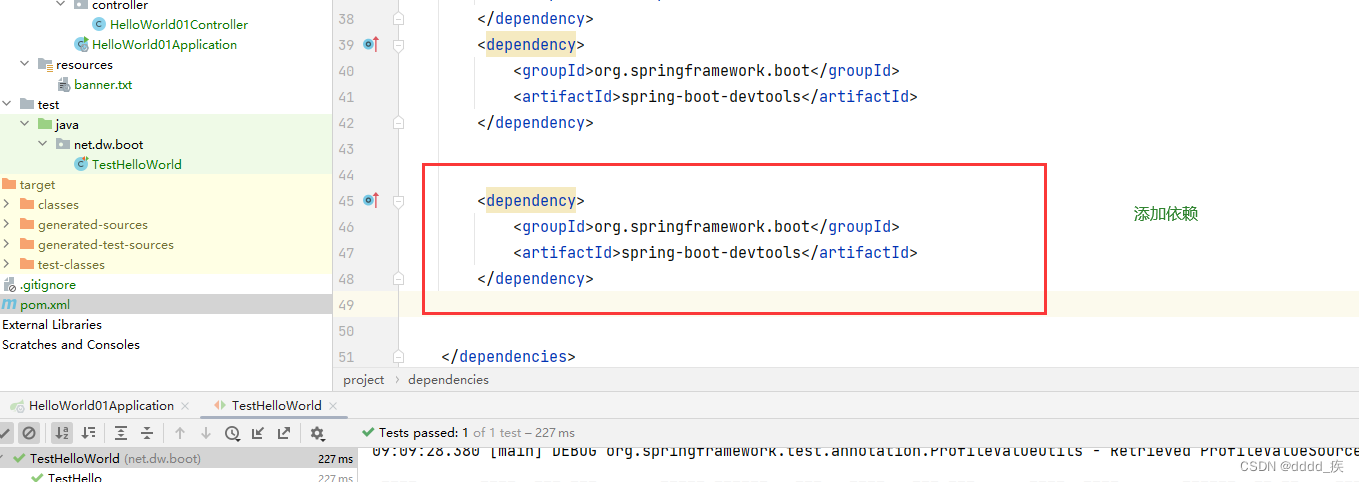
(1)–首先添加Maven依赖,并刷新Maven
        <dependency>
            <groupId>org.springframework.boot</groupId>
            <artifactId>spring-boot-devtools</artifactId>
            <scope>runtime</scope>
            <optional>true</optional>
        </dependency>
(2)–然后file ——>settings……如图
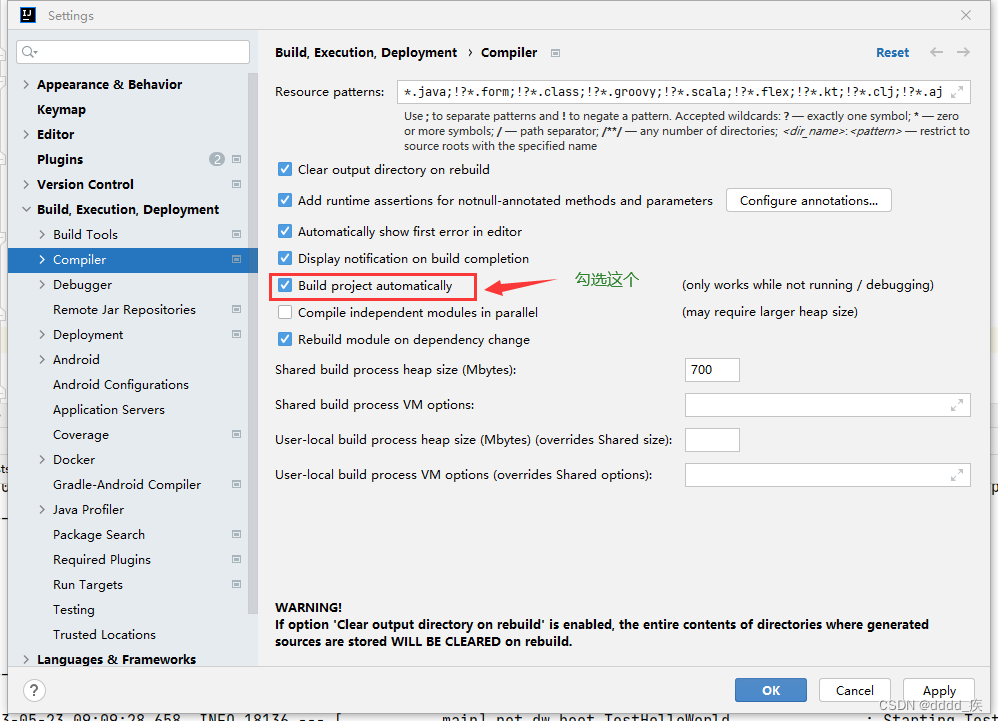
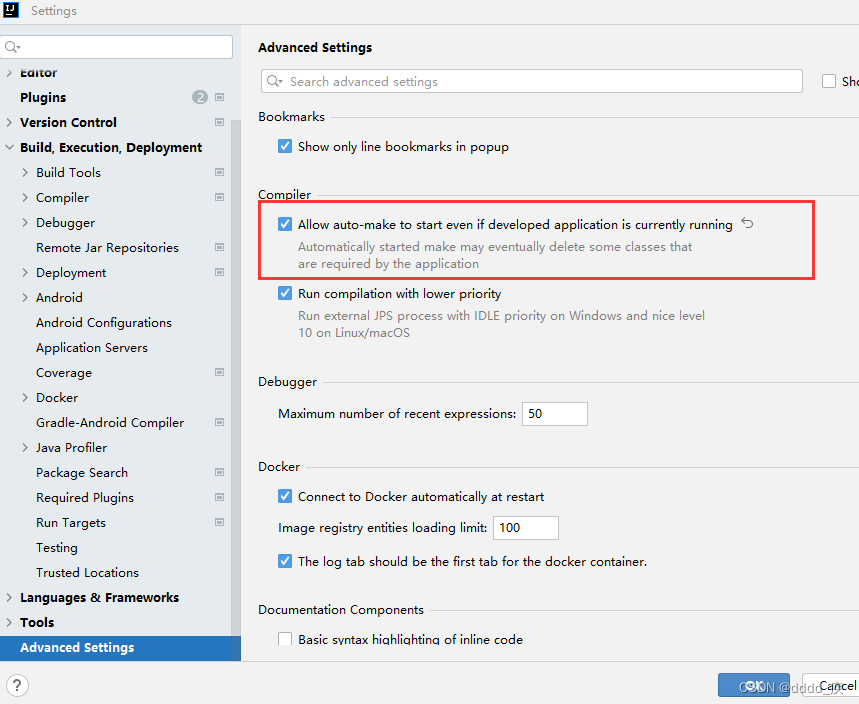
(3.1)Idea 版本如果是2022 在Advanced Settings 里勾选
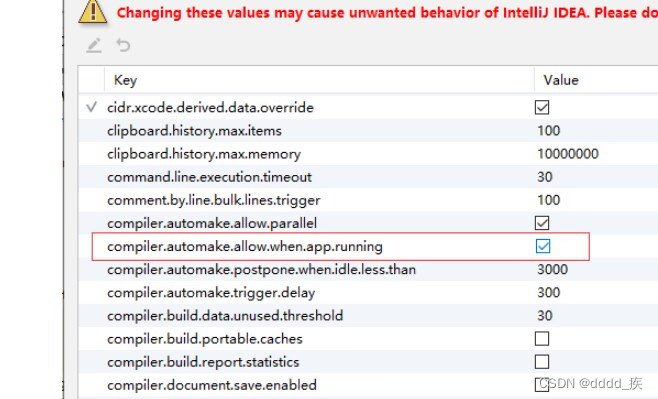
(3.2)Idea 版本如果是2020 需要使用 快捷键 Ctrl + shift +alt + / ,选registry然后如图勾选
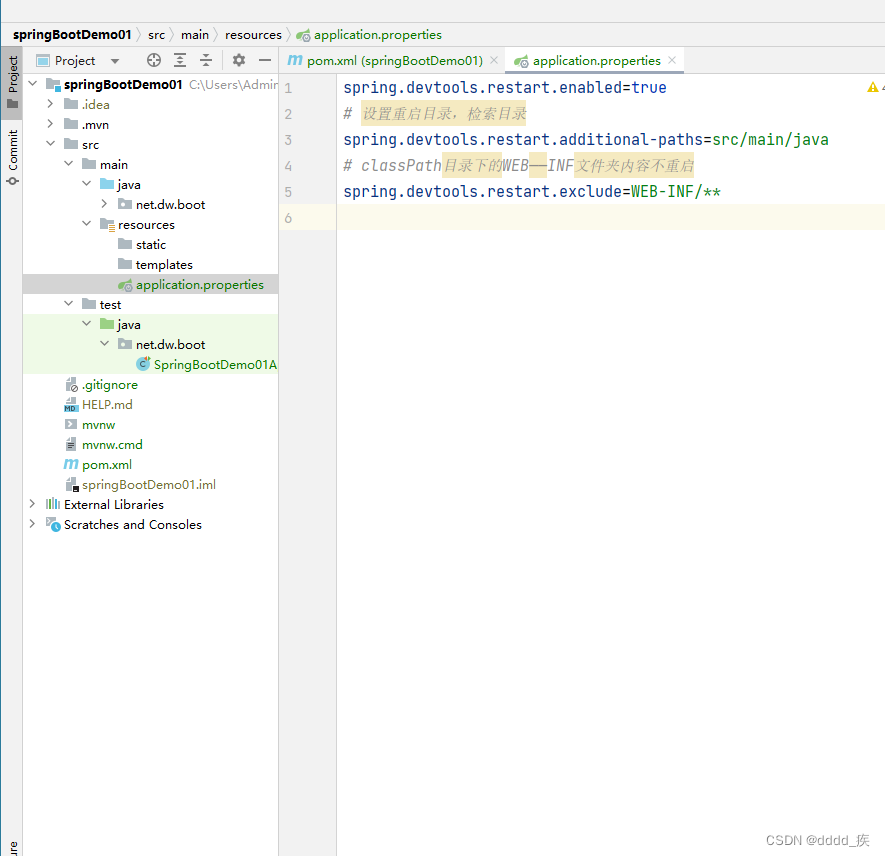
(4)配置src/main/resources/application.properties
spring.devtools.restart.enabled=true
# 设置重启目录,检索目录
spring.devtools.restart.additional-paths=src/main/java
# classPath目录下的WEB——INF文件夹内容不重启
spring.devtools.restart.exclude=WEB-INF/**

2.在新建项目里设置热部署
(1)首先新建一个Spring Initialzr项目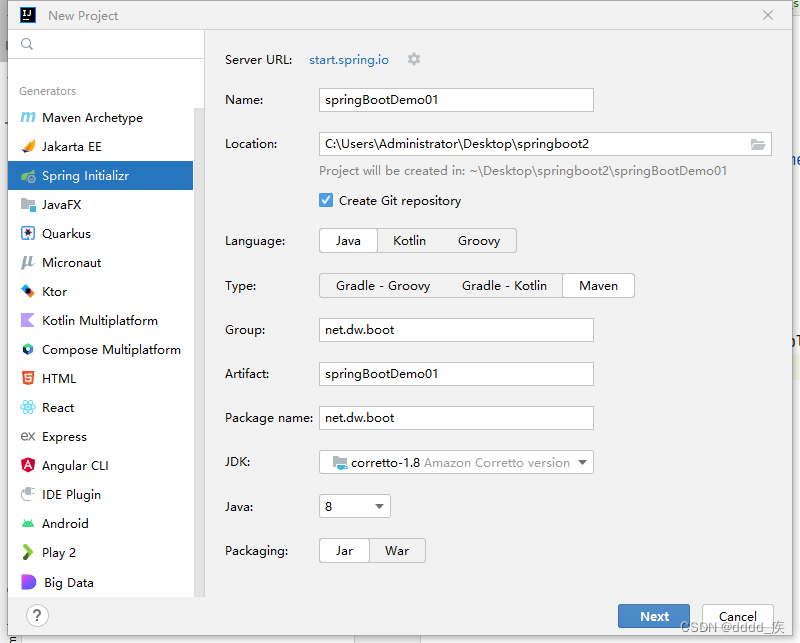 ##
##
(2)然后如图

(3)–然后file ——>settings……如图
(4.1)Idea 版本如果是2022 在Advanced Settings 里勾选
(4.2)Idea 版本如果是2020 需要使用 快捷键 Ctrl + shift +alt + / ,选registry然后如图勾选
(5)配置src/main/resources/application.properties
spring.devtools.restart.enabled=true
# 设置重启目录,检索目录
spring.devtools.restart.additional-paths=src/main/java
# classPath目录下的WEB——INF文件夹内容不重启
spring.devtools.restart.exclude=WEB-INF/**

二、Web入门
1.了解组件
(1)Spring Boot将传统Web开发的mvc、json、tomcat等框架整合,提供了spring-boot-starter-web组件,简化了Web应用配置。
(2)创建SpringBoot项目勾选Spring Web选项后,会自动将spring-boot-starter-web组件加入到项目中。
(3)spring-boot-starter-web启动器主要包括web、webmvc、json、tomcat等基础依赖组件,作用是提供Web开发场景所需的所有底层依赖。
(4)webmvc为Web开发的基础框架,json为JSON数据解析组件,tomcat为自带的容器依赖。
  <dependency>
            <groupId>org.springframework.boot</groupId>
            <artifactId>spring-boot-starter-web</artifactId>
        </dependency>
2.控制器
(1)Spring Boot 提供了@controller 和@RestController两种注解来标识此类负责接受和处理HTTP请求
(2) 如果请求的页面和数据,使用Controller 注解即可;如果只是请求数据则可以使用@RestController注解。
(3)Model View Contrlloer (MVC)

因为主流的web设计是前后端分离这里主要介绍RestController
(4) 默认情况下、@RestController注解会将返回的对象数据转换为JSON格式,基本格式如下
@RestController
public class SpringBoot01Controller {
    @RequestMapping("/user")
    public String user(String name ,String age){
        return name + age;


    }
3.路由映射
(1)@RequestMapping注解主要负责URL的路由映射。它可以添加在Controller类或者具体的方法上。
(2)如果添加在Controller类上,则这个Controller中的所有路由映射都将会加上此映射规则,如果添加在方法上,则只对当前方法生效。
(3)@RequestMapping注解包含很多属性参数来定义HTTP的请求映射规则。常用的属性参数如下:
(4)value:请求URL的路径,支持URL模板、正则表达式method: HTTP请求方法
(5)consumes:请求的媒体类型(Content-Type),如application/jsonproduces:响应的媒体类型
(7)params,headers:请求的参数及请求头的值
--------------------------------------------------------- 以下是相关的RequestMapping
(8)RequestMapping的value属性用于匹配URL映射,value支持简单表达式@RequestMapping(" /user")
(9)@RequestMapping支持使用通配符匹配URL,用于统一映射某些URL规则类似的请求: @RequestMapping(“/getJson/*.json”),当在浏览器中请求/getJson/a.json或者/getJson/b.json时都会匹配到后台的Json方法
(10)@RequestMapping的通配符匹配非常简单实用,支持“*”“?”“**”等通配符
(11)符号“星号”匹配任意字符,符号两个星号“**”匹配任意路径,符号“?”匹配单个字符。有通配符的优先级低于没有通配符的,比如/user/add.json比/user/*.json优先匹配。
(12)有“**”通配符的优先级低于有“*”通配符的。
--------------------------------------------------------- 以下是相关的method
(13)HTTP请求Method有GET、POST、PUT、DELETE等方式。HTTP支持的全部Method
(14)@RequestMapping注解提供了method参数指定请求的Method类型,包括RequestMethod.GET、RequestMethod.POST、RequestMethod.DELETE、RequestMethod.PUT等值,分别对应HTTP请求的Method
@RequestMapping(value = "/getData", method = RequestMethod.GET)
    public String getData() {
        return "helle";

    }
(15)Method匹配也可以使用@GetMapping、@PostMapping等注解代替。
4.参数传递
– 实验1.
–新建一个controller包并在里面建一个SpringBoot01Controller类
 –添加RestController注解
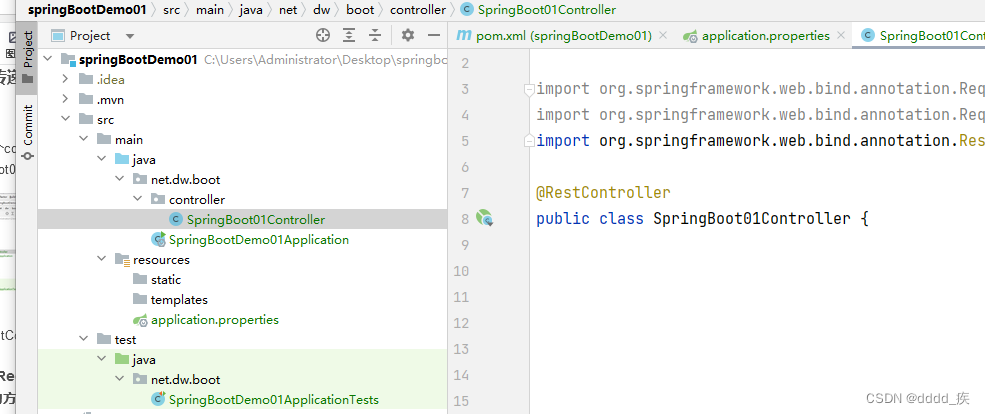 –新建一个hello方法
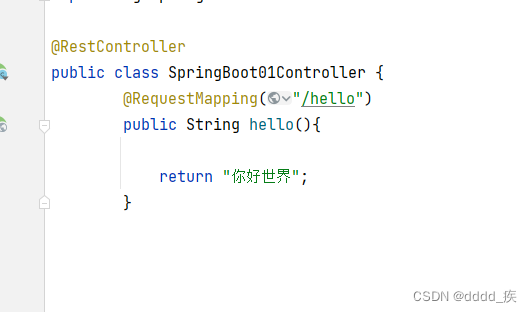
   @RequestMapping("/hello")
        public String hello(){

            return "你好世界";
        }
–运行SpringBootDemo01Application类

–在浏览器里输入http://localhost:8080/hello

–完成了一次请求
由于没有使用method参数,所有请求都可以请求到这个数据hello()括号里也没有参数所有这个是无参的方法
(1)@RequestParam将请求参数绑定到控制器的方法参数上,接收的参数来自HTTP请求体或请求url的QueryString,当请求的参数名称与Controller的业务方法参数名称一致时,@RequestParam可以省略
(2) @PathVaraible:用来处理动态的URL,URL的值可以作为控制器中处理方法的参数
(3) @RequestBody接收的参数是来自requestBody中,即请求体。一般用于处理非Content-Type: application/x-www-form-urlencoded编码格式的数据,比如: applicationjson、application/xml等类型的数据
(4) get请求的一些例子
package com.example.helloworlddemo.controller;

import jdk.nashorn.internal.ir.RuntimeNode;
import org.springframework.web.bind.annotation.RequestMapping;
import org.springframework.web.bind.annotation.RequestMethod;
import org.springframework.web.bind.annotation.RequestParam;
import org.springframework.web.bind.annotation.RestController;

@RestController //只能用来返回数据
public class ParamsController {

//    @RequestMapping(value = "/testGet",method = RequestMethod.GET)
//   // @RequestMapping(value = "/hello",method = RequestMethod.GET) ==GetMapping("/hello")
//   // http://localhost:8080/testGet?name=dw&password=123 //查询字符串的方式传递
//    //?后面是要传的参数,用参数名=值的格式,如果有多个参数则使用&连接 例如?name=dw&password=123
//    // 注意这里的name和password 和 下面方法的参数名必须 相同
//    //如果只传了name的参数 则password的值为null
//    public String getHello(@RequestParam( )String name, String password){
//        System.out.println(name + password);
//        return "你好" + name;
//    }


    @RequestMapping(value = "/getTest1", method = RequestMethod.GET)
    public String getTest1() { //最基本的一个get请求
        return "GET请求";
    }

    @RequestMapping(value = "/getTest2", method = RequestMethod.GET)
//    http://localhost/getTest2?nickname=dw&phone=123   查询字符串的方式传递
    public String getTest2(String nickname,String phone){//带两个参数的GET请求
        System.out.println("nickname "+nickname);
        System.out.println("phone " + phone);
        return "GET请求";
    }
    @RequestMapping(value = "getTest3" ,method = RequestMethod.GET)
    //    http://localhost/getTest3?nickname=dw&phone=123   查询字符串的方式传递
    //@RequestParam 用来做参数映射 这里将前端发来nickname参数映射为name
    // 注意 如果使用了这个注解那么就必须要传注解绑定的参数,不然会报错并且不会被访问到
    //或者往@RequestParam里添加一个参数,让这个参数是可惜传递
    //@RequestParam(value ="nickname" ,required = false)
    public String getTest3(@RequestParam(value ="nickname")String name, String phone)  {
        System.out.println("name " + name);
        System.out.println("phone " + phone);
        return "GET请求";
    }

}
post请求例子和基本格式
 @RequestMapping(value = "/postTest1",method = RequestMethod.POST)
    public String postTest1(){

        return "POST请求";
    }
    @RequestMapping(value = "/postTest2",method = RequestMethod.POST)
    public String postTest2(String username,String password){
        System.out.println("username:" + username);
        System.out.println("password:" + password);
        return "POST请求";
    }
    @RequestMapping(value = "/postTest3",method = RequestMethod.POST)
    public String postTest3(User user){
        System.out.println(user);
        return "POST请求";
    }


    @RequestMapping(value = "/postTest4",method = RequestMethod.POST)
    //如果要接受JSON类型的数据需要加@RequestBody
    public String postTest4(@RequestBody User user){
        System.out.println(user);
        return "POST请求";
    }
    //注意JSON也是有数据类型 的 1 和 “1” 不一样,传递参数的个数和名称必须和User类一致
//    {
//              "name":"dw",
//            "age":"99",
//            "phone":"123"
//
//
//    }


 3271
3271


 被折叠的 条评论
为什么被折叠?
被折叠的 条评论
为什么被折叠?
 到【灌水乐园】发言


