


1.ace5.6中没有提供vc6的工程文件,可以利用MPC文件生成,网上有提供方法。ace5.5中提供了vc6的工程文件,以下以ace5.5为例。
在目录/ACE_wrappers/ace下创建文件config.h。文件内容如下
#ifndef ACE_CONFIG_H
#define ACE_CONFIG_H
#if !defined (ACE_LACKS_PRAGMA_ONCE)
# pragma once
#endif /* ACE_LACKS_PRAGMA_ONCE */
//在mfc的程序中使用的ace.dll,必须是定义了ACE_HAS_MFC编译的,否则会有内存泄漏等问题。
//在使用标准C++类的程序中使用的ace.dll,最好是定义了ACE_HAS_STANDARD_CPP_LIBRARY编译的。
//If you want to use the standard C++ headers (iostream, cstdio, ... as defined by the C++ Standard Draft 2)
//that comes with MSVC, then add the line:
#define ACE_HAS_STANDARD_CPP_LIBRARY 1
//To use ACE with MFC libraries, also add the following to your config.h file.
//Notice that if you want to spawn a new thread with CWinThread,
//make sure you spawn the thread with THR_USE_AFX flag set.
#define ACE_HAS_MFC 1
//By default, all of the ACE projects use the DLL versions of the MSVC run-time libraries.
//You can still choose use the static (LIB) versions of ACE libraries regardless of run-time libraries.
//The reason we chose to link only the dynamic run-time library is that almost every NT box has these library installed and to save disk space.
//If you prefer to link MFC as a static library into ACE, you can do this by defining ACE_USES_STATIC_MFC in your config.h file.
//However, if you would like to link everything (including the MSVC run-time libraries) statically,
//you'll need to modify the project files in ACE yourself.
#define ACE_USES_STATIC_MFC 1
//Static version of ACE libraries are built with ACE_AS_STATIC_LIBS
//defined. This macro should also be used in application projects that link to static ACE libraries
//编译和使用静态链接库时,必须使用下面行的定义
//#define ACE_AS_STATIC_LIBS 1
//before the #include statement in ACE_ROOT/ace/config.h to disable inline function and reduce the size of static libraries (and your executables.)
//Optionally you can also add the line
//#define ACE_NO_INLINE 1
//该行必须在所有定义的后面
#include "ace/config-win32.h"
#endif /* ACE_CONFIG_H */
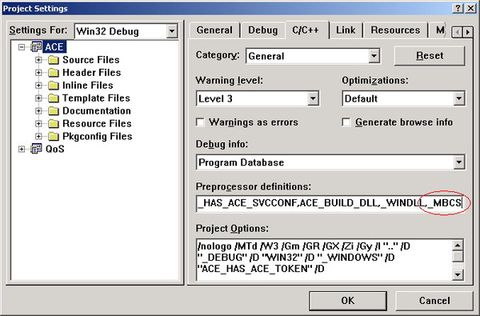
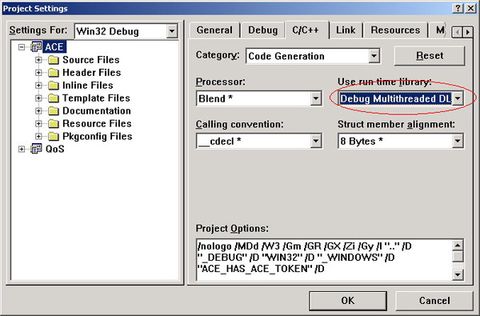
2.工程属性修改。打开工程属性设置窗口,将红色圈标示的属性设置为如图所示,如果与表示相同则不需修改。
3.保存工程,编译。
4.ACE与vs集成。以下以ace在D盘根目录下为例子,D:/ACE_wrappers。
打开 Tools>Options>Directories
加入以下内容:
Include File:
D:/ACE_wrappers/
D:/ACE_wrappers/ace
Library Files:
D:/ACE_wrappers/lib
Source Files:
D:/ACE_wrappers/
D:/ACE_wrappers/ace


 1784
1784


 被折叠的 条评论
为什么被折叠?
被折叠的 条评论
为什么被折叠?
 到【灌水乐园】发言


