


打个广告:欢迎关注我的微信公众号,在这里您将获取更全面、更新颖的文章!

原文链接:深入理解 go context 欢迎点赞关注
context 介绍
context 是 Go 语言中用于处理并发操作的一个重要概念。context也被称作上下文,主要用于在 goroutine 之间传递截止日期、取消信号和其他请求范围的值。
什么是 Go Context
Context 是一个接口,它定义了以下方法:
type Context interface {
    Deadline() (deadline time.Time, ok bool)
    Done() <-chan struct{}
    Err() error
    Value(key interface{}) interface{}
}
- Deadline(): 返回与 Context 关联的截止时间。如果没有设置截止时间,则返回 zero time.Time 和 false。
- Done(): 返回一个 channel,当 Context 被取消或者截止时间到达时,该 channel 会被关闭。
- Err(): 返回 Context 被取消的原因。如果 Context 还未被取消,则返回 nil。
- Value(key interface{}): 返回与 Context 关联的请求范围的值。
context 的作用
Go Context 主要用于以下几个方面:
- 传递取消信号: 当一个长时间运行的操作被取消时,它可以及时停止并释放资源。
- 设置截止时间: 当一个操作超过预期时间时,可以自动取消该操作,避免阻塞。
- 携带请求范围的数据: 可以在 goroutine 之间传递一些请求相关的数据,如用户 ID、跟踪 ID 等。
Context底层实现
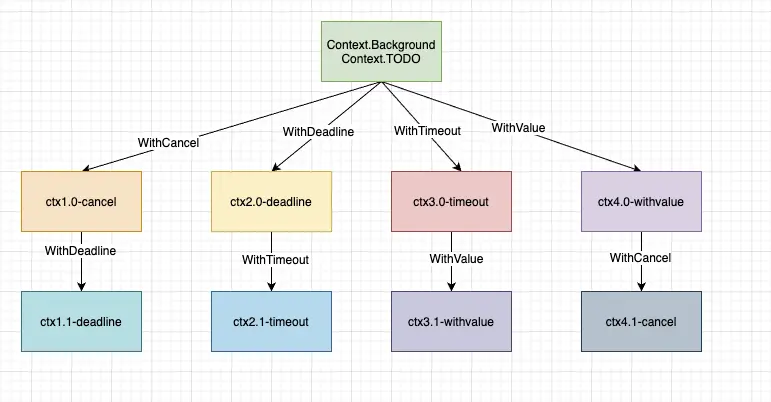
context 树状模型
go 提供了四种创建context的函数:
func WithCancel(parent Context) (ctx Context, cancel CancelFunc)
func WithDeadline(parent Context, deadline time.Time) (Context, CancelFunc)
func WithTimeout(parent Context, timeout time.Duration) (Context, CancelFunc)
func WithValue(parent Context, key, val interface{}) Context
可以看到在构建过程中都是基于 parent context 来构建子 context,子 context 还可以继续派生新的子 context 因此 context 是一个类似树状的模型:
context 的根节点
context 树的最原始的根节点通常是 context.Background() 和 context.TODO(),他们底层都是基于 emptyCtx 实现的:
var (
    background = new(emptyCtx)
    todo       = new(emptyCtx)
)

func Background() Context {
    return background
}


func TODO() Context {
    return todo
}
emptyCtx 的实现也特别简单,只是对 Context 接口的实现,逻辑比较简单这里就不赘述了:
type emptyCtx int

func (*emptyCtx) Deadline() (deadline time.Time, ok bool) {
    return
}

func (*emptyCtx) Done() <-chan struct{} {
    return nil
}

func (*emptyCtx) Err() error {
    return nil
}

func (*emptyCtx) Value(key any) any {
    return nil
}

func (e *emptyCtx) String() string {
    switch e {
    case background:
        return "context.Background"
    case todo:
        return "context.TODO"
    }
    return "unknown empty Context"
}
这里有个问题:context.Background() 和 context.TODO() 底层实现是一样的,那么为什么暴露两个函数给用户呢?
原因是它们拥有不同的语义
context.Background():
Background returns a non-nil, empty Context. It is never canceled, has no values, and has no deadline. It is typically used by the main function, initialization, and tests, and as the top-level Context for incoming requests.
context.TODO():
TODO returns a non-nil, empty Context. Code should use context.TODO when it’s unclear which Context to use or it is not yet available (because the
surrounding function has not yet been extended to accept a Context parameter).
context.WithValue
WithValue 实际会返回 valueCtx类型:
func WithValue(parent Context, key, val any) Context {
    if parent == nil {
        panic("cannot create context from nil parent")
    }
    if key == nil {
        panic("nil key")
    }
    if !reflectlite.TypeOf(key).Comparable() {
        panic("key is not comparable")
    }
    return &valueCtx{parent, key, val}
}

type valueCtx struct {
	Context
	key, val any
}
valueCtx类型和链表的节点比较像,通过Context字段指向父节点,key 和 val 存储 valueCtx 的 key 、val 参数。
func main() {
    ctx := context.Background()
    ctx = context.WithValue(ctx, "a", 100)
    ctx = context.WithValue(ctx, "b", 200)
    ctx = context.WithValue(ctx, "c", 300)

}
上面的代码执行后会形成类似下面的链表:

这里需要注意的:
- key 必须是可以比较的类型,推荐自定义一个 struct{} 类型
- WithValue 的结果是一个链表,查找复杂度是 O ( n ) O(n) O(n) 所以不要使用WithValue传递大量的key-val。
key-val 查找是通过 valueCtx.Value() 实现的,整个查找过程就是沿着链表的最后一个节点一个一个向上查找:
type valueCtx struct {
    Context
    key, val any
}


func (c *valueCtx) Value(key any) any {
    if c.key == key {
        return c.val
    }
    return value(c.Context, key)
}

func value(c Context, key any) any {
    for {
        switch ctx := c.(type) {
        case *valueCtx:
            if key == ctx.key {
                return ctx.val
            }
            c = ctx.Context
        case *cancelCtx:
            if key == &cancelCtxKey {
                return c
            }
            c = ctx.Context
        case *timerCtx:
            if key == &cancelCtxKey {
                return ctx.cancelCtx
            }
            c = ctx.Context
        case *emptyCtx:
            return nil
        default:
            return c.Value(key)
        }
    }
}
context.WithCancel
context.WithCancel 的底层实现是 withCancel 函数,withCancel 函数主要有两个功能:
- 调用 newCancelCtx 创建
cancelCtx类型的 ctx 实例 - 调用 propagateCancel 将 ctx 实例挂载到父节点上
func WithCancel(parent Context) (ctx Context, cancel CancelFunc) {
    c := withCancel(parent)
    return c, func() { c.cancel(true, Canceled, nil) }
}

func withCancel(parent Context) *cancelCtx {
    if parent == nil {
        panic("cannot create context from nil parent")
    }
    c := newCancelCtx(parent)  // 创建 cancelCtx 实例
    propagateCancel(parent, c) // 把当前节点
    return c
}

func newCancelCtx(parent Context) *cancelCtx {
  return &cancelCtx{Context: parent}
}
cancelCtx 类
type cancelCtx struct {
    Context

    mu       sync.Mutex            // protects following fields
    done     atomic.Value          // of chan struct{}, created lazily, closed by first cancel call
    children map[canceler]struct{} // set to nil by the first cancel call
    err      error                 // set to non-nil by the first cancel call
    cause    error                 // set to non-nil by the first cancel call
}
字段解释:
- mu:就是一个互斥锁,保证并发安全的,所以context是并发安全的
- done:用来做context的取消通知信号,之前的版本使用的是chan struct{}类型,现在用atomic.Value做锁优化
- children:key是接口类型canceler,目的就是存储实现当前canceler接口的子节点,当根节点发生取消时,遍历子节点发送取消信号
- error:当context取消时存储取消信息
propagateCancel 函数
func propagateCancel(parent Context, child canceler) {
    done := parent.Done()
    if done == nil {
        return // parent is never canceled
    }

    select {
    case <-done:
        // parent is already canceled
        child.cancel(false, parent.Err(), Cause(parent))
        return
    default:
    }

    if p, ok := parentCancelCtx(parent); ok {
        p.mu.Lock()
        if p.err != nil {
            // parent has already been canceled
            child.cancel(false, p.err, p.cause)
        } else {
            if p.children == nil {
                p.children = make(map[canceler]struct{})
            }
            p.children[child] = struct{}{}
        }
        p.mu.Unlock()
    } else {
        goroutines.Add(1)
        go func() {
            select {
            case <-parent.Done():
                child.cancel(false, parent.Err(), Cause(parent))
            case <-child.Done():
            }
        }()
    }
}
propagateCancel 函数的逻辑也比较简单:
- 调用 parentCancelCtx 寻找可取消的父节点
- 如果找到了就把当前节点加入到父节点的 children 里面
- 如果没找到则需要起一个协程来监听父节点和当前节点的取消事件
- 挂载的目的是父节点取消是当前节点也能被取消
这里有个问题为什么没找到父节点,还要监听父节点的取消事件呢?原因是 parentCancelCtx 函数只能识别 *cancelCtx 类型的父节点,如果父节点是实现了 Context 类型的自定义类型或者是嵌套了*cancelCtx 就识别不出来,所以需要启动一个协程来监听自定类型或者嵌套类型的取消事件。
func parentCancelCtx(parent Context) (*cancelCtx, bool) {
    done := parent.Done()
    if done == closedchan || done == nil {
        return nil, false
    }
    p, ok := parent.Value(&cancelCtxKey).(*cancelCtx)
    if !ok {
        return nil, false
    }
    pdone, _ := p.done.Load().(chan struct{})
    if pdone != done {
        return nil, false
    }
    return p, true
}
parentCancelCtx函数是寻找一个父节点,关键逻辑 cancelCtxKey + valuea()
func value(c Context, key any) any {
    for {
        switch ctx := c.(type) {
        case *valueCtx:
            if key == ctx.key {
                return ctx.val
            }
            c = ctx.Context
        case *cancelCtx:
            if key == &cancelCtxKey {
                return c
            }
            c = ctx.Context
        case *timerCtx:
            if key == &cancelCtxKey {
                return ctx.cancelCtx
            }
            c = ctx.Context
        case *emptyCtx:
            return nil
        default:
            return c.Value(key)
        }
    }
}
可以看到当 key == &cancelCtxKey 时:
- cancelCtx类型返回的自身
- timerCtx类型返回的 timerCtx.cancelCtx
cancel 函数
cancelCtx.cancel 是取消 ctx 的具体实现
func (c *cancelCtx) cancel(removeFromParent bool, err, cause error) {
    if err == nil {
        panic("context: internal error: missing cancel error")
    }
    if cause == nil {
        cause = err
    }
    c.mu.Lock()
    if c.err != nil {
        c.mu.Unlock()
        return // already canceled
    }
    c.err = err
    c.cause = cause
    d, _ := c.done.Load().(chan struct{})
    if d == nil {
        c.done.Store(closedchan)
    } else {
        close(d)
    }
    for child := range c.children {
        // NOTE: acquiring the child's lock while holding parent's lock.
        child.cancel(false, err, cause)
    }
    c.children = nil
    c.mu.Unlock()

    if removeFromParent {
        removeChild(c.Context, c)
    }
}
cancel 函数的实现也比较简单:
- 关闭 done channel
- 调用所有子节点的cancel函数,取消所有子节点
- 根据 removeFromParent 参数来决定是否要从删除父节点删除当前节点
- 因为父节点取消而被动取消的情况 removeFromParent 为false
- 当前节点主动取消的情况 removeFromParent 为 true
context.WithDeadline
context.WithDeadline 的逻辑也同样比较简单:
- 创建一个 timerCtx 类型的实例并返回
- 将 timerCtx 实例挂载到父节点上
- 启动一个定时器,定时调用 cancel 方法
func WithDeadline(parent Context, d time.Time) (Context, CancelFunc) {
    if parent == nil {
        panic("cannot create context from nil parent")
    }
    if cur, ok := parent.Deadline(); ok && cur.Before(d) {
        // The current deadline is already sooner than the new one.
        return WithCancel(parent)
    }

    // 创建一个 timerCtx 类型的实例并返回
    c := &timerCtx{
        cancelCtx: newCancelCtx(parent),
        deadline:  d,
    }

    // 将 timerCtx 实例挂载到父节点上
    propagateCancel(parent, c)
    dur := time.Until(d)
    if dur <= 0 {
        c.cancel(true, DeadlineExceeded, nil) // deadline has already passed
        return c, func() { c.cancel(false, Canceled, nil) }
    }
    c.mu.Lock()
    defer c.mu.Unlock()
    if c.err == nil {
        // 启动一个定时器,定时调用 cancel 方法
        c.timer = time.AfterFunc(dur, func() {
            c.cancel(true, DeadlineExceeded, nil)
        })
    }
    return c, func() { c.cancel(true, Canceled, nil) }
}
timerCtx 类型
type timerCtx struct {
    *cancelCtx
    timer *time.Timer // Under cancelCtx.mu.

    deadline time.Time
}

func (c *timerCtx) Deadline() (deadline time.Time, ok bool) {
	return c.deadline, true
}

func (c *timerCtx) cancel(removeFromParent bool, err, cause error) {
    c.cancelCtx.cancel(false, err, cause)
    if removeFromParent {
        // Remove this timerCtx from its parent cancelCtx's children.
        removeChild(c.cancelCtx.Context, c)
    }
    c.mu.Lock()
    if c.timer != nil {
        c.timer.Stop()
        c.timer = nil
    }
    c.mu.Unlock()
}
timerCtx内嵌了cancelCtx相当于timerCtx继承了cancelCtx;- 其中 timer 字段是实现WithDeadline、WithTimeout 的关键,其原理就是启动一个定时器定时调用 cancel 方法;
- timer 字段是非并发安全的,所以对timer的操作需要先加锁;
context.WithTimeout
context.WithTimeout 是基于 context.WithDeadline 实现的,这里就不赘述了。
func WithTimeout(parent Context, timeout time.Duration) (Context, CancelFunc) {
    return WithDeadline(parent, time.Now().Add(timeout))
}
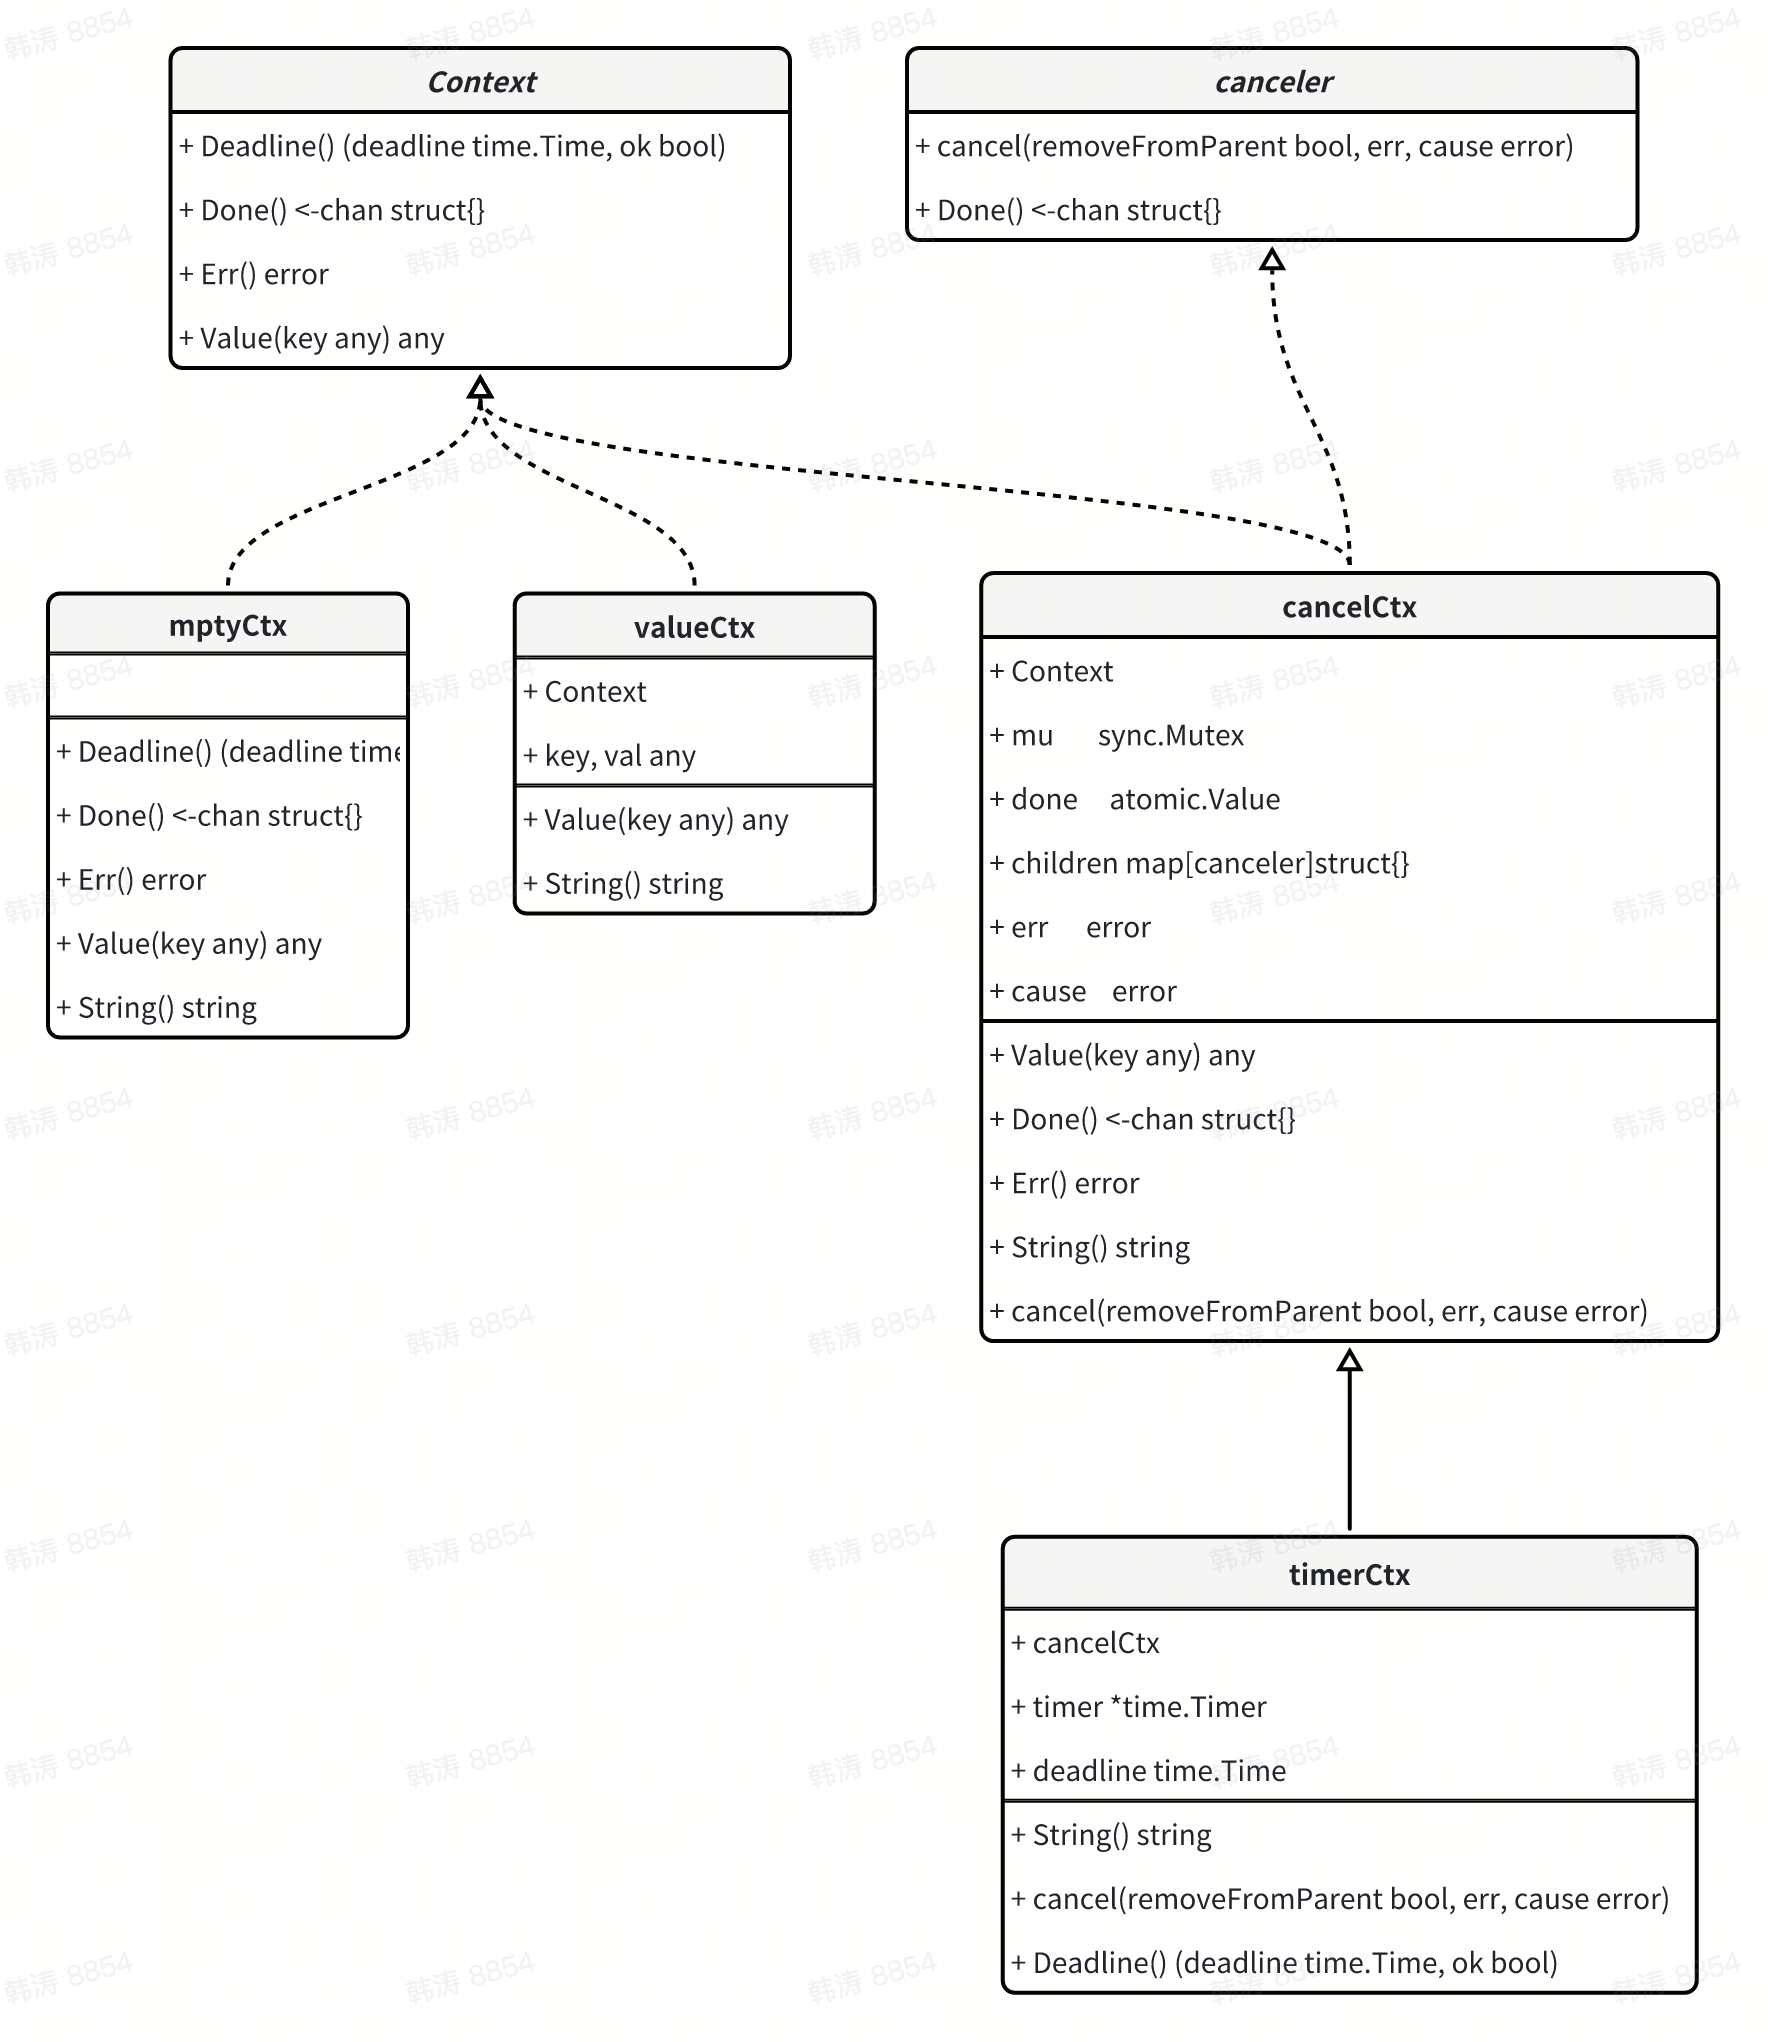
小结
上面介绍了 context 的实现原理,里面涉及了很多接口与结构体,下面通过类图串一下他们之间的关系:
Context 的使用
取消信号传递
package main

import (
    "context"
    "fmt"
    "time"
)

func worker(ctx context.Context) {
    for {
        select {
        case <-ctx.Done():
            fmt.Println("Worker received cancellation signal.")
            return
        default:
            // Simulate some work
            time.Sleep(500 * time.Millisecond)
            fmt.Println("Working...")
        }
    }
}

func main() {
    parentCtx, cancel := context.WithCancel(context.Background())
    go worker(parentCtx)

    // Simulate main program execution
    time.Sleep(2 * time.Second)

    // Cancel the context to stop the worker
    cancel()

    // Wait for the worker to finish
    time.Sleep(1 * time.Second)
}
超时控制
package main

import (
    "context"
    "fmt"
    "time"
)

func operationWithTimeout(ctx context.Context) {
    select {
    case <-time.After(3 * time.Second): // Simulate some long operation
        fmt.Println("Operation completed.")
    case <-ctx.Done():
        fmt.Println("Operation canceled due to timeout.")
    }
}

func main() {
    timeoutCtx, cancel := context.WithTimeout(context.Background(), 2*time.Second)
    defer cancel()

    operationWithTimeout(timeoutCtx)
}
截止时间
package main

import (
    "context"
    "fmt"
    "time"
)

func operationWithDeadline(ctx context.Context) {
    deadline, ok := ctx.Deadline()
    if ok {
        fmt.Printf("Operation must be completed before: %s\n", deadline)
    } else {
        fmt.Println("No specific deadline for the operation.")
    }

    // Simulate some operation
    time.Sleep(2 * time.Second)

    select {
    case <-ctx.Done():
        fmt.Println("Operation canceled due to context deadline.")
    default:
        fmt.Println("Operation completed within the deadline.")
    }
}

func main() {
    deadline := time.Now().Add(5 * time.Second)
    deadlineCtx, cancel := context.WithDeadline(context.Background(), deadline)
    defer cancel()

    operationWithDeadline(deadlineCtx)
}
请求范围的值传递
package main

import (
    "context"
    "fmt"
    "sync"
)

func processRequest(ctx context.Context, requestID int) {
    // Accessing request-scoped value from the context
    userID, ok := ctx.Value("userID").(int)
    if !ok {
        fmt.Println("Failed to get userID from context.")
        return
    }

    fmt.Printf("Processing request %d for user %d\n", requestID, userID)
}

func main() {
    // Creating a parent context with a request-scoped value
    parentCtx := context.WithValue(context.Background(), "userID", 123)

    var wg sync.WaitGroup

    // Simulating multiple requests
    for i := 1; i <= 3; i++ {
        wg.Add(1)
        go func(requestID int) {
            // Creating a child context for each request
            childCtx := context.WithValue(parentCtx, "requestID", requestID)
            processRequest(childCtx, requestID)
            wg.Done()
        }(i)
    }

    wg.Wait()
}
本文由mdnice多平台发布


 468
468

 被折叠的 条评论
为什么被折叠?
被折叠的 条评论
为什么被折叠?
 到【灌水乐园】发言


