


二、界面的绘制流程
上一节把Activity的启动流程介绍了一下,在Activity的启动流程中,onResume的生命周期是显示界面的过程,下面来分析界面是如何显示的。上一节内容查看:http://blog.csdn.net/newhope1106/article/details/53355189
PhoneWindow并不是具体的布局界面,我们可以看到handleResumeActivity中,有下面代码调用
     final void handleResumeActivity(IBinder token,
            boolean clearHide, boolean isForward, boolean reallyResume) {
            ......
            if (r.window == null && !a.mFinished && willBeVisible) {
                r.window = r.activity.getWindow();
                View decor = r.window.getDecorView();
                decor.setVisibility(View.INVISIBLE);
                ViewManager wm = a.getWindowManager();
                WindowManager.LayoutParams l = r.window.getAttributes();
                a.mDecor = decor;
                l.type = WindowManager.LayoutParams.TYPE_BASE_APPLICATION;
                l.softInputMode |= forwardBit;
                if (a.mVisibleFromClient) {
                    a.mWindowAdded = true;
                    wm.addView(decor, l);
                }

            ......
    }
其中,r.window.getDecorView()我们可以看到,PhoneWindow.getDecorView(),如果decor不存在的情况下,进行初始化。
   public final View getDecorView() {
        if (mDecor == null) {
            installDecor();
        }
        return mDecor;
    }
private void installDecor() {
if (mDecor == null) {
mDecor = generateDecor();
mDecor.setDescendantFocusability(ViewGroup.FOCUS_AFTER_DESCENDANTS);
mDecor.setIsRootNamespace(true);
if (!mInvalidatePanelMenuPosted && mInvalidatePanelMenuFeatures != 0) {
mDecor.postOnAnimation(mInvalidatePanelMenuRunnable);
}
}
if (mContentParent == null) {
mContentParent = generateLayout(mDecor);
......
}
}
generateLayout(mDecor)这里,它会把我们写的Activity的布局文件放到mDecor中
protected ViewGroup generateLayout(DecorView decor) {
        // Apply data from current theme.

        ......

        mDecor.startChanging();

        View in = mLayoutInflater.inflate(layoutResource, null);
        decor.addView(in, new ViewGroup.LayoutParams(MATCH_PARENT, MATCH_PARENT));
        mContentRoot = (ViewGroup) in;

        ViewGroup contentParent = (ViewGroup)findViewById(ID_ANDROID_CONTENT);
        if (contentParent == null) {
            throw new RuntimeException("Window couldn't find content container view");
        }

        ......

        return contentParent;
    }
然后DecorView被加到了WindowManger中。然后是调用WindowManger的updateViewLayout.下面是WindowManagerImpl的addView方法
    @Override
    public void addView(@NonNull View view, @NonNull ViewGroup.LayoutParams params) {
        applyDefaultToken(params);
        mGlobal.addView(view, params, mDisplay, mParentWindow);
} public void addView(View view, ViewGroup.LayoutParams params,
Display display, Window parentWindow) {
......
root = new ViewRootImpl(view.getContext(), display);
view.setLayoutParams(wparams);
mViews.add(view);
mRoots.add(root);
mParams.add(wparams);
}
// do this last because it fires off messages to start doing things
try {
root.setView(view, wparams, panelParentView);
} catch (RuntimeException e) {
// BadTokenException or InvalidDisplayException, clean up.
synchronized (mLock) {
final int index = findViewLocked(view, false);
if (index >= 0) {
removeViewLocked(index, true);
}
}
throw e;
}
} WindowManager.LayoutParams l = r.window.getAttributes();
if ((l.softInputMode
& WindowManager.LayoutParams.SOFT_INPUT_IS_FORWARD_NAVIGATION)
!= forwardBit) {
l.softInputMode = (l.softInputMode
& (~WindowManager.LayoutParams.SOFT_INPUT_IS_FORWARD_NAVIGATION))
| forwardBit;
if (r.activity.mVisibleFromClient) {
ViewManager wm = a.getWindowManager();
View decor = r.window.getDecorView();
wm.updateViewLayout(decor, l);
}
} @Override
public void updateViewLayout(@NonNull View view, @NonNull ViewGroup.LayoutParams params) {
applyDefaultToken(params);
mGlobal.updateViewLayout(view, params);
} public void updateViewLayout(View view, ViewGroup.LayoutParams params) {
if (view == null) {
throw new IllegalArgumentException("view must not be null");
}
if (!(params instanceof WindowManager.LayoutParams)) {
throw new IllegalArgumentException("Params must be WindowManager.LayoutParams");
}
final WindowManager.LayoutParams wparams = (WindowManager.LayoutParams)params;
view.setLayoutParams(wparams);
synchronized (mLock) {
int index = findViewLocked(view, true);
ViewRootImpl root = mRoots.get(index);
mParams.remove(index);
mParams.add(index, wparams);
root.setLayoutParams(wparams, false);
}
}
上面的部分搞清楚了,布局是如何加入进来的,那么现在要找一下布局三大流程measure、layout、draw在哪里调用的了。看上图的这段代码,这里是关键。也就是三个过程的起点了。
root.setLayoutParams(wparams, false); void setLayoutParams(WindowManager.LayoutParams attrs, boolean newView) {
synchronized (this) {
......
mWindowAttributesChanged = true;
scheduleTraversals();
}
}
然后再看看,scheduleTraversals的内容,出现了一个关键的类-
Choreographer
   void scheduleTraversals() {
        if (!mTraversalScheduled) {
            mTraversalScheduled = true;
            mTraversalBarrier = mHandler.getLooper().getQueue().postSyncBarrier();
            mChoreographer.postCallback(
                    Choreographer.CALLBACK_TRAVERSAL, mTraversalRunnable, null);
            if (!mUnbufferedInputDispatch) {
                scheduleConsumeBatchedInput();
            }
            notifyRendererOfFramePending();
            pokeDrawLockIfNeeded();
        }
    }
这个类的出现是由历史的,这个关键的类是做什么用的,可以转到这里仔细看看,
http://blog.csdn.net/farmer_cc/article/details/18619429,里面讲得非常详细,而且动画和输入事件等都会通过这种方式交给
Choreographer来处理。继续往下分析,当时机成熟之后,Choreographer会在doCallbacks调用这里的TraversalRunnable的run方法
    final class TraversalRunnable implements Runnable {
        @Override
        public void run() {
            doTraversal();
        }
    }
    final TraversalRunnable mTraversalRunnable = new TraversalRunnable();
void doTraversal() {
if (mTraversalScheduled) {
mTraversalScheduled = false;
mHandler.getLooper().getQueue().removeSyncBarrier(mTraversalBarrier);
if (mProfile) {
Debug.startMethodTracing("ViewAncestor");
}
performTraversals();
if (mProfile) {
Debug.stopMethodTracing();
mProfile = false;
}
}
} private void performTraversals() {
......
int desiredWindowWidth;
int desiredWindowHeight;
final int viewVisibility = getHostVisibility();
boolean viewVisibilityChanged = mViewVisibility != viewVisibility
|| mNewSurfaceNeeded;
WindowManager.LayoutParams params = null;
if (mWindowAttributesChanged) {
mWindowAttributesChanged = false;
surfaceChanged = true;
params = lp;
}
CompatibilityInfo compatibilityInfo = mDisplayAdjustments.getCompatibilityInfo();
if (compatibilityInfo.supportsScreen() == mLastInCompatMode) {
params = lp;
mFullRedrawNeeded = true;
mLayoutRequested = true;
if (mLastInCompatMode) {
params.privateFlags &= ~WindowManager.LayoutParams.PRIVATE_FLAG_COMPATIBLE_WINDOW;
mLastInCompatMode = false;
} else {
params.privateFlags |= WindowManager.LayoutParams.PRIVATE_FLAG_COMPATIBLE_WINDOW;
mLastInCompatMode = true;
}
}
mWindowAttributesChangesFlag = 0;
Rect frame = mWinFrame;
if (mFirst) {
mFullRedrawNeeded = true;
mLayoutRequested = true;
if (lp.type == WindowManager.LayoutParams.TYPE_STATUS_BAR_PANEL
|| lp.type == WindowManager.LayoutParams.TYPE_INPUT_METHOD) {
// NOTE -- system code, won't try to do compat mode.
Point size = new Point();
mDisplay.getRealSize(size);
desiredWindowWidth = size.x;
desiredWindowHeight = size.y;
} else {
DisplayMetrics packageMetrics =
mView.getContext().getResources().getDisplayMetrics();
desiredWindowWidth = packageMetrics.widthPixels;
desiredWindowHeight = packageMetrics.heightPixels;
}
// We used to use the following condition to choose 32 bits drawing caches:
// PixelFormat.hasAlpha(lp.format) || lp.format == PixelFormat.RGBX_8888
// However, windows are now always 32 bits by default, so choose 32 bits
mAttachInfo.mUse32BitDrawingCache = true;
mAttachInfo.mHasWindowFocus = false;
mAttachInfo.mWindowVisibility = viewVisibility;
mAttachInfo.mRecomputeGlobalAttributes = false;
viewVisibilityChanged = false;
mLastConfiguration.setTo(host.getResources().getConfiguration());
mLastSystemUiVisibility = mAttachInfo.mSystemUiVisibility;
// Set the layout direction if it has not been set before (inherit is the default)
if (mViewLayoutDirectionInitial == View.LAYOUT_DIRECTION_INHERIT) {
host.setLayoutDirection(mLastConfiguration.getLayoutDirection());
}
host.dispatchAttachedToWindow(mAttachInfo, 0);
mAttachInfo.mTreeObserver.dispatchOnWindowAttachedChange(true);
dispatchApplyInsets(host);
//Log.i(TAG, "Screen on initialized: " + attachInfo.mKeepScreenOn);
} else {
desiredWindowWidth = frame.width();
desiredWindowHeight = frame.height();
if (desiredWindowWidth != mWidth || desiredWindowHeight != mHeight) {
if (DEBUG_ORIENTATION) Log.v(TAG,
"View " + host + " resized to: " + frame);
mFullRedrawNeeded = true;
mLayoutRequested = true;
windowSizeMayChange = true;
}
}
......
final HardwareRenderer hardwareRenderer = mAttachInfo.mHardwareRenderer;
if (hardwareRenderer != null && hardwareRenderer.isEnabled()) {
if (hwInitialized
|| mWidth != hardwareRenderer.getWidth()
|| mHeight != hardwareRenderer.getHeight()) {
hardwareRenderer.setup(mWidth, mHeight, mAttachInfo,
mWindowAttributes.surfaceInsets);
if (!hwInitialized) {
hardwareRenderer.invalidate(mSurface);
mFullRedrawNeeded = true;
}
}
}
if (!mStopped || mReportNextDraw) {
boolean focusChangedDueToTouchMode = ensureTouchModeLocally(
(relayoutResult&WindowManagerGlobal.RELAYOUT_RES_IN_TOUCH_MODE) != 0);
......
// Ask host how big it wants to be
performMeasure(childWidthMeasureSpec, childHeightMeasureSpec);
// Implementation of weights from WindowManager.LayoutParams
// We just grow the dimensions as needed and re-measure if
// needs be
int width = host.getMeasuredWidth();
int height = host.getMeasuredHeight();
boolean measureAgain = false;
if (lp.horizontalWeight > 0.0f) {
width += (int) ((mWidth - width) * lp.horizontalWeight);
childWidthMeasureSpec = MeasureSpec.makeMeasureSpec(width,
MeasureSpec.EXACTLY);
measureAgain = true;
}
if (lp.verticalWeight > 0.0f) {
height += (int) ((mHeight - height) * lp.verticalWeight);
childHeightMeasureSpec = MeasureSpec.makeMeasureSpec(height,
MeasureSpec.EXACTLY);
measureAgain = true;
}
if (measureAgain) {
if (DEBUG_LAYOUT) Log.v(TAG,
"And hey let's measure once more: width=" + width
+ " height=" + height);
performMeasure(childWidthMeasureSpec, childHeightMeasureSpec);
}
layoutRequested = true;
}
}
} else {
......
}
final boolean didLayout = layoutRequested && (!mStopped || mReportNextDraw);
boolean triggerGlobalLayoutListener = didLayout
|| mAttachInfo.mRecomputeGlobalAttributes;
if (didLayout) {
performLayout(lp, desiredWindowWidth, desiredWindowHeight);
......
}
......
if (!cancelDraw && !newSurface) {
if (!skipDraw || mReportNextDraw) {
if (mPendingTransitions != null && mPendingTransitions.size() > 0) {
for (int i = 0; i < mPendingTransitions.size(); ++i) {
mPendingTransitions.get(i).startChangingAnimations();
}
mPendingTransitions.clear();
}
performDraw();
}
} else {
......
}
mIsInTraversal = false;
}
上述三个过程中,measure操作最复杂,三个操作的相同点都是从父view遍历到子view,然后调用操作。首先简要的说一个meassure操作,ViewRootImpl调用performMessure操作,里面调用的是DecorView的measure,由于DecorView其实是集成FrameLayout,最终转化为调用View的measure操作。measure的流程,可以参考:
http://blog.csdn.net/a553181867/article/details/51494058
   private void performMeasure(int childWidthMeasureSpec, int childHeightMeasureSpec) {
        Trace.traceBegin(Trace.TRACE_TAG_VIEW, "measure");
        try {
            mView.measure(childWidthMeasureSpec, childHeightMeasureSpec);
        } finally {
            Trace.traceEnd(Trace.TRACE_TAG_VIEW);
        }
    }
补充说明一下measure:
View的测量规格是由自身的规格和父View的规格共同决定,共三类,AT_MOST、EXACTLY、UNSPECIFIED,如果当前View的大小在布局中是确定的,比如300dip,那么它就是EXACTLY模式,不管父View的测量规格是咋样的,如果当前View在布局中是match_parent,那么根据父类的测量规格,如果父类是EXACTLY,那么当前view也就变成了EXACTLLY,如果父类是AT_MOST,那么当前View也是AT_MOST,大小是父类大小,如果当前View是wrap_content,那么不管父类是EXACTLY还是AT_MOST,子类都是AT_MOST,大小是父类大小,至于特殊的测量规格UNSPECIFIED,目前还不清楚怎么出现的,那么当前View在此模式下,如果是match_parent还是wrap_content都是UNSPECIFIED,默认大小是0,由于DecorView基本是EXACTLY模式因此,只要子view不是EXACTLY模式的,那么都不会超过这个值。
至于常用布局FrameLayout、LinearLayout、RelativeLayout效率问题,可以在网上搜索一下,同样的层次下,基本上FrameLayout > LinearLayout > RelativeLayout,RelativeLayout 会进行2次measure操作,水平和垂直,而当LinearLayout的子View有weight属性时,也会进行2次measure操作,不过第一次时measure没有weight属性的子view,第二次才是有weight属性的子view,因此效率还是比RelativeLayout效率高。FrameLayout的基本上不会有布局依赖的问题,一次遍历即可。当然最影响效率还是布局层次,所以最好是减少布局层次。(参考:
http://blog.csdn.net/guyuealian/article/details/52162774、
http://www.tuicool.com/articles/uQ3MBnj)
layout操作ViewGroup中没有实现,LinearLayout、RelativeLayout、FrameLayout有具体的实现,可以自行参考。
draw操作基本上就是把View通过调用Canvas接口进行绘制,具体的界面绘制看下一节,这里补充一下其他的。
从draw的绘制流程可以知道,第一步是如果背景不是透明的,就绘制背景,第二步是绘制内容,由于ViewGroup是容器,本身没有内容,如果背景透明,onDraw方法会被跳过,直接执行,dispatchDraw方法,因此,当重写ViewGroup的时候,最好在dispatchDraw方法中调用绘制.
   public void draw(Canvas canvas) {
        final int privateFlags = mPrivateFlags;
        final boolean dirtyOpaque = (privateFlags & PFLAG_DIRTY_MASK) == PFLAG_DIRTY_OPAQUE &&
                (mAttachInfo == null || !mAttachInfo.mIgnoreDirtyState);
        mPrivateFlags = (privateFlags & ~PFLAG_DIRTY_MASK) | PFLAG_DRAWN;

        /*
         * Draw traversal performs several drawing steps which must be executed
         * in the appropriate order:
         *
         *      1. Draw the background
         *      2. If necessary, save the canvas' layers to prepare for fading
         *      3. Draw view's content
         *      4. Draw children
         *      5. If necessary, draw the fading edges and restore layers
         *      6. Draw decorations (scrollbars for instance)
         */

        // Step 1, draw the background, if needed
        int saveCount;

        if (!dirtyOpaque) {
            drawBackground(canvas);
        }

        // skip step 2 & 5 if possible (common case)
        final int viewFlags = mViewFlags;
        boolean horizontalEdges = (viewFlags & FADING_EDGE_HORIZONTAL) != 0;
        boolean verticalEdges = (viewFlags & FADING_EDGE_VERTICAL) != 0;
        if (!verticalEdges && !horizontalEdges) {
            // Step 3, draw the content
            if (!dirtyOpaque) onDraw(canvas);

            // Step 4, draw the children
            dispatchDraw(canvas);

            // Overlay is part of the content and draws beneath Foreground
            if (mOverlay != null && !mOverlay.isEmpty()) {
                mOverlay.getOverlayView().dispatchDraw(canvas);
            }

            // Step 6, draw decorations (foreground, scrollbars)
            onDrawForeground(canvas);

            // we're done...
            return;
        }

        ......

        // Step 3, draw the content
        if (!dirtyOpaque) onDraw(canvas);

        // Step 4, draw the children
        dispatchDraw(canvas);

        // Step 5, draw the fade effect and restore layers
        ......

        // Step 6, draw decorations (foreground, scrollbars)
        onDrawForeground(canvas);
    }
三、界面的具体绘制过程
在ViewRootImpl中调用了performDraw之后,接着调用draw方法,里面有硬绘制和软绘制,
     private void performDraw() {
        ......
        Trace.traceBegin(Trace.TRACE_TAG_VIEW, "draw");
        try {
            draw(fullRedrawNeeded);
        } finally {
            mIsDrawing = false;
            Trace.traceEnd(Trace.TRACE_TAG_VIEW);
        }

            ......
    }
开启硬件加速,则采用硬绘制(Android 6.0 mHardwareRenderer是ThreadedRenderer),否则,采用软绘制
     private void draw(boolean fullRedrawNeeded) {
                .....
                mAttachInfo.mHardwareRenderer.draw(mView, mAttachInfo, this);
            } else {
                ......

                if (!drawSoftware(surface, mAttachInfo, xOffset, yOffset, scalingRequired, dirty)) {
                    return;
                }
            }
        }.....
    }
给一张图形象的看一下(
http://blog.csdn.net/michaelcao1980/article/details/43233909),图中的Render是老版本的,流程差不多
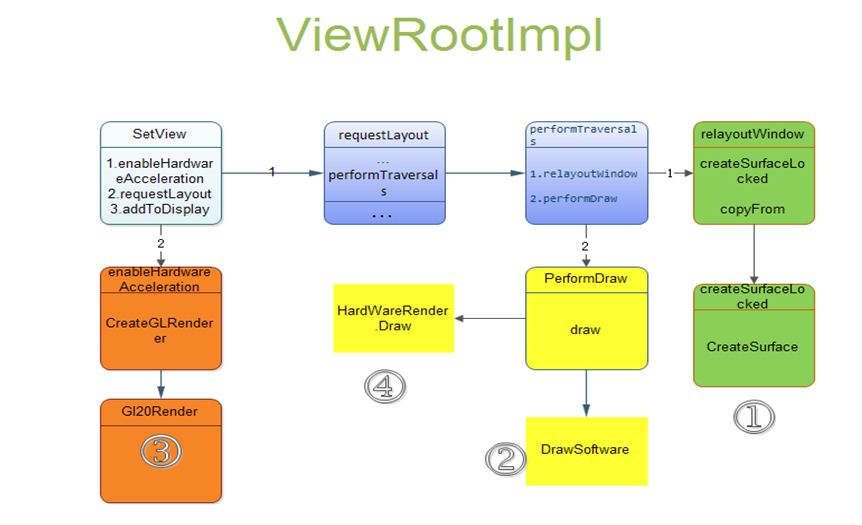
首先看看ThreadedRenderer的draw方法,然后是是updateRootDisplayList
  void draw(View view, AttachInfo attachInfo, HardwareDrawCallbacks callbacks) {
        attachInfo.mIgnoreDirtyState = true;

        final Choreographer choreographer = attachInfo.mViewRootImpl.mChoreographer;
        choreographer.mFrameInfo.markDrawStart();

        updateRootDisplayList(view, callbacks);

        ......
    }
private void updateRootDisplayList(View view, HardwareDrawCallbacks callbacks) {
Trace.traceBegin(Trace.TRACE_TAG_VIEW, "Record View#draw()");
updateViewTreeDisplayList(view);
if (mRootNodeNeedsUpdate || !mRootNode.isValid()) {
DisplayListCanvas canvas = mRootNode.start(mSurfaceWidth, mSurfaceHeight);
try {
final int saveCount = canvas.save();
canvas.translate(mInsetLeft, mInsetTop);
callbacks.onHardwarePreDraw(canvas);
canvas.insertReorderBarrier();
canvas.drawRenderNode(view.updateDisplayListIfDirty());
canvas.insertInorderBarrier();
callbacks.onHardwarePostDraw(canvas);
canvas.restoreToCount(saveCount);
mRootNodeNeedsUpdate = false;
} finally {
mRootNode.end(canvas);
}
}
Trace.traceEnd(Trace.TRACE_TAG_VIEW);
}
具体的绘制过程请参考:
http://blog.csdn.net/luoshengyang/article/details/45943255,上面的硬件绘制比较繁琐,没有深入研究,软绘制逻辑比较简单了。
     private boolean drawSoftware(Surface surface, AttachInfo attachInfo, int xoff, int yoff,
            boolean scalingRequired, Rect dirty) {

        // Draw with software renderer.
        final Canvas canvas;
        try {
            final int left = dirty.left;
            final int top = dirty.top;
            final int right = dirty.right;
            final int bottom = dirty.bottom;

            canvas = mSurface.lockCanvas(dirty);

            // The dirty rectangle can be modified by Surface.lockCanvas()
            //noinspection ConstantConditions
            if (left != dirty.left || top != dirty.top || right != dirty.right
                    || bottom != dirty.bottom) {
                attachInfo.mIgnoreDirtyState = true;
            }

            // TODO: Do this in native
            canvas.setDensity(mDensity);
        } catch (Surface.OutOfResourcesException e) {
            handleOutOfResourcesException(e);
            return false;
        } catch (IllegalArgumentException e) {
            Log.e(TAG, "Could not lock surface", e);
            // Don't assume this is due to out of memory, it could be
            // something else, and if it is something else then we could
            // kill stuff (or ourself) for no reason.
            mLayoutRequested = true;    // ask wm for a new surface next time.
            return false;
        }

        try {
            if (DEBUG_ORIENTATION || DEBUG_DRAW) {
                Log.v(TAG, "Surface " + surface + " drawing to bitmap w="
                        + canvas.getWidth() + ", h=" + canvas.getHeight());
                //canvas.drawARGB(255, 255, 0, 0);
            }

            // If this bitmap's format includes an alpha channel, we
            // need to clear it before drawing so that the child will
            // properly re-composite its drawing on a transparent
            // background. This automatically respects the clip/dirty region
            // or
            // If we are applying an offset, we need to clear the area
            // where the offset doesn't appear to avoid having garbage
            // left in the blank areas.
            if (!canvas.isOpaque() || yoff != 0 || xoff != 0) {
                canvas.drawColor(0, PorterDuff.Mode.CLEAR);
            }

            dirty.setEmpty();
            mIsAnimating = false;
            mView.mPrivateFlags |= View.PFLAG_DRAWN;

            if (DEBUG_DRAW) {
                Context cxt = mView.getContext();
                Log.i(TAG, "Drawing: package:" + cxt.getPackageName() +
                        ", metrics=" + cxt.getResources().getDisplayMetrics() +
                        ", compatibilityInfo=" + cxt.getResources().getCompatibilityInfo());
            }
            try {
                canvas.translate(-xoff, -yoff);
                if (mTranslator != null) {
                    mTranslator.translateCanvas(canvas);
                }
                canvas.setScreenDensity(scalingRequired ? mNoncompatDensity : 0);
                attachInfo.mSetIgnoreDirtyState = false;

                mView.draw(canvas);

                drawAccessibilityFocusedDrawableIfNeeded(canvas);
            } finally {
                if (!attachInfo.mSetIgnoreDirtyState) {
                    // Only clear the flag if it was not set during the mView.draw() call
                    attachInfo.mIgnoreDirtyState = false;
                }
            }
        } finally {
            try {
                surface.unlockCanvasAndPost(canvas);
            } catch (IllegalArgumentException e) {
                Log.e(TAG, "Could not unlock surface", e);
                mLayoutRequested = true;    // ask wm for a new surface next time.
                //noinspection ReturnInsideFinallyBlock
                return false;
            }

            if (LOCAL_LOGV) {
                Log.v(TAG, "Surface " + surface + " unlockCanvasAndPost");
            }
        }
        return true;
    }
Surface中调用unlockCanvasAndPost开始绘制啦
绘制的数据基本上都在Surface上,可以看源码知道,在Surface上分配了一个缓存,然后有一个指针指向这个地方,每个View都会有一个Surface。
下一节是事件的分发流程,比起前面的要简单一些。


 317
317


 被折叠的 条评论
为什么被折叠?
被折叠的 条评论
为什么被折叠?
 到【灌水乐园】发言


