


研究生入学跟老师做项目,之前没有接触过Spring,在看了近一个月的教学视频后,发现也就那么点东西,在这里总结回顾一下,算是对Spring进行一下巩固。顺便推荐一下使用IDEA进行开发,我之前都是用Eclipse,可是转到IDEA上之后简直对它爱不释手,我反正以后写Java 都不会再用Eclipse和MyEclipse了
一、Spring MVC 架构
Spring Web MVC和Struts一样都是表现层的框架,它是Spring的框架的一部分,可以视其为Spring的一个模块。Spring Web MVC的架构如下图所示:
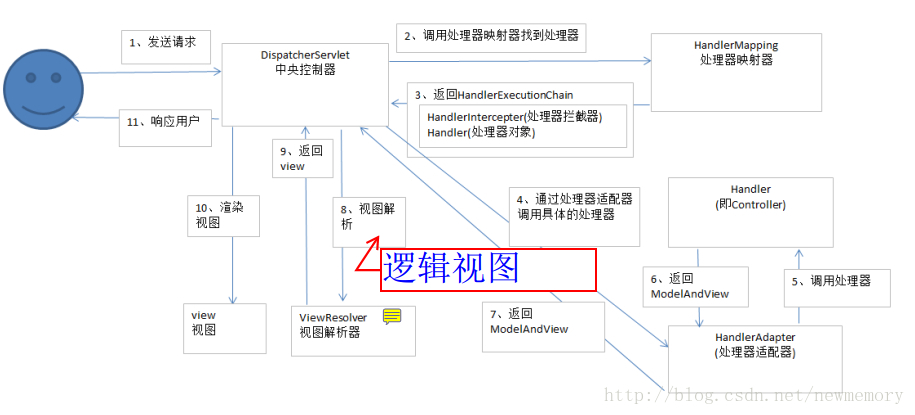
对上图中组件的说明:
- DispatcherServlet(前端控制器):DispatcherServlet是整个流程控制的中心,由它调用其它组件处理用户的请求,DispatcherServlet的存在降低了组件之间的耦合性。
- HandlerMapping(处理器映射器):HandlerMapping负责根据用户请求找到Handler即处理器,springmvc提供了不同的映射器实现不同的映射方式,例如:配置文件方式,实现接口方式,注解方式等,推荐使用注解开发。
- Handler(处理器):Handler 是继DispatcherServlet前端控制器的后端控制器,在DispatcherServlet的控制下Handler对具体的用户请求进行处理。由于Handler涉及到具体的用户业务请求,所以一般情况需要程序员根据业务需求开发Handler。
- HandlAdapter(处理器适配器):通过HandlerAdapter对处理器进行执行,这是适配器模式的应用,通过扩展适配器可以对更多类型的处理器进行执行。
- ViewResolver(视图解析器):View Resolver负责将处理结果生成View视图,View Resolver首先根据逻辑视图名解析成物理视图名即具体的页面地址,再生成View视图对象,最后对View进行渲染将处理结果通过页面展示给用户。
Spring MVC Demo
根据对Spring MVC的架构分析,如果我们想要完成一个应用Spring MVC的项目,就必须要在配置文件中进行配置,只要完成了配置,开发就相对容易了。
这次要实现的一个Demo只是一个Hello World级别的SpringMVC入门程序,实现表单提交用户姓名,然后再转向另一个JSP。
工程目录结构:

Spring组件的配置:
1.在web.xml中配置前端控制器:
<?xml version="1.0" encoding="UTF-8"?>
<web-app xmlns="http://xmlns.jcp.org/xml/ns/javaee"
         xmlns:xsi="http://www.w3.org/2001/XMLSchema-instance"
         xsi:schemaLocation="http://xmlns.jcp.org/xml/ns/javaee http://xmlns.jcp.org/xml/ns/javaee/web-app_3_1.xsd"
         version="3.1">
    <!--
       加载Spring容器,不建议直接使用applicationContext.xml,而应根据分类另外创建配置文件
    -->
    <context-param>
        <param-name>contextConfigLocation</param-name>
        <param-value>/WEB-INF/applicationContext.xml</param-value>
    </context-param>
    <listener>
        <listener-class>org.springframework.web.context.ContextLoaderListener</listener-class>
    </listener>


    <!--
    配置前端控制器
        这里配置的前端控制器的名字叫dispatcher,SpringMVC默认会加载同目录下的dispatcher-servlet.xml
    这里为了便于分层管理,不使用dispatcher-servlet.xml,而是自己写一个springmvc.xml,用contextConfigLocation
    指定SpringMVC的加载位置。
    要求:spring文件夹的上一层文件夹必须mark为“Resources Root”,同时注意如果一个文件夹一旦配置为“Resources Root”
    其下的配置文件夹都是可以直接写在路径中的,具体检测方式看能否直接打开
    springmvc.xml中配置了
        1、处理器映射器和处理器适配器
        2、处理器
        3、视图解析器
    使用RESTful格式的话,将<url-pattern>标签中的“*.action”变为“/”
    -->
    <servlet>
        <servlet-name>dispatcher</servlet-name>
        <servlet-class>org.springframework.web.servlet.DispatcherServlet</servlet-class>
        <init-param>
            <param-name>contextConfigLocation</param-name>
            <param-value>classpath:spring/springmvc.xml</param-value>
        </init-param>
        <load-on-startup>1</load-on-startup>
    </servlet>
    <servlet-mapping>
        <servlet-name>dispatcher</servlet-name>
        <url-pattern>*.action</url-pattern>
    </servlet-mapping>

    <!--配置编码-->
    <filter>
        <filter-name>CharacterEncodingFilter</filter-name>
        <filter-class>org.springframework.web.filter.CharacterEncodingFilter</filter-class>
        <init-param>
            <param-name>encoding</param-name>
            <param-value>utf-8</param-value>
        </init-param>
    </filter>
    <filter-mapping>
        <filter-name>CharacterEncodingFilter</filter-name>
        <url-pattern>*.action</url-pattern>
    </filter-mapping>

    <welcome-file-list>
        <welcome-file>index.jsp</welcome-file>
    </welcome-file-list>

</web-app>
2.Spring默认是在"前端控制器name-servlet.xml"中进行配置,但这里为了后期便于扩展,将其放到springmvc.xml中配置,在该配置文件中我们会配置映射器,适配器,处理器和视图解析器。其中处理器采用注解方式。
<beans xmlns="http://www.springframework.org/schema/beans"
	   xmlns:xsi="http://www.w3.org/2001/XMLSchema-instance" xmlns:mvc="http://www.springframework.org/schema/mvc"
	   xmlns:context="http://www.springframework.org/schema/context"
	   xmlns:aop="http://www.springframework.org/schema/aop"
	   xmlns:tx="http://www.springframework.org/schema/tx"
	   xsi:schemaLocation="http://www.springframework.org/schema/beans
		http://www.springframework.org/schema/beans/spring-beans-3.2.xsd
		http://www.springframework.org/schema/mvc
		http://www.springframework.org/schema/mvc/spring-mvc-3.2.xsd
		http://www.springframework.org/schema/context
		http://www.springframework.org/schema/context/spring-context-3.2.xsd
		http://www.springframework.org/schema/aop
		http://www.springframework.org/schema/aop/spring-aop-3.2.xsd
		http://www.springframework.org/schema/tx
		http://www.springframework.org/schema/tx/spring-tx-3.2.xsd ">

	<!--
    配置处理器映射器和处理器适配器
    使用<mvc:annotation-drvier/>配置注解映射器和注解适配器
    -->
	<mvc:annotation-driven/>

    <!--
    配置处理器
      使用<context:component-sacn/>组件扫描器自动扫描包中标记为@Controller的注解类,
      注意:多个包中间使用半角逗号分隔
      要求:base-package对应的包中应该是controller包
    -->
    <context:component-scan base-package="cn.michael.controller"/>

	<!--
	配置视图解析器
		要求:
		1、配置解析JSP的视图解析器,默认使用JSTL,因此classpath下需要有JSTL的包
		2、根据前缀和后缀,在WEB-INF目录下要有pages目录,其中存放jsp文件
	-->
	<bean class="org.springframework.web.servlet.view.InternalResourceViewResolver">
        <property name="viewClass" value="org.springframework.web.servlet.view.JstlView"/>
		<property name="prefix" value="/WEB-INF/pages/"/>
		<property name="suffix" value=".jsp"/>
	</bean>
</beans>
3.视图及Controller的编写
经过在web.xml和springmvc.xml中的配置,我们已经完成了Spring组件的配置。下面编写视图及必要的控制器,因为是入门程序,只有一个控制器(FirstController),两个JSP:index.jsp和showName.jsp,其数据流动是:index.jsp—> FirstController —> showName.jsp。
index.jsp:
<%@ page contentType="text/html;charset=UTF-8" language="java" %>
<%@ taglib prefix="c" uri="http://java.sun.com/jsp/jstl/core" %>
<html>
  <head>
    <title>SpringMVC_Demo</title>
  </head>
  <body>
      <form action="${pageContext.request.contextPath}/views/showName.action" method="post" >
		  <input name="username" type="text">
		  <input type="submit" value="提交">
	  </form>
  </body>

</html>
FirstController:
package cn.michael.controller;

import org.springframework.stereotype.Controller;
import org.springframework.web.bind.annotation.RequestMapping;
import org.springframework.web.servlet.ModelAndView;

@Controller
@RequestMapping("/views")
public class FirstController {
	@RequestMapping("/showName")
	public ModelAndView showName(String username){
		System.out.println (username);
		ModelAndView modelAndView = new ModelAndView ();
		modelAndView.addObject ("username", username);
		modelAndView.setViewName ("showName");
		return modelAndView;
	}
}
showName.jsp:
<%@ page contentType="text/html;charset=UTF-8" language="java" %>
<%@ taglib prefix="c" uri="http://java.sun.com/jsp/jstl/core" %>
<html>
<head>
	<title>用户姓名</title>
</head>
<body>

	<c:choose>
		<c:when test="${username != null}">
			用户姓名是:${username}
		</c:when>
		<c:otherwise>
			没有接收到用户姓名
		</c:otherwise>
	</c:choose>
</body>
</html>
三、工程源代码下载及注意
工程源代码下载:SpringMVCDemo
- 任何一个框架,入门的难点在于配置文件的配置。
- 多多实践,一定要学会如何去Debug,会用搜索引擎!!!
- 千万不要忽视每一个细节。
ps:在学习过程中借鉴了别人的一些学习感悟,仅供参考,望多多指教


 243
243

 被折叠的 条评论
为什么被折叠?
被折叠的 条评论
为什么被折叠?
 到【灌水乐园】发言


