


本节课主要介绍的内容是基于PyQt6的GUI界面设计。
PyQt6是Python的一个GUI框架,其基于Qt6开发,用于创建功能强大的跨平台桌面应用程序。它提供了丰富的组件(如按钮、窗口、表格等)和现代化特性(如高性能渲染、改进的多媒体支持、更好的 HiDPI 缩放),同时支持信号与槽机制实现事件驱动编程,能够帮助我们制作出美观的界面,实现对于一个系统的完整开发。
图像处理的功能我们之前都已经写过且顺利实现了各项功能,此次设计界面即是将功能集成在一起,增强其可视化功能,使之对用户更友好。
1.Hello World!
首先我们需要在终端安装PyQt6,之后让我们先来运行下第一个程序。
from PyQt6.QtWidgets import QApplication, QLabel, QWidget
# 创建应用实例
app = QApplication([])
# 创建主窗口
window = QWidget()
window.setWindowTitle("PyQt6 Hello World") # 设置窗口标题
window.setGeometry(100, 100, 300, 200) # 设置窗口位置和大小 (x, y, width, height)
# 添加一个标签(显示 "Hello World!")
label = QLabel("Hello World!", parent=window)
label.move(100, 80) # 设置标签位置(相对于窗口)
# 显示窗口
window.show()
# 运行应用主循环
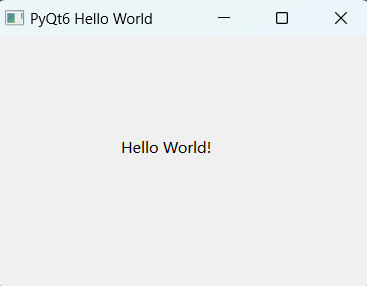
app.exec()上述代码是一个简单的 PyQt6 图形界面程序,创建一个显示"Hello World!"的窗口。
代码解读
1.导入模块:QApplication、Qlabel、Qwidget等都是PyQt6的核心组件,帮助我们实现想要的功能。
2.创建应用实例:创建QApplication实例,这是所有PyQt6 GUI应用程序必须的。参数[]表示命令行参数列表(这里为空)
app = QApplication([])3.创建主窗口:
QWidget():创建一个基本窗口。
setWindowTitle():设置窗口标题栏显示的文本
setGeometry(x, y, width, height):x,y表示窗口在屏幕的位置,width,height则表示窗口的宽度与高度。
window = QWidget()
window.setWindowTitle("PyQt6 Hello World")  # 设置窗口标题
window.setGeometry(100, 100, 300, 200)     # 设置窗口位置和大小 (x, y, width, height)
4.添加标签控件:
QLabel("Hello World!", parent=window):创建一个显示"Hello World!"文本的标签,parent=window表示这个标签是窗口的子控件。
move(x, y): 设置标签在父窗口中的位置。
label = QLabel("Hello World!", parent=window)
label.move(100, 80)
5.显示窗口:
window.show()6.运行应用主循环: 保证程序能够正常运行。
app.exec()结果如下图所示:
2. 简单图像处理界面
下面我们先来展示一个简单的数字图像系统界面。代码如下:其展示了一个基于PyQt6的图像处理应用程序,主要功能包括图像加载,灰度处理,高斯模糊处理。
import sys
import cv2
import numpy as np
from PyQt6.QtWidgets import QApplication, QMainWindow, QLabel, QPushButton, QVBoxLayout, QWidget, QFileDialog
from PyQt6.QtGui import QPixmap, QImage
from PyQt6.QtCore import Qt


class ImageProcessingApp(QMainWindow):
    def __init__(self):
        super().__init__()
        self.setWindowTitle("图像处理系统")
        self.setGeometry(100, 100, 800, 600)  # 设置窗口位置和大小

        # 创建中心部件
        self.central_widget = QWidget()
        self.setCentralWidget(self.central_widget)

        # 创建布局
        self.layout = QVBoxLayout(self.central_widget)

        # 创建标签用于显示原始图像
        self.original_label = QLabel("原始图像", self)
        self.original_label.setAlignment(Qt.AlignmentFlag.AlignCenter)
        self.layout.addWidget(self.original_label)

        # 创建标签用于显示处理后的图像
        self.processed_label = QLabel("处理后的图像", self)
        self.processed_label.setAlignment(Qt.AlignmentFlag.AlignCenter)
        self.layout.addWidget(self.processed_label)

        # 创建按钮用于加载图像
        self.load_button = QPushButton("加载图像", self)
        self.layout.addWidget(self.load_button)
        self.load_button.clicked.connect(self.load_image)

        # 创建按钮用于处理图像
        self.process_button = QPushButton("灰度化处理", self)
        self.layout.addWidget(self.process_button)
        self.process_button.clicked.connect(self.process_image)

        # 创建按钮用于高斯模糊处理
        self.blur_button = QPushButton("高斯模糊", self)
        self.layout.addWidget(self.blur_button)
        self.blur_button.clicked.connect(self.blur_image)

        # 初始化图像变量
        self.original_image = None
        self.processed_image = None

    def load_image(self):
        """加载图像(兼容中文路径)"""
        file_path, _ = QFileDialog.getOpenFileName(self, "选择图像文件", "", "Image Files (*.png *.jpg *.bmp *.gif)")
        if file_path:
            print("加载路径:", file_path)  # 调试用,正式可移除
            self.original_image = cv2.imdecode(np.fromfile(file_path, dtype=np.uint8), cv2.IMREAD_COLOR)
            if self.original_image is not None:
                self.display_image(self.original_label, self.original_image)
            else:
                print("图像读取失败,请检查文件路径或格式。")

    def process_image(self):
        """对图像进行灰度化处理"""
        if self.original_image is not None:
            self.processed_image = cv2.cvtColor(self.original_image, cv2.COLOR_BGR2GRAY)
            self.display_image(self.processed_label, self.processed_image)

    def blur_image(self):
        """对图像进行高斯模糊处理"""
        if self.original_image is not None:
            self.processed_image = cv2.GaussianBlur(self.original_image, (15, 15), 0)
            self.display_image(self.processed_label, self.processed_image)
    def display_image(self, label, image):
        """将 OpenCV 图像转换为 QPixmap 并显示在 QLabel 中"""
        if len(image.shape) == 3:  # 彩色图像
            height, width, channel = image.shape
            bytesPerLine = 3 * width
            qImg = QImage(image.data, width, height, bytesPerLine, QImage.Format.Format_RGB888).rgbSwapped()
        else:  # 灰度图像
            height, width = image.shape
            bytesPerLine = width
            qImg = QImage(image.data, width, height, bytesPerLine, QImage.Format.Format_Grayscale8)

        pixmap = QPixmap.fromImage(qImg)
        label.setPixmap(pixmap.scaled(400, 400, Qt.AspectRatioMode.KeepAspectRatio))
        label.show()


if __name__ == "__main__":
    app = QApplication(sys.argv)
    window = ImageProcessingApp()
    window.show()
    sys.exit(app.exec())
上述代码中我们定义了名为“ImageProcessingApp”的类,该类中的主要内容就是GUI界面的设计以及图像处理的函数设计,是本该程序的核心内容。
注意事项:
在加载图像时,一开始读入图像使用的函数是
cv2.imread()但其不支持中文路径,不能正确读入我们的图像,故需要将路径全部写成英文或使用下面这个函数cv2.imdecode()即可。
cv2.imdecode()在读入图像时,cv2.imdecode()总是优于cv2.imdead()的。
结果展示:
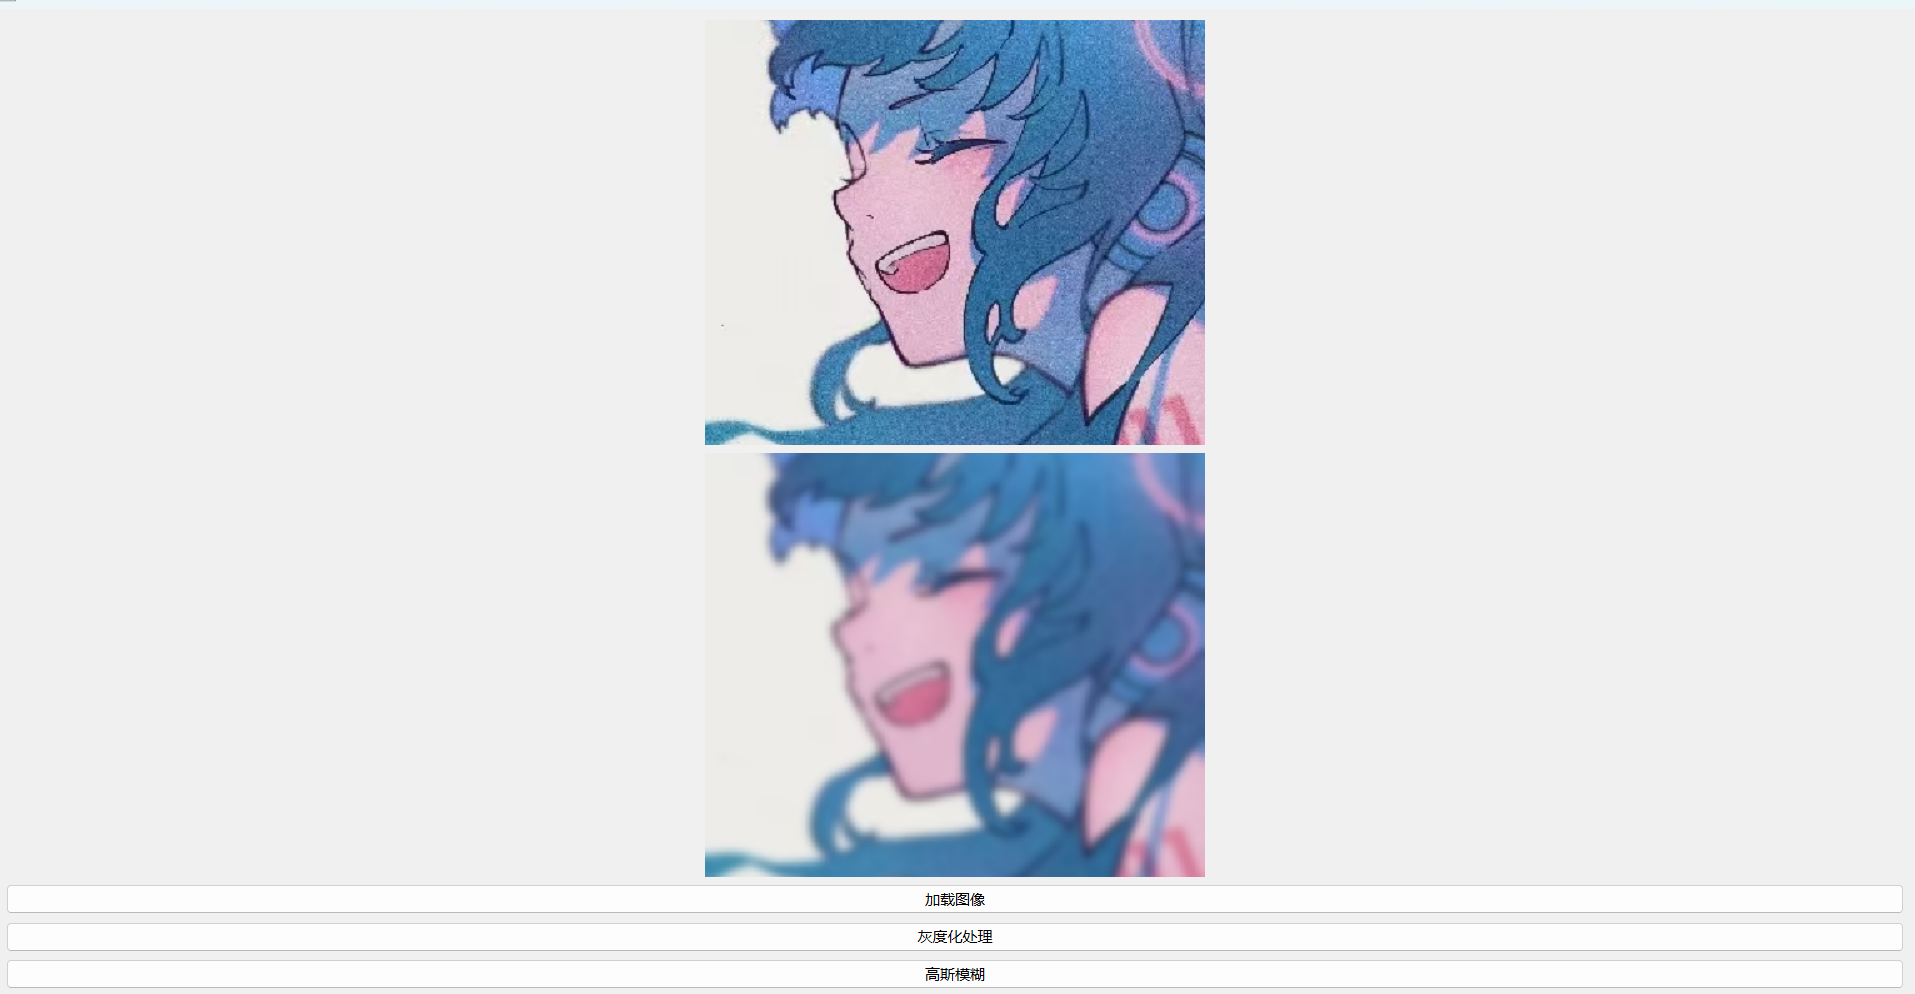
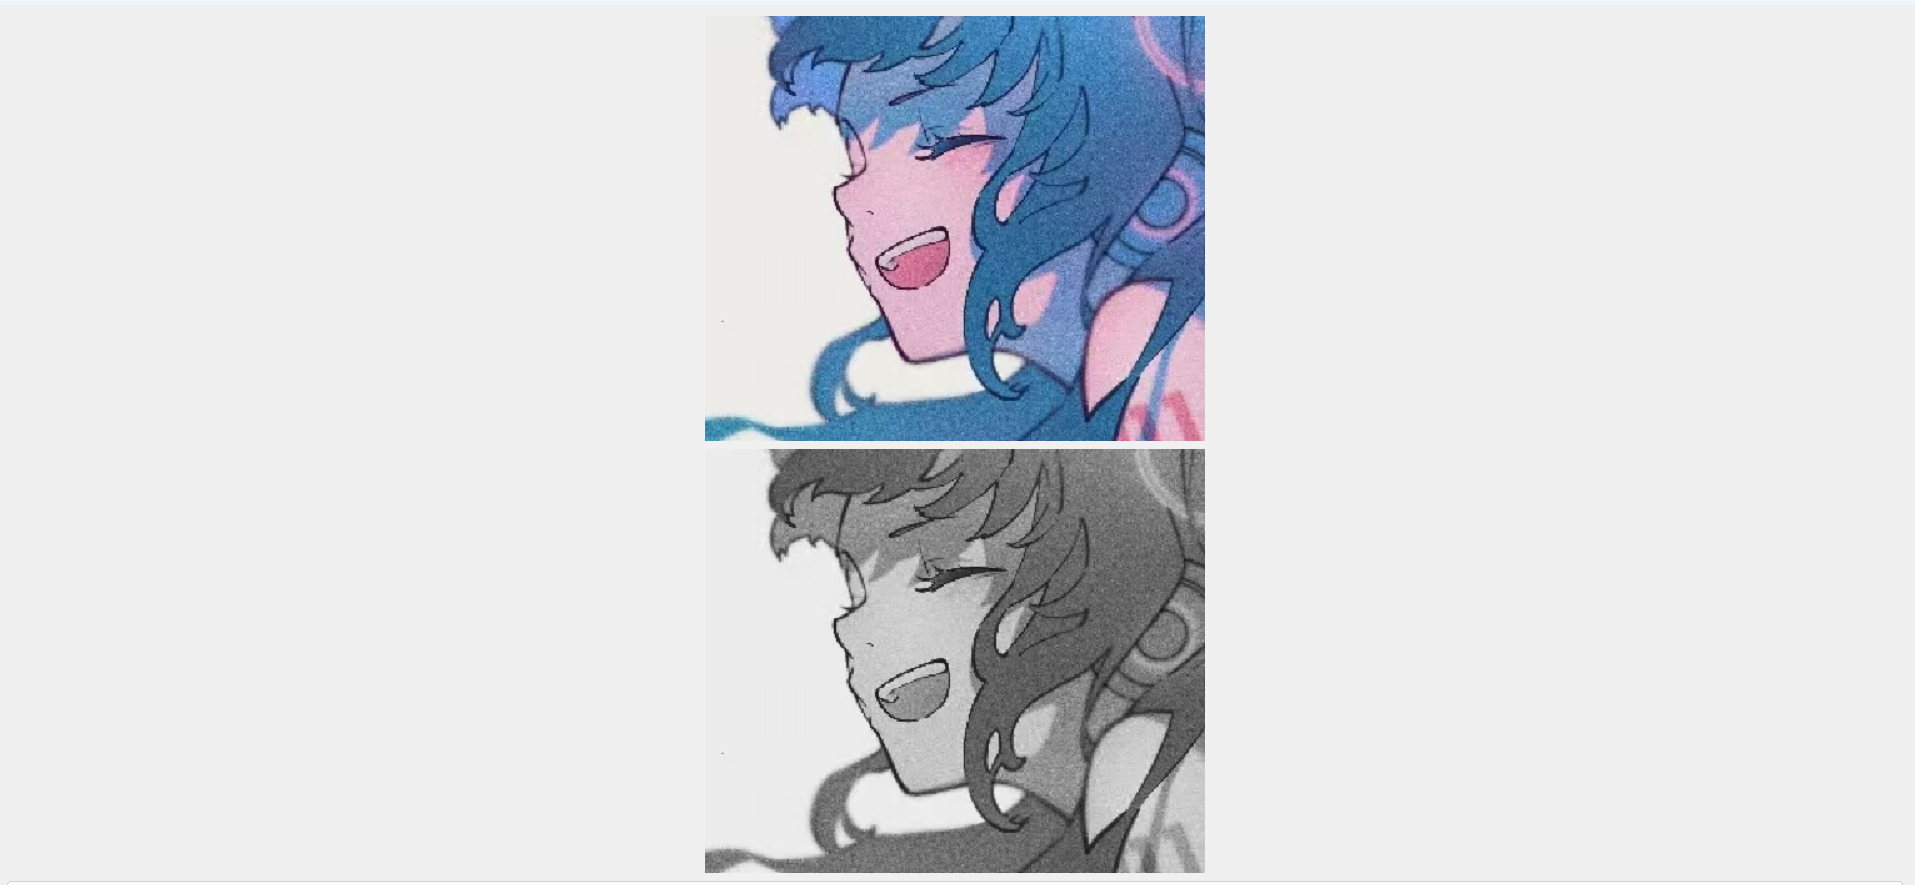
我们可以发现上面的程序的一些问题:界面不够美观、只有一个处理窗口导致我们不能看到多种处理方式之间的对比。
接下来,就要依次解决上面的问题。
3. 界面的优化处理
下面这个代码是一个相对美观的界面设计。
import sys
import cv2
import numpy as np
from PyQt6.QtWidgets import (
    QApplication, QMainWindow, QWidget, QLabel, QPushButton,
    QFileDialog, QMessageBox, QVBoxLayout, QHBoxLayout, QFrame
)
from PyQt6.QtGui import QPixmap, QImage
from PyQt6.QtCore import Qt


class ImageProcessor(QMainWindow):
    def __init__(self):
        super().__init__()
        self.setWindowTitle("PyQt演示")
        self.resize(900, 600)

        # 存储原始图像和处理后的图像数据
        self.image_data = {}

        # 创建主窗口小部件并设置布局
        main_widget = QWidget()
        self.setCentralWidget(main_widget)
        main_layout = QVBoxLayout(main_widget)

        # 设置主窗口的样式
        main_widget.setStyleSheet("""
            QWidget {
                background-color: #f0f4f8;
            }
            QLabel {
                border: 2px solid #aaa;
                border-radius: 10px;
                background-color: white;
                padding: 5px;
                box-shadow: 0px 4px 6px rgba(0, 0, 0, 0.1);
            }
            QPushButton {
                font-size: 15px;
                padding: 8px 18px;
                min-width: 100px;
            }
        """)

        # 创建顶部布局:加载按钮和保存按钮
        top_layout = QHBoxLayout()
        load_btn = QPushButton("📂 加载图片")
        save_btn = QPushButton("💾 保存图像")
        load_btn.clicked.connect(self.load_image)  # 连接加载按钮的事件
        save_btn.clicked.connect(self.save_image)  # 连接保存按钮的事件
        top_layout.addWidget(load_btn)
        top_layout.addWidget(save_btn)
        top_layout.addStretch()
        main_layout.addLayout(top_layout)
        # 添加水平分割线
        main_layout.addWidget(self._h_line())

        # 创建用于显示原始图像和处理后图像的布局
        img_layout = QHBoxLayout()
        self.original_label = QLabel()  # 用于显示原始图像
        self.processed_label = QLabel()  # 用于显示处理后的图像

        # 设置标签的固定大小和对齐方式
        for label in (self.original_label, self.processed_label):
            label.setFixedSize(400, 400)
            label.setAlignment(Qt.AlignmentFlag.AlignCenter)
        # 添加原始图像和处理图像标签
        img_layout.addWidget(self.original_label)
        img_layout.addWidget(self._v_line())
        img_layout.addWidget(self.processed_label)
        img_layout.setSpacing(0)
        main_layout.addLayout(img_layout)
        main_layout.addWidget(self._h_line())

        # 创建底部按钮布局:灰度化、去噪、锐化
        bottom_layout = QHBoxLayout()
        for text, func in [("⚫灰度化", "gray"), ("🔍去噪", "denoise"),
                           ("✨锐化", "sharpen"), ("旋转", "rotation")]:
            btn = QPushButton(text)
            btn.setGeometry(200,150,100,50)
            # 绑定按钮点击事件
            btn.clicked.connect(lambda _, f=func: self.process(f))
            bottom_layout.addWidget(btn)
        bottom_layout.addStretch()
        main_layout.addLayout(bottom_layout)

    def _h_line(self):
        line = QFrame()
        line.setFrameShape(QFrame.Shape.HLine)
        line.setFrameShadow(QFrame.Shadow.Sunken)
        line.setStyleSheet("color: #ccc;")
        return line

    def _v_line(self):
        line = QFrame()
        line.setFrameShape(QFrame.Shape.VLine)
        line.setFrameShadow(QFrame.Shadow.Sunken)
        line.setStyleSheet("color: #ccc;")
        return line

    def load_image(self):
        """加载图像"""
        file, _ = QFileDialog.getOpenFileName(self, "选择图片", "", "图片文件 (*.png *.jpg *.bmp)")
        if file:
            img = cv2.imdecode(np.fromfile(file, dtype=np.uint8), cv2.IMREAD_COLOR)

            if img is None:
                QMessageBox.warning(self, "错误", "无法加载图像")  # 显示错误消息
                return
            self.image_data['original'] = img  # 存储原始图像
            self.image_data['processed'] = img.copy()  # 存储处理后的图像(初始为原图)
            self.show_image(img, self.original_label)  # 显示原图像

    def load_video(self):
        """加载视频"""
        capture, _ = QFileDialog.getOpenFileName(self, "选择视频", "", "视频文件 (*.mp4 *.avi)")
        if capture:
            cap = cv2.VideoCapture(capture)

            if cap is None:
                QMessageBox.warning(self, "错误", "无法加载图像")
                return


    def save_image(self):
        """保存图像"""
        if 'processed' not in self.image_data:
            QMessageBox.warning(self, "提示", "没有可保存的图像")  # 没有处理图像时提示
            return
        file, _ = QFileDialog.getSaveFileName(self, "保存图像", "", "PNG (*.png);;JPG (*.jpg)")
        if file:
            cv2.imwrite(file, self.image_data['processed'])  # 保存处理图像
            QMessageBox.information(self, "成功", f"图像已保存:{file}")  # 提示保存成功

    def process(self, mode):
        """根据选择的模式处理图像"""
        if 'original' not in self.image_data:
            QMessageBox.warning(self, "提示", "请先加载图片")  # 提示用户加载图像
            return

        img = self.image_data['original']  # 获取原始图像
        if mode == "gray":  # 灰度化处理
            result = cv2.cvtColor(img, cv2.COLOR_BGR2GRAY)
            result = cv2.cvtColor(result, cv2.COLOR_GRAY2BGR)  # 转回三通道
        elif mode == "denoise":  # 去噪处理
            result = cv2.fastNlMeansDenoisingColored(img, None, 10, 10, 7, 21)
        elif mode == "sharpen":  # 锐化处理
            kernel = np.array([[-1, -1, -1], [-1, 9, -1], [-1, -1, -1]])
            result = cv2.filter2D(img, -1, kernel)
        elif mode == "rotation":  # 旋转处理
            result = cv2.rotate(img, cv2.ROTATE_90_CLOCKWISE)
        else:
            return

        self.image_data['processed'] = result  # 存储处理后的图像
        self.show_image(result, self.processed_label)  # 显示处理后的图像

    def show_image(self, img, label):
        """显示图像"""
        rgb = cv2.cvtColor(img, cv2.COLOR_BGR2RGB)  # 将BGR转为RGB格式
        h, w, ch = rgb.shape
        bytes_per_line = ch * w
        q_img = QImage(rgb.data, w, h, bytes_per_line, QImage.Format.Format_RGB888)  # 转为QImage格式
        label.setPixmap(QPixmap.fromImage(q_img).scaled(400, 400, Qt.AspectRatioMode.KeepAspectRatio))  # 设置显示图像


if __name__ == "__main__":
    app = QApplication(sys.argv)
    window = ImageProcessor()
    window.show()  # 显示主窗口
    sys.exit(app.exec())
结果展示:
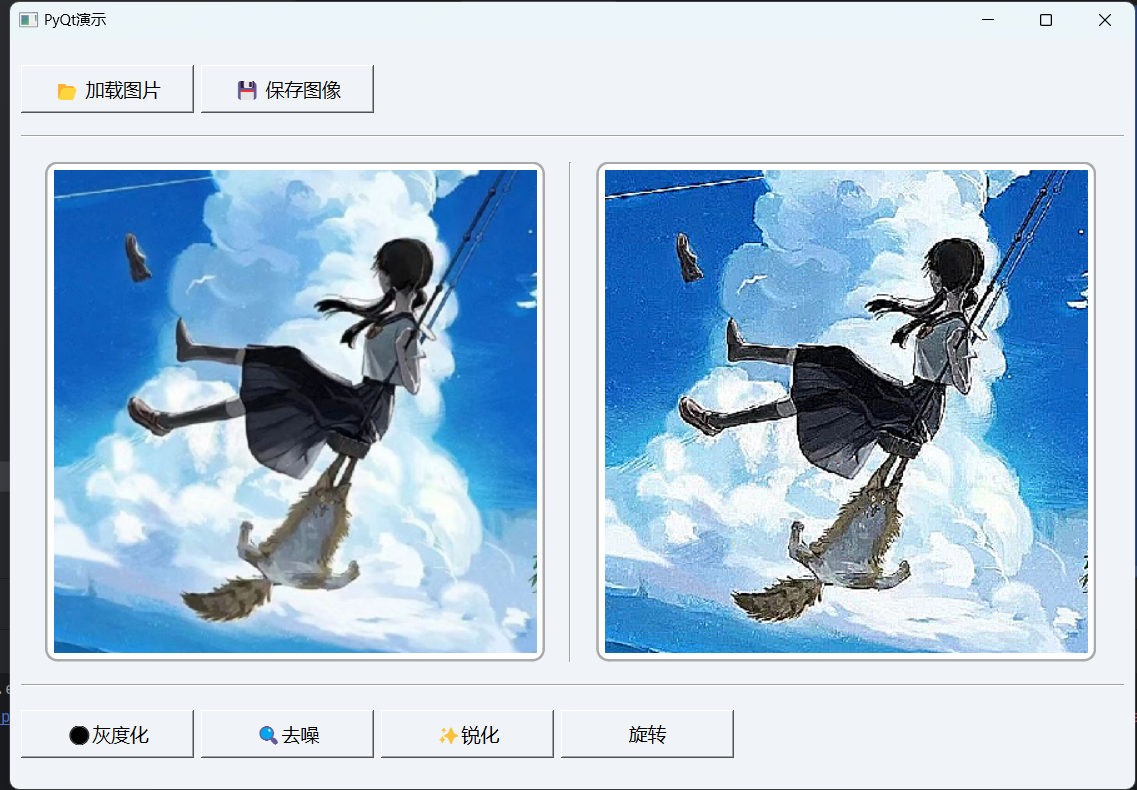
其优点主要在于其整体布局的设计,上述代码采用垂直布局(QVBoxLayout)嵌套水平布局(QHBoxLayout)的结构,即从上到下依次分为三部分:顶部按钮布局、图像显示布局、底部按钮布局,每一部分又设置成从左到右的布局结构,使得整体界面显得干净、美观。
该代码中,底部按钮是我们图像处理的主要功能,若想要继续添加新的图像处理技术,我们只需对下面的代码二、三行添加上新的按钮,然后在process()函数中添加上新的图像处理的相关函数即可(也可通过更改其他地方对界面做出进一步美化调整)。
        bottom_layout = QHBoxLayout()
        for text, func in [("⚫灰度化", "gray"), ("🔍去噪", "denoise"),
                           ("✨锐化", "sharpen"), ("旋转", "rotation")]:
            btn = QPushButton(text)
            btn.setGeometry(200,150,100,50)
            # 绑定按钮点击事件
            btn.clicked.connect(lambda _, f=func: self.process(f))
            bottom_layout.addWidget(btn)
        bottom_layout.addStretch()
        main_layout.addLayout(bottom_layout)
多种处理结果同时显示:
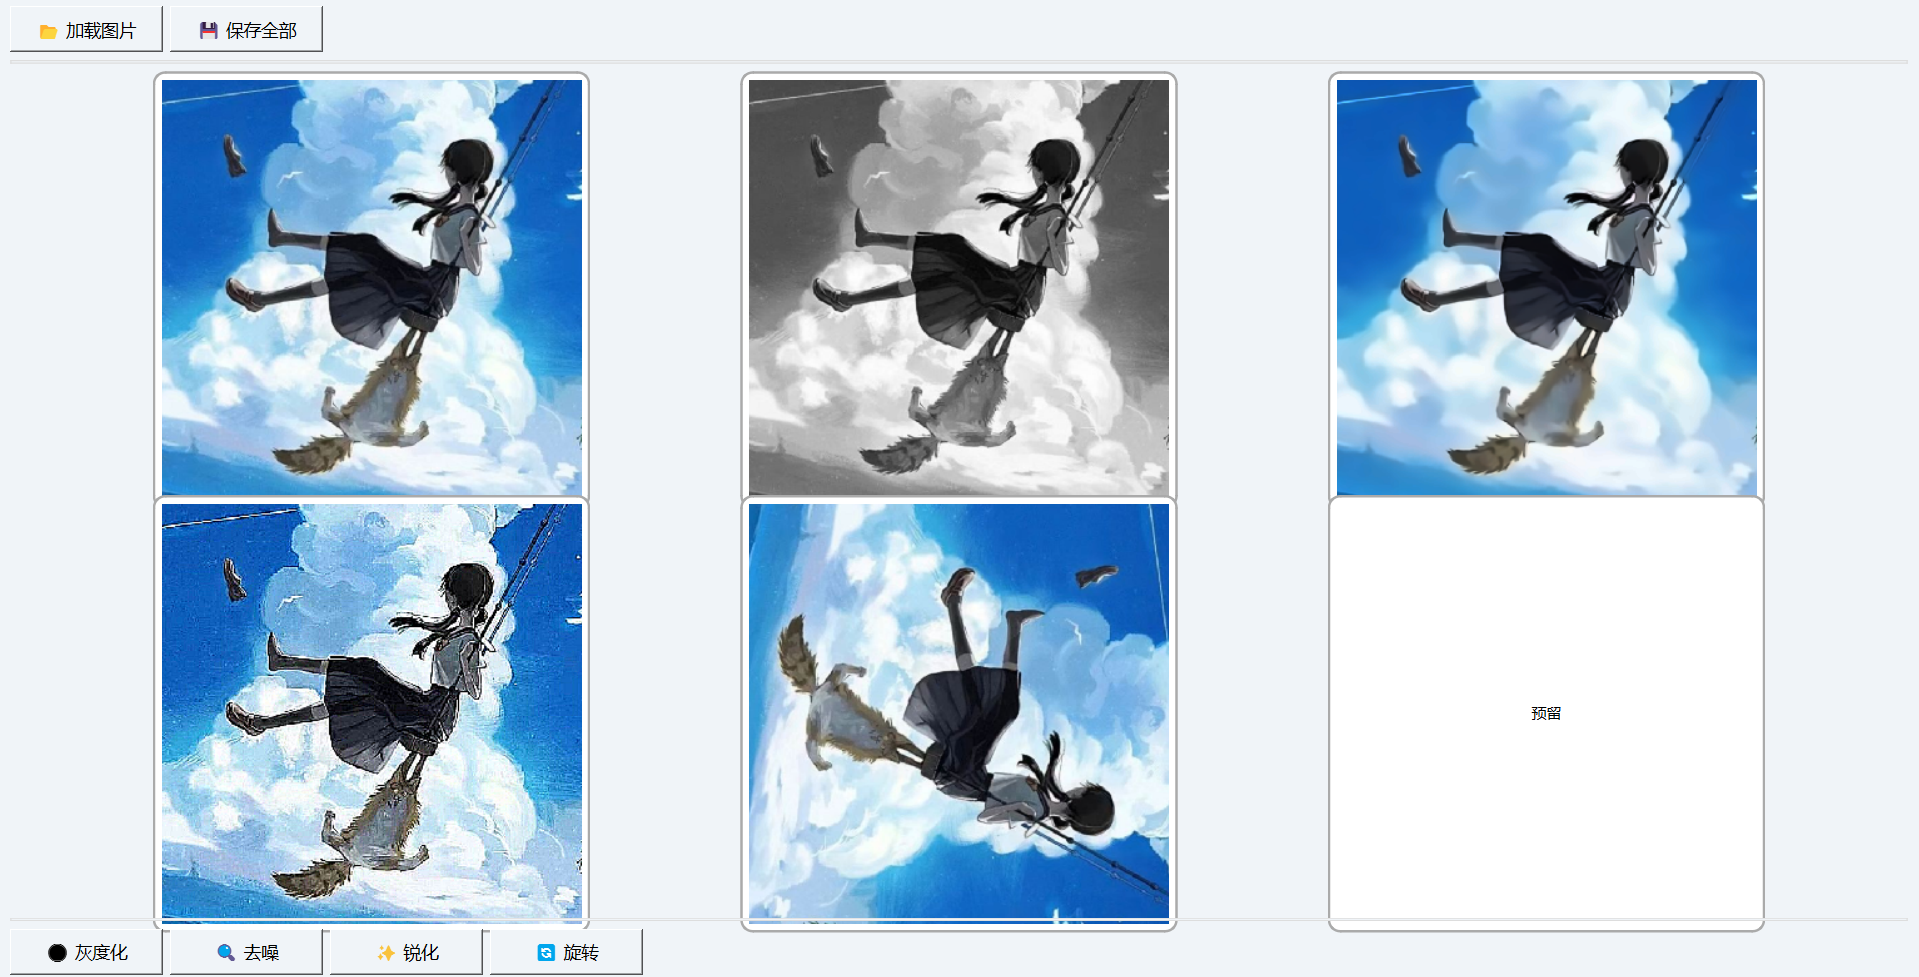
通过使用使用QGridLayout替代原来的水平布局,实现2行x3列的网格排列,并将每个图像窗口与相应的函数功能一一对应,再对其他的小地方进行微调,最终可实现多种结果同时显示。
self.grid_layout = QGridLayout()
positions = [
    (0, 0, "原始图像"), (0, 1, "灰度化"),
    (0, 2, "去噪"), (1, 0, "锐化"),
    (1, 1, "旋转"), (1, 2, "预留")
]
for row, col, name in positions:
    label = QLabel(name)
    self.grid_layout.addWidget(label, row, col)
    self.labels[name] = label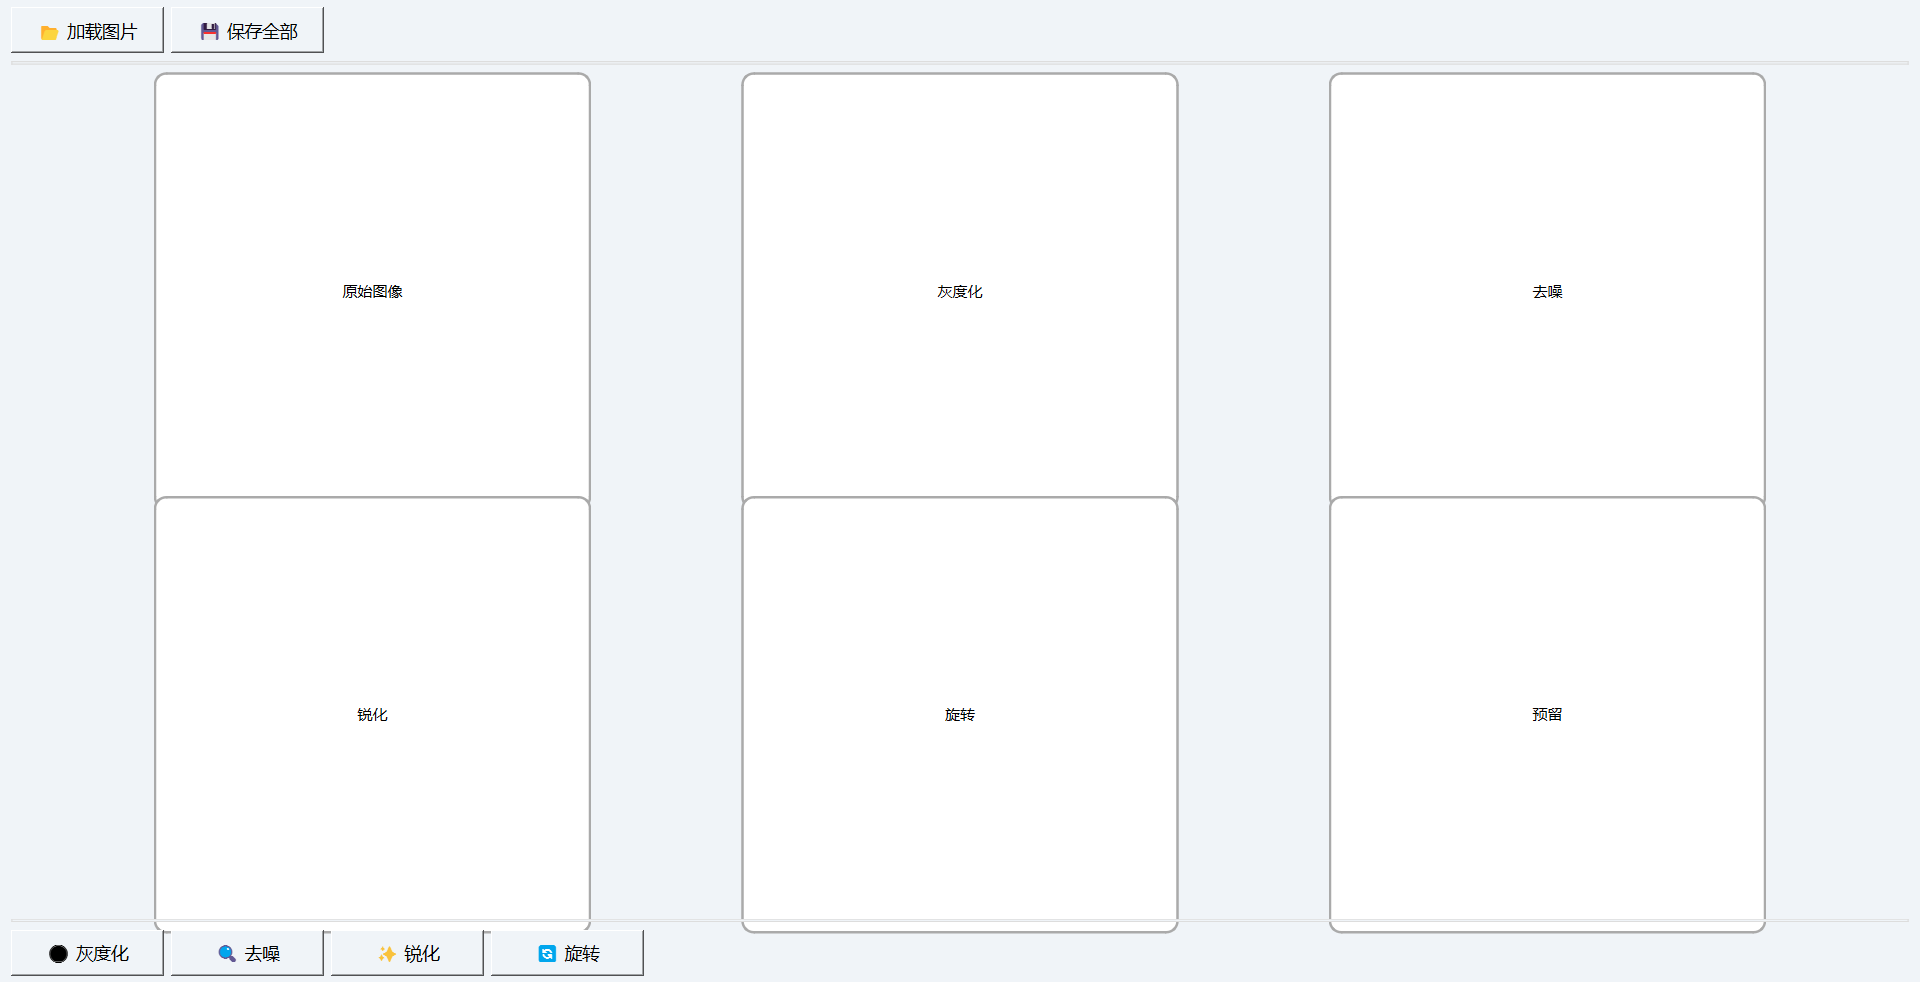
总之,PyQt6是一个强大的界面设计工具,其还有许多,此处仅展示了比较简单的处理方法,更多功能我们可以到官网 功能我们可以到官网Qt for Python进行详细学习。发挥自己的想象力,去构建出更加美观的界面吧。


 被折叠的 条评论
为什么被折叠?
被折叠的 条评论
为什么被折叠?
 到【灌水乐园】发言


