


Today it has been a tiring day fighting with Ubuntu and Windows 7. Here is the story:
Because I am not clear about the partition of Ubuntu, I made a terrible mistake which seemed to be helpless. I set /home with only 2 GB and save the rest of the disk for Ubuntu to exchange info with Windows. Obviously, my Ubuntu is totally useless.
For clarification, Manual disk partitioning guide for Ubuntu 11.04 helped me to do partition for Ubuntu. It is for rookies like me. In case it would be inaccessible in the future, I quote the post here:
Advanced or manual disk partitioning is available for those that want to create a custom set of partitions for installing Ubuntu 11.04. For whatever reason or reasons you choose to use the advanced disk partitioning tool, this article gives a step by step guide, with detailed explanations, on how to do it.
This tutorial assumes that you are going to create partitions for a standalone installation of Ubuntu 11.04. If you are going to create partitions for dual-booting with Windows or another Linux distribution, a future article, to be published soon, will provide instructions on how to create partitions manually, when dual-booting.
On a default installation of Ubuntu 11.04, the installer creates just two partitions; the first for /, the root directory, and the second for Swap. When creating partitions for installing any desktop Linux distribution, my recommendation is to create the following four partitions:
- /boot, the boot partition. This is where programs critical for booting the system will reside.
- /, the root directory. The bulk of the programs used for running the system will be installed here.
- Swap, unformatted disk space for use as virtual memory.
- /home, the partition where your home directory will be located. In the course of using the system, files and folders you create will reside in various folders here.
Note that this guide is for creating partitions when using the graphical installer available with the CD and DVD ISO images. The Alternate Installer CD ISO image uses an ncurses-based installer. To reduce the number of images used, this tutorial begins at the step where disk detection starts.
Depending on the state of the disk you are installing on, the disk partitioning methods step will look like the one below. To get to the advanced partitioning tool, select the Something Else option and click Forward.

This is the main window of the advanced disk partitioning tool. This is a standalone installation, so the first task is to delete all existing partitions. If the target disk is a new one and it has not been initialized, select it and click the New Partition Table button.

When you are done deleting existing partitions, or initializing the disk, if it needed to be initialized, the main window will look just like this. Now, you can start creating partitions. Note that the first partition should be mounted at /boot.
Select the free space and click the Add button.

This is the partition creation window of the advanced disk partitioning tool. There is nothing very complicated about it, but if you are new to disk partitioning on Linux, the following explanation is for you: There are three types of partitions that we can create with this tool, and they are, primary, extended, and logical. The disk partitioning scheme used by this tool allows for a maximum of four primary partitions. I am not going to go into the reasons, but just understand that you can only create four primary partitions. There is no way around that unless you want to use a different partitioning scheme, which this tool does not support
But what if you want to create more than four partitions in this scheme? That is where an extended partition comes in. When you create one partition as an extended partition, the system makes it possible to create an unlimited number of partitions under it. Those partitions are called logical partitions.
Except for the partition that will be used as swap, any other partition has to be formatted, a file system stamped on it and then it is mounted at a particular directory – the Mount point.
That is a summary explanation of disk partitioning. Now, let us actually create those partitions.

f you are attempting to install Ubuntu alone on the disk, the installer will create the first partition as a primary partition. And that first partition, following the recommendation made earlier, should be mounted at /boot. The default file system for /boot on Ubuntu is ext2. You can use that, or ext4, the default journaling file system on Ubuntu 11.04. The partition number of this boot partition, if it is the first partition on the disk, will be /dev/sda1. While many Linux distributions assign about 500 MB of disk space to /boot, only about 30 MB is used on a new installation of Ubuntu 11.04. If you are tight on disk space, you can go as low as 50 BM, but keep in mind that disk usage on /boot will grow with each upgrade. Click OK to create it.

Now that /boot has been created, select the free space and click on Add to create other partitions. Note that this step will have to be repeated for all other partitions.

The second partition will be for Swap. The installer will attempt to create it as a logical partition, but you do not have to. Like /boot, it could also be a primary partition. The first logical partition of an extended partition is /dev/sda5. If you create this partition as a primary partition, it will be /dev/sda2.
Select “Swap area” from the “Use as” dropdown menu. The “Mount point” menu will be disabled because Swap does not need a mount point. A disk size of 2000 MB or 2 GB is usually good enough for Swap. Add.

The third partition will be for /. The installer recommends a minimum of 4.4 GB of disk space for installing Ubuntu 11.04, but on a new installation, just 2.3 GB of disk space is used. As more applications are installed on a running system, disk usage will grow, so you want to be very generous here – if you have disk space to spare. The default file system on a non-boot partition is ext4. Other options available are ext3, xfs, jfs and reiserfs. Btrfs is also a file system option, but the disk partitioning scheme for installing Linux on a btrfs file system is slightly different from this one. That will be covered in another article.
OK to create this partition.

The final partition will be for /home. The file system is ext4, and you may use the available disk space here. OK

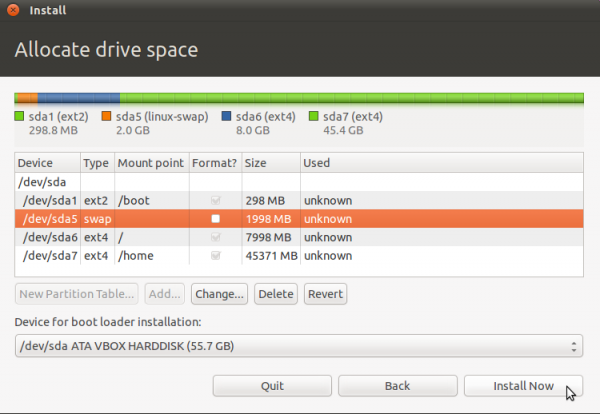
Back to the main manual partitioning window, you can see all the partitions just created. Before you click Install Now, you have to determine where GRUB, the boot loader, will be installed. On a standalone installation, the best location is the default – in the Master Boot Record of the disk. It is also possible to install it in the /boot partition, but that is not recommended for this installation.
That is how to partition a disk using Ubuntu’s advanced disk partitioning tool.
OK. So, I wanted to resize the partition on Ubuntu and I found that in the installation guide there was a option for that. I really tried, but it did not work for some partition it could be shrunk or deleted but not to be extended. Yes, it left me no choice but to reinstall it with a new and reasonable partition. That was when I did a stupid thing owing to my ignorance. I clicked the button "reinstall Ubuntu" which erased my whole disk. Yes, Windows 7 was gone. I put myself into more work then.
I reinstalled Windows and spared space for Ubuntu. BUT, another problem popped out: Ubuntu installation did not recognized the existing Windows OS. OH MY!!!
What was that for?
The answer is from from this forum post. The old GPT table remained which leaded to errors when Ubuntu read about space distribution. It could be solved by deleting the old one and setting and saving a new one.
1. Get the Debian package for fixparts from the link on their homepage according to the version you have, 32bit or 64bit:
http://sourceforge.net/projects/gptf...arts-binaries/
2. When downloaded, right click on the file and select Install with package manager (or similar text). It will install it.
(I did this on "try Ubuntu", after downloading the .deb package. I right clicked to run this by Ubuntu software center. After fixparts was installed, enter the following commands)
3. Then just open terminal and run the command stated on their website, like:
sudo fixparts /dev/sda
(delete the old GPT -> set the boot device -> save the changes )
Usually that's all you need. It will detect your problem and offer to fix it for you (delete the backup gpt table).
You can do all of the above from live mode.
I thought that was enough. BUT, no!!! My Ubuntu had not yet appeared in the boot option. I still had no access to it but USB stick installation.
I was reminded that there must have been sth wrong with GRUB. YES, I agreed because it never showed up. I needed it badly.
How to do it?
More useful is this
- boot your computer on a Ubuntu live-CD or live-USB.
- choose "Try Ubuntu"
- connect internet
- open a new Terminal, then type:
sudo add-apt-repository ppa:yannubuntu/boot-repair && sudo apt-get update
- Press Enter.
- Then type:
sudo apt-get install -y boot-repair && (sudo boot-repair &)
- Press Enter
Using Boot-Repair
Recommended repair
- launch Boot-Repair from either :
- the Dash (the Ubuntu logo at the top-left of the screen)
-
or System->Administration->Boot-Repair menu (Ubuntu 10.04 only)
- or by typing 'boot-repair' in a terminal
-
Then click the "Recommended repair" button. When repair is finished, note the URL (paste.ubuntu.com/XXXXX) that appeared on a paper, then reboot and check if you recovered access to your OSs.
- If the repair did not succeed, indicate the URL to people who help you by email or forum.
It is not exactly the same, but following the guide you will not get lost. haha, yes by doing this, I get Ubuntu and Windows 7 in the boot option again and both of them are working just fine.
OK, nailded it. Time to go home now.


 6537
6537


 被折叠的 条评论
为什么被折叠?
被折叠的 条评论
为什么被折叠?
 到【灌水乐园】发言


