


1、集合对象
WPF列表式控件派生自ItemsControl类,自然也就继承了ItemsSource这个属性。ItemsSource属性可以接收一个IEnumerable接口派生类的实例作为自己的值(所有可被迭代遍历的集合都实现了这个接口,例如:List<T>)。每个ItemsControl的派生类都具有自己对应的条目容器。例如ListBox的条目容器就是ListBoxItem。ItemsSource里存放的是一条一条的数据,要想把数据显示出来需要为它们穿上外衣,条目容器就起到数据外衣的作用。怎样让每件数据外衣与它对应的数据条目关联起来呢?当然要依靠Binding。只要我们为一个ItemsSource对象设置了ItemsSource属性,并使用Binding在条目容器与数据元素之间建立关联。下面看一个例子:
<Window x:Class="BindingResearch.MainWindow"
        xmlns="http://schemas.microsoft.com/winfx/2006/xaml/presentation"
        xmlns:x="http://schemas.microsoft.com/winfx/2006/xaml"
        xmlns:d="http://schemas.microsoft.com/expression/blend/2008"
        xmlns:mc="http://schemas.openxmlformats.org/markup-compatibility/2006"
        xmlns:local="clr-namespace:BindingResearch"
        mc:Ignorable="d"
        Title="MainWindow" Height="450" Width="800">
    <StackPanel>
        <TextBlock Text="Student ID:" Margin="5"/>
        <TextBox x:Name="txtStuID" Margin="5"/>
        <TextBlock Text="Student List:" Margin="5"/>
        <ListBox x:Name="lstStudent" Margin="5"/>
    </StackPanel>
</Window>
ListBox就是集合对象,下面看后台代码:
List<Student> listStudents = new List<Student>()
        {
            new Student(){ID=1,Name="Tim",Age=29},
            new Student(){ID=2,Name="Tom",Age=30},
            new Student(){ID=3,Name="Kyle",Age=31},
        };

        public MainWindow()
        {
            InitializeComponent();

            lstStudent.ItemsSource = listStudents;
            lstStudent.DisplayMemberPath = "Name";

            Binding binding = new Binding("SelectedItem.ID") { Source = lstStudent };
            txtStuID.SetBinding(TextBox.TextProperty, binding);
        }
public class Student
{
public int ID { get; set; }
public string Name { get; set; }
public int Age { get; set; }
}运行效果:

我们直接把List<Student>的实例赋值给ListBox的ItemSource,设置ListBox的显示字段为Name,ListBox的赋值就完成了。
当我们单机选中ListBox的一个条目时,上面的文本框就会显示选中条目的ID。
2、ADO.NET对象
ADO.NET对象就是从数据库中查询出来的数据集,一般情况下使用DataTable来存放。我们这里就不访问数据库了,直接新建一个DataTable对象。直接看代码吧:
<Window x:Class="BindingResearch.Window2"
        xmlns="http://schemas.microsoft.com/winfx/2006/xaml/presentation"
        xmlns:x="http://schemas.microsoft.com/winfx/2006/xaml"
        xmlns:d="http://schemas.microsoft.com/expression/blend/2008"
        xmlns:mc="http://schemas.openxmlformats.org/markup-compatibility/2006"
        xmlns:local="clr-namespace:BindingResearch"
        mc:Ignorable="d"
        Title="Window2" Height="450" Width="800">
    <StackPanel>
        <ListView x:Name="listViewStudents">
            <ListView.View>
                <GridView>
                    <GridViewColumn Header="ID" Width="60" DisplayMemberBinding="{Binding ID}"/>
                    <GridViewColumn Header="Name" Width="60" DisplayMemberBinding="{Binding Name}"/>
                    <GridViewColumn Header="Age" Width="60" DisplayMemberBinding="{Binding Age}"/>
                </GridView>
            </ListView.View>
        </ListView>
        <Button Content="Load" Click="Button_Click"/>
    </StackPanel>
</Window>
这里我们使用最常见的GridView来作为列表控件,设置了3个列,使用Binding设置了路径,但并没有设置Source。
后台代码:
private void Button_Click(object sender, RoutedEventArgs e)
        {
            DataTable table = new DataTable();
            table.Columns.Add("ID");
            table.Columns.Add("Name");
            table.Columns.Add("Age");

            DataRow row1 = table.NewRow();
            row1["ID"] = 1;
            row1["Name"] = "Tim";
            row1["Age"] = 30;
            table.Rows.Add(row1);

            DataRow row2 = table.NewRow();
            row2["ID"] = 2;
            row2["Name"] = "Tom";
            row2["Age"] = 31;
            table.Rows.Add(row2);

            DataRow row3 = table.NewRow();
            row3["ID"] = 3;
            row3["Name"] = "Twm";
            row3["Age"] = 32;
            table.Rows.Add(row3);

            //listViewStudents.DataContext = table;
            listViewStudents.SetBinding(ListView.ItemsSourceProperty, new Binding());
            listViewStudents.ItemsSource = table.DefaultView;
        }
运行效果:
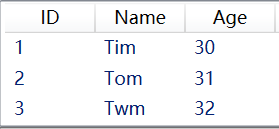
注意这里是把table.DefaultView赋值给了ItemsSource,而不是table。如果是table,发现编译无法通过,提示无法将DataTable转换成IEnumerable。前面我们提过,ItemsSource的值必须是实现了接口IEnumerable接口的对象,因为集合条目必须是可遍历的。DefaultView属性是一个DataView类型的对象,这个类继承了接口IEnumerable。
我们看一下xaml代码,在给GridView的列设置DisplayMemberBinding时,我们只指定了Path,没有指定Source。根据前面学习的内容,当没有给Binding设置Source的时候,WPF会沿着UI树向上查找DataContext对象。所以我们也可以把table赋值给ListView的DataContext属性,把ItemsSource的赋值注释掉,也可正常显示。
3、使用XML数据作为Binding的源
有时我们会把某些数据存放在xml文件里,那我们要把这些数据显示在界面的列表控件里,该怎么显示呢?我以前的做法都是读取xml文件,然后建一个与xml节点匹配的DataTable,把从xml文件读取的数据存入到DataTable里面,再把这个DataTable赋值给列表控件。这样做很麻烦,代码量很大,WPF的处理就简单很多,下面看一个例子:
xml文件内容:
<?xml version="1.0" encoding="utf-8"?>
<StudentList>
  <Student ID="1">
    <Name>Tim</Name>
  </Student>
  <Student ID="2">
    <Name>Tom</Name>
  </Student>
  <Student ID="3">
    <Name>Vina</Name>
  </Student>
</StudentList>
xaml.cs文件内容:
<Window x:Class="BindingResearch.XMLBind"
        xmlns="http://schemas.microsoft.com/winfx/2006/xaml/presentation"
        xmlns:x="http://schemas.microsoft.com/winfx/2006/xaml"
        xmlns:d="http://schemas.microsoft.com/expression/blend/2008"
        xmlns:mc="http://schemas.openxmlformats.org/markup-compatibility/2006"
        xmlns:local="clr-namespace:BindingResearch"
        mc:Ignorable="d"
        Title="XMLBind" Height="450" Width="800">
    <StackPanel>
        <ListView x:Name="listViewStudents">
            <ListView.View>
                <GridView>
                    <GridViewColumn Header="ID" Width="60" DisplayMemberBinding="{Binding XPath=@ID}"/>
                    <GridViewColumn Header="Name" Width="60" DisplayMemberBinding="{Binding XPath=Name}"/>
                </GridView>
            </ListView.View>
        </ListView>
        <Button Content="Load" Click="Button_Click"/>
    </StackPanel>
</Window>
后台代码:
private void Button_Click(object sender, RoutedEventArgs e)
        {
            XmlDataProvider dataProvider = new XmlDataProvider();
            dataProvider.Source = new Uri(@"c:\RawData.xml");
            dataProvider.XPath = @"/StudentList/Student";

            listViewStudents.DataContext = dataProvider;
            listViewStudents.SetBinding(ListView.ItemsSourceProperty, new Binding());
        }
运行效果:
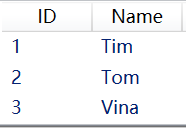
在xaml代码中有两点需要注意:DisplayMemberBinding="{Binding XPath=@ID}"。首先,当使用XML数据作为Binding的Source的时候,我们使用XPath属性而不是Path属性;其次,我们看到ID前面有一个"@"符号,而Name属性前面没有这个符号。因为使用"@"符号加字符串表示的是XML元素的Attribute,不加"@"的字符串表示的是子级元素。
4、使用LINQ检索结果作为Binding的源
LINQ的查询结果是一个IEnumerable<T>类型的对象,所以它的查询结果可以直接赋值给控件的ItemsSource属性。
xaml代码和前面的差不多,下面直接贴出后台代码吧:
List<Student> listStudents = new List<Student>()
            {
                new Student(){ID=1,Name="Tim",Age=29},
                new Student(){ID=2,Name="Tom",Age=30},
                new Student(){ID=3,Name="Kyle",Age=31},
            };

            var linqResult = from s in listStudents where s.Name=="Tim" select s;
            listViewStudents.ItemsSource = linqResult;
运行效果:

5、使用ObjectDataProvider对象作为Binding的源
理想情况下,上游程序员把类设计好,使用属性把数据暴露出来,下游程序员把这些类的实例作为Binding的源、把属性作为Binding的Path来消费这些类。但很难保证一个类的所有数据都使用属性暴露出来,比如我们需要的数据可能是方法的返回值。而重新设计底层类的风险的成本会比较高,况且黑盒引用类库的情况下我们也不可能更改已经编译好的类,这时候就需要使用ObjectDataProvider来包装作为Binding源的数据对象了。
ObjectDataProvider,顾名思义就是把对象作为数据源提供给Binding。前面还提到了XmlDataProvider,也就是把XML数据作为数据源提供给Binding。这两个类的父类都是DataSourceProvider。下面我们看一个例子:
xaml代码:
<Window x:Class="BindingResearch.ObjectProviderBind"
        xmlns="http://schemas.microsoft.com/winfx/2006/xaml/presentation"
        xmlns:x="http://schemas.microsoft.com/winfx/2006/xaml"
        xmlns:d="http://schemas.microsoft.com/expression/blend/2008"
        xmlns:mc="http://schemas.openxmlformats.org/markup-compatibility/2006"
        xmlns:local="clr-namespace:BindingResearch"
        mc:Ignorable="d"
        Title="ObjectProviderBind" Height="450" Width="800">
    <StackPanel>
        <TextBox x:Name="txt1" Height="30" Margin="5"/>
        <TextBox x:Name="txt2" Height="30" Margin="5"/>
        <TextBox x:Name="txt3" Height="30" Margin="5"/>
    </StackPanel>
</Window>
后台代码:
public class Calculator
    {
        public string Add(string arg1,string arg2)
        {
            double result = 0;
            if(double.TryParse(arg1,out double a)&&double.TryParse(arg2,out double b))
            {
                result = a + b;
                return result.ToString();
            }
            return "Input Error";
        }
    }
public void SetBinding()
        {
            ObjectDataProvider odp = new ObjectDataProvider();
            odp.ObjectInstance = new Calculator();
            odp.MethodName = "Add";
            odp.MethodParameters.Add("0");
            odp.MethodParameters.Add("0");


            Binding binding1 = new Binding("MethodParameters[0]")
            {
                Source = odp,
                BindsDirectlyToSource = true,
                UpdateSourceTrigger = UpdateSourceTrigger.PropertyChanged
            };

            txt1.SetBinding(TextBox.TextProperty, binding1);

            Binding binding2 = new Binding("MethodParameters[1]")
            {
                Source = odp,
                BindsDirectlyToSource = true,
                UpdateSourceTrigger = UpdateSourceTrigger.PropertyChanged
            };

            txt2.SetBinding(TextBox.TextProperty, binding2);

            Binding binding3 = new Binding(".") { Source = odp };
            txt3.SetBinding(TextBox.TextProperty, binding3);
        }
ObjectInstance属性的值为Calculator类的实例,这就是把Calculator对象包装在了ObjectDataProvider对象里。
MethodName = "Add",指定将要调用Calculator对象中名为Add的函数。
MethodParameters.Add方法给参数赋值,参数的类型和Add函数的类型要一致。
那如果Add方法有重载怎么办呢?我们知道重载方法主要看参数的个数和参数的类型,这个例子里我们的Add函数有2个string类型的参数。在MethodParameters.Add的时候也是赋值了2个string类型的值。那我们给添加一个Add的重载函数看一下:
public string Add(string arg1, int arg2)
        {
            return "100";
        }
为了方便,我们这里直接返回100,然后在调用MethodParameters.Add给第二个参数赋值的时候,把参数的类型改为int:odp.MethodParameters.Add(3);
运行效果:
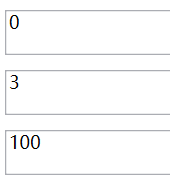
上面是重载Add方法的运行效果,正常的运行效果如下:
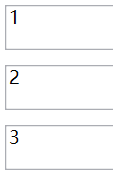
下面我们看一下Binding。BindsDirectlyToSource=true,这句的意思是告诉Binding对象只负责把从UI元素收集到的数据写入其Source,即ObjectDataProvider,而不是被ObjectDataProvider包装的对象。UpdateSourceTrigger属性被设置为一有更新就立刻将值传回Source。第三个文本框的Binding的Path设置为".",前面已经讲过,当数据源本身就代表数据的时候就使用"."作为Path。
6、使用Binding的RelativeSource
当一个Binding有明确的数据来源时,我们可以通过为Source或ElementName赋值的办法让Binding与之关联。有些时候我们不能确定作为Source的对象叫什么名字,但知道它与作为Binding目标的对象在UI布局上有相对关系,比如控件自己关联自己的某个数据,关联自己某级容器的数据。这时候就要使用Binding的RelativeSource属性。下面看个例子:
<Window x:Class="BindingResearch.RelativeSourceBind"
xmlns="http://schemas.microsoft.com/winfx/2006/xaml/presentation"
xmlns:x="http://schemas.microsoft.com/winfx/2006/xaml"
xmlns:d="http://schemas.microsoft.com/expression/blend/2008"
xmlns:mc="http://schemas.openxmlformats.org/markup-compatibility/2006"
xmlns:local="clr-namespace:BindingResearch"
mc:Ignorable="d"
Title="RelativeSourceBind" Height="450" Width="800">
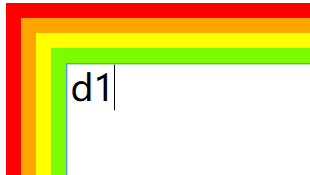
<Grid x:Name="g1" Background="Red" Margin="10">
<DockPanel x:Name="d1" Background="Orange" Margin="10">
<Grid x:Name="g2" Background="Yellow" Margin="10">
<DockPanel x:Name="d2" Background="LawnGreen" Margin="10">
<TextBox x:Name="txt1" FontSize="24" Margin="10"
Text="{Binding Path=Name, RelativeSource={RelativeSource Mode=FindAncestor, AncestorLevel=2, AncestorType={x:Type DockPanel}}}"/>
</DockPanel>
</Grid>
</DockPanel>
</Grid>
</Window>
这里我们看到有很多层的控件嵌套,就是控件的UI层级。这个界面显示的效果如下:
上面我们贴出的是xaml的代码,下面我们贴出c#的代码:
RelativeSource relativeSource = new RelativeSource(RelativeSourceMode.FindAncestor);
            relativeSource.AncestorLevel = 2;
            relativeSource.AncestorType = typeof(DockPanel);
            Binding binding = new Binding("Name") { RelativeSource = relativeSource };
            txt1.SetBinding(TextBox.TextProperty, binding);
我们来解释一下这个代码。RelativeSourceMode.FindAncestor,这是一个枚举,说明了RelativeSource是如何查找关联控件的。
Ancestor这个单词的意思是祖先,应用在UI布局上就是上级控件的意思,FindAncestor就是查找该控件的上级控件。
AncestorLevel,这个就是说要往上找几层。AncestorType,这个是说要查找的控件是什么类型的控件。
在这个例子中,我们的AncestorLevel = 2,AncestorType = typeof(DockPanel);查找到的控件的Name是d1。如果AncestorLevel = 1,AncestorType = typeof(Grid),那查找到的控件的Name就是g2。
上面说的是当RelativeSourceMode=FindAncestor的情况,下面我们来看看RelativeSourceMode=Self的情况。Self的意思就是自己,就是说该控件要关联自身的某个属性。
RelativeSource relativeSource = new RelativeSource(RelativeSourceMode.Self);
Binding binding = new Binding("Name") { RelativeSource = relativeSource };
txt1.SetBinding(TextBox.TextProperty, binding);
因为关联的是自己,所以AncestorLevel 和AncestorType 都不需要了,这个文本框显示的文本就是它的Name属性的值。
好了,Binding的绑定就介绍到这里了。


 3603
3603


 被折叠的 条评论
为什么被折叠?
被折叠的 条评论
为什么被折叠?
 到【灌水乐园】发言


