


 文章介绍了如何在PythonIDLE中使用内置的help工具查询关键字,如`import`和`from`的用法。Python的关键字是预定义并赋有特定含义的标识符,不可重新赋值。`import`语句用于导入模块,而`from...import`则允许选择性地导入模块的特定部分。此外,`__future__`模块支持向后兼容的未来语法特性。
关键字是电脑语言里事先定义的,有特别意义的标识符,有时又叫保留字,用来标识文件中各个记录的特定数据项目的值。
它们与可自行赋值不同(列 you = ...),它们具有自身提前赋予过的值,不可变动,可以调用。
那么在Python中如何知道有哪些关键字呢。
打开IDIE输入help()(这里展示的是Python3.11 64bit)
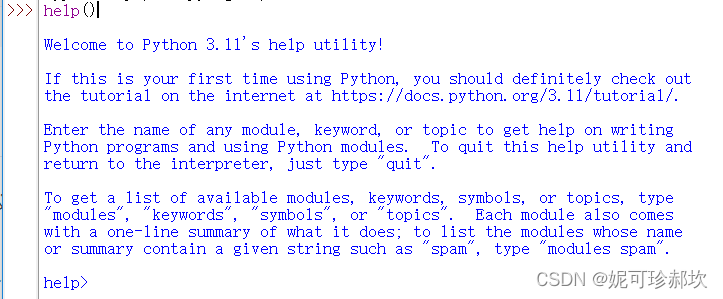
欢迎使用Python 3.11的帮助实用程序!
如果这是你第一次使用Python,你应该去看看
互联网上的教程https://docs.python.org/3.11/tutorial/.
输入任何模块、关键字或主题的名称以获取写作帮助
Python程序和使用Python模块。退出此帮助实用程序并
返回到解释器,只需键入“退出”。
要获取可用模块、关键字、符号或主题的列表,请键入
“模块”、“关键字”、“符号”或“主题”。每个模块还包括
用一行文字概括它的作用;列出其名称的模块
或摘要包含给定字符串,如“垃圾邮件”,类型为“模块垃圾邮件”。
这样就进入到了Python帮助器中,在段文字中,指出可以获取关键字模块,接下来输入keywords(关键字)
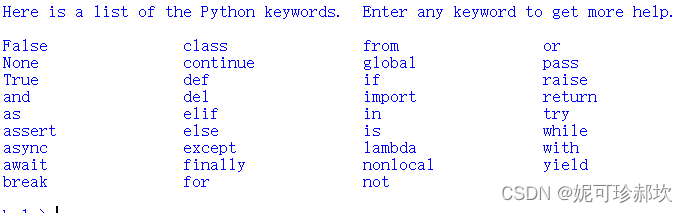
下面是Python关键字的列表。输入任何关键字以获得更多帮助。
这些列出的全部都是Python中,提前编译好赋过值的关键字,可以直接使用并且不可重新赋值。
并且在help帮助器中,直接输入对应的关键字可以了解其作用。
列如:输入from
help> from
The "import" statement
**********************
import_stmt ::= "import" module ["as" identifier] ("," module ["as" identifier])*
| "from" relative_module "import" identifier ["as" identifier]
("," identifier ["as" identifier])*
| "from" relative_module "import" "(" identifier ["as" identifier]
("," identifier ["as" identifier])* [","] ")"
| "from" relative_module "import" "*"
module ::= (identifier ".")* identifier
relative_module ::= "."* module | "."+
The basic import statement (no "from" clause) is executed in two
steps:
1. find a module, loading and initializing it if necessary
2. define a name or names in the local namespace for the scope where
the "import" statement occurs.
When the statement contains multiple clauses (separated by commas) the
two steps are carried out separately for each clause, just as though
the clauses had been separated out into individual import statements.
The details of the first step, finding and loading modules, are
described in greater detail in the section on the import system, which
also describes the various types of packages and modules that can be
imported, as well as all the hooks that can be used to customize the
import system. Note that failures in this step may indicate either
that the module could not be located, *or* that an error occurred
while initializing the module, which includes execution of the
module’s code.
If the requested module is retrieved successfully, it will be made
available in the local namespace in one of three ways:
* If the module name is followed by "as", then the name following "as"
is bound directly to the imported module.
* If no other name is specified, and the module being imported is a
top level module, the module’s name is bound in the local namespace
as a reference to the imported module
* If the module being imported is *not* a top level module, then the
name of the top level package that contains the module is bound in
the local namespace as a reference to the top level package. The
imported module must be accessed using its full qualified name
rather than directly
The "from" form uses a slightly more complex process:
1. find the module specified in the "from" clause, loading and
initializing it if necessary;
2. for each of the identifiers specified in the "import" clauses:
1. check if the imported module has an attribute by that name
2. if not, attempt to import a submodule with that name and then
check the imported module again for that attribute
3. if the attribute is not found, "ImportError" is raised.
4. otherwise, a reference to that value is stored in the local
namespace, using the name in the "as" clause if it is present,
otherwise using the attribute name
Examples:
import foo # foo imported and bound locally
import foo.bar.baz # foo, foo.bar, and foo.bar.baz imported, foo bound locally
import foo.bar.baz as fbb # foo, foo.bar, and foo.bar.baz imported, foo.bar.baz bound as fbb
from foo.bar import baz # foo, foo.bar, and foo.bar.baz imported, foo.bar.baz bound as baz
from foo import attr # foo imported and foo.attr bound as attr
If the list of identifiers is replaced by a star ("'*'"), all public
names defined in the module are bound in the local namespace for the
scope where the "import" statement occurs.
The *public names* defined by a module are determined by checking the
module’s namespace for a variable named "__all__"; if defined, it must
be a sequence of strings which are names defined or imported by that
module. The names given in "__all__" are all considered public and
are required to exist. If "__all__" is not defined, the set of public
names includes all names found in the module’s namespace which do not
begin with an underscore character ("'_'"). "__all__" should contain
the entire public API. It is intended to avoid accidentally exporting
items that are not part of the API (such as library modules which were
imported and used within the module).
The wild card form of import — "from module import *" — is only
allowed at the module level. Attempting to use it in class or
function definitions will raise a "SyntaxError".
When specifying what module to import you do not have to specify the
absolute name of the module. When a module or package is contained
within another package it is possible to make a relative import within
the same top package without having to mention the package name. By
using leading dots in the specified module or package after "from" you
can specify how high to traverse up the current package hierarchy
without specifying exact names. One leading dot means the current
package where the module making the import exists. Two dots means up
one package level. Three dots is up two levels, etc. So if you execute
"from . import mod" from a module in the "pkg" package then you will
end up importing "pkg.mod". If you execute "from ..subpkg2 import mod"
from within "pkg.subpkg1" you will import "pkg.subpkg2.mod". The
specification for relative imports is contained in the Package
Relative Imports section.
"importlib.import_module()" is provided to support applications that
determine dynamically the modules to be loaded.
Raises an auditing event "import" with arguments "module", "filename",
"sys.path", "sys.meta_path", "sys.path_hooks".
Future statements
=================
A *future statement* is a directive to the compiler that a particular
module should be compiled using syntax or semantics that will be
available in a specified future release of Python where the feature
becomes standard.
The future statement is intended to ease migration to future versions
of Python that introduce incompatible changes to the language. It
allows use of the new features on a per-module basis before the
release in which the feature becomes standard.
future_stmt ::= "from" "__future__" "import" feature ["as" identifier]
("," feature ["as" identifier])*
| "from" "__future__" "import" "(" feature ["as" identifier]
("," feature ["as" identifier])* [","] ")"
feature ::= identifier
A future statement must appear near the top of the module. The only
lines that can appear before a future statement are:
* the module docstring (if any),
* comments,
* blank lines, and
* other future statements.
The only feature that requires using the future statement is
"annotations" (see **PEP 563**).
All historical features enabled by the future statement are still
recognized by Python 3. The list includes "absolute_import",
"division", "generators", "generator_stop", "unicode_literals",
"print_function", "nested_scopes" and "with_statement". They are all
redundant because they are always enabled, and only kept for backwards
compatibility.
A future statement is recognized and treated specially at compile
time: Changes to the semantics of core constructs are often
implemented by generating different code. It may even be the case
that a new feature introduces new incompatible syntax (such as a new
reserved word), in which case the compiler may need to parse the
module differently. Such decisions cannot be pushed off until
runtime.
For any given release, the compiler knows which feature names have
been defined, and raises a compile-time error if a future statement
contains a feature not known to it.
The direct runtime semantics are the same as for any import statement:
there is a standard module "__future__", described later, and it will
be imported in the usual way at the time the future statement is
executed.
The interesting runtime semantics depend on the specific feature
enabled by the future statement.
Note that there is nothing special about the statement:
import __future__ [as name]
That is not a future statement; it’s an ordinary import statement with
no special semantics or syntax restrictions.
Code compiled by calls to the built-in functions "exec()" and
"compile()" that occur in a module "M" containing a future statement
will, by default, use the new syntax or semantics associated with the
future statement. This can be controlled by optional arguments to
"compile()" — see the documentation of that function for details.
A future statement typed at an interactive interpreter prompt will
take effect for the rest of the interpreter session. If an
interpreter is started with the "-i" option, is passed a script name
to execute, and the script includes a future statement, it will be in
effect in the interactive session started after the script is
executed.
See also:
**PEP 236** - Back to the __future__
The original proposal for the __future__ mechanism.
它会十分详细的,为我们介绍刚刚输入的关键字的作用意义等(一定是在help>状态下)


 1050
1050

 被折叠的 条评论
为什么被折叠?
被折叠的 条评论
为什么被折叠?
 到【灌水乐园】发言


