


LVS简介
LVS(Linux Virtual Server)即Linux虚拟服务器,是一个虚拟的服务器集群系统,由章文嵩博士在1998年5月成立,在linux2.6+后将lvs自动加入了kernel模块,我们看下lvs在我们日常的服务器架构所在的位置:
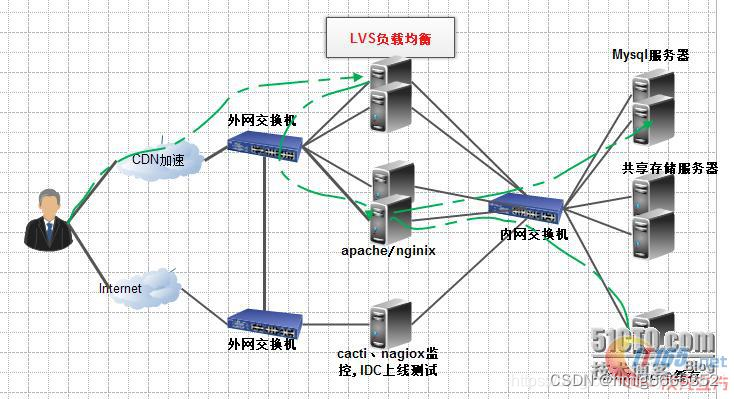
负载均衡
(Load Balance)让负载均衡,当然这是一个简单的概括,我在微信里看的架构师之路写的一篇如何实现负载均衡的文章就不错,我有10台机器都提供web服务,那么我如何均衡的利用这10台机器呢,让这10台机器保证高性能、高可用、高并发就是负载均衡要考虑和要做的事情。
实现负载均衡一般可以使用顺序、比重、流量、服务类别等进行分配,负载均衡的部署方式也分为路由和服务直接返回模式,实现负载均衡的主要几个方式:
http重定向
下载网站用的较多,其实也算一种负载均衡,工作在应用层的业务代码中
DNS负载均衡
DNS负载提供域名到IP解析的过程,我们实例查看百度的域名解析其实是一对多的,这时候DNS服务器也就充当了负载均衡,很多域名运营商提供的智能dns以及多线解析都是利用了DNS负载均衡的技术,开源的BIND就可提供电信联通多线解析等强大的技术。
四层负载和七层负载
所谓四层就是基于IP+端口的负载均衡,主要代表有lvs。
七层负载也称内容交换,就是基于URL等应用层信息的负载均衡,主要代表有nginx。
LVS工作模式
VS/DR模式
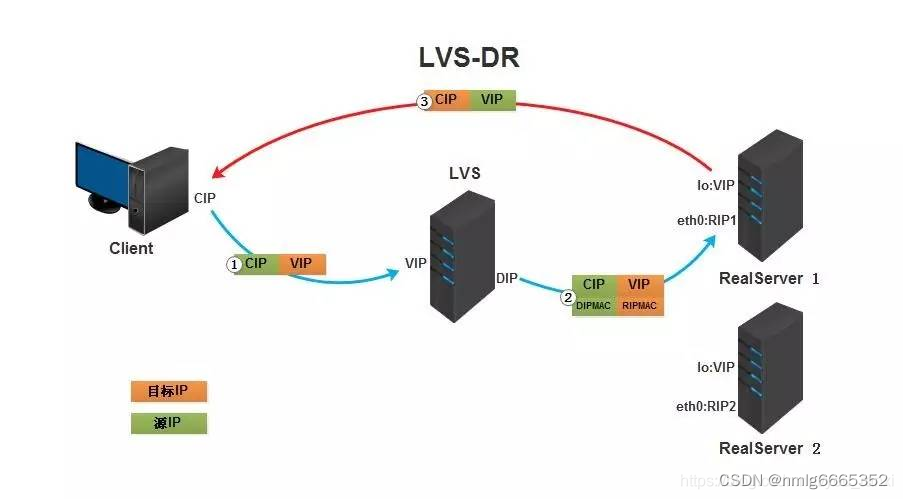
①.客户端将请求发往前端的负载均衡器,请求报文源地址是CIP,目标地址为VIP。
②.负载均衡器收到报文后,发现请求的是在规则里面存在的地址,那么它将客户端请求报文的源MAC地址改为自己DIP的MAC地址,目标MAC改为了RIP的MAC地址,并将此包发送给RS。
③.RS发现请求报文中的目的MAC是自己,就会将次报文接收下来,处理完请求报文后,将响应报文通过lo接口送给eth0网卡直接发送给客户端。
需要设置lo接口的VIP不能响应本地网络内的arp请求。
LVS-DR实战
实践目标
LVS-DR模型实现HTTP和HTTPS负载均衡集群
环境
| 主机ip | 身份 | 角色 | 操作系统 |
| 192.168.16.128/24 192.168.16.200(vip) | DR | 负载均衡器 | centos-8 |
| 192.168.16.130/24 192.168.16.200(vip) | RS1 | 后端服务器 | centos-8 |
| 192.168.16.129/24 192.168.16.200(vip) | RS2 | 后端服务器 | redhat8 |
准备工作
//关闭三台主机的防火墙和selinux
systemctl disable --now firewalld.service
setenforce 0
vi /etc/selinux/config
SELINUX=disabled //改为disabled
重启三台主机
reboot
配置后端服务器网页
在RS1和RS2上安装httpd服务,并准备分别准备网站内容
- //RS1上安装httpd,并编辑一个网页文件
- [root@dum ~]# yum -y install httpd
- [root@dum ~]# systemctl enable --now httpd
- [root@dum ~]# echo "this is RS1" > /var/www/html/index.html
//RS2上安装httpd,并编辑一个网页文件
- [root@rh8~]# yum -y install httpd
- [root@rh8 ~]# systemctl enable --now httpd
- root@rh8 ~]# echo "this is RS2" > /var/www/html/index.html


DR配置ip
1.配置dip
修改主机的网卡配置文件,配置为静态ip
- //配置静态ip
- [root@node01 ~]# vim /etc/sysconfig/network-scripts/ifcfg-ens160
- [root@node01 ~]# cat /etc/sysconfig/network-scripts/ifcfg-ens160
- TYPE=Ethernet
- PROXY_METHOD=none
- BROWSER_ONLY=no
- BOOTPROTO=none
- DEFROUTE=yes
- IPV4_FAILURE_FATAL=no
- IPV6INIT=yes
- IPV6_AUTOCONF=yes
- IPV6_DEFROUTE=yes
- IPV6_FAILURE_FATAL=no
- IPV6_ADDR_GEN_MODE=eui64
- NAME=ens160
- UUID=52770052-a1de-4bbd-8601-fd3f324f2175
- DEVICE=ens160
- ONBOOT=yes
- IPADDR=192.168.16.12
- PREFIX=24
- GATEWAY=192.168.16.2
- DNS1=8.8.8.8
- DNS2=114.114.114.114
- //重启网卡
- [root@node01 ~]# nmcli connection down ens160
- [root@node01 ~]# nmcli connection up ens160
2.配置vip
//安装net-tools
[root@node01 ~]# yum -y install net-tools
//添加一个vip在网卡上
[root@node01 ~]# ifconfig ens160:0 192.168.16.200/32 broadcast 192.168.16.200 up
//这条最好手打 容易出错
//查看网卡信息
[root@DR ~]# ifconfig
[root@node01 ~]# ifconfig
ens160: flags=4163<UP,BROADCAST,RUNNING,MULTICAST> mtu 1500
inet 192.168.16.12 netmask 255.255.255.0 broadcast 192.168.16.255
inet6 fe80::20c:29ff:fe5a:2446 prefixlen 64 scopeid 0x20<link>
ether 00:0c:29:5a:24:46 txqueuelen 1000 (Ethernet)
RX packets 88081 bytes 122263407 (116.5 MiB)
RX errors 0 dropped 0 overruns 0 frame 0
TX packets 11721 bytes 727822 (710.7 KiB)
TX errors 0 dropped 0 overruns 0 carrier 0 collisions 0ens160:0: flags=4163<UP,BROADCAST,RUNNING,MULTICAST> mtu 1500
inet 192.168.16.200 netmask 0.0.0.0 broadcast 192.168.16.200
ether 00:0c:29:5a:24:46 txqueuelen 1000 (Ethernet)lo: flags=73<UP,LOOPBACK,RUNNING> mtu 65536
inet 127.0.0.1 netmask 255.0.0.0
inet6 ::1 prefixlen 128 scopeid 0x10<host>
loop txqueuelen 1000 (Local Loopback)
RX packets 52621 bytes 4945111 (4.7 MiB)
RX errors 0 dropped 0 overruns 0 frame 0
TX packets 52621 bytes 4945111 (4.7 MiB)
TX errors 0 dropped 0 overruns 0 carrier 0 collisions 0virbr0: flags=4099<UP,BROADCAST,MULTICAST> mtu 1500
inet 192.168.122.1 netmask 255.255.255.0 broadcast 192.168.122.255
ether 52:54:00:16:cc:21 txqueuelen 1000 (Ethernet)
RX packets 0 bytes 0 (0.0 B)
RX errors 0 dropped 0 overruns 0 frame 0
TX packets 0 bytes 0 (0.0 B)
TX errors 0 dropped 0 overruns 0 carrier 0 collisions 0
RS配置ip
1.配置rip
修改两台后端服务器的网卡配置文件,配置静态ip
//配置RS1静态ip
[root@dum ~]# vim /etc/sysconfig/network-scripts/ifcfg-ens160
[root@dum ~]# cat /etc/sysconfig/network-scripts/ifcfg-ens160
TYPE=Ethernet
PROXY_METHOD=none
BROWSER_ONLY=no
BOOTPROTO=none
DEFROUTE=yes
IPV4_FAILURE_FATAL=no
IPV6INIT=yes
IPV6_AUTOCONF=yes
IPV6_DEFROUTE=yes
IPV6_FAILURE_FATAL=no
IPV6_ADDR_GEN_MODE=eui64
NAME=ens160
UUID=636ef0cb-4bb7-4cce-82fa-4a9cbabff227
DEVICE=ens160
ONBOOT=yes
IPADDR=192.168.16.130
PREFIX=24
GATEWAY=192.168.16.2
DNS1=8.8.8.8
DNS2=114.114.114.114
//重启网卡
[root@dum ~]# nmcli connection down ens160
[root@dum ~]# nmcli connection up ens160
//配置RS2静态ip (步骤同上)
2.修改网卡内核参数
编辑两台后端服务器的/etc/sysctl.conf文件,添加如下内容
//配置RS1,添加两行内容
[root@dum ~]# vim /etc/sysctl.conf
net.ipv4.conf.all.arp_ignore = 1
net.ipv4.conf.all.arp_announce = 2
//添加这两行
配置RS2,添加两行
[root@rh8 ~]# vim /etc/sysctl.conf
net.ipv4.conf.all.arp_ignore = 1
net.ipv4.conf.all.arp_announce = 2
//添加这两行
3.配置vip
给两台后端服务器配置vip
//都安装net-tools
[root@dum ~]# yum -y install net-tools
[root@rh8 ~]# yum -y install net-tools//RS1配置vp
[root@dujm ~]# ifconfig lo:0 192.168.16.200/32 broadcast 192.168.16.200 up//RS2配置vip
[root@rh8~]# ifconfig lo:0 192.168.16.200/32 broadcast 192.168.16.200 up
配置路由
在三台主机上配置路由
//在DR上配置路由
[root@DR ~]# route add -host 192.168.179.200 dev ens160:0//在RS1上配置路由
[root@RS1 ~]# route add -host 192.168.179.200 dev lo:0//在RS2上配置路由
[root@RS2 ~]# route add -host 192.168.179.200 dev lo:0
配置HTTP负载均衡集群
在DR上配置
//安装ipvsadm命令
[root@node01~]# yum -y install ipvsadm//配置规则
[root@node01 ~]# ipvsadm -A -t 192.168.16.200:80 -s wrr[root@node01 ~]# ipvsadm -a -t 192.168.16.200:80 -r 192.168.16.11:80 -g
[root@node01 ~]# ipvsadm -a -t 192.168.16.200:80 -r 192.168.16.12:80 -g
[root@node01 ~]# ipvsadm -S > /etc/sysconfig/ipvsadm //将规则保存到一个文件中
//查看
[root@node01 ~]# ipvsadm -Ln
IP Virtual Server version 1.2.1 (size=4096)
Prot LocalAddress:Port Scheduler Flags
-> RemoteAddress:Port Forward Weight ActiveConn InActConn
TCP 192.168.16.200:80 wrr
-> 192.168.16.130:80 Route 1 0 0
-> 192.168.16.129:80 Route 1 0 0
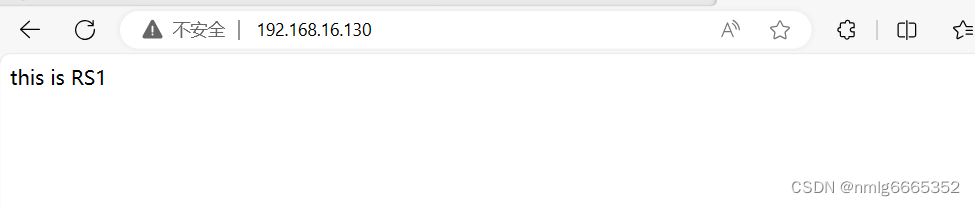
在浏览器访问测试测试
第一次访问,负载均衡器分配给了RS2

刷新一下,分配给了RS1
配置HTTPS负载均衡集群
1.生成证书,并在所有后端服务器上安装证书
在其中一台后端服务器上生成证书和私钥
//在RS1上配置ssl证书
[root@dum ~]# mkdir -p /etc/pki/CA
[root@dum ~]# cd /etc/pki/CA
[root@dum CA]# mkdir private
[root@dum CA]# (umask 077;openssl genrsa -out private/cakey.pem 2048)
Generating RSA private key, 2048 bit long modulus (2 primes)
.................................................................+++++
...+++++e is 65537 (0x010001)
[root@dum CA]# ls private/cakey.pem
private/cakey.pem
[root@dum CA]# openssl req -new -x509 -key private/cakey.pem -out cacert.pem -days 365You are about to be asked to enter information that will be incorporated
into your certificate request.
What you are about to enter is what is called a Distinguished Name or a DN.
There are quite a few fields but you can leave some blank
For some fields there will be a default value,
If you enter '.', the field will be left blank.
-----Country Name (2 letter code) [XX]:CN
State or Province Name (full name) []:HB
Locality Name (eg, city) [Default City]:WH
Organization Name (eg, company) [Default Company Ltd]:www.raoling.com
Organizational Unit Name (eg, section) []:wwww.raoling.com
Common Name (eg, your name or your server's hostname) []:www.raoling.com
Email Address []:[root@dum CA]# ls cacert.pem private [
root@dum CA]# cd private/
[root@dum private]# ls
cakey.pem
客户端(例如httpd服务器)生成密钥
[root@dum private]# cd ..
[root@dum CA]# mkdir certs newcerts crl
[root@dum CA]# touch index.txt && echo 01 > serial
[root@dum CA]# cd /etc/httpd/ && mkdir ssl && cd ssl
[root@dum ssl]# (umask 077;openssl genrsa -out httpd.key 2048)
Generating RSA private key, 2048 bit long modulus (2 primes)
.........................+++++
.............+++++
e is 65537 (0x010001)
[root@dum ssl]# ls
httpd.key
客户端生成证书签署请求
[root@RS1 ssl]# openssl req -new -key httpd.key -days 365 -out httpd.csr
Ignoring -days; not generating a certificate
You are about to be asked to enter information that will be incorporated
into your certificate request.
What you are about to enter is what is called a Distinguished Name or a DN.
There are quite a few fields but you can leave some blank
For some fields there will be a default value,
If you enter '.', the field will be left blank.
-----
Country Name (2 letter code) [XX]:CN
State or Province Name (full name) []:HB
Locality Name (eg, city) [Default City]:WH
Organization Name (eg, company) [Default Company Ltd]:www.raoling.com
Organizational Unit Name (eg, section) []:www.raoling.com
Common Name (eg, your name or your server's hostname) []:www.raoling.com
Email Address []:Please enter the following 'extra' attributes to be sent with your certificate request
A challenge password []:
An optional company name []:
CA签署客户端提交上来的证书
[root@dum ssl]# ls
httpd.csr httpd.key
[root@dum ssl]# openssl ca -in httpd.csr -out httpd.crt -days 365
Using configuration from /etc/pki/tls/openssl.cnf
Check that the request matches the signature
Signature ok
Certificate Details:Serial Number: 1 (0x1)
Validity
Not Before: Oct 8 09:27:23 2023 GMT
Not After : Oct 7 09:27:23 2024 GMT
Subject:
countryName = CN
stateOrProvinceName = HB
organizationName = www.raoling.com
organizationalUnitName = www.raoling.com
commonName = www.raoling.com
emailAddress =
X509v3 extensions:
X509v3 Basic Constraints:
CA:FALSE
Netscape Comment:
OpenSSL Generated Certificate
X509v3 Subject Key Identifier:
21:5C:42:03:7F:45:7C:A2:5E:70:76:6A:2D:87:4E:37:BF:78:3B:55
X509v3 Authority Key Identifier:
keyid:60:E7:0E:F6:57:63:78:98:DD:F1:0C:ED:FA:A9:17:46:5D:4C:19:ACCertificate is to be certified until Oct 7 09:27:23 2024 GMT (365 days) Sign the certificate? [y/n]:y
1 out of 1 certificate requests certified, commit? [y/n]y
Write out database with 1 new entries
Data Base Updated
安装证书服务
[root@dum ssl]# yum -y install httpd-devel
[root@dum ssl]# yum -y install mod_ssl
修改配置文件
[root@dum ssl]# vim /etc/httpd/conf.d/ssl.conf
<VirtualHost _default_:443>
DocumentRoot "/var/www/html/www.xx.com" //修改为自己域名
ServerName www.xx.com:443 //取消注释,修改为自己域名
SSLCertificateFile /etc/httpd/ssl/httpd.crt //修改成对应路径 SSLCertificateKeyFile /etc/httpd/ssl/httpd.key //修改成对应路径
创建https的网页文件
[root@dum ~]# mkdir -p /var/www/html/www.raoling.com
[root@dum ~]# echo "this is RS1 https" > /var/www/html/www.raoling.com/index.html
重启服务
[root@dum ssl]# systemctl restart httpd
在RS2上安装同样的证书
//通过scp把刚刚RS1生成的证书拉过来
[root@rh8 ]# cd /etc/httpd/ && mkdir ssl && cd ssl
[root@ rh8 ssl]# scp root@192.168.16.130:/etc/httpd/ssl/httpd.crt /etc/httpd/ssl/
The authenticity of host '192.168.16.130 (192.168.16.130)' can't be established.
ECDSA key fingerprint is SHA256:U1hP1QknHUuLXn71NCSh1JVmGkyNy4ZN6YQA4XF/VAw.
Are you sure you want to continue connecting (yes/no/[fingerprint])? yes
Warning: Permanently added '192.168.16.130' (ECDSA) to the list of known hosts.
root@192.168.16.130's password:
httpd.crt 100% 4574 3.4MB/s 00:00 [root@RS2 ssl]# scp
[root@rh8 ssl]# scp root@192.168.16.130:/etc/httpd/ssl/httpd.key etc/httpd/ssl/
root@192.168.16.130's password:
httpd.key 100% 1679 2.3MB/s 00:00
[root@rh8 ssl]# ls
httpd.crt httpd.key//安装证书服务
[root@rh8 ~]# yum -y install httpd-devel
[root@rh8 ~]# yum -y install mod_ssl//修改配置文件,和上面的一模一样
[root@rh8 ~]# vim /etc/httpd/conf.d/ssl.conf
DocumentRoot "/var/www/html/www.raoling.com" //修改为自己域名ServerName www.raoling.com:443 //取消注释,修改为自己域名
SSLCertificateFile /etc/httpd/ssl/httpd.crt //修改成对应路径
SSLCertificateKeyFile /etc/httpd/ssl/httpd.key //修改成对应路径
创建https的网页文件
[root@rh8 ~]# mkdir -p /var/www/html/www.raoling.com
[root@rh8 ~]# echo "this is RS2 https" > /var/www/html/www.raoling.com/index.html
重启服务
[root@rh8 ~]# systemctl restart httpd
2.配置https负载均衡规则
在DR主机上配置
//配置规则
[root@node01 ~]# ipvsadm -A -t 192.168.16.200:443 -s wrr
[root@node01 ~]# ipvsadm -a -t 192.168.16.200:443 -r 192.168.16.130:443 -g
[root@node01 ~]# ipvsadm -a -t 192.168.16.200:443 -r 192.168.16.129:443 -g
[root@node01 ~]# ipvsadm -S > /etc/sysconfig/ipvsadm //将规则保存到一个文件中
//查看
[root@node01 ~]# ipvsadm -Ln
IP Virtual Server version 1.2.1 (size=4096)
Prot LocalAddress:Port Scheduler Flags
-> RemoteAddress:Port Forward Weight ActiveConn InActConn
TCP 192.168.16.200:80 wrr
-> 192.168.16.130:80 Route 1 0 0
-> 192.168.16.129:80 Route 1 0 0
TCP 192.168.16.200:443 wrr
-> 192.168.16.130:443 Route 1 0 28
-> 192.168.16.129:443 Route 1 1 28


 744
744


 被折叠的 条评论
为什么被折叠?
被折叠的 条评论
为什么被折叠?
 到【灌水乐园】发言


