


文章详情页左侧边栏数据复用
文章详情页和个人站点的左侧边栏的内容格式都是一样的,从个人站点路由和文章详情路由进入到网页,侧边栏显示的内容是一模一样,解决方案:
方案一:
写一个home_site.html和article_detail.html建立一个新的母版base.html,两者继承base.html,在将所需的数据从对应的视图函数中传入即可。这只是解决了html代码重复问题。视图函数代码的问题是,在文章详情页和个人站点的视图函数中都要获取相同的数据,存在了数据代码冗余问题。
方案二:
利用inclusion_tag来解决方案一中的代码冗余。将样式和数据整合为一个整体,在返回到html中。
inclusion_tag方案设计
- 在对应应用下创建templatetags文件夹,文件夹的名字必须为这个。
- 在templatetags文件夹下创建my_tags.py文件,这个文件的名字可以随意。
- 在settings.py文件中添加my_tags的配置
TEMPLATES = [
{
    'BACKEND': 'django.template.backends.django.DjangoTemplates',
    'DIRS': [os.path.join(BASE_DIR, 'templates')],
    'APP_DIRS': True,
    'OPTIONS': {
        'context_processors': [
            'django.template.context_processors.debug',
            'django.template.context_processors.request',
            'django.contrib.auth.context_processors.auth',
            'django.contrib.messages.context_processors.messages',
        ],
        'libraries':{
                "my_tags": "blog.templatetags.my_tags",
        },
    },

},
]
```
准备工作完毕,下面添加正式代码
代码
前端代码:
classification.html
<div class="panel panel-warning">
    <div class="panel-heading">我的标签</div>
    <div class="panel-body">
        {% for tag in tag_list %}
            <p><a href="/{{ username }}/tag/{{ tag.title }}/">{{ tag.title }}({{ tag.c }})</a></p>
        {% endfor %}
    </div>
</div>
<div class="panel panel-danger">
    <div class="panel-heading">我的分类</div>
    <div class="panel-body">
        {% for category in category_list %}
            <p><a href="/{{ username }}/category/{{ category.title }}/">{{ category.title }}({{ category.c }})</a></p>
        {% endfor %}
    </div>
</div>
<div class="panel panel-info">
    <div class="panel-heading">随笔归档</div>
    <div class="panel-body">
        {% for date in date_list %}
        <p><a href="/{{ username }}/archive/{{ date.month|date:'Y-m' }}/">{{ date.month|date:'Y-m' }}({{ date.c }})</a></p>
        {% endfor %}
    </div>
</div>
base.html
<!DOCTYPE html>
<html lang="en">
<head>
    <meta charset="UTF-8">
    <title>Title</title>
    <link rel="stylesheet" href="/static/css/bootstrap.min.css">
    <script src="/static/js/jquery.min.js"></script>
    <script src="/static/js/bootstrap.min.js"></script>
    <style>
        *{
            margin: 0;
            padding: 0
        }
        .header{
            width:100%;
            height:60px;
            background-color: #369;
        }
        .header .title{
            font-size: 18px;
            font-weight: 100;
            line-height: 60px;
            color: white;
            margin-left: 15px;
            margin-top: -10px;
        }
        .backend{
            float:right;
            color:white;
            text-decoration: none;
            margin-right:10px;
            margin-top:10px;
            font-size:14px;
        }
        .pub_info{
            margin-top:10px;
            color:dark-green;
        }
    </style>
</head>
<body>
<div class="header">
    <div class="content">
        <p class="title">
            <span class="">{{ blog.title }}</span>
            <a href="" class="backend">管理</a>
        </p>
    </div>
</div>
<div class="container">
    <div class="row">
        <div class="col-md-3">
            {% load my_tags %}
            {% get_classification_style username %}

        </div>
        <div class="col-md-9">
            {% block content %}
            {% endblock %}
        </div>
    </div>
</div>
</body>
</html>
home_site.html
{% extends 'base.html' %}
{% block content %}
<div class="article_list">
{% for article in article_list %}
<div class="article_item clearfix">
<h5><a href="">{{ article.title }}</a></h5>
<div class="article-desc">
{{ article.desc }}
</div>
<div class="small pub_info pull-right">
<span><a href="">{{ article.user.username }}</a></span>
<span>发布于 {{ article.create_time|date:"Y-m-d H:i" }}</span>
<span class="glyphicon glyphicon-comment"></span>评论({{ article.comment_count }})
<span class="glyphicon glyphicon-thumbs-up"></span>点赞({{ article.up_count }})
</div>
</div>
<hr>
{% endfor %}
</div>
{% endblock %}
article_detail.html
{% extends 'base.html' %}
后端代码:
# urls.py
"""cnblog URL Configuration

The `urlpatterns` list routes URLs to views. For more information please see:
    https://docs.djangoproject.com/en/1.10/topics/http/urls/
Examples:
Function views
    1. Add an import:  from my_app import views
    2. Add a URL to urlpatterns:  url(r'^$', views.home, name='home')
Class-based views
    1. Add an import:  from other_app.views import Home
    2. Add a URL to urlpatterns:  url(r'^$', Home.as_view(), name='home')
Including another URLconf
    1. Import the include() function: from django.conf.urls import url, include
    2. Add a URL to urlpatterns:  url(r'^blog/', include('blog.urls'))
"""
from django.conf.urls import url
from django.contrib import admin
from django.views.static import serve
from cnblog import settings
from blog import views as blog_views
urlpatterns = [
    url(r'^admin/', admin.site.urls),
    url(r'^$', blog_views.index),
    url(r'^login/', blog_views.login, name="login"),
    url(r'^logout/', blog_views.logout, name="logout"),
    url(r'^register', blog_views.register, name="register"),
    url(r'^index/', blog_views.index, name="index"),
    url(r'^get_validCode_img', blog_views.get_validCode_img),

    # media 配置
    url(r'media/(?P<path>.*)$', serve, {"document_root": settings.MEDIA_ROOT}),

    # 个人站点
    url(r'^(?P<username>\w+)/$', blog_views.home_site),

    # 个人站点跳转
    url(r'^(?P<username>\w+)/(?P<condition>tag|category|archive)/(?P<param>.*)/$', blog_views.home_site),

    # 文章详情
    url(r'^(?P<username>\w+)/article/(?P<article_id>\d+)/$', blog_views.article_detail),
]
# views.py
def home_site(request, username, **kwargs):
    user = UserInfo.objects.filter(username=username).first()
    # 判断用户是否存在
    if not user:
        # 返回404
        return render(request, 'not_found.html')

    # 查询出当前用户对应的站站点信息
    blog = user.blog

    # 基于对象的所有文章查询
    # article_list = user.article_set.all()
    # 基于 __ 查询
    article_list = models.Article.objects.filter(user=user)
    if kwargs:
        condition = kwargs.get('condition')
        param = kwargs.get('param')

        if condition == 'category':
            # article_list = models.Article.objects.filter(user=user, category__title=param)
            article_list = article_list.filter(category__title=param)
        elif condition == 'tag':
            # article_list = models.Article.objects.filter(user=user, tags__title=param)
            article_list = article_list.filter(tags__title=param)
        elif condition == 'archive':
            year, month = param.split('-')
            print(year, month)
            # article_list = models.Article.objects.filter(
            #     user=user,
            #     create_time__year=year,
            #     create_time__month=month
            # )
            article_list = article_list.filter(create_time__year=year, create_time__month=month)
        else:
            pass

    return render(request, 'home_site.html', {'username': username, 'blog': blog, 'article_list': article_list})


def article_detail(request, username, article_id):
    return render(request, 'article_detail.html', locals())
# my_tags.py
from django import template
from django.db.models.functions import TruncMonth
from django.db.models import Count
from blog import models

register = template.Library()


@register.inclusion_tag("classification.html")
def get_classification_style(username):
    print(username)
    user = models.UserInfo.objects.filter(username=username).first()
    blog = user.blog

    category_list = models.Category.objects.filter(blog=blog).annotate(c=Count('article__title')).values('title', 'c')
    tag_list = models.Tag.objects.filter(blog=blog).annotate(c=Count('article__title')).values('title', 'c')
    date_list = models.Article.objects.filter(user=user).annotate(month=TruncMonth('create_time')).values(
        'month').annotate(c=Count('pk')). \
        values('month', 'c')

    return {'user': user, 'blog': blog, 'category_list': category_list, 'tag_list': tag_list, 'date_list': date_list, 'username': username}
知识点
模板继承
inclusion_tag
执行流程
- 访问http://127.0.0.1:8080/lxt/
- 进入路由层进行匹配,匹配到url(r’^(?P\w+)/$’, blog_views.home_site)
- 进入对应视图层blog_views.home_site,返回home_site.html网页
- 在home_site.html中继承了base.html,先加载base.html
- base.html中执行了inclusion_tag的语法{% load my_tags %}
{% get_classification_style username %} - 加载get_classification_style,执行get_classification_style中的代码,将执行完拿到的数据返回到@register.inclusion_tag(“classification.html”)对应的classification.html进行数据和样式整合。
- 将数据和样式整合之后的html代码返回到调用get_classfication_style的地方
- 在base.html中将样式和数据整合为一体的html代码展示到调用处
- home_site.html网页完成加载
每次加载base.html时,其他网页的视图函数就不需要重复传入左侧边栏的数据内容,解决了代码冗余。
style样式抽出
对base.html中的style样式提出到单独的css文件隔离出home_site.css和article_detail.css样式
代码
home_site.css
*{
    margin: 0;
    padding: 0
}
.header{
    width:100%;
    height:60px;
    background-color: #369;
}
.header .title{
    font-size: 18px;
    font-weight: 100;
    line-height: 60px;
    color: white;
    margin-left: 15px;
    margin-top: -10px;
}
.backend{
    float:right;
    color:white;
    text-decoration: none;
    margin-right:10px;
    margin-top:10px;
    font-size:14px;
}
.pub_info{
    margin-top:10px;
    color:dark-green;
}
article_detail.css
.article_info .title{
    margin-bottom: 20px;
}
base.html
引入两个css样式
<head>
    <meta charset="UTF-8">
    <title>Title</title>
    <link rel="stylesheet" href="/static/css/bootstrap.min.css">
    <link rel="stylesheet" href="/static/css/home_site.css">
    <link rel="stylesheet" href="/static/css/article_detail.css">
    <script src="/static/js/jquery.min.js"></script>
    <script src="/static/js/bootstrap.min.js"></script>

</head>
点赞样式构建
代码
article_detail.css
.article_info .title{
    margin-bottom: 20px;
}
#div_digg {
    float: right;
    margin-bottom: 10px;
    margin-right: 30px;
    font-size: 12px;
    width: 125px;
    text-align: center;
    margin-top: 10px;
}
.diggit {
    float: left;
    width: 46px;
    height: 52px;
    background: url("/static/fonts/upup.gif") no-repeat;
    text-align: center;
    cursor: pointer;
    margin-top: 2px;
    padding-top: 5px;
}
.buryit {
    float: right;
    margin-left: 20px;
    width: 46px;
    height: 52px;
    background: url("/static/fonts/downdown.gif") no-repeat;
    text-align: center;
    cursor: pointer;
    margin-top: 2px;
    padding-top: 5px;
}
.clear {
    clear: both;
}
.diggword {
    margin-top: 5px;
    margin-left: 0;
    font-size: 12px;
    color: #808080;
}
article_detail.html
<div id="div_digg">
    <div class="diggit">
        <span class="diggnum" id="digg_count">0</span>
    </div>
    <div class="buryit">
        <span class="burynum" id="bury_count">0</span>
    </div>
    <div class="clear"></div>
    <div class="diggword" id="digg_tips" style="color: red;"></div>
</div>
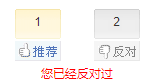
效果预览
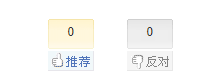
文章点赞
给推荐和反对绑定同一个点击事件,当点击推荐的时候传递到后端的是True,当点击反对的时候传递到后端的是False。
给div_digg下的两个div标签起同一个名字添加事件。
一个用户只能赞同或者反对一次,再次点击会提示已经操作过了,不能重复操作。
代码
article_detail.html
<div id="div_digg">
    {% csrf_token %}
    <div class="diggit action">
        <span class="diggnum" id="digg_count">{{ article_obj.up_count }}</span>
    </div>
    <div class="buryit action">
        <span class="burynum" id="bury_count">{{ article_obj.down_count }}</span>
    </div>
    <div class="clear"></div>
    <div class="diggword" id="digg_tips" style="color: red;"></div>
</div>

<script>
    $('#div_digg .action').click(function (){
        var is_up = $(this).hasClass("diggit")
        $.ajax({
            url:"/digg/",
            type:"post",
            data:{
                "csrfmiddlewaretoken": $("[name='csrfmiddlewaretoken']").val(),
                "is_up":is_up,
                "article_id":{{ article_obj.pk }}
            },
            success: function (data){
                console.log(data.state, data.handle)
                if (data.state){
                    if (is_up){
                        var val =parseInt($('#digg_count').text())+1;
                        $('#digg_count').text(val)
                    }
                    else{
                        var val =parseInt($('#bury_count').text())+1;
                        $('#bury_count').text(val)
                    }
                }
                else{
                    if (data.handle){
                        $('#digg_tips').html("您已经推荐过")
                    }
                    else{
                        $('#digg_tips').html("您已经反对过")
                    }
                    setTimeout(function(){
                        $('#digg_tips').html("")
                    }, 1000)

                }
            }
        })
    })
</script>
views.py
def digg(request):
    article_id = request.POST.get("article_id")
    is_up = request.POST.get("is_up")  # 拿到的是一个字符串
    is_up = json.loads(is_up)

    response = {'state': True, 'handle': None}
    obj = models.ArticleUpDown.objects.filter(user=request.user, article_id=article_id).first()
    if not obj:
        # 用户没有进行赞同或者反对,生成新的数据
        models.ArticleUpDown.objects.create(user=request.user, article_id=article_id, is_up=is_up)
        queryset = models.Article.objects.filter(pk=article_id)
        if is_up:
            # 用户点击赞同,对article中的upcount进行加1
            queryset.update(up_count=F("up_count")+1)
        else:
            queryset.update(down_count=F("down_count")+1)
    else:
        response['state'] = False  # state 代表用户已经进行过赞同或者反对了
        response['handle'] = obj.is_up  # handle 代表用户进行的是赞同还是反对
    return JsonResponse(response)
urls.py
url(r'^digg/', blog_views.digg),
效果展示


 343
343


 被折叠的 条评论
为什么被折叠?
被折叠的 条评论
为什么被折叠?
 到【灌水乐园】发言


