


在安卓应用中Toast的使用频率是非常高的,关于Toast的基本使用这里就不再啰嗦,这里只说一下怎么去更改Toast的显示风格,让Toast不再是千年不变的黑框框。
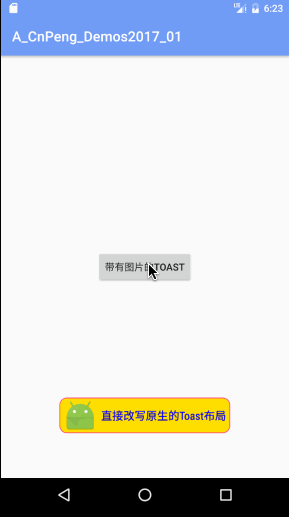
先上效果图:

1 方式1 :使用Toast类的setView( )
在Toast类中,有一个 setView( view ) 方法,该方法的作用就是用传入的view替换默认的那个黑框框。
使用setView( ) 方法自定义Toast时大致步骤如下:
- 通过Toast 的构造方法创建一个toast对象
- 使用LayoutInflater 填充一个view
- 将填充起来的view通过setView( ) 设置给toast对象
- 调用show( ) 展示吐司。
具体实现代码:
ImageToastActivity.java
/**
 * 作者:CnPeng
 * <p>
 * 时间:2017/2/27:上午10:50
 * <p>
 * 说明:展示带有图片的Toast,自定义吐司布局时,主要依靠setView 方法
 * <p>
 * 关于 负的margin值的注意事项 查看 activity_imagetoast22222222222.xml
 */

public class ImageToastActivity extends AppCompatActivity implements View.OnClickListener {
    @Override
    protected void onCreate(Bundle savedInstanceState) {
        super.onCreate(savedInstanceState);
        setContentView(R.layout.activity_imagetoast);

        Button button = (Button) findViewById(R.id.bt_imageToast);
        button.setOnClickListener(this);
    }

    @Override
    public void onClick(View v) {
        switch (v.getId()) {
            case R.id.bt_imageToast:

                //自定义Toast 方式1 ,直接setView
                //填充view,官方guide说根布局必须设置id为custom_toast_container,且inflate的第二个参数必须按照这个模式写,实际测试无所谓
                // View toastView = getLayoutInflater().inflate(R.layout.imagetoast, (ViewGroup)findViewById(R.id
                // .custom_toast_container));

                // 填充view
                View toastView = getLayoutInflater().inflate(R.layout.imagetoast, null);

                Toast toast = new Toast(getApplicationContext());           //构造方法创建吐司对象
                toast.setDuration(Toast.LENGTH_SHORT);                      //设置吐司时长
                //toast.setGravity(Gravity.BOTTOM | Gravity.RIGHT, 100, 300); //更改吐司的展示位置(默认的位置就挺好)
                toast.setView(toastView);                                   //设置吐司的新view
                toast.show();                                               //展示吐司
                break;
        }
    }
}
activity的布局文件中只有一个button,代码省略。
布局文件:imagetoast.xml
<?xml version="1.0" encoding="utf-8"?>
<RelativeLayout
android:id="@+id/custom_toast_container"
xmlns:android="http://schemas.android.com/apk/res/android"
android:layout_width="wrap_content"
android:layout_height="wrap_content">
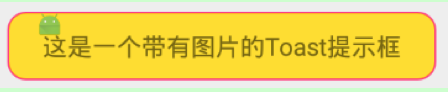
<!--风格2 吐司左上角展示图标-->
<TextView
android:layout_width="wrap_content"
android:layout_height="wrap_content"
android:layout_centerVertical="true"
android:layout_marginLeft="28dp"
android:layout_marginTop="50dp"
android:background="@drawable/shape_bk_imagetoast"
android:paddingBottom="10dp"
android:paddingLeft="20dp"
android:paddingRight="20dp"
android:paddingTop="10dp"
android:text="这是一个带有图片的Toast提示框"/>
<ImageView
android:layout_width="wrap_content"
android:layout_height="wrap_content"
android:src="@mipmap/ic_launcher"/>
</RelativeLayout>shape_imagetoast.xml
<?xml version="1.0" encoding="utf-8"?>
<shape xmlns:android="http://schemas.android.com/apk/res/android">
    <corners android:radius="10dp"/>
    <solid android:color="#ffdd00"/>
    <stroke android:color="@color/colorAccent" android:width="@dimen/dp1"/>

</shape>
注意:
- setView(view)方法中传入的view可以任意定义,但需要注意的是,有些控制view位置的属性可能会不生效。比如负的margin值,具体效果将列举在文章末尾。
- 官方guide说根布局view必须设置id为custom_toast_container,且inflate的第二个参数必须按照这个模式写,实际测试无所谓
View toastView =getLayoutInflater().inflate(R.layout.imagetoast, (ViewGroup)findViewById(R.id.custom_toast_container));
2 方式2 :通过java代码直接修改原生布局
如果要展示的Toast 只是在上方(或者下方、左方、右方)添加一个图片或者更改字号字体背景色等内容,可以直接在java代码中获取原生的布局view并去修改它。
大致步骤如下:
- 通过Toast 中的静态方法 makeText( ) 创建一个Toast 对象。
- 通过调用toast对象的 getView( ) 方法获取 toast展示的view
- 在java代码中修改Toast的显示风格
- 调用show( ) 展示Toast
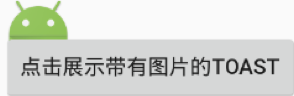
效果图:
具体实现代码:
ImageToastActivity.java
/**
 * 作者:CnPeng
 * <p>
 * 时间:2017/2/27:上午10:50
 * <p>
 * 说明:展示带有图片的Toast,自定义吐司布局时,主要依靠setView 方法
 * <p>
 * 关于 负的margin值的注意事项 查看 activity_imagetoast22222222222.xml
 */

public class ImageToastActivity extends AppCompatActivity implements View.OnClickListener {
    @Override
    protected void onCreate(Bundle savedInstanceState) {
        super.onCreate(savedInstanceState);
        setContentView(R.layout.activity_imagetoast);

        Button button = (Button) findViewById(R.id.bt_imageToast);
        button.setOnClickListener(this);
    }

    @Override
    public void onClick(View v) {
        switch (v.getId()) {
            case R.id.bt_imageToast:
                //自定义Toast方式2 : 直接修改原生的toast布局(效果同setView时,view只是一个TextView的情况)
                Toast toast = Toast.makeText(ImageToastActivity.this, "直接改写原生的Toast布局", Toast.LENGTH_SHORT);
                View toastView = toast.getView();
                toastView.setBackgroundResource(R.drawable.shape_bk_imagetoast);
                toastView.setPadding(20, 5, 20, 5);

                TextView tv = (TextView) toastView.findViewById(android.R.id.message);
                tv.setTextSize(16);
                tv.setTextColor(Color.BLUE);
                tv.setGravity(Gravity.CENTER);
                tv.setCompoundDrawablesWithIntrinsicBounds(R.mipmap.ic_launcher, 0, 0, 0);
                tv.setCompoundDrawablePadding(20);
                toast.show();

                break;
        }
    }
}
activity的布局文件中只有Button,代码省略。
注意:
- toast.getView( ) 可以获取toast展示的布局view
- textView 中的drawableLeft 等drawableXXX属性对应的java中的方法是:setCompoundDrawablesWithIntrinsicBounds(leftDrawable , topDrawable, rightDrawable, bottomDrawable); 该方法中传入的四个参数分别对应 drawableLeft , drawableRight, drawableTop , drawableBottom 。如果在某个方向上不需要设置图片就直接传入0。
- 通过查看toast的 makeText( ) 方法的源码可以知道,默认的布局文件是:com.android.internal.R.layout.transient_notification,该文件中textView的id是 android:id="@android:id/message"
3 未生效的一个布局文件 :
在这个布局文件中,使用了相对布局,先添加了一个TextView ,然后通过 layout_above 再添加一个ImageView,之后再通过负的margin值控制 imageView 与TextView的相对位置,并通过 layout_alignLeft 让图片的左边框与textView的左边框对齐。然而,这种方式在布局预览中看着是正常的,but,运行之后确实不好使,却展示成下图中的模式,没想明白为啥。如果你知道了请一定要告诉我。。。
详细布局文件:
<?xml version="1.0" encoding="utf-8"?>
<RelativeLayout
    android:id="@+id/custom_toast_container"
    xmlns:android="http://schemas.android.com/apk/res/android"
    android:layout_width="match_parent"
    android:layout_height="match_parent">

    <!--这种在预览的时候没问题,但实际上并不好使!!!-->
    <TextView
        android:id="@+id/tv_imagetoast"
        android:layout_width="wrap_content"
        android:layout_height="wrap_content"
        android:layout_centerInParent="true"
        android:background="@drawable/shape_bk_imagetoast"
        android:paddingBottom="10dp"
        android:paddingLeft="20dp"
        android:paddingRight="20dp"
        android:paddingTop="10dp"
        android:text="这是一个带有图片的Toast提示框"/>

    <ImageView
        android:layout_width="wrap_content"
        android:layout_height="wrap_content"
        android:layout_above="@id/tv_imagetoast"
        android:layout_alignLeft="@id/tv_imagetoast"
        android:layout_marginBottom="-15dp"
        android:src="@mipmap/ic_launcher"/>

</RelativeLayout>
4 关于负的margin值 :
关于负的margin 的详细介绍,请参考我之前在CSDN中写的文章,http://blog.csdn.net/north1989/article/details/52922564
(我的CSDN已经暂停更新,以后有新内容会一直在简书更新)
这里只是说明一点:如果负的margin值是相对于Button的,那么button依旧会覆盖该控件!!!!如下图:
布局文件:
<?xml version="1.0" encoding="utf-8"?>
<RelativeLayout
    xmlns:android="http://schemas.android.com/apk/res/android"
    android:layout_width="match_parent"
    android:layout_height="match_parent">

    <Button
        android:id="@+id/bt_imageToast"
        android:layout_width="wrap_content"
        android:layout_height="wrap_content"
        android:layout_centerInParent="true"
        android:text="点击展示带有图片的Toast"/>

    <!--相对于Button使用负的margin值时,位置虽然发生了变化,但是button 自带的灰色背景会覆盖控件-->
    <ImageView
        android:layout_width="wrap_content"
        android:layout_height="wrap_content"
        android:layout_above="@id/bt_imageToast"
        android:layout_alignLeft="@id/bt_imageToast"
        android:layout_marginBottom="-20dp"
        android:src="@mipmap/ic_launcher"/>

</RelativeLayout>以上的代码均为测试过的完整的可用的代码。也可以直接到github下载代码:https://github.com/CnPeng/CrazyAndroid , 其中的a_36 对应该文章


 4250
4250

 被折叠的 条评论
为什么被折叠?
被折叠的 条评论
为什么被折叠?
 到【灌水乐园】发言


