


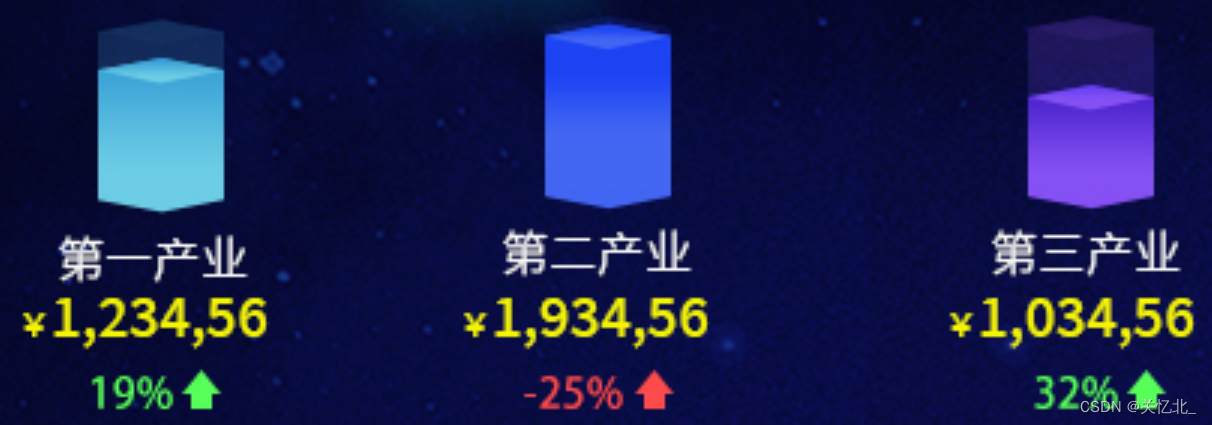
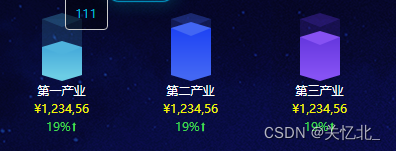
碰到一个需求 3D柱状图 正常来说这块地方是一张图片 但是leader说死图片不能很好的反应效果 我就去找了一下其他的发现threejs可以做 但是还要下载其他东西 找不到资源(主要是要花钱)心一横 直接自己封装一个
我的逻辑如下:
将这种有背景的 拆分成两个大块:背景块 (也就是背后透明的那部分) 和 填充块
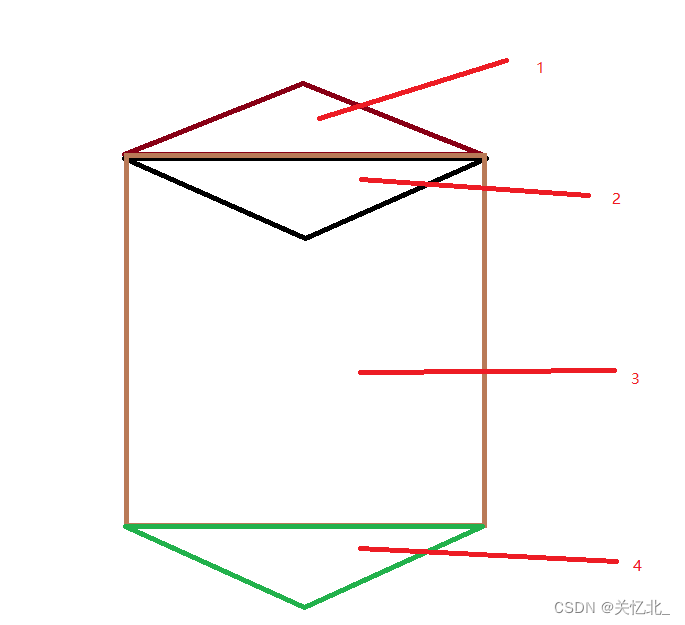
每大块分为这四个小块 下方就称为 填充块1,填充块2,填充块3,填充块4(背景块同)
效果如下

基础展示封装代码如下
html
<!-- 手绘柱状图 y开头为背后阴影 f为填充色区域 -->
<!-- 背景块3的颜色直接给在主题区域 -->
<div class="fzt" style="background: rgba(70, 171, 218, 0.2);">
    <!-- 填充块1 -->
    <div class="fhead" style="bottom:3vh;border: 6px solid #4FB3DD;"></div>
    <!-- 填充块2 -->
    <div class="fbody" style="bottom:calc(3vh - 16px);border: 8px solid #4FB3DD;"></div>
    <!-- 填充块4 -->
    <div class="ffoot" style="border: 6px solid #6CCDE5;"></div>
    <!-- 填充块3 -->
    <div class="fmain" style="height: 3vh;background-image: linear-gradient(#44A9DA, #6CCCE5);"></div>
    <!-- 背景块1 -->
    <div class="yhead" style="border: 6px solid rgba(70, 171, 218, 0.34);"></div>
    <!-- 背景块2 -->
    <div class="ybody" style="border: 8px solid rgba(70, 171, 218, 0.2);"></div>
    <!-- 背景块4 -->
    <div class="yfoot" style="border: 6px solid rgba(70, 171, 218, 0.2);"></div>
</div>
css
.fzt {
    height: 6vh;
    width: 40px;
    position: relative;
}

.fmain {
    position: absolute;
    bottom: 0;
    width: 100%;
    z-index: 10;
}

.yhead {
    height: 0;
    width: 0;
    border-right: 20px solid transparent !important;
    border-left: 20px solid transparent !important;
    border-top: 6px solid transparent !important;
    position: absolute;
    top: -12px;
    z-index: 1;
}

.fhead {
    height: 0;
    width: 0;
    border-right: 20px solid transparent !important;
    border-left: 20px solid transparent !important;
    border-top: 6px solid transparent !important;
    position: absolute;
    z-index: 10;
}

.ybody {
    height: 0;
    width: 0;
    border-right: 20px solid transparent !important;
    border-left: 20px solid transparent !important;
    border-bottom-color: transparent !important;
    position: absolute;
    top: 0;
    left: 0;
    z-index: 1;
}

.fbody {
    height: 0;
    width: 0;
    border-right: 20px solid transparent !important;
    border-left: 20px solid transparent !important;
    border-bottom-color: transparent !important;
    position: absolute;
    left: 0;
    z-index: 100;
}

.yfoot {
    height: 0;
    width: 0;
    border-right: 20px solid transparent !important;
    border-left: 20px solid transparent !important;
    border-bottom-color: transparent !important;
    position: absolute;
    bottom: -12px;
    z-index: 1;
}

.ffoot {
    height: 0;
    width: 0;
    border-right: 20px solid transparent !important;
    border-left: 20px solid transparent !important;
    border-bottom-color: transparent !important;
    position: absolute;
    bottom: -12px;
    z-index: 10;
}
复制代码就可以直接使用了
高度,颜色的在html行内里计算更改就好了
进阶代码
高亮
为了让别人感觉我们封装的不是死的 类似于图片这样的 我们得加高亮
首先在html里加入这个css
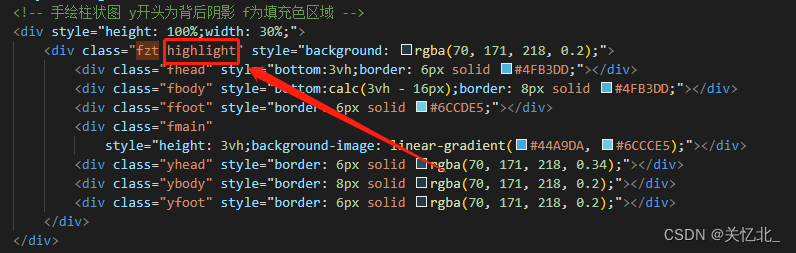
然后css里添加红框框起来的几个 这样高亮我们就添加好了
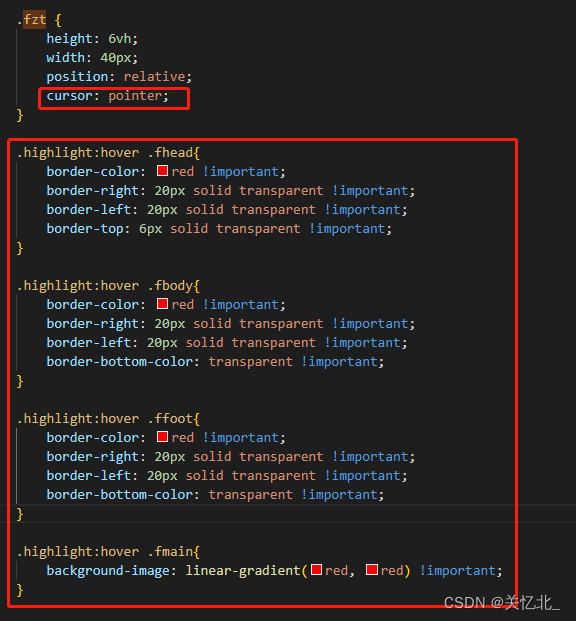
效果如下
鼠标滑到上面之前

鼠标滑到上面之后

这样我们的高亮就搞定了
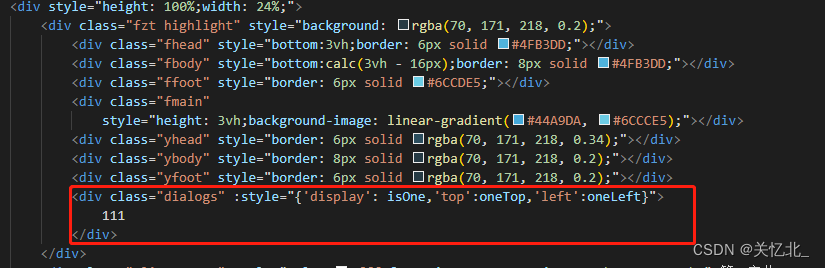
弹框
css添加
.dialogs {
    border: 1px solid #cccccc;
    background-color: rgba(0, 0, 0, 0.4);
    position: absolute;
    padding: 8px 10px;
    border-radius: 4px;
    font-size: 12px;
    z-index: 1000;
}
html添加
js添加
let that = this
let fzt = document.getElementsByClassName("fzt")
for (let i = 0; i < fzt.length; i++) {
    // 鼠标进入时  弹框显示
    fzt[i].addEventListener("mouseover", function (e) {
        if (i == 0) {
            that.isOne = "block"
        } else if (i == 1) {
            that.isTwo = "block"
        } else if (i == 2) {
            that.isThree = "block"
        }

    })
    // 鼠标滑动时  弹框跟着变化
    fzt[i].addEventListener("mousemove", function (e) {
        if (i == 0) {
            that.oneTop = e.layerY - 20 + 'px'
            that.oneLeft = e.layerX + 20 + 'px'
        } else if (i == 1) {
            that.twoTop = e.layerY - 20 + 'px'
            that.twoLeft = e.layerX + 20 + 'px'
        } else if (i == 2) {
            that.threeTop = e.layerY - 20 + 'px'
            that.threeLeft = e.layerX + 20 + 'px'
        }
    })
    // 鼠标移除时  弹框消失
    fzt[i].addEventListener("mouseout", function (e) {
        if (i == 0) {
            that.isOne = "none"
        } else if (i == 1) {
            that.isTwo = "none"
        } else if (i == 2) {
            that.isThree = "none"
        }
    })
}
这样就完成啦!


 9261
9261


 被折叠的 条评论
为什么被折叠?
被折叠的 条评论
为什么被折叠?
 到【灌水乐园】发言


