


MyBatis多对多级联查询
级联关系是数据库实体的概念,有3种级联关系,分别为1对1级联,1对多级联,多对多级联。
级联的优点:关联数据十分方便。
缺点:级联过多会增加数据库系统的复杂度,同时降低系统性能。
如果表A引用了表B的主键,A表就是主表,B表就是父表,当查询表A数据时,通过A的外键将B的相关记录返回,这就是级联查询。例如,当查询一个人的个人信息,可以通过身份证号返回他的身份信息。
其实,MyBatis并没有实现多对多级联查询,这是因为多对多级联可以通过两个一对多级联查询进行替换。例如:一个订单可以有多个商品,一个商品可以属于多个订单,使用一张中间表(订单记录表)就可以将多对多级联关系转换为两个一对多级联关系。
下面通过订单和商品之间多对多级联关系,查询订单以及每个订单对应的商品信息。
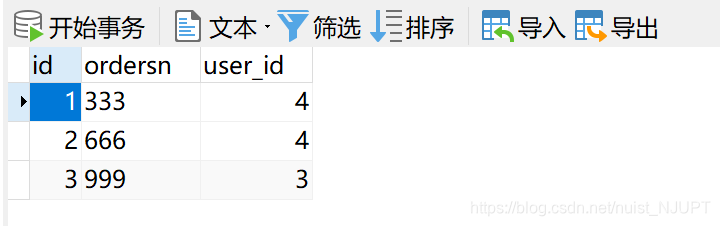
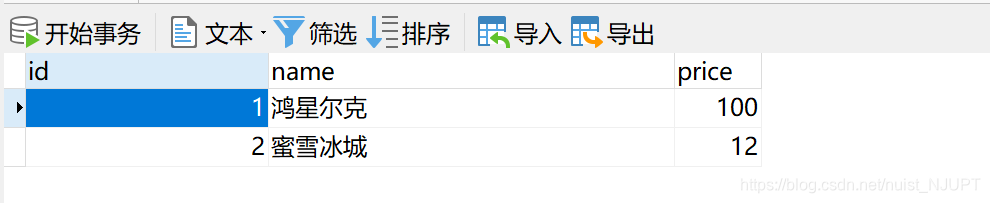
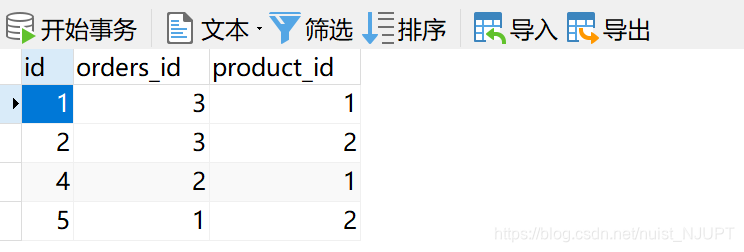
1-在MySQL中创建名为spring的数据库,在该数据库中创建订单表orders,商品表product,订单记录表orders_detail
订单表orders:

商品表product:

订单记录表orders_detail:

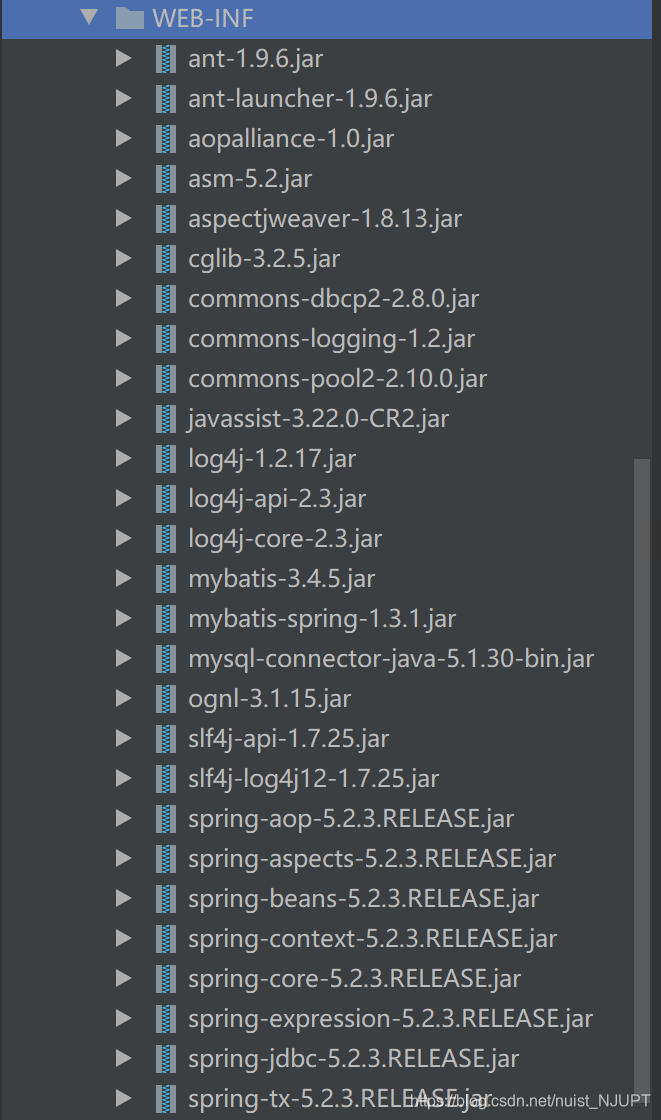
2-在IDEA中创建web应用Mappers,在web目录下的WEB-INF文件夹下导入相关jar包,并将jar包添加为库项目。
3-在src目录下创建com.po包,在该包中创建数据表product的持久化类Product,订单表orders的持久化类Orders,中间表订单记录表不需要持久化类。
Orders类:
import java.util.List;

/**
 * spring数据库中orders表的持久化类
 * 一个用户可以有多个订单,订单只属于一个用户,
 * 根据uid查询用户即其关联的订单信息
 */
public class Orders {
    private Integer id ;
    private String ordersn ;
    //多对多中的另一个一对多
    private List<Product> products ;

    public Integer getId() {
        return id;
    }

    public void setId(Integer id) {
        this.id = id;
    }

    public String getOrdersn() {
        return ordersn;
    }

    public void setOrdersn(String ordersn) {
        this.ordersn = ordersn;
    }

    public List<Product> getProducts() {
        return products;
    }

    public void setProducts(List<Product> products) {
        this.products = products;
    }

    @Override
    public String toString(){
        return "Orders [id = " + id + " ordersn = " + ordersn + " products = " + products + "]" ;
    }
}
Product类:
import java.util.List;

/**
 * 产品product的持久化类
 */
public class Product {
    private Integer id ;
    private String name ;
    private Double price ;
    //多对多中的一个一对多
    private List<Orders> orders ;

    public Integer getId() {
        return id;
    }

    public void setId(Integer id) {
        this.id = id;
    }

    public String getName() {
        return name;
    }

    public void setName(String name) {
        this.name = name;
    }

    public Double getPrice() {
        return price;
    }

    public void setPrice(Double price) {
        this.price = price;
    }

    public List<Orders> getOrders() {
        return orders;
    }

    public void setOrders(List<Orders> orders) {
        this.orders = orders;
    }
    public String toString(){
        return "Products [id = " + id + " name = " + name + " price = " + price + "]" ;
    }

}
4-在src目录下创建com.mybatis包,在该包中创建订单表的映射文件OrdersMapper.xml
<?xml version="1.0" encoding="UTF-8"?>
<!DOCTYPE mapper
        PUBLIC "-//mybatis.org//DTD Mapper 3.0//EN"
        "http://mybatis.org/dtd/mybatis-3-mapper.dtd">
<mapper namespace = "com.dao.OrdersDao">
    <!--多对多级联查询,查询所有订单以及所有订单对应的产品信息-->
    <resultMap type = "com.po.Orders" id ="allOrdersAndProducts">
        <id property = "id" column = "id"/>
        <result property = "ordersn" column = "ordersn"/>
        <!--多对多级联查询-->
        <collection property = "products" ofType = "com.po.Product">
            <id property = "id" column = "pid"/>
            <result property = "name" column = "name"/>
            <result property = "price" column = "price"/>
        </collection>
    </resultMap>
    <select id = "selectAllOrdersAndProducts" resultMap = "allOrdersAndProducts">
        select o.*, p.id as pid, p.name, p.price
        from orders o,  orders_detail od, product p
        where od.orders_id = o.id and od.product_id = p.id
    </select>
</mapper>
5-在com.mybatis下创建MyBatis核心配置文件mybatis-config.xml,需要在该配置文件中指明SQL映射文件的位置。
<?xml version="1.0" encoding="UTF-8"?>
<!DOCTYPE configuration
        PUBLIC "-//mybatis.org/= /DTD Config 3.0//EN"
        "http://mybatis.org/dtd/mybatis-3-config.dtd">
<configuration>
    <!--在使用MyBatis嵌套查询方式进行关联查询时,使用MyBatis延时加载可以在一定程度上提高查询效率-->
    <settings>
        <!--打开延时加载开关-->
        <setting name="lazyLoadingEnabled" value="true"/>
        <!--将积极加载改成按需加载-->
        <setting name = "aggressiveLazyLoading" value = "false"/>
    </settings>
    <!--告诉MyBatis映射文件的位置-->
    <mappers>
        <mapper resource = "com/mybatis/UserMapper.xml"/>
        <mapper resource = "com/mybatis/IdCardMapper.xml"/>
        <mapper resource = "com/mybatis/PersonMapper.xml"/>
        <mapper resource = "com/mybatis/OrdersMapper.xml"/>
        <mapper resource=  "com/mybatis/ProductMapper.xml"/>
    </mappers>
</configuration>
6-在src目录下创建spring配置文件applicationContetx.xml,在该文件扫描有注解的包,使得注解生效,同时需要配置数据源等。
<?xml version="1.0" encoding="UTF-8"?>
<beans xmlns="http://www.springframework.org/schema/beans"
       xmlns:xsi="http://www.w3.org/2001/XMLSchema-instance"
       xmlns:context="http://www.springframework.org/schema/context"
       xmlns:tx="http://www.springframework.org/schema/tx"
       xsi:schemaLocation="http://www.springframework.org/schema/beans
       http://www.springframework.org/schema/beans/spring-beans.xsd
       http://www.springframework.org/schema/context
       https://www.springframework.org/schema/context/spring-context.xsd
       http://www.springframework.org/schema/tx
       http://www.springframework.org/schema/tx/spring-tx.xsd">
    <!--指定需要扫描的包,是注解生效-->
    <context:component-scan base-package="com.dao"/>
    <context:component-scan base-package="com.controller"/>
    <!--配置数据源-->
    <bean id = "dataSource" class = "org.apache.commons.dbcp2.BasicDataSource">
        <!--配置数据库驱动-->
        <property name = "driverClassName" value = "com.mysql.jdbc.Driver"/>
        <!--配置连接数据库的url-->
        <property name = "url" value = "jdbc:mysql://localhost:3306/spring?characterEncoding=utf8"/>
        <!--连接数据库的用户名-->
        <property name = "username" value = "root"/>
        <!--连接数据库的密码-->
        <property name = "password" value = "123456"/>
        <!--最大连接数-->
        <property name = "maxTotal" value = "30"/>
        <!--最大空闲连接数-->
        <property name = "maxIdle" value = "10"/>
        <!--初始化最大连接数-->
        <property name = "initialSize" value = "5"/>
    </bean>
    <!--添加事务支持-->
    <bean id = "txManager" class = "org.springframework.jdbc.datasource.DataSourceTransactionManager">
        <property name = "dataSource" ref = "dataSource"/>
    </bean>
    <!--开启事务注解-->
    <tx:annotation-driven transaction-manager="txManager"/>
    <!--配置MyBatis工厂,同时指定数据源,并与MyBatis完美整合-->
    <bean id = "sqlSessionFactory" class = "org.mybatis.spring.SqlSessionFactoryBean">
        <property name = "dataSource" ref = "dataSource"/>
        <!--configLocation的属性值为MyBatis的核心配置文件-->
        <property name = "configLocation" value = "classpath:com/mybatis/mybatis-config.xml"/>
    </bean>
    <!--Mapper代理开发,使用Spring自动扫描MyBatis接口并装配,Spring将指定包中的所有被@Mapper注解过的接口自动装配为MyBatis的映射接口-->
    <bean class = "org.mybatis.spring.mapper.MapperScannerConfigurer">
        <!--mybatis-spring的组件扫描器-->
        <property name = "basePackage" value = "com.dao"/>
        <property name = "sqlSessionFactoryBeanName" value = "sqlSessionFactory"/>
    </bean>
</beans>
7-在src目录下创建com.dao包,在该包中创建数据操作接口OrdersDao
import com.po.Orders;
import org.apache.ibatis.annotations.Mapper;
import org.springframework.stereotype.Repository;

import java.util.List;

@Repository
@Mapper
public interface OrdersDao {
    public List<Orders> selectAllOrdersAndProducts() ;
}
8-在src目录下创建包com.controller,并在该包中创建MoreToMoreController类,在该类中调用接口方法
import com.dao.OrdersDao;
import com.po.Orders;
import org.springframework.beans.factory.annotation.Autowired;
import org.springframework.stereotype.Controller;

import java.util.List;
@Controller
public class MoreToMoreController {
     @Autowired
    private OrdersDao ordersDao ;
     public void test(){
         List <Orders> os = ordersDao.selectAllOrdersAndProducts() ;
         for(Orders os1 : os){
             System.out.println(os1) ;
         }
     }
}
9-在com.controller包中创建测试类TestMoreToMore
import org.springframework.context.ApplicationContext;
import org.springframework.context.support.ClassPathXmlApplicationContext;

public class TestMoreToMore {
    public static void main(String[] args){
        ApplicationContext appCon = new ClassPathXmlApplicationContext("applicationContext.xml") ;
        MoreToMoreController mtm = (MoreToMoreController) appCon.getBean("moreToMoreController");
        mtm.test() ;
    }
}
10-测试结果


 4156
4156


 被折叠的 条评论
为什么被折叠?
被折叠的 条评论
为什么被折叠?
 到【灌水乐园】发言


