


Compose Canvas饼图效果绘制
本用例基于Compose开发 通过Canvas来绘制饼图 实现了饼图数据展示并可进行点击选择不同的数据。
最终效果和代码
- 立体绘制效果
- 各板块可点击和响应
- 整体饼图可进行触摸拖拽和旋转
- 增加线条平行间距
最终代码
package com.ftd.journal.ui.view.dataui

import android.content.Context
import android.graphics.Paint
import android.util.Log
import android.widget.Toast
import androidx.compose.animation.core.FloatTweenSpec
import androidx.compose.animation.core.animateFloatAsState
import androidx.compose.foundation.Canvas
import androidx.compose.foundation.background
import androidx.compose.foundation.gestures.detectDragGestures
import androidx.compose.foundation.gestures.detectTapGestures
import androidx.compose.foundation.layout.*
import androidx.compose.material.Text
import androidx.compose.runtime.*
import androidx.compose.ui.Alignment
import androidx.compose.ui.Modifier
import androidx.compose.ui.geometry.Offset
import androidx.compose.ui.geometry.Size
import androidx.compose.ui.graphics.Color
import androidx.compose.ui.graphics.StrokeCap
import androidx.compose.ui.graphics.drawscope.Stroke
import androidx.compose.ui.graphics.drawscope.rotate
import androidx.compose.ui.graphics.drawscope.scale
import androidx.compose.ui.graphics.drawscope.translate
import androidx.compose.ui.graphics.nativeCanvas
import androidx.compose.ui.graphics.toArgb
import androidx.compose.ui.input.pointer.PointerInputChange
import androidx.compose.ui.input.pointer.pointerInput
import androidx.compose.ui.platform.LocalContext
import androidx.compose.ui.unit.dp
import androidx.compose.ui.unit.sp
import com.ftd.journal.utils.px2dip
import kotlin.math.cos
import kotlin.math.sin

private fun getPositionFromAngle(angles: List<Float>, touchAngle: Double, startAngle: Float): Int {
    var totalanagle = 0f
    for ((i, angle) in angles.withIndex()) {
        totalanagle += angle
        if (touchAngle >= startAngle && touchAngle <= (startAngle + totalanagle) % 360) {
            return i
        } else if (startAngle + totalanagle > 360) {
            if (touchAngle >= startAngle || touchAngle < (startAngle + totalanagle) % 360) {
                return i
            }
        }//角度计算
    }
    return -1
}

@Composable
fun PieChart(title: String, color: List<Color>, point: List<Float>, labels: List<String>) {
    Column(
        modifier = Modifier.fillMaxWidth(),
        verticalArrangement = Arrangement.Top,
        horizontalAlignment = Alignment.CenterHorizontally
    ) {
        Text(title)
        Row(
            verticalAlignment = Alignment.CenterVertically,
            horizontalArrangement = Arrangement.Center
        ) {
            CenterPieChart(context = LocalContext.current, color, point, labels)
            Column(
                modifier = Modifier
                    .padding(start = 30.dp, end = 10.dp), horizontalAlignment = Alignment.Start
            ) {
                for ((i, p) in point.withIndex()) {
                    Row(
                        horizontalArrangement = Arrangement.Start,
                        verticalAlignment = Alignment.CenterVertically
                    ) {
                        Box(
                            modifier = Modifier
                                .size(10.dp, 10.dp)
                                .background(color = color[i])
                        )
                        Text(
                            text = "${labels[i]} ($p)",
                            fontSize = 12.sp,
                            modifier = Modifier.padding(start = 5.dp, end = 5.dp)
                        )
                    }
                }//循环添加右边排列元素
            }
        }//右边排列

    }
}

@Composable
fun CenterPieChart(context: Context, color: List<Color>, point: List<Float>, labels: List<String>) {
    val sum = point.sum()
    val ViewWeight = 400f //自定义View宽度 此处为正方形 所以宽高一致
    val drawHeight = 60f //内部线高 即有颜色部分的宽度
    val selecyAddHeight = 10f //点击后增加的高度
    val angles = mutableListOf<Float>()

    var start by remember { mutableStateOf(false) }
    var position by remember { mutableStateOf(0) }
    var dragOffest by remember { mutableStateOf(0f) }
    val sweepPre by animateFloatAsState(
        targetValue = if (start) 1f else 0f,
        animationSpec = FloatTweenSpec(duration = 1000)
    )
    val paint = Paint()
    paint.color = Color.Black.toArgb()
    paint.textSize = 28f //中间文本字体大小
    paint.style = Paint.Style.STROKE
    Canvas(
        modifier = Modifier
            .width(px2dip(LocalContext.current, ViewWeight))
            .height(px2dip(LocalContext.current, ViewWeight))
            .background(Color.White)
            .pointerInput(Unit) {

                detectTapGestures(
                    onTap = {
                        val x = it.x - ViewWeight / 2
                        val y = it.y - ViewWeight / 2
                        var touchAngle = Math.toDegrees(Math.atan2(y.toDouble(), x.toDouble()))
                        //坐标1,2象限返回-180~0  3,4象限返回0~180
                        if (x < 0 && y < 0 || x > 0 && y < 0) {//1,2象限
                            touchAngle += 360
                        }

                        val nowpostion =
                            getPositionFromAngle(
                                touchAngle = touchAngle,
                                angles = angles,
                                startAngle = dragOffest % 360
                            )
                        if (nowpostion == position) {
                            position = -1;
                        } else {
                            position = nowpostion;
                        }
                        Toast
                            .makeText(
                                context,
                                "onTap: $position",
                                Toast.LENGTH_SHORT
                            )
                            .show()
                    }
                )
            }
            .pointerInput(Unit) {

                var dragstartx = 0f
                var dragstarty = 0f
                detectDragGestures(
                    onDragStart = { offset ->
                        // 拖动开始
                        dragstartx = offset.x
                        dragstarty = offset.y
                    },
                    onDragEnd = {
                        // 拖动结束
                    },
                    onDragCancel = {
                        // 拖动取消
                    },
                    onDrag = { change: PointerInputChange, dragAmount: Offset ->
                        // 拖动中
                        dragstartx += dragAmount.x
                        dragstarty += dragAmount.y
                        val x: Float
                        if (dragstarty < ViewWeight / 2) {
                            x = dragAmount.x
                        } else {
                            x = -dragAmount.x
                        }
                        val y: Float = if (dragstartx < ViewWeight / 2) {
                            -dragAmount.y
                        } else {
                            dragAmount.y
                        }//拆分坐标分量来进行顺逆的判断
                        dragOffest += x + y

                    }
                )
            }
    ) {
        translate(0f, 0f) {
            start = true//开始绘制动画
            var startAngle = dragOffest % 360//初始角度
            var selectAngle = 0f//记录被点击项的初始角度

            for ((i, p) in point.withIndex()) {
                val sweepAngle = p / sum * 360f//偏向的角度
                if (angles.size < point.size) {
                    angles.add(sweepAngle)
                }

                if (position != i) {

                    var angle=startAngle%360+sweepAngle* sweepPre*0.5
                    angle=angle*Math.PI/180// 要转弧度
                    val  y= sin(angle)*10
                    val  x= cos(angle) *10

                    drawArc(
                        color = color[i],
                        startAngle = startAngle,
                        sweepAngle = sweepAngle* sweepPre,//1f 弥补部分精度不足问题
                        useCenter = false, // 指示圆弧是否闭合边界中心的标志
                        // 样式
                        style = Stroke(width = drawHeight, miter = 0f, cap = StrokeCap.Butt),
                        size = Size(
                            (ViewWeight - drawHeight * 2),
                            (ViewWeight - drawHeight * 2)
                        ),
                        topLeft = Offset((drawHeight+x).toFloat(), (drawHeight+y).toFloat())
                    )

                    drawArc(
                        color = color[i],
                        alpha = 0.5f,
                        startAngle = startAngle ,
                        sweepAngle = sweepAngle * sweepPre,
                        useCenter = false, // 指示圆弧是否闭合边界中心的标志
                        // 样式
                        style = Stroke(width = drawHeight / 5, miter = 10f, cap = StrokeCap.Butt),
                        size = Size(ViewWeight - drawHeight * 3, ViewWeight - drawHeight * 3),
                        topLeft = Offset((drawHeight * 1.5f+x).toFloat(), (drawHeight * 1.5f+y).toFloat())
                    )


                } else {
                    selectAngle = startAngle;
                }
                startAngle += sweepAngle
            }

            //中间文本绘制
            var textweight = paint.measureText("全部")
            var text = "$sum"
            var pointweight = paint.measureText(text)
            if (position != -1) {

                //选择的内容
                val sweepAngle = point[position] / sum * 360f

                var angle= selectAngle +(sweepAngle * sweepPre )*0.5
                angle=angle*Math.PI/180 // 要转弧度
                val  y= sin(angle)*10
                val  x= cos(angle) *10

                drawArc(
                    color = color[position],
                    startAngle = selectAngle ,
                    sweepAngle = sweepAngle * sweepPre ,
                    useCenter = false, // 指示圆弧是否闭合边界中心的标志
                    // 样式
                    style = Stroke(
                        width = drawHeight + selecyAddHeight,
                        miter = 10f,
                        cap = StrokeCap.Butt
                    ),
                    size = Size(
                        ViewWeight - drawHeight * 2 + selecyAddHeight,
                        ViewWeight - drawHeight * 2 + selecyAddHeight
                    ),
                    topLeft = Offset(
                        (drawHeight - selecyAddHeight / 2+x).toFloat(),
                        (drawHeight - selecyAddHeight / 2+y).toFloat()
                    )
                )//选择后宽度

                drawArc(
                    color = color[position],
                    alpha = 0.5f,
                    startAngle = selectAngle ,
                    sweepAngle = sweepAngle * sweepPre ,
                    useCenter = false, // 指示圆弧是否闭合边界中心的标志
                    style = Stroke(width = drawHeight / 5, miter = 10f, cap = StrokeCap.Butt),                          // 样式
                    size = Size(ViewWeight - drawHeight * 3, ViewWeight - drawHeight * 3),
                    topLeft =  Offset((drawHeight * 1.5f+x).toFloat(),
                        (drawHeight * 1.5f+y).toFloat()
                    )
                )

                //中间文本绘制
                textweight = paint.measureText(labels[position])
                val pointF = "%.1f".format(sweepAngle * 100 / 360)
                val positionF = point[position]
                text = "$positionF($pointF%)"
                pointweight = paint.measureText(text)
                //用原生Canvas来绘制
                drawContext.canvas.nativeCanvas.drawText(
                    labels[position],
                    ViewWeight / 2 - textweight / 2,
                    ViewWeight / 2,
                    paint
                )
                drawContext.canvas.nativeCanvas.drawText(
                    text,
                    ViewWeight / 2 - pointweight / 2,
                    ViewWeight / 2 + paint.textSize,
                    paint
                )
            }
            //用原生Canvas来绘制
            drawContext.canvas.nativeCanvas.drawText(
                if (position == -1) "全部" else labels[position],
                ViewWeight / 2 - textweight / 2,
                ViewWeight / 2,
                paint
            )

            drawContext.canvas.nativeCanvas.drawText(
                text,
                ViewWeight / 2 - pointweight / 2,
                ViewWeight / 2 + paint.textSize,
                paint
            )

        }

    }
}
实际使用
@Composable
fun Content() {
Column(
modifier = Modifier.fillMaxWidth(),
verticalArrangement = Arrangement.Top,
horizontalAlignment = Alignment.CenterHorizontally
) {
val point = listOf(10f, 40f, 20f, 80f, 100f, 60f)
val labels = listOf("吃饭", "睡觉", "打牌", "去超市", "上班", "工资")
val color = listOf(Color.Blue, Color.Yellow, Color.Green, Color.Gray, Color.Red, Color.Cyan)
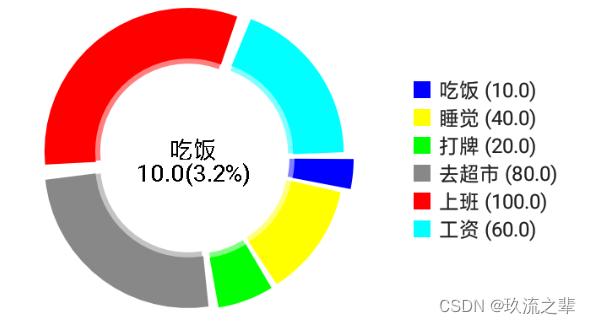
PieChart("总支出占比",color, point, labels)
}
}
代码剖析
如果还想进一步了解我是怎么实现的,可往下继续阅读和了解
圆形绘制
因为饼图整体呈圆形,所以我们将所有数据合起来当一个圆,里面的每一块数据的占比,就是它的弧度,而对于弧度我们可以用Canvas中的drawArc 可以来绘制器弧形
- color 绘制颜色
- startAngle 开始角度
- sweepAngle 弧形经过角度
- useCenter 圆弧是否闭合边界中心的标志
- style 样式 这里我们利用设定样式的粗细来设置外距圆的宽度,即下图有颜色的部分的宽(drawHeight)
- size 整体弧度的完整圆大小 主要控制弧度距离中心点的距离
- topLeft 左上角基点的位置 因为考虑到在圆内绘制 所以进行了距离矫正
 			  drawArc(
                        color = color[i],
                        startAngle = startAngle + partpadding,
                        sweepAngle = sweepAngle * sweepPre - partpadding,//1f 弥补部分精度不足问题
                        useCenter = false, // 指示圆弧是否闭合边界中心的标志
                        // 样式
                        style = Stroke(width = drawHeight, miter = 10f, cap = StrokeCap.Butt),
                        size = Size(ViewWeight - drawHeight * 2, ViewWeight - drawHeight * 2),
                        topLeft = Offset(drawHeight, drawHeight)
                    )
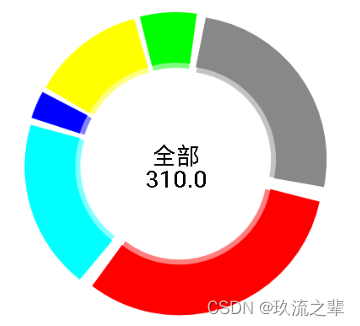
然后依次计算数据中每个部分的偏移角度,然后全部相加,那么最后整个圆就能拼接绘制出来。

立体效果
同样,我们在最内圈画一成小的弧形,并设置透明度,最后再分隔开每一个部分就能有立体的效果了。如下为内弧的画发,其角度基本是一致的,如下的partpadding就是分隔角度
                   drawArc(
                        color = color[i],
                        startAngle = startAngle + partpadding,
                        sweepAngle = sweepAngle * sweepPre - partpadding,
                        useCenter = false, // 指示圆弧是否闭合边界中心的标志
                        // 样式
                        style = Stroke(width = drawHeight, miter = 10f, cap = StrokeCap.Butt),
                        size = Size(ViewWeight - drawHeight * 2, ViewWeight - drawHeight * 2),
                        topLeft = Offset(drawHeight, drawHeight)
                    )
                    drawArc(
                        color = color[i],
                        alpha = 0.5f,
                        startAngle = startAngle + partpadding / 2,
                        sweepAngle = sweepAngle * sweepPre - partpadding / 2,
                        useCenter = false, // 指示圆弧是否闭合边界中心的标志
                        // 样式
                        style = Stroke(width = drawHeight / 5, miter = 10f, cap = StrokeCap.Butt),
                        size = Size(ViewWeight - drawHeight * 3, ViewWeight - drawHeight * 3),
                        topLeft = Offset(drawHeight * 1.5f, drawHeight * 1.5f)
                    )

拖移旋转
利用触摸手势,以原图中心点作为基准,将每次移动的分量进行拆分,来判断该区间对于x分量和y分量应该采取加或减的增幅方式,举个例子,当处于饼图下方时(一半高度以下),移动方向为正时,其增幅为正,该方向为顺时针方向,所以角度可以增加,当处于饼图左侧时(一半宽度偏左),移动方向为下时,其增幅为负,该方向为逆时针方向,所以角度需要减少。
                var dragstartx = 0f
                var dragstarty = 0f
                detectDragGestures(
                    onDragStart = { offset ->
                        // 拖动开始
                        Log.d(
                            "pointerInput",
                            "onDragStart: ${offset.x}  :  ${offset.y}"
                        )
                        dragstartx = offset.x
                        dragstarty = offset.y
                    },
                    onDragEnd = {
                        // 拖动结束
                    },
                    onDragCancel = {
                        // 拖动取消
                    },
                    onDrag = { change: PointerInputChange, dragAmount: Offset ->
                        // 拖动中
                        Log.d(
                            "pointerInput",
                            "onDrag: $dragAmount"
                        )
                        dragstartx += dragAmount.x
                        dragstarty += dragAmount.y
                        var x = 0f
                        var y = 0f
                        if (dragstarty < ViewWeight / 2 ) {
                            x=dragAmount.x
                        }else{
                            x=-dragAmount.x
                        }
                        if (dragstartx < ViewWeight / 2 ) {
                            y=-dragAmount.y
                        }else{
                            y=dragAmount.y
                        }//拆分坐标分量来进行顺逆的判断
                        dragOffest = dragOffest + x + y

                    }
                )
            }
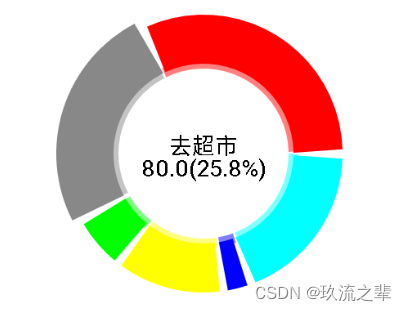
点击放大
如上图我们能看到部分区域点击后会进行放大,其逻辑其实也非常简单,在需要放大的位置 我们在最后进行绘制,一方面是可以保证该部分会处于相较于其他部分的上层,另一方面我们对其在绘制弧度时的可以使用不同的宽度,然后再调整一下位置,放大的部分就完成了。
               drawArc(
                    color = color[position],
                    startAngle = selectAngle + partpadding,
                    sweepAngle = sweepAngle * sweepPre - partpadding,
                    useCenter = false, // 指示圆弧是否闭合边界中心的标志
                    // 样式
                    style = Stroke(
                        width = drawHeight + selecyAddHeight,
                        miter = 10f,
                        cap = StrokeCap.Butt
                    ),
                    size = Size(
                        ViewWeight - drawHeight * 2 + selecyAddHeight,
                        ViewWeight - drawHeight * 2 + selecyAddHeight
                    ),
                    topLeft = Offset(
                        drawHeight - selecyAddHeight / 2,
                        drawHeight - selecyAddHeight / 2
                    )
                )//选择后宽度

                drawArc(
                    color = color[position],
                    alpha = 0.5f,
                    startAngle = selectAngle + partpadding,
                    sweepAngle = sweepAngle * sweepPre - partpadding,
                    useCenter = false, // 指示圆弧是否闭合边界中心的标志
                    // 样式
                    style = Stroke(width = drawHeight / 5, miter = 10f, cap = StrokeCap.Butt),
                    size = Size(ViewWeight - drawHeight * 3, ViewWeight - drawHeight * 3),
                    topLeft = Offset(drawHeight * 1.5f, drawHeight * 1.5f)
                )
其中点击的监听,我们采用手势进行监听即可
                 detectTapGestures(
                    onTap = {
                        Log.d(
                            "pointerInput",
                            "onTap: ${it.x - ViewWeight / 2} ${it.y - ViewWeight / 2}"
                        )
                        val x = it.x - ViewWeight / 2
                        val y = it.y - ViewWeight / 2
                        var touchAngle = Math.toDegrees(Math.atan2(y.toDouble(), x.toDouble()))
                        //坐标1,2象限返回-180~0  3,4象限返回0~180
                        if (x < 0 && y < 0 || x > 0 && y < 0) {//1,2象限
                            touchAngle += 360
                        }

                        val nowpostion =
                            getPositionFromAngle(touchAngle = touchAngle, angles = angles, startAngle = dragOffest%360)
                        if (nowpostion == position) {
                            position = -1;
                        } else {
                            position = nowpostion;
                        }
                        Toast
                            .makeText(
                                context,
                                "onTap: $position",
                                Toast.LENGTH_SHORT
                            )
                            .show()
                    }
                )
角度位置判断,如果偏移角度刚好落于该部分位置区间内,表示其命中并返回
private fun getPositionFromAngle(angles: List<Float>, touchAngle: Double,startAngle:Float): Int {
    var totalanagle=0f
    for ((i, angle) in angles.withIndex()) {
        totalanagle+=angle
        if (touchAngle>=startAngle&&touchAngle<=(startAngle+totalanagle)%360){
            return i
        }else if (startAngle+totalanagle>360){
            if (touchAngle>=startAngle||touchAngle<(startAngle+totalanagle)%360){
                return i
            }
        }//角度计算
    }
    return -1
}
排列元素
最后,通过compose的组合,将标题和排列元素进行封装处理和展示
@Composable
fun PieChart(title:String,color: List<Color>, point: List<Float>, labels: List<String>) {
    Column(
        modifier = Modifier.fillMaxWidth(),
        verticalArrangement = Arrangement.Top,
        horizontalAlignment = Alignment.CenterHorizontally
    ) {
        Text(title)
        Row(
            verticalAlignment = Alignment.CenterVertically,
            horizontalArrangement = Arrangement.Center
        ) {
            CenterPieChart(context = LocalContext.current, color, point, labels)
            Column(
                modifier = Modifier
                    .padding(start = 30.dp, end = 10.dp), horizontalAlignment = Alignment.Start
            ) {
                for ((i, p) in point.withIndex()) {
                    Row(horizontalArrangement = Arrangement.Start, verticalAlignment = Alignment.CenterVertically) {
                        Box(
                            modifier = Modifier
                                .size(10.dp, 10.dp)
                                .background(color = color[i])
                        )
                        Text(
                            text = "${labels[i]} ($p)",
                            fontSize = 12.sp,
                            modifier = Modifier.padding(start = 5.dp, end = 5.dp)
                        )
                    }
                }//循环添加右边排列元素
            }
        }//右边排列

    }
}

线条平行问题解决
之前评论区有位不甜不辣老兄提出了需要平行的意见,很抱歉这位兄弟,中间因为一直在处理其他事情没来得及去解决,今天得空对此也进行了优化希望是及时的 😁

废话不多说,其实老兄说的原理就是对的,我们只需要基于圆心朝外进行偏移就好了,大致原理如下
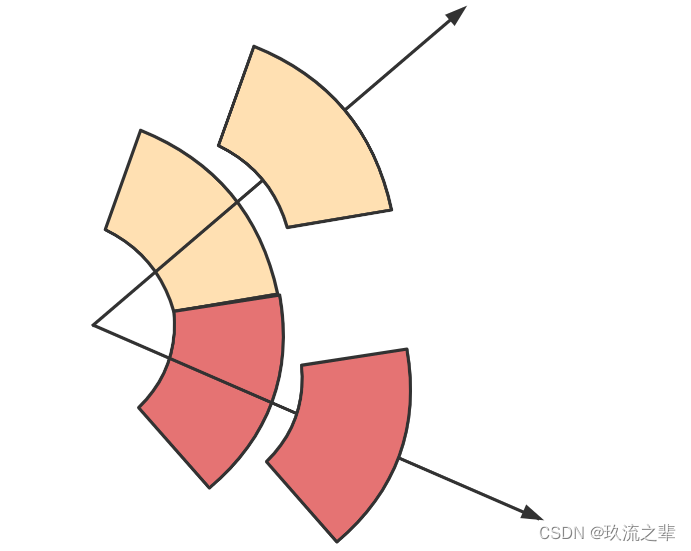
那么知道了原理,其步骤也清晰可见
- 首先算出圆弧中心线的的度数
- 如何基于改度数将其sin和cos值进行计算,这样就知道两个方向的偏离值是多少,可以用在后续的矩形移动中
- 最后就是给个偏移值的大小进行偏移就好,topLeft 修改
                var angle= selectAngle +(sweepAngle * sweepPre )*0.5	//首先算出圆弧中心线的的度数
                angle=angle*Math.PI/180 // 要转弧度
                val  y= sin(angle)*10// y轴的偏移距离 10是倍增,可以换其他值,相当于是外偏移的大小
                val  x= cos(angle) *10// x轴的偏移距离

                drawArc(
                    color = color[position],
                    startAngle = selectAngle ,
                    sweepAngle = sweepAngle * sweepPre ,
                    useCenter = false, // 指示圆弧是否闭合边界中心的标志
                    // 样式
                    style = Stroke(
                        width = drawHeight + selecyAddHeight,
                        miter = 10f,
                        cap = StrokeCap.Butt
                    ),
                    size = Size(
                        ViewWeight - drawHeight * 2 + selecyAddHeight,
                        ViewWeight - drawHeight * 2 + selecyAddHeight
                    ),
                    topLeft = Offset(
                        (drawHeight - selecyAddHeight / 2+x).toFloat(),
                        (drawHeight - selecyAddHeight / 2+y).toFloat()
                    )
                )//选择后宽度
这样偏移效果就出来了
最后
觉得不错的,收藏,点赞或关注一波呗!大家一起成长收获!


 300
300


 被折叠的 条评论
为什么被折叠?
被折叠的 条评论
为什么被折叠?
 到【灌水乐园】发言


