


Android5.0的Palette(调色板)、视图阴影、着色和裁剪介绍
随着Android5.0的发布,google带来了Material Design,俗称:材料设计。并带来了一些新的东西,这里就一一介绍这些新的设计元素。
1、Palette(调色板)
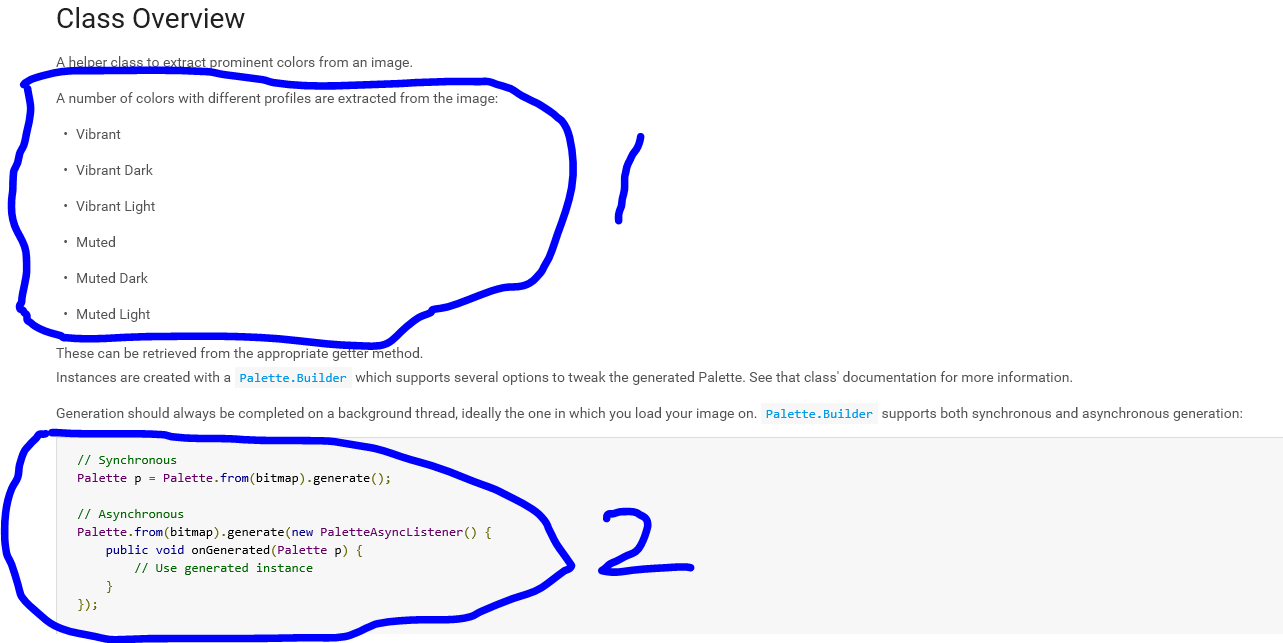
在5.0以后的android版本中可以使用调色板来提取颜色,让app的主题颜色动态的适应当前页面的色调,使得你的app整体看起来主题基调和谐统一;下面是官网的介绍和使用说明,先截个图,后面简单翻译下:
翻译:
palette这是一个可以从image中提取颜色的类,它可以从image中提取及几种不同的色调,如下:
-
Vibrant : 充满活力的,
-
Vibrant dark :充满活力的黑
-
Vibrant light :充满活力的亮
-
Muted :柔和的
-
Muted dark : 柔和的黑
-
Muted light : 柔和的亮
使用Palette可以在Android studio中的gradle添加以下依赖:
compile 'com.android.support:palette-v7:23.4.0'
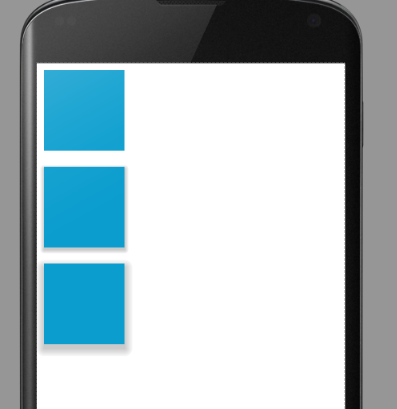
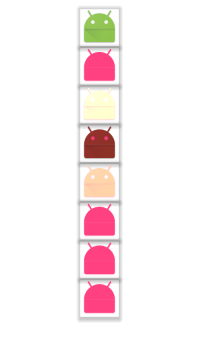
从示例代码中,我们可以看到:通过传递一个bitmap对象给Palette,并调用他的Palette.generate()静态方法或者在静态方法中添加异步接口的方法来创建一个Palette,接下来就可以使用Palette的getter方法来检索相应的色调,就是是昂面那6中色调;下面显示一段代码,将通过背景图片的柔和色调来改变ActionBar和状态来的色调,使之能够统一,然而并不是所有6种颜色方案都可用,每种颜色方案都返回为Palette.Swatch,如果图片示例包含的颜色不足以产生兼容的方案,则对应的颜色方案可能为null。为了展示这个功能,我们将创建一个图片图块的背景和标题将通过Palette主题话。效果如下:
是不是给人很不一样的感觉了,接下来就介绍代码,如下:
item_list.xml 如下:
<?xml version="1.0" encoding="utf-8"?>
<LinearLayout xmlns:android="http://schemas.android.com/apk/res/android"
    android:id="@+id/root"
    android:layout_width="match_parent"
    android:layout_height="match_parent"
    android:orientation="vertical"
    android:padding="16dp">

    <ImageView
        android:id="@+id/image"
        android:layout_width="match_parent"
        android:layout_height="110dp"
        android:scaleType="centerCrop" />

    <TextView
        android:id="@+id/text"
        android:layout_width="match_parent"
        android:layout_height="70dp"
        android:gravity="center"
        android:textAppearance="?android:textAppearanceLarge" />
</LinearLayout>
适配器中的调色板颜色
ColorfulAdapter.class
package com.world.hello.colorfullistactivity;

import android.content.Context;
import android.graphics.Bitmap;
import android.graphics.BitmapFactory;
import android.graphics.Color;
import android.os.AsyncTask;
import android.support.v7.graphics.Palette;
import android.util.SparseArray;
import android.view.LayoutInflater;
import android.view.View;
import android.view.ViewGroup;
import android.widget.ArrayAdapter;
import android.widget.ImageView;
import android.widget.TextView;

/**
 * Created by chengguo on 2016/6/12.
 */
public class ColorfulAdapter extends ArrayAdapter<String> {

    private static final int[] IMAGES = {
            R.drawable.bricks, R.drawable.flower,
            R.drawable.grass, R.drawable.stones,
            R.drawable.wood, R.drawable.dog
    };

    private static final String[] NAMES = {
            "Bricks", "Flower",
            "Grass", "Stones",
            "Wood", "Dog"
    };

    private SparseArray<Bitmap> mImages;
    private SparseArray<Palette.Swatch> mBackgroundClolors;

    public ColorfulAdapter(Context context) {
        super(context, R.layout.item_list, NAMES);
        mImages = new SparseArray<Bitmap>(IMAGES.length);
        mBackgroundClolors = new SparseArray<Palette.Swatch>(IMAGES.length);
    }

    @Override
    public View getView(int position, View convertView, ViewGroup parent) {
        if (convertView == null) {
            convertView = LayoutInflater.from(getContext()).inflate(R.layout.item_list, parent, false);
        }
        View root = convertView.findViewById(R.id.root);
        ImageView imageView = (ImageView) convertView.findViewById(R.id.image);
        TextView textView = (TextView) convertView.findViewById(R.id.text);

        int imageId = IMAGES[position];
        if (mImages.get(imageId) == null) {
            new ImageTask().execute(imageId);
            textView.setTextColor(Color.BLACK);
        } else {
            imageView.setImageBitmap(mImages.get(imageId));

            Palette.Swatch colors = mBackgroundClolors.get(imageId);
            if (colors != null) {
                root.setBackgroundColor(colors.getRgb());
                textView.setTextColor(colors.getTitleTextColor());
            }
        }
        textView.setText(NAMES[position]);
        return convertView;
    }

    private class ImageResult {
        public int imageId;
        public Bitmap image;
        public Palette.Swatch colors;

        public ImageResult(int imageId, Bitmap image, Palette.Swatch colors) {
            this.imageId = imageId;
            this.image = image;
            this.colors = colors;
        }
    }

    /**
     * 因为从磁盘加载图片和使用Palette分析这些图片的过程会花费一些时间,所以我们要在后台执行此工作,
     * 以免阻塞主线程太长时间,因此放在AsyncTask中执行
     */
    private class ImageTask extends AsyncTask<Integer, Void, ImageResult> {

        @Override
        protected ImageResult doInBackground(Integer... params) {

            int imageId = params[0];
            //确保图片缩率图不会太大
            BitmapFactory.Options options = new BitmapFactory.Options();
            options.inSampleSize = 4;
            Bitmap image = BitmapFactory.decodeResource(getContext().getResources(), imageId, options);
            Palette colors = Palette.generate(image);
            Palette.Swatch selected = colors.getVibrantSwatch();
            if (selected == null) {
                selected = colors.getMutedSwatch();
            }

            return new ImageResult(imageId, image, selected);
        }

        @Override
        protected void onPostExecute(ImageResult imageResult) {
            updateImageItem(imageResult);
            notifyDataSetChanged();
        }
    }

    /**
     * 更新一项的颜色
     *
     * @param imageResult
     */
    private void updateImageItem(ImageResult imageResult) {
        mImages.put(imageResult.imageId, imageResult.image);
        mBackgroundClolors.put(imageResult.imageId, imageResult.colors);
    }
}
activity.class
package com.world.hello.colorfullistactivity;

import android.os.Bundle;
import android.support.v7.app.AppCompatActivity;
import android.widget.GridView;

public class MainActivity extends AppCompatActivity {

    private GridView mGridView;

    @Override
    protected void onCreate(Bundle savedInstanceState) {
        super.onCreate(savedInstanceState);

        mGridView = new GridView(this);
        mGridView.setNumColumns(2);
        mGridView.setAdapter(new ColorfulAdapter(this));

        setContentView(mGridView);
    }
}
2、视图和阴影
在Material Design中很重要的风格就是拟物扁平化,使用阴影和光线,在配合完美的动画,展示出现实生活中的效果,看起来就感觉非常的美丽
以前的UI设计都只有X、Y轴这个两个方向,现在多出来一个垂直于手机屏幕的Z轴,那么设置Z轴的高度,然后配合光线,然后就在UI的下方看到阴影,这样就实现了拟物效果。
View的Z轴由两部分组成,elevation和translationZ,这两个属性都是5.0以后才引入的。elevation是静态的成员,translationZ可以在代码中使用来实现动画效果,他们的关系是:
Z = elevation + translationZ
elevation是在XML布局文件中使用,如果android版本小于5.0设置的elevation是不生效的,只有大于5.0的android系统设置elevation才行;下面是xm示例
<?xml version="1.0" encoding="utf-8"?>
<LinearLayout xmlns:android="http://schemas.android.com/apk/res/android"
    xmlns:tools="http://schemas.android.com/tools"
    android:layout_width="match_parent"
    android:layout_height="match_parent"
    android:orientation="vertical"
    tools:context="com.example.chengguo.paletteexample.MainActivity"
    android:background="@android:color/white">

    <TextView
        android:layout_width="100dp"
        android:layout_height="100dp"
        android:layout_margin="10dp"
        android:background="@android:color/holo_blue_dark" />

    <TextView
        android:layout_width="100dp"
        android:layout_height="100dp"
        android:elevation="10dp"
        android:layout_margin="10dp"
        android:background="@android:color/holo_blue_dark" />

    <TextView
        android:layout_width="100dp"
        android:layout_height="100dp"
        android:layout_margin="10dp"
        android:elevation="20dp"
        android:background="@android:color/holo_blue_dark" />

</LinearLayout>
效果图如下:
然而,在java代码中要使用setTranslationZ()来动态改变视图的高度
通常是使用属性动画来为视图高改变的时候增加一个动画效果,例如:
<strong>    if (flag){
            view.animate.translationZ(100);
            flag = false;
        }else {
            view.animate.translationZ(0);
            flag = true;
        }</strong>
3、着色和裁剪
在andorid5.0中还增加了两个非常实用的功能:Tinting(着色)和Clipping(裁剪)
3.1 使用Tinting非常简单,只需要在XML文件中使用tint和tintMode就行了,有几种配合效果,
t它的实质是通过修改图像的Alpha遮罩层来修改图像的颜色,从而达到重新着色的目的。对图像处理使用起来非常方便 如下:
<?xml version="1.0" encoding="utf-8"?>
<LinearLayout xmlns:android="http://schemas.android.com/apk/res/android"
    xmlns:tools="http://schemas.android.com/tools"
    android:layout_width="match_parent"
    android:layout_height="match_parent"
    android:background="@android:color/white"
    android:gravity="center|center_horizontal"
    android:orientation="vertical"
    tools:context="com.example.chengguo.paletteexample.MainActivity">

    <ImageView
        android:layout_width="wrap_content"
        android:layout_height="wrap_content"
        android:elevation="10dp"
        android:src="@mipmap/ic_launcher" />


    <ImageView
        android:layout_width="wrap_content"
        android:layout_height="wrap_content"
        android:elevation="10dp"
        android:src="@mipmap/ic_launcher"
        android:tint="@color/colorAccent" />


    <ImageView
        android:layout_width="wrap_content"
        android:layout_height="wrap_content"
        android:elevation="10dp"
        android:src="@mipmap/ic_launcher"
        android:tint="@color/colorAccent"
        android:tintMode="add" />


    <ImageView
        android:layout_width="wrap_content"
        android:layout_height="wrap_content"
        android:elevation="10dp"
        android:src="@mipmap/ic_launcher"
        android:tint="@color/colorAccent"
        android:tintMode="multiply" />


    <ImageView
        android:layout_width="wrap_content"
        android:layout_height="wrap_content"
        android:elevation="10dp"
        android:src="@mipmap/ic_launcher"
        android:tint="@color/colorAccent"
        android:tintMode="screen" />

    <ImageView
        android:layout_width="wrap_content"
        android:layout_height="wrap_content"
        android:elevation="10dp"
        android:src="@mipmap/ic_launcher"
        android:tint="@color/colorAccent"
        android:tintMode="src_atop" />

    <ImageView
        android:layout_width="wrap_content"
        android:layout_height="wrap_content"
        android:elevation="10dp"
        android:src="@mipmap/ic_launcher"
        android:tint="@color/colorAccent"
        android:tintMode="src_in" />

    <ImageView
        android:layout_width="wrap_content"
        android:layout_height="wrap_content"
        android:elevation="10dp"
        android:src="@mipmap/ic_launcher"
        android:tint="@color/colorAccent"
        android:tintMode="src_over" />
</LinearLayout>
3.2 Clipping裁剪,它可以改变一个视图的外观,首先,要使用ViewOutlineProvider来修改outline,然后再通过setOutlineProvider将outline作用给视图;下面使用IamgeView通过Clipping裁剪成圆角正方形和一个圆形;示例如下:
<?xml version="1.0" encoding="utf-8"?>
<LinearLayout xmlns:android="http://schemas.android.com/apk/res/android"
    xmlns:tools="http://schemas.android.com/tools"
    android:layout_width="match_parent"
    android:layout_height="match_parent"
    android:background="@android:color/white"
    android:gravity="center|center_horizontal"
    android:orientation="vertical"
    tools:context="com.example.chengguo.paletteexample.MainActivity">

    <ImageView
        android:id="@+id/image_rect"
        android:layout_width="100dp"
        android:layout_height="100dp"
        android:elevation="2dp" />

    <ImageView
        android:id="@+id/image_circle"
        android:layout_width="100dp"
        android:layout_height="100dp"
        android:layout_marginTop="20dp"
        android:elevation="2dp" />
</LinearLayout>
package com.example.chengguo.paletteexample;

import android.graphics.Outline;
import android.os.Bundle;
import android.support.v7.app.AppCompatActivity;
import android.view.View;
import android.view.ViewOutlineProvider;
import android.widget.ImageView;

public class MainActivity extends AppCompatActivity {

    private ImageView mRectView;
    private ImageView mCircleView;

    @Override
    protected void onCreate(Bundle savedInstanceState) {
        super.onCreate(savedInstanceState);
        setContentView(R.layout.activity_main);

        mRectView = (ImageView) findViewById(R.id.image_rect);
        mCircleView = (ImageView) findViewById(R.id.image_circle);
        //获取outline
        ViewOutlineProvider outLine1 = new ViewOutlineProvider() {
            @Override
            public void getOutline(View view, Outline outline) {
                //修改outline为特定形状
                outline.setRoundRect(0,0,view.getWidth(),view.getHeight(),10);
            }
        };

        //获取outline
        ViewOutlineProvider outline2 = new ViewOutlineProvider() {
            @Override
            public void getOutline(View view, Outline outline) {
                outline.setOval(0,0,view.getWidth(),view.getHeight());
            }
        };
        //重新为两个imageView设置外形
        mRectView.setOutlineProvider(outLine1);
        mCircleView.setOutlineProvider(outline2);
    }
}


 1969
1969

 被折叠的 条评论
为什么被折叠?
被折叠的 条评论
为什么被折叠?
 到【灌水乐园】发言


