


生产环境得k8s负载
HA FT 高可用,容错
k8s主要有以下得组件
1. replicationController
最初得定义pod replication能力,定义一个replicas值,不停得校准,后续已经逐步淘汰。
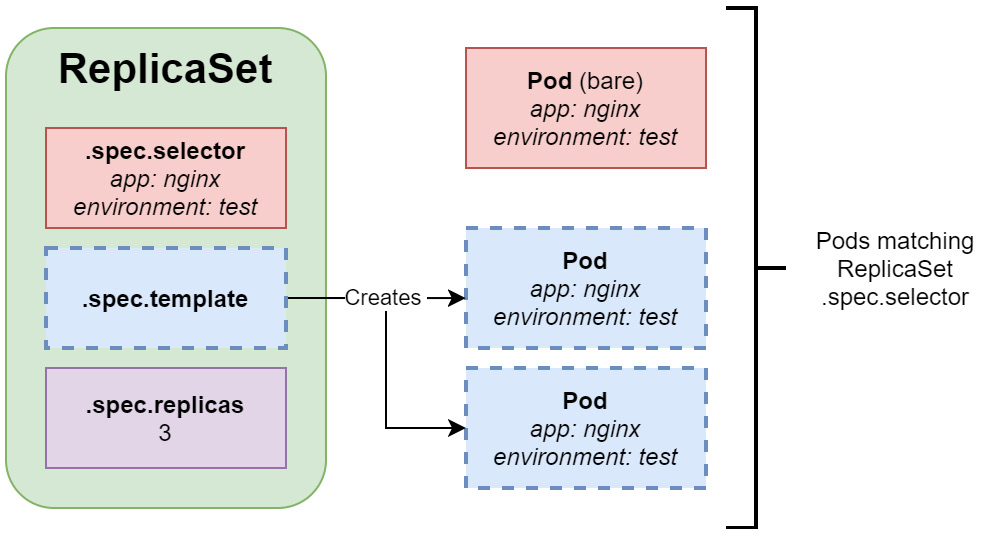
2. replicaSet
1得继任者,支持基于set 得selectors 即选择器
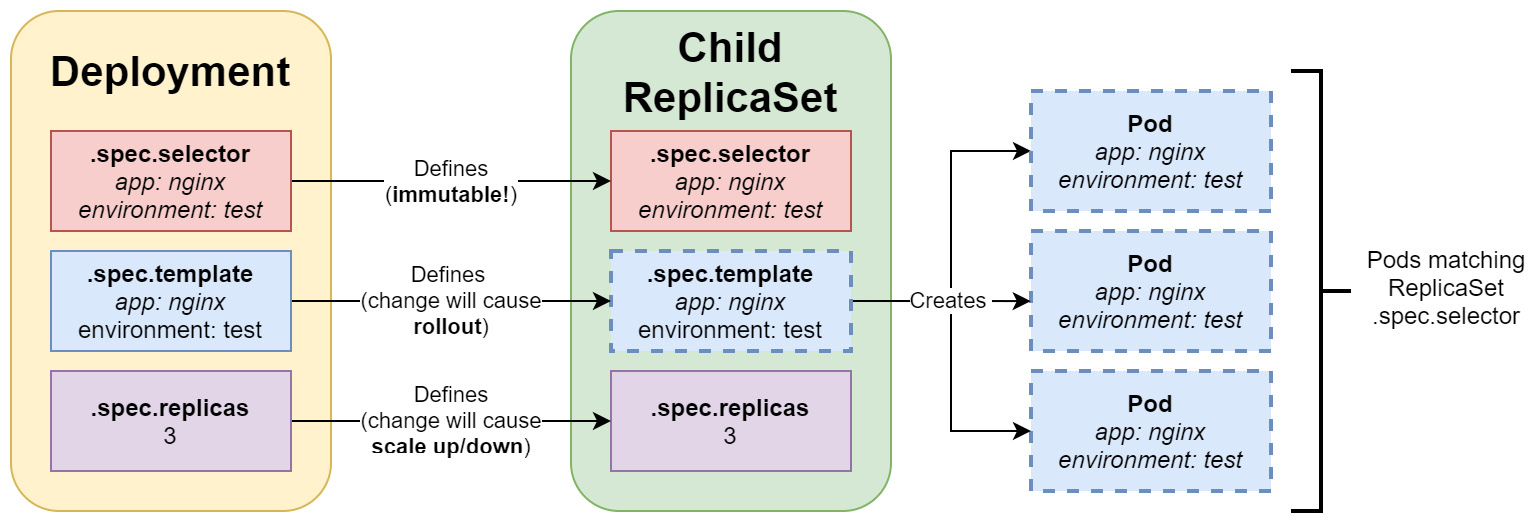
3. deployment
更高层级得replicaSet抽象。声明式得pod。用于管理无状态服务和负载
4. statefulSet
statefulSet 有状态服务。难以设计
5. daemonSet
每个nod上有一个daemonset
apiVersion: v1
kind: ReplicationController
metadata:
  name: nginx-replicationcontroller-example
spec:
  replicas: 3
  selector:
    app: nginx
    environment: test
  template:
    metadata:
      labels:
        app: nginx
        environment: test
    spec:
      containers:
        - name: nginx
          image: nginx:1.17
          ports:
            - containerPort: 80
replicaSet
#先用这个bare
vim nginx-bare.yaml

apiVersion: v1
kind: Pod
metadata:
  name: nginx-pod-bare-example
  labels:
    app: nginx
    environment: test
spec:
  containers:
    - name: nginx
      image: nginx:1.17
      ports:
        - containerPort: 80

kubectl apply -f nginx-bare.yaml

#再用这个replicasSet
vim nginx-replicaset.yaml
apiVersion: apps/v1
kind: ReplicaSet
metadata:
  name: nginx-replicaset-example
spec:
  replicas: 3
# replicasController管理得pod得特征
  selector:
    matchLabels:
      app: nginx
      environment: test
# 创建得pod得模板
  template:
    metadata:
#创建得pod得labels
      labels:
        app: nginx
        environment: test
    spec:
      containers:
        - name: nginx
          image: nginx:1.17
          ports:
            - containerPort: 80

kubectl apply-f nginx-replicaset.yaml

#match 可以用operator
spec:
  replicas: 3
  selector:
    matchLabels:
      app: nginx
    matchExpressions:
      - key: environment
        operator: In
        values:
          - test
          - dev
replicas与livenessprobe结合
#带探针检测得
vim replicaset-livenessprobe.yaml

apiVersion: apps/v1
kind: ReplicaSet
metadata:
  name: nginx-replicaset-livenessprobe-example
spec:
  replicas: 3
  selector:
    matchLabels:
      app: nginx
      environment: test
  template:
    metadata:
      labels:
        app: nginx
        environment: test
    spec:
      containers:
        - name: nginx
          image: nginx:1.17
          ports:
            - containerPort: 80
          livenessProbe:
            httpGet:
              path: /
              port: 80
            initialDelaySeconds: 2
            periodSeconds: 2


kubectl apply -f replicaset-livenessprobe.yaml

#获取pod删除index.html
kubectl get pods

kubectl exec -it nginx-replicaset-livenessprobe-example-2qbhk -- rm /usr/share/nginx/html/index.html

#查看实际得历史
kubectl describe pod/nginx-replicaset-livenessprobe-example-2qbhk
deployment
四类资源
- stateless 不包括任何来自客户端得可变更得值
- stateful 如mysql mongodb
- batch 批处理得pod
- node-local 如daemonset 每个node节点上有一个
vim deployment-nginx.yaml

apiVersion: apps/v1
kind: Deployment
metadata:
  name: nginx-deployment-example
spec:
  replicas: 3
  selector:
    matchLabels:
      app: nginx
      environment: test
  minReadySeconds: 10
  strategy:
    type: RollingUpdate
    rollingUpdate:
      maxUnavailable: 1
      maxSurge: 1
  template:
    metadata:
      labels:
        app: nginx
        environment: test
    spec:
      containers:
        - name: nginx
          image: nginx:1.17
          ports:
            - containerPort: 80

kubectl apply -f deployment-nginx.yaml

kubectl delete deploy nginx-deployment-example --cascade=orphan
selector pod-template-hash标签防止不同得replicaSet当滚动升级得时候
strategy 意味着怎么取更新 maxUnavailable 最大不可用 maxSurge 最多增长
service
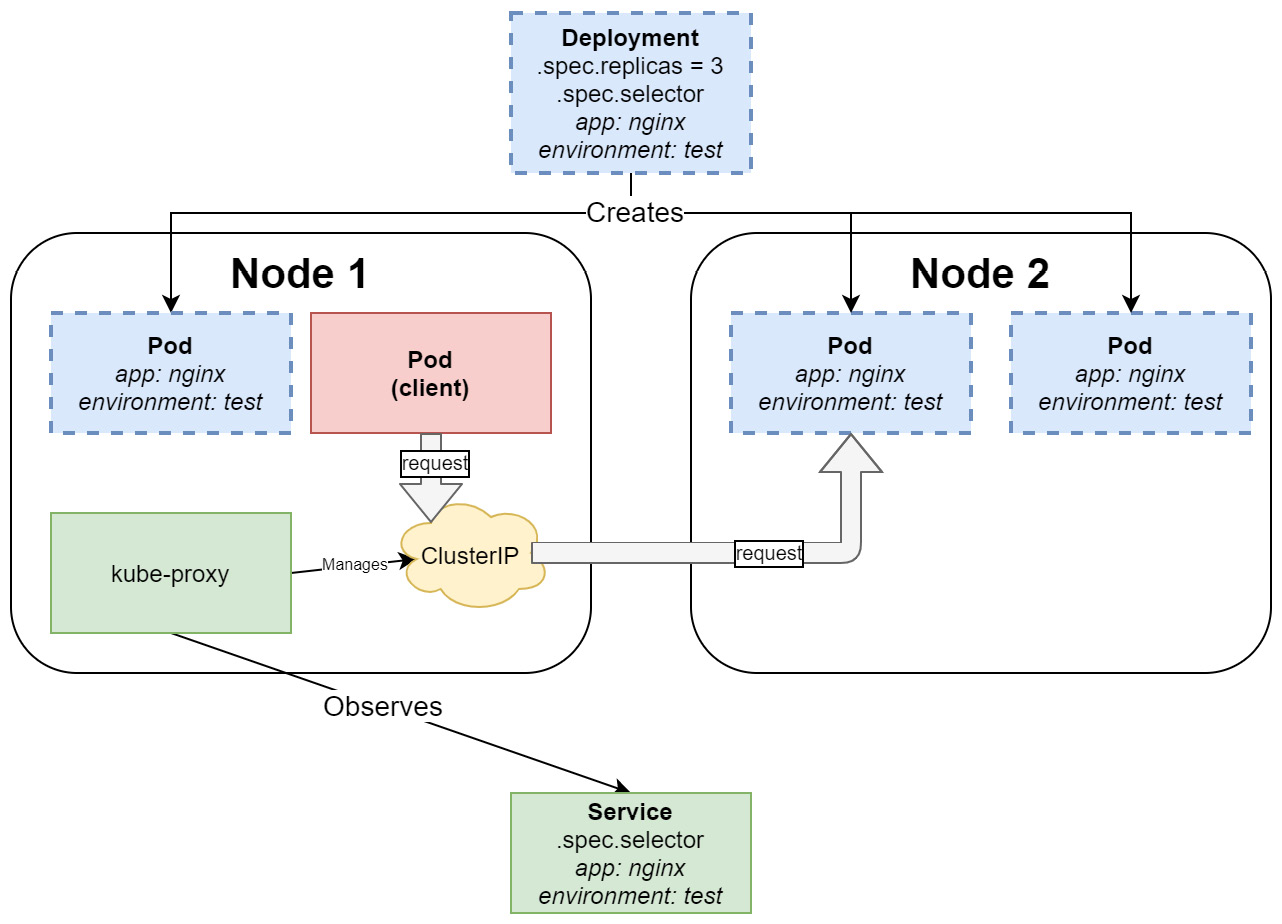
service由kube-proxy监听,service属于deployment、
vim nginx-service.yaml

apiVersion: v1
kind: Service
metadata:
  name: nginx-service-example
spec:
  selector:
    app: nginx
    environment: test
  type: LoadBalancer
  ports:
    - port: 80
      protocol: TCP
      targetPort: 80

kubectl apply -f nginx-service.yaml
readiness liveness startup probe
是否准备好了
是否还活着,防止比如死锁之类的。
开启得probe,必须startup之后,才能走另外两个
vim nginx-deployment-liveliness-readiness.yaml


apiVersion: apps/v1
kind: ReplicaSet
metadata:
  name: nginx-replicaset-livenessprobe-example
spec:
  replicas: 3
  selector:
    matchLabels:
      app: nginx
      environment: test
#更新策略
  strategy:
    type: RollingUpdate
    rollingUpdate:
      maxUnavailable: 1
      maxSurge: 1
  template:
    metadata:
      labels:
        app: nginx
        environment: test
    spec:
      containers:
        - name: nginx
          image: nginx:1.17
          ports:
            - containerPort: 80
          command:
            - /bin/sh
# -c 是/bin/bash得参数, touch创建一个ready文件 echo 准备好了,替换原本得文件
            - -c
            - |
              touch /usr/share/nginx/html/ready
              echo "You have been served by Pod with IP address: $(hostname -i)" > /usr/share/nginx/html/index.html
              nginx -g "daemon off;"
          readinessProbe:
            httpGet:
              path: /ready
              port: 80
            initialDelaySeconds: 5
            periodSeconds: 2
            timeoutSeconds: 10
            successThreshold: 1
#失败得阈值
            failureThreshold: 2
          livenessProbe:
            httpGet:
              path: /
              port: 80
            initialDelaySeconds: 2
            periodSeconds: 2

kubectl create -f nginx-deployment-liveliness-readiness.yaml

#删除
kubectl exec -it nginx-replicaset-livenessprobe-example-7bblt -- rm /usr/share/nginx/html/ready
#查看
kubectl describe svc nginx-service-example
扩缩容
kubectl scale deploy nginx-deployment-example --replicas=2
滚动升级
RollingUpdate
内部又两个replicaSet,老得先scale down 然后new将呗scaled up。 又两个参数 .spec.strategy.rollilngUpdate.maxUnavailable 最多有几个不可用,以及.spec.strategy.rollilngUpdate.maxSurge最多多出来几个pods
Recreate
非滚动升级,直接替换
回滚
kubectl rollout history deploy nginx-replicaset-livenessprobe-example

#查看
kubectl rollout history deploy  nginx-replicaset-livenessprobe-example --revision=1
#回滚到上一次
kubectl rollout undo deploy  nginx-replicaset-livenessprobe-example
#回滚到指定revision
kubectl rollout undo deploy  nginx-replicaset-livenessprobe-example --to-revision=2

kubectl rollout status deploy  nginx-replicaset-livenessprobe-example


kubectl rollout pause deployment nginx-replicaset-livenessprobe-example
kubectl rollout resume deployment nginx-replicaset-livenessprobe-example
最佳实践
用声明式得东西去做
不要用recreate strategy
因为存在一个问题就是不可用问题,用RollingUpdate
不要创建一些命中现有label selector得pod
探针得正确使用
readiness
- 如果可能需要额外准备,就需要使用
- cache预热 包括数据库迁移 ,但注意不要用耗时过久得东西放在这里面
- 微服务来说,如果是http得终端,可以考虑用http得方式做探针
- 可以用一个专门得入口,如/health
- 如果依赖去检测一些诸如外部得database等服务,就需要小心。小心超时
liveness
- 如果非必须,不要用 deadlock这种可以用
- 应该支取检查他自己得状态,快速得检查,而不要检查依赖。
- 如果说你得容器自己崩溃了,那就完全不需要liveliness探针
- initialDelaySeconds设置保守点来避免一直重新启动。
image tags最好使用具备语义得
从老k8s中迁移。
statefulSet
state是说可以改变的状态。
一般来说,用statefulset一般必须满足如下的请求:
- 被k8s的集群管理的 持久化存储
- 对于单一的pod副本稳定的以及唯一的网络标识符(dnsName)
- 管理的deployment以及scaling
- 管理的滚动升级。
与deployments相比,可以看做一个更具备预测能力的object
- statefulset 一般就是statefulsetName-ordinal ,deployments 复杂一些更随机一些 比如 deploymentName-podTemplateHash-randomHash
- 对于有状态的对象,pod以一个特定的、可预测的 顺序启动
- 依据存储,k8s 依据volumeClaimTemplates 创建pvc(再stateSet中)并且经常附到同样的pod名字中。
- 你需要创建一个headless服务来负责管理这些 确定性的网络标识符,headless service,他允许我们依据这个获取所有的podIp 指定stateful的方式为增加 spec.serviceName
管理有状态服务
pv 挂载在 minikube下的 /tmp/hostpath-provisioner/default/my-hostpath-pvc 可以用minikube ssh进去

vim nginx-statefulset.yaml

apiVersion: apps/v1
kind: StatefulSet
metadata:
  name: nginx-statefulset-example
spec:
  replicas: 3
  serviceName: nginx-headless
  selector:
    matchLabels:
      app: nginx-stateful
      environment: test
  template:
    metadata:
      labels:
        app: nginx-stateful
        environment: test
    spec:
      containers:
        - name: nginx
          image: nginx:1.17
          ports:
            - containerPort: 80
          volumeMounts:
            - name: nginx-data
              mountPath: /usr/share/nginx/html
          command:
            - /bin/sh
            - -c
            - |
              echo "You have been served by Pod with IP address: $(hostname -i)" > /usr/share/nginx/html/index.html
              nginx -g "daemon off;"
  volumeClaimTemplates:
    - metadata:
        name: nginx-data
      spec:
        accessModes: [ "ReadWriteOnce" ]
        resources:
          requests:
            storage: 1Gi

kubectl apply -f nginx-statefulset.yaml


vim nginx-headless-service.yaml

apiVersion: v1
kind: Service
metadata:
  name: nginx-headless
spec:
  selector:
    app: nginx-stateful
    environment: test
  clusterIP: None
  ports:
    - port: 80
      protocol: TCP
      targetPort: 80

kubectl apply -f nginx-headless-service.yaml


vim nginx-client-service.yaml
apiVersion: v1
kind: Service
metadata:
  name: nginx-client
spec:
  selector:
    app: nginx-stateful
    environment: test
  type: LoadBalancer
  ports:
    - port: 80
      protocol: TCP
      targetPort: 80
kubectl apply -f nginx-client-service.yaml

#get pvId
kubectl get pvc nginx-data-nginx-statefulset-example-1
#get pvId
kubectl describe pv pvid
#结果
Name:            pvc-fb07149d-48f4-44c4-ad67-4c5ea26961d2
Labels:          <none>
Annotations:     hostPathProvisionerIdentity: fe86868a-72c3-43e2-98fd-4f86b38b7bf9
                 pv.kubernetes.io/provisioned-by: k8s.io/minikube-hostpath
Finalizers:      [kubernetes.io/pv-protection]
StorageClass:    standard
Status:          Bound
Claim:           default/nginx-data-nginx-statefulset-example-1
Reclaim Policy:  Delete
Access Modes:    RWO
VolumeMode:      Filesystem
Capacity:        1Gi
Node Affinity:   <none>
Message:
Source:
    Type:          HostPath (bare host directory volume)
    Path:          /tmp/hostpath-provisioner/default/nginx-data-nginx-statefulset-example-1
    HostPathType:
Events:            <none>
chens@chens-01:~$
已经创建了statefulSet,现在来验证是否按照预期
kubectl describe svc nginx-client
kubectl run -i --tty busybox --image=busybox:1.28 --rm --restart=Never -- sh
#查询
nslookup nginx-client

#结果
Server:    10.96.0.10
Address 1: 10.96.0.10 kube-dns.kube-system.svc.cluster.local
Name:      nginx-client
Address 1: 10.111.188.122 nginx-client.default.svc.cluster.local

#查询nginx-headless 就能得到一个结果
nslookup nginx-headless

#结果
Server:    10.96.0.10
Address 1: 10.96.0.10 kube-dns.kube-system.svc.cluster.local

Name:      nginx-headless
Address 1: 10.244.120.88 nginx-statefulset-example-2.nginx-headless.default.svc.cluster.local
Address 2: 10.244.120.86 nginx-statefulset-example-0.nginx-headless.default.svc.cluster.local
Address 3: 10.244.120.87 nginx-statefulset-example-1.nginx-headless.default.svc.cluster.local


wget http://nginx-statefulset-example-0.nginx-headless && cat index.html
#结果
Connecting to nginx-statefulset-example-0.nginx-headless (10.244.120.86:80)
index.html           100% |************************************************************************************************************************************|    59   0:00:00 ETA
You have been served by Pod with IP address: 10.244.120.86


#如果删除后,还会再起来同样的dnsname
kubectl delete pod nginx-statefulset-example-0
#再执行一遍
nslookup nginx-headless
Server:    10.96.0.10
Address 1: 10.96.0.10 kube-dns.kube-system.svc.cluster.local
Name:      nginx-headless
Address 1: 10.244.120.87 nginx-statefulset-example-1.nginx-headless.default.svc.cluster.local
Address 2: 10.244.120.69 nginx-statefulset-example-0.nginx-headless.default.svc.cluster.local
Address 3: 10.244.120.88 nginx-statefulset-example-2.nginx-headless.default.svc.cluster.local
pv得持久化演示
kubectl exec -it nginx-statefulset-example-0 -- /bin/sh -c "echo State of Pod 0 > /usr/share/nginx/html/state.html"

kubectl exec -it nginx-statefulset-example-1 -- /bin/sh -c "echo State of Pod 1 > /usr/share/nginx/html/state.html"

kubectl exec -it nginx-statefulset-example-2 -- /bin/sh -c "echo State of Pod 2 > /usr/share/nginx/html/state.html"

# get list
minikube service list

#states
minikube ssh
wget ip:port/state.html
wget http://nginx-statefulset-example-0.nginx-headless/state.html && cat state.html


#查看ip
kubectl get pods -o wide

#删除
kubectl delete  pod nginx-statefulset-example-0 nginx-statefulset-example-1 nginx-statefulset-example-2

#wide
kubectl get pods -o wide -w
扩缩容
- 按照顺序 从0- n-1得依次序创建
- 缩容得时候反过来,从大到小。
- 后续创建必须等前置创建完成。
- 缩容时必须后续得terminated 和删除掉得。
- 如果后续失败了,再后续得就动不了了。
.spec.podManagementPolicy这个参数默认是OrderedReady,控制了扩缩容得行为。
删除
kubectl delete sts nginx-statefulset-example

kubectl delete sts nginx-statefulset-example --cascade=orphan

#删除后不会删除pvc,如果要删除,就需要
kubectl delete pvc nginx-data-nginx-statefulset-example-0 nginx-data-nginx-statefulset-example-1 nginx-data-nginx-statefulset-example-2
新版本释放。
.spec.updateStrategy.type
RollingUpdate:只不过相比来说按照次序创建得。
.spec.updateStrategy.rollingUpdate.partition 小于他不会升级得副本数。即便删除了,也用原来得版本。
OnDelete 1.7之前就有得。必须手动删除一个来替换。
最佳实践
- 使用声明式管理方式
- 不要使用时常为0得优雅停机。有状态服务需要优雅停机。
- 如果你后续还需要使用pvc,最好先缩容,再停机。
- 回滚得时候要注意相互兼容性。
- 不要创建与现有服务冲突得有状态服务得标签
daemonset
一个node一个做一些
- node监控
- logs 监控得聚合
- 管理集群得存储。尤其是对pv 和pvc管理
如果需要与外部交流
- 需要映射内部与外部得端口
- 推送data到另外一个service
- headless service来匹配daemonset pod标签选择器
- 普通得service匹配daemonset 标签选择器 不是很常见
创建和管理daemonset
vim nginx-daemon.yaml

apiVersion: apps/v1
kind: DaemonSet
metadata:
  name: nginx-daemonset-example
spec:
  selector:
    matchLabels:
      app: nginx-daemon
      environment: test
  template:
    metadata:
      labels:
        app: nginx-daemon
        environment: test
    spec:
      containers:
        - name: nginx
          image: nginx:1.17
          ports:
            - containerPort: 80
          env:
            - name: NODE_IP
              valueFrom:
                fieldRef:
                  fieldPath: status.hostIP
          command:
            - /bin/sh
            - -c
            - |
              echo "You have been served by Pod running on Node with IP address: $(NODE_IP)" > /usr/share/nginx/html/index.html
              nginx -g "daemon off;"

kubectl apply -f nginx-daemon.yaml


vim nginx-daemon-headless.yaml

apiVersion: v1
kind: Service
metadata:
  name: nginx-daemon-headless
spec:
  selector:
    app: nginx-daemon
    environment: test
  clusterIP: None
  ports:
    - port: 80
      protocol: TCP
      targetPort: 80

kubectl apply -f nginx-daemon-headless.yaml

kubectl get daemonset

kubectl desribe daemonset nginx-daemonset-example

#获取node
kubectl get node -o wide

#shell 去查看对应消息
kubectl run -i --tty busybox --image=busybox:1.28 --rm --restart=Never -- s
wget http://10-244-120-66.nginx-daemon-headless && cat index.html
.spec.template.spec.nodeSelector or .spec.template.spec.tolerations 控制哪些节点布置
.spec.updateStrategy, .spec.revisionHistoryLimit, and .spec.minReadySeconds 回滚升级信息
后续包括升级方式、删除等,与上面deployments类似
一些可替代得设计思路
- sidecar模式,虽然需要更多资源,但是更号
- 如果仅仅是想跑周期任务,就走k8s得cronJobs
- 有些系统共据能提供类似得功能,如ubuntu中得systemd,与k8s相比,又以来上得优势和劣势(不依赖k8s,有时候必须要k8s管理得时候没法处理)
- 静态容器 (Create static Pods | Kubernetes) kubelet会监听对应得静态文件,但不能用kubectl监控,但似乎一般用于cluster 启动函数。


 1299
1299


 被折叠的 条评论
为什么被折叠?
被折叠的 条评论
为什么被折叠?
 到【灌水乐园】发言


