


1 准备开发的电脑(略)
2 Download and install the SDK starter package
3 Install the ADT Plugin for Eclipse
4 Add Android platforms and other components to your SDK
android2.2支持的屏幕:
- QVGA (240x320, low density(120dpi), small screen)
- WQVGA (240x400, low density, normal screen)
- FWQVGA (240x432, low density, normal screen)
- HVGA (320x480, medium density(160dpi), normal screen)
- WVGA800 (480x800, high density(240dpi), normal screen)
- WVGA854 (480x854 high density, normal screen)
一、Android Debug Bridge (adb)
adb [-d | -e | -s <serialNumber>] <command>
命令:devices
用法 当adb devices (输出所有可用Emulator或devices)
有多个设备时,可以用 adb -s <serialNumber> 指明设备,例子如下:
$ adb devices
List of devices attached
emulator-5554 device
emulator-5556 device
emulator-5558 device
adb -s emulator-5556 install helloWorld.apk安装应用程序
adb install <path_to_apk> (要指定apk的文件路径)
pull和push命令
adb pull <remote> <local> (从emulator/device中提取数据到电脑中)
adb push <local> <remote> (把电脑中的数据放到emulator/device中)
在这里 remote 指 emulator/device, local指computer
下面是一个例子
adb push foo.txt /sdcard/foo.txt通过adb来调用/system/bin下的 shell程序
如何调用shell 命令有以下两种方式
adb [-d|-e|-s {<serialNumber>}] shell <shellCommand>
adb [-d|-e|-s {<serialNumber>}] shell
所有的shell命令都在 /system/bin 目录下,常用的有 sqlite3、logcat等
关于这些shell命令的具体用法,请查看相关文档,其中 sqlite3 官网上有相关命令的介绍, logcat在sdk adb工具的介绍中有描述,不过
如果在Eclispe下开发,logcat命令一般是不以命令行的方式使用的。
二、Android Vitual Devices(AVDs)
Each AVD is made up of:
- A hardware profile. You can set options to define the hardware features of the virtual device. For example, you can define whether the device has a camera, whether it uses a physical QWERTY keyboard or a dialing pad, how much memory it has, and so on.
- A mapping to a system image. You can define what version of the Android platform will run on the virtual device. You can choose a version of the standard Android platform or the system image packaged with an SDK add-on.
- Other options. You can specify the emulator skin you want to use with the AVD, which lets you control the screen dimensions, appearance, and so on. You can also specify the emulated SD card to use with the AVD.
- A dedicated storage area on your development machine, in which is stored the device's user data (installed applications, settings, and so on) and emulated SD card.
所有对AVD的定制命令都是通过 toos/android 命令来完成的。
android list targets (列出所有可用的系统平台) 在我的机子上列出的结果如下:
Available Android targets:
id: 1 or "android-2"
Name: Android 1.1
Type: Platform
API level: 2
Revision: 1
Skins: HVGA (default), HVGA-L, HVGA-P, QVGA-L, QVGA-P
id: 2 or "android-3"
Name: Android 1.5
Type: Platform
API level: 3
Revision: 4
Skins: HVGA (default), HVGA-L, HVGA-P, QVGA-L, QVGA-P
id: 3 or "android-4"
Name: Android 1.6
Type: Platform
API level: 4
Revision: 3
Skins: HVGA (default), QVGA, WVGA800, WVGA854
id: 4 or "android-5"
Name: Android 2.0
Type: Platform
API level: 5
Revision: 1
Skins: HVGA (default), QVGA, WQVGA400, WQVGA432, WVGA800, WVGA854
id: 5 or "android-6"
Name: Android 2.0.1
Type: Platform
API level: 6
Revision: 1
Skins: HVGA (default), QVGA, WQVGA400, WQVGA432, WVGA800, WVGA854
id: 6 or "android-7"
Name: Android 2.1-update1
Type: Platform
API level: 7
Revision: 2
Skins: HVGA (default), QVGA, WQVGA400, WQVGA432, WVGA800, WVGA854
id: 7 or "android-8"
Name: Android 2.2
Type: Platform
API level: 8
Revision: 2
Skins: HVGA (default), QVGA, WQVGA400, WQVGA432, WVGA800, WVGA854根据上面的列表,制造自己的AVD,命令如下:
android create avd -n <name> -t <targetID> [-<option> <value>] ...
其中 name 自己取, targetIID就是上面列的那些,id 是 6,7,8等
当执行此命令后,系统为提示让你设置 hardware profile.
其中一些选项如下:
Device ram size The amount of physical RAM on the device, in megabytes. Default value is "96". 这个RAM是用来干什么的呢? 运行程序用的,还是存储程序用的? 待研究
对于我的手机来说,Abstracted LCD density 是120哦,唉,手机屏幕有点差哦。
当AVD制作完成之后,它的位置在(WINXP)C:/Documents and Settings/<user>/.android/ 里,
截图如下:
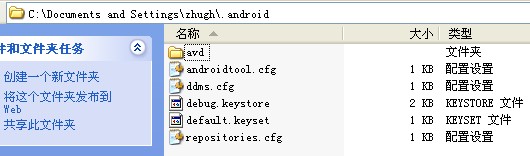
那么都包括些什么内容呢?
如下描述:
The directory contains the AVD configuration file, the user data image and SD card image (if available), and any other files associated with the device. Note that the directory does not contain a system image — instead, the AVD configuration file contains a mapping to the system image, which it loads when the AVD is launched.
下面,我们再往目录里走一下,看看有什么东西
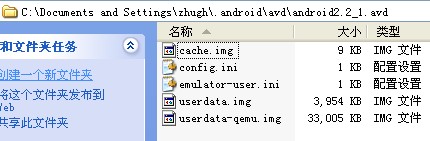
我们发现 userdata.img 当用户安装了自己的程序时,程序就被放在这个镜像里。然后系统镜像也就是system.img并不在这个里面,它是在
android2.2的系统平台里,config.ini 里有指向系统镜像的配置,看一下

可以看到 image.sysdir.1 = platforms/android-8/images/ 我们去这个目录看一下:
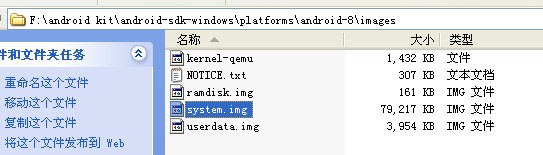
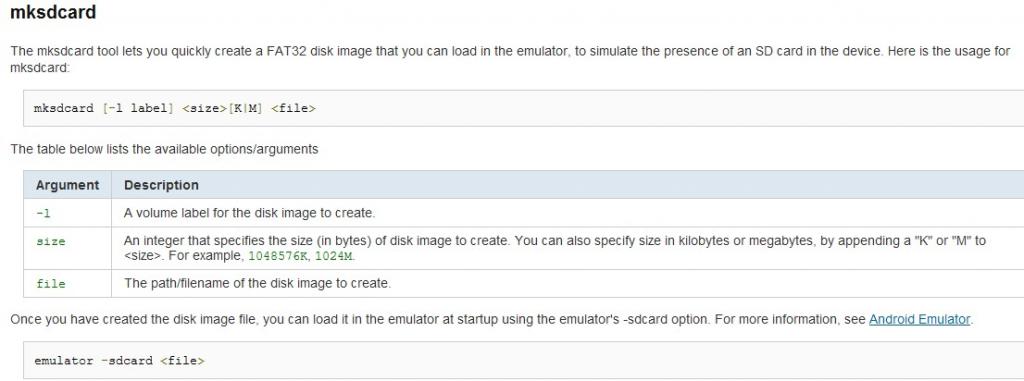
被选中的system.img就是系统镜像。在这里我的SDcard.img是我自己定义的位置,如何自己定义sdCard的位置,下面会提到。

三、Emulator工具
Android Development Tools (ADT)
SD Card support Whether the device supports insertion/removal of virtual SD Cards. Default value is "yes". hw.sdCard Cache partition support Whether we use a /cache partition on the device. Default value is "yes". disk.cachePartition Cache partition size Default value is "66MB". disk.cachePartition.size Abstracted LCD density Sets the generalized density characteristic used by the AVD's screen. Default value is "160".
hw.lcd.density


 1313
1313

 被折叠的 条评论
为什么被折叠?
被折叠的 条评论
为什么被折叠?
 到【灌水乐园】发言


