


参考:
1.Android:Tools命名空间原来是有大用处的
2.Android中tools属性的使用
3.工具属性参考文档
4. 命名空间介绍
5. 注解
6. lint
7. 资源压缩shrink-resources
目录
一、概述
Android Studio在tools命名空间中支持一些XML属性来开关设计功能和编译时行为。当构建应用时,构建工具会删除这些属性,从而不会影响APK的大小和运行行为。
二、引入tools命名空间
<LinearLayout xmlns:android="http://schemas.android.com/apk/res/android"
    xmlns:tools="http://schemas.android.com/tools" >
三、tools 命名空间的作用有哪些?
根据官方文档描述,根据其属性的功能类别,大致有三种主要功能:
- xml中的错误处理
- xml 预览
- 资源压缩
说的通俗一点就是:
- 减少或者避免黄线提示,让代码更清爽,让编译少报错
- 让预览界面更灵活,可以随心所欲的定制预览视图
- 压缩资源文件,降低APK体积。
四、tools 命名空间属性功能详解
(一)、xml 中的错误处理属性
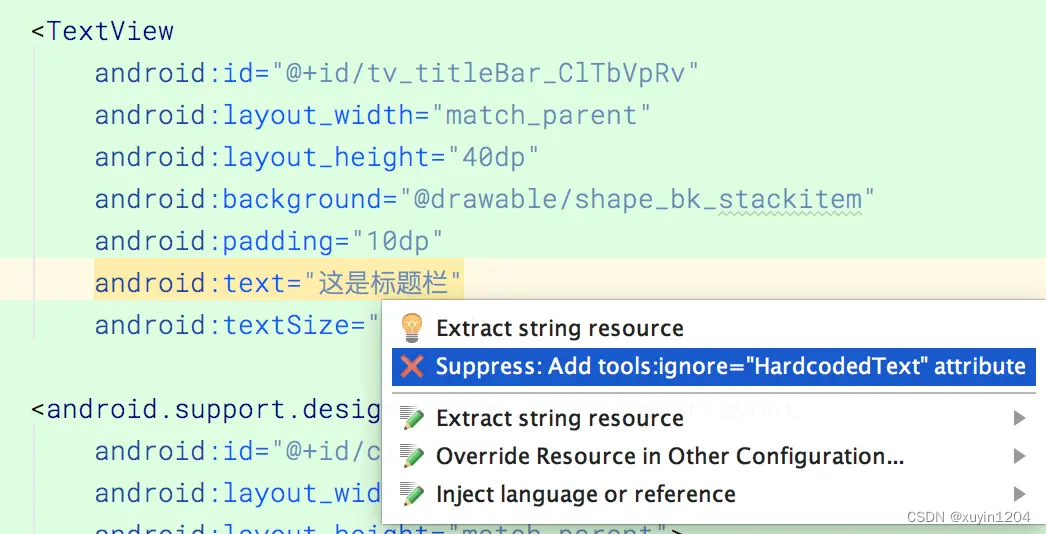
1、tools:ignore
| 说明 | |
|---|---|
| 应用范围 | xml中的任意元素 |
| 作用对象 | Lint (Lint 是AndroidStudio提供的代码扫描工具) |
| 具体作用 | 让Lint 工具在检查代码时忽略指定的错误。 |
| 取值说明 | 不同的错误对应不同的id,这些id 就是 ignore的取值。如:MissingTranslation。ignore后面可以同时跟多个id,多个id之间使用逗号分割 |
示例1:
Lint 检查时默认语言为 英文,如果在 xml 中有中文,就会报 MissingTranslation 错误,我们加上 tools:ignore 之后即可避免。
<string name="show_all_apps" tools:ignore="MissingTranslation">All</string>
示例2:
2、tools:targetApi
| 说明 | |
|---|---|
| 应用范围 | xml的任意元素 |
| 作用对象 | Lint |
| 具体作用 | 同 java 代码中的 @TargetApi 注解, 指明某个控件只在指定的API 及更高的版本中生效。这样,在使用 Lint 检测时就不会因 minSdkVersion 低于控件出现的版本而报错。 |
| 取值说明 | API 版本号对应的 int值 |
示例:
<GridLayout xmlns:android="http://schemas.android.com/apk/res/android"
    xmlns:tools="http://schemas.android.com/tools"
    tools:targetApi="14" >
3、 tools:locale
| 说明 | |
|---|---|
| 应用范围 | <resources> |
| 作用对象 | Lint, Android Studio editor |
| 具体作用 | 指明 resources 中元素的语言类型,避免拼写检查或者Lint 检查时报错。这两者中默认的语言类型时英文 es |
| 取值说明 |
示例:
我们在 values/strings.xml中指明元素的语言版本。
<resources xmlns:tools="http://schemas.android.com/tools" tools:locale="es">
(二)、xml视图预览相关属性
以下属性在xml中定义之后,只在预览时会展示,正式部署之后并不会展示。类似于 DataBindg 中引用字符串资源时的 default 属性。
1、用 tools:xxxx 替代 android:xxxx
| 说明 | |
|---|---|
| 应用范围 | view |
| 作用对象 | Android Studio布局编辑器 |
| 具体作用 | 将view的任意属性值的 android 前缀替换为 tools 之后,就可以实现预览效果。以tools 为命名空间的属性值只在预览时有效。 另外,在预览时,如果同时有 tools:xxx 和 android:xxx ,则优先展示 tools:xxx 的预览效果, 可参考示例代码2 |
| 取值说明 | 具体取值以view的属性取值为准 |
示例代码1:
预览时展示指定文本
<TextView
        android:layout_width="wrap_content"
        android:layout_height="wrap_content"
        tools:text="欢迎关注 CnPeng 公众号"
       />
示例代码2:
tools:text 和 android:text 同时存在,在预览时会优先展示 tools:text
<TextView
        android:layout_width="wrap_content"
        android:layout_height="wrap_content"
        tools:text="这些在预览时展示,并会在预览时优先于 android:text 展示"
        android:text="这些在部署之后会展示"
       />
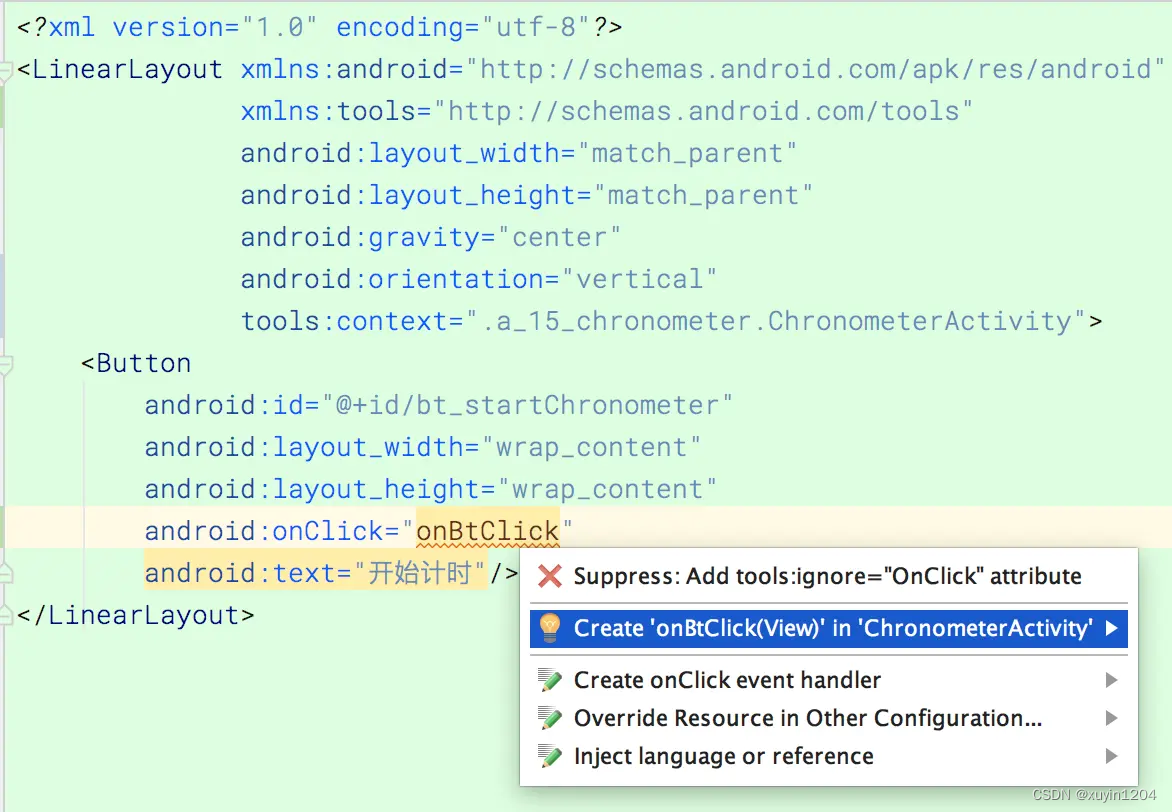
2、tools:context
| 说明 | |
|---|---|
| 应用范围 | xml 中的根布局 |
| 作用对象 | Lint, Android Studio布局编辑器 |
| 具体作用 | **声明该布局文件默认关联的 activity。**声明之后会在布局编辑器或者预览界面中开启一些与该activity相关的特性,比如,在写 onClick时,直接输入方法名,然后点击自动完成代码的快捷键就会提示你在对应activity中创建该方法。This enables features in the editor or layout preview that require knowledge of the activity, such as what the layout theme should be in the preview and where to insertonClickhandlers when you make those from a quickfix . |
| 取值说明 | 关联的activity。需要带路径,建议与清单文件中注册 activity时的路径保持一致。 |
示例代码:
先声明关联的activity,然后直接写 onclick 方法名,然后按下自动完成代码的快捷键,就会提示在对应的activity中创建该方法。
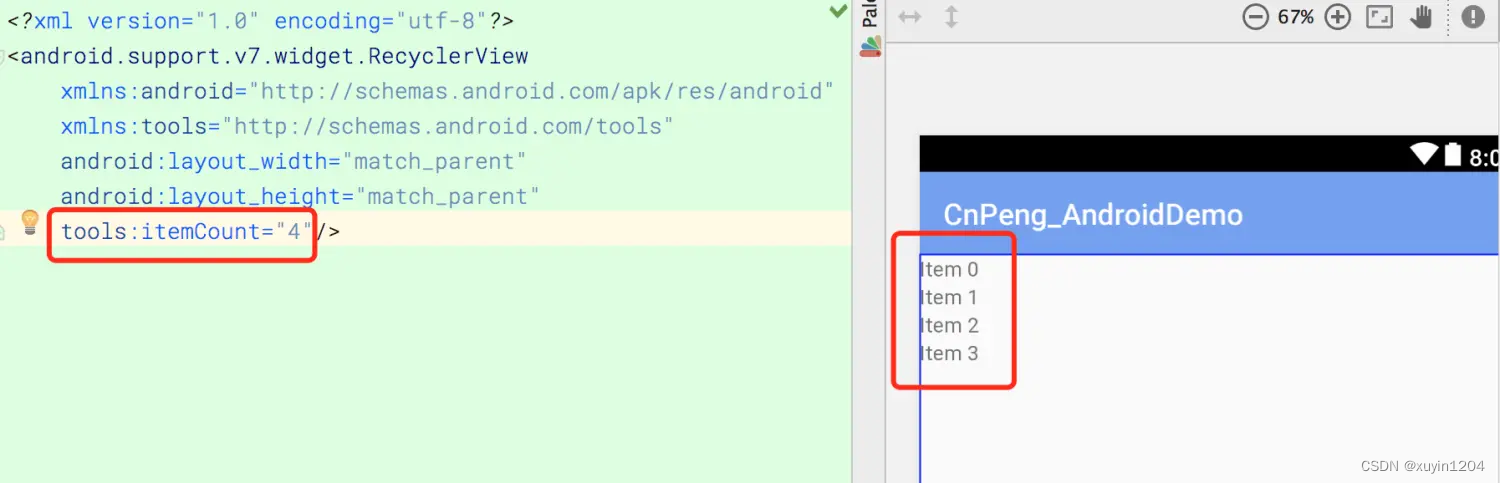
3、tools:itemCount
| 说明 | |
|---|---|
| 应用范围 | <RecyclerView> |
| 作用对象 | Android Studio 布局编辑器 |
| 具体作用 | 在 <RecyclerView> 节点中设置该属性之后,会指定在预览界面中绘制/展示几个条目 |
| 取值说明 | int 类型数值 |
示例代码:
预览界面展示 4个 条目
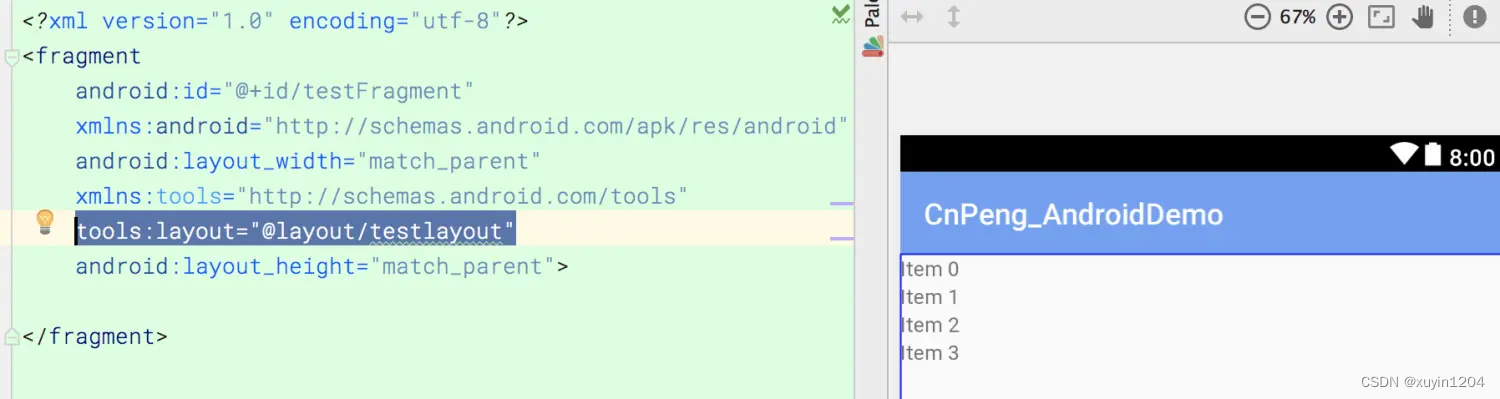
4、tools:layout
| 说明 | |
|---|---|
| 应用范围 | < fragment> |
| 作用对象 | Android Studio 布局编辑器 |
| 具体作用 | 声明在预览时将哪个布局文件填充到该Fragment |
| 取值说明 | 布局id 的引用值 |
示例代码:
在预览时将 testlayout 这个布局文件填充到fragment。testlayout的布局中包含一个 RecyclerView,并通过 itemCount 设置的预览时展示的条数为4(参考 tools:itemCount)
5、tools:listitem 、 tools:listheader 、 tools:listfooter
| 说明 | |
|---|---|
| 应用范围 | <AdapterView>及其子类,如<ListView> |
| 作用对象 | Android Studio 布局编辑器 |
| 具体作用 | 指明 AdapterView在预览界面中所展示的 条目、头布局、脚步局 |
| 取值说明 | 布局文件的引用 |
示例代码:
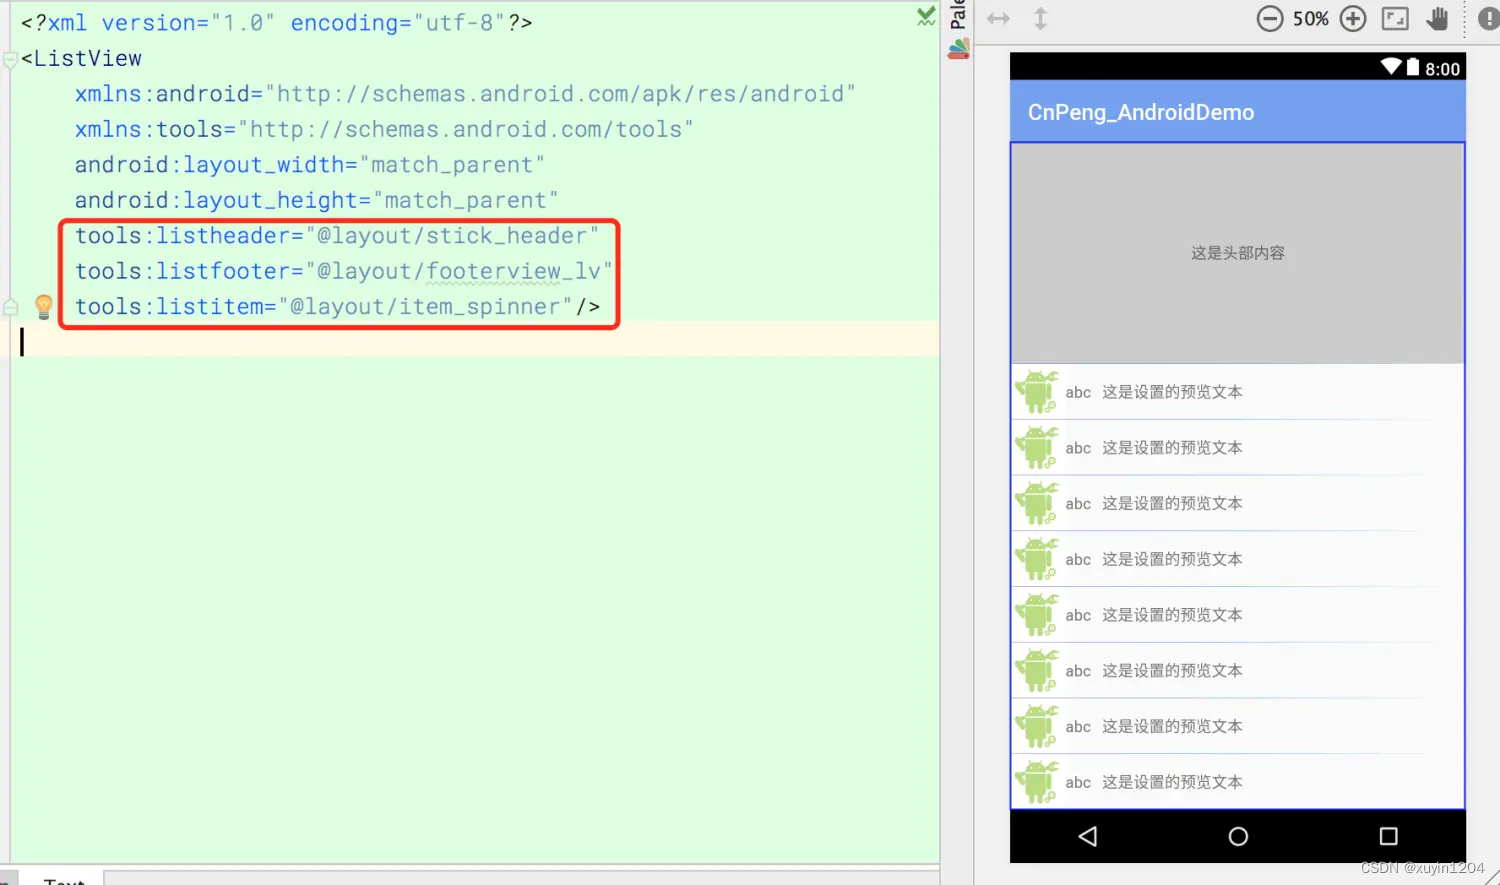
item_spinner.xml
<?xml version="1.0" encoding="utf-8"?>
<LinearLayout
    xmlns:android="http://schemas.android.com/apk/res/android"
    xmlns:tools="http://schemas.android.com/tools"
    android:layout_width="match_parent"
    android:layout_height="match_parent"
    android:gravity="center_vertical"
    android:orientation="horizontal">

    <ImageView
        android:layout_width="@dimen/dp50"
        android:layout_height="@dimen/dp50"
        android:src="@drawable/logo"
        tools:ignore="ContentDescription"/>

    <!--ignore 后面根由多个错误id时,用逗号分隔 ; -->
    <TextView
        android:id="@+id/tv_item_suspendRv"
        android:layout_width="wrap_content"
        android:layout_height="wrap_content"
        android:layout_marginRight="@dimen/dp10"
        android:gravity="center_vertical"
        android:text="abc"
        tools:ignore="HardcodedText,RtlHardcoded"/>

    <!--使用 tools:text 设置预览文本-->
    <TextView
        android:layout_width="wrap_content"
        android:layout_height="wrap_content"
        tools:text="这是设置的预览文本"/>
</LinearLayout>
注意
如果 条目布局中有 TextView及其子类控件
(1) 如果设置了 tools:text , 在预览时会优先展示该值;
(2) 如果没有设置 tools:text ,但设置了 android:text , 在预览时就会展示android:text 的属性值;
(3) 如果都没有设置,则会默认使用 item1、item2 填充到 TextView中作为预览文本
6、 tools:showIn
| 说明 | |
|---|---|
| 应用范围 | 所有 <view> 的根节点(即 布局文件的根节点) |
| 作用对象 | Android Studio 布局编辑器 |
| 具体作用 | 声明该布局文件将会被哪个布局通过 <include>引用。声明之后,在对应的文件中不要忘了用 <include>引用 |
| 取值说明 | 布局文件的引用 |
示例代码:
testlayout2.xml 将会被 testlayout 引用。
testlayout2.xml
<?xml version="1.0" encoding="utf-8"?>
<TextView
    android:id="@+id/testFragment"
    xmlns:android="http://schemas.android.com/apk/res/android"
    xmlns:tools="http://schemas.android.com/tools"
    android:layout_width="match_parent"
    android:layout_height="wrap_content"
    tools:showIn="@layout/testlayout"
    tools:text="预览文本">

</TextView>
testlayout.xml
<?xml version="1.0" encoding="utf-8"?>
<LinearLayout
    xmlns:android="http://schemas.android.com/apk/res/android"
    android:layout_width="match_parent"
    android:layout_height="match_parent">
    <include layout="@layout/testlayout2"/>

</LinearLayout>
通过这种方式我们在确认该布局文件在哪里使用了的时候就比较方便了。
7、 tools:menu
| 说明 | |
|---|---|
| 应用范围 | 布局文件的根节点(Any root <View>) |
| 作用对象 | Android Studio 布局编辑器 |
| 具体作用 | 声明在预览界面中 AppBar 将展示哪些菜单 |
| 取值说明 | menu文件的id,多个id 之间用逗号间隔。不需要任何前缀和后缀。The value can be one or more menu IDs, separated by commas (without @menu/ or any such ID prefix and without the .xml extension) |
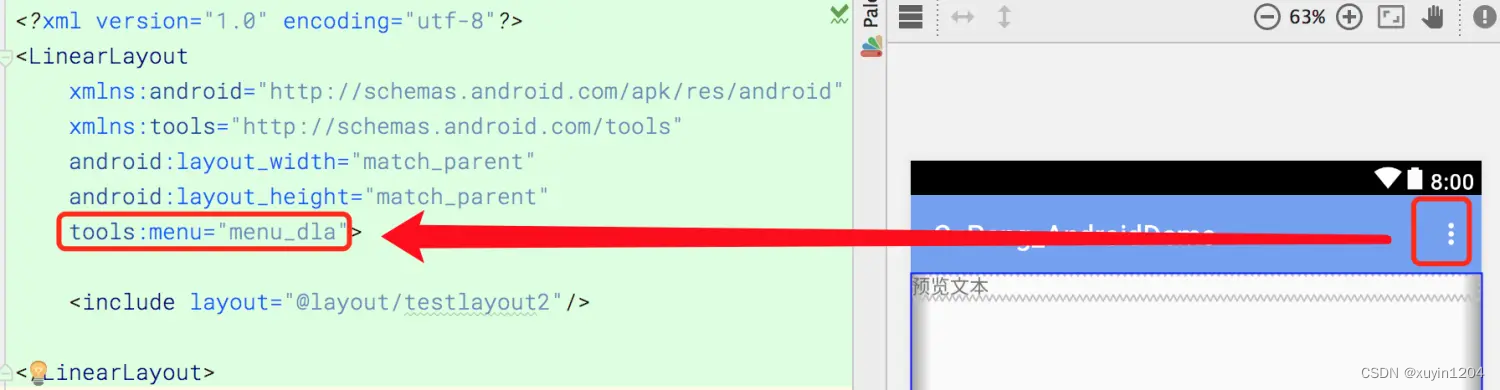
注意:按照官方文档的说明,可以传入多个 menu id 。但是实际测试时发现,传入多个时右上角并没有什么不同的显示。
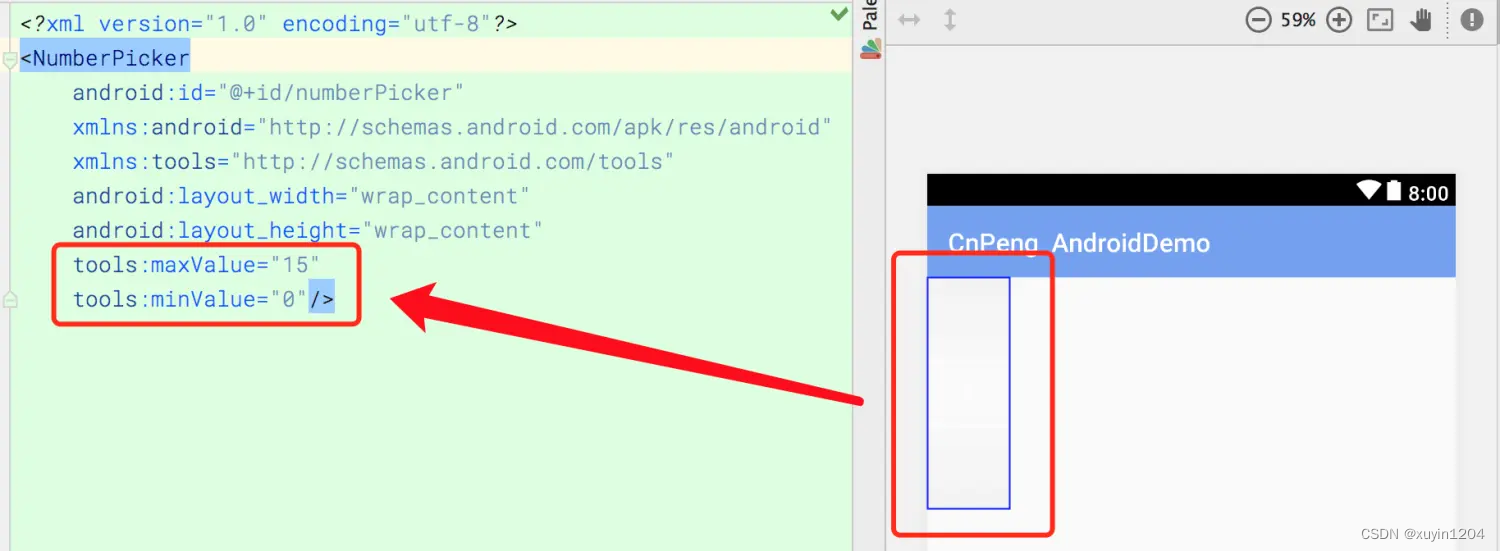
8、 tools:minValue / tools:maxValue
| 说明 | |
|---|---|
| 应用范围 | <NumberPicker> |
| 作用对象 | Android Studio 布局编辑器 |
| 具体作用 | 为 NumberPicker 设置预览时的最小值和最大值 |
| 取值说明 | int 型数值 |
示例说明:
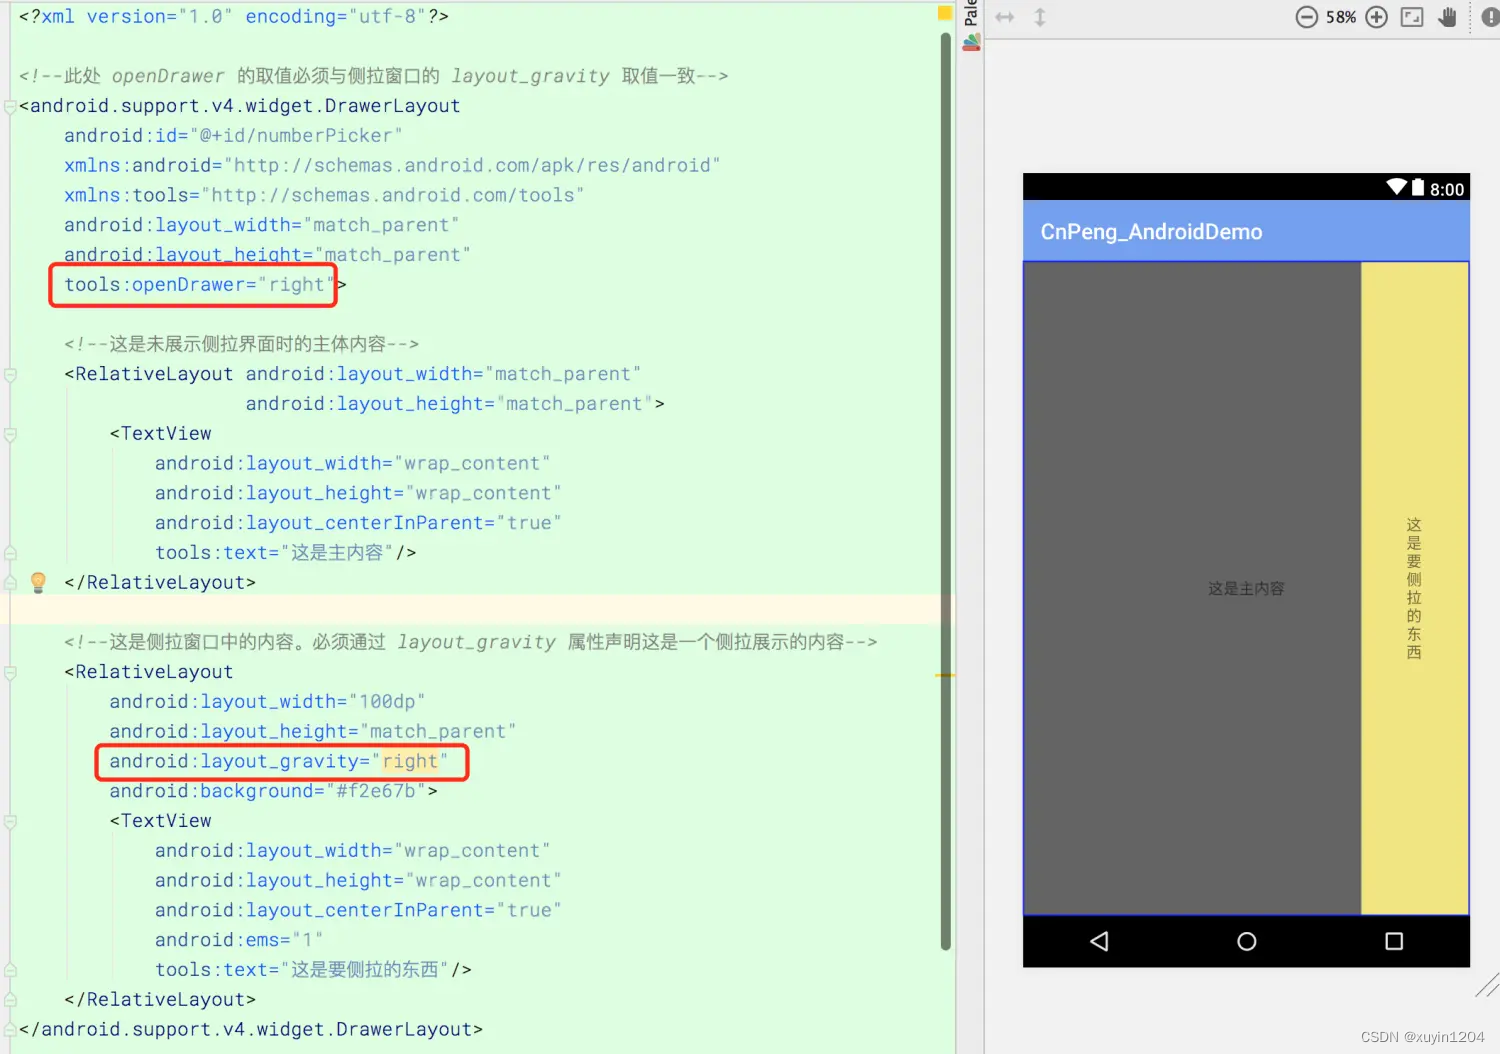
9、 tools:openDrawer
| 说明 | |
|---|---|
| 应用范围 | <DrawerLayout> |
| 作用对象 | Android Studio 布局编辑器 |
| 具体作用 | 在预览界面中将 DrawerLayout 打开。 |
| 取值说明 | end、left、right、start。具体说明,参考下表 |
| Constant | Value | Description |
|---|---|---|
| end | 800005 | Push object to the end of its container, not changing its size. |
| left | 3 | Push object to the left of its container, not changing its size. |
| right | 5 | Push object to the right of its container, not changing its size. |
| start | 800003 | Push object to the beginning of its container, not changing its size. |
注意:
1、在 <DrawerLayout > 需要通过 layout_gravity 声明哪一部分作为侧拉窗口,其取值也是 end、start、left、right。
2、tools:openDrawer 的取值必须与侧拉窗口的 layout_gravity 的取值一致
<?xml version="1.0" encoding="utf-8"?>

<!--此处 openDrawer 的取值必须与侧拉窗口的 layout_gravity 取值一致-->
<android.support.v4.widget.DrawerLayout
    android:id="@+id/numberPicker"
    xmlns:android="http://schemas.android.com/apk/res/android"
    xmlns:tools="http://schemas.android.com/tools"
    android:layout_width="match_parent"
    android:layout_height="match_parent"
    tools:openDrawer="right">

    <!--这是未展示侧拉界面时的主体内容-->
    <RelativeLayout android:layout_width="match_parent"
                    android:layout_height="match_parent">
        <TextView
            android:layout_width="wrap_content"
            android:layout_height="wrap_content"
            android:layout_centerInParent="true"
            tools:text="这是主内容"/>
    </RelativeLayout>

    <!--这是侧拉窗口中的内容。必须通过 layout_gravity 属性声明这是一个侧拉展示的内容-->
    <RelativeLayout
        android:layout_width="100dp"
        android:layout_height="match_parent"
        android:layout_gravity="right"
        android:background="#f2e67b">
        <TextView
            android:layout_width="wrap_content"
            android:layout_height="wrap_content"
            android:layout_centerInParent="true"
            android:ems="1"
            tools:text="这是要侧拉的东西"/>
    </RelativeLayout>
</android.support.v4.widget.DrawerLayout>
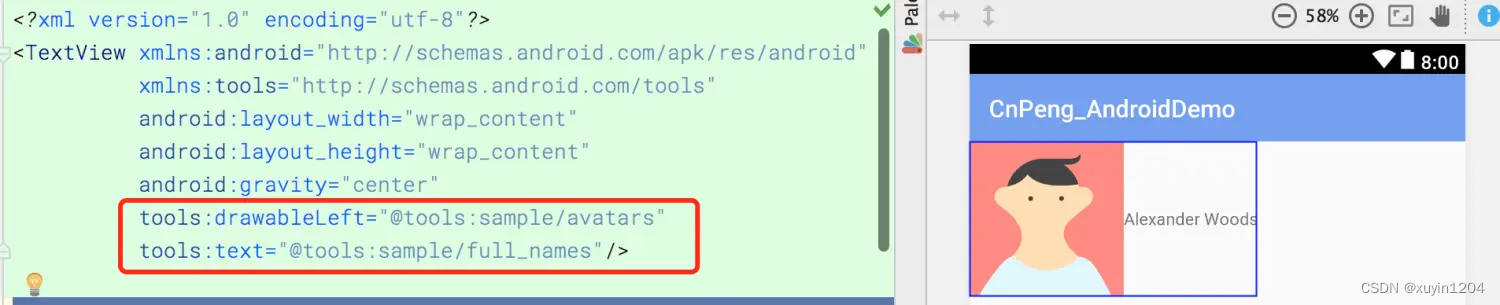
10、 “@tools:sample/*” 资源
| 说明 | |
|---|---|
| 应用范围 | 所有支持显示 text 或者 image 的view控件(Any view that supports UI text or images) |
| 作用对象 | Android Studio 布局编辑器 |
| 具体作用 | 为View设置占位文本或图片。这其实就是系统预置的一堆字符串和图片资源,当你想设置预览文本或者预览图片时,如果不想自己去定义,直接引用这些系统预置的字符串和图片就可以了 |
| 取值说明 | 参考下表 |
| 属性值 | 说明 |
|---|---|
@tools:sample/full_names | Full names that are randomly generated from the combination of @tools:sample/first_names and@tools:sample/last_names. |
@tools:sample/first_names | Common first names. |
@tools:sample/last_names | Common last names. |
@tools:sample/cities | Names of cities from across the world. |
@tools:sample/us_zipcodes | Randomly generated US zipcodes. |
@tools:sample/us_phones | Randomly generated phone numbers with the following format: (800) 555-xxxx. |
@tools:sample/lorem | Placeholder text that is derived from Latin. |
@tools:sample/date/day_of_week | Randomized dates and times for the specified format. |
@tools:sample/date/ddmmyy | |
@tools:sample/date/mmddyy | |
@tools:sample/date/hhmm | |
@tools:sample/date/hhmmss | |
@tools:sample/avatars | Vector drawables that you can use as profile avatars. |
@tools:sample/backgrounds/scenic | Images that you can use as backgrounds. |
示例代码:
在下面的预览图中,图标和文本都是直接引用的系统预置的。
(三)、资源压缩相关属性 (Resource shrinking attributes)
下面这些属性,可以让我们在 资源压缩时确定哪些资源可以保留或者丢弃,也可以让我们开启严格模式的资源引用检查。 The following attributes allow you to enable strict reference checks and declare whether to keep or discard certain resources when using resource shrinking
开启资源压缩时,在 module 的build.gradle 文件作如下修改:
android {
    buildTypes {
        release {
            shrinkResources true    //开启资源压缩。minifyEnabled 也必须为true,否则编译不通过
            minifyEnabled true     //开启代码混淆/压缩
            proguardFiles getDefaultProguardFile('proguard-android.txt'), 'proguard-rules.pro'
        }
    }
}
1、 tools:shrinkMode
| 说明 | |
|---|---|
| 应用范围 | <resources> |
| 作用对象 | 开启了资源压缩的构建工具Build tools with resource shrinking |
| 具体作用 | 指明 构建工具在压缩资源时使用哪种模式:safe mode 、strict mode |
| 取值说明 | safe、strict |
| 模式 | 说明 |
|---|---|
| safe | 保留被显示引用的,或者可能通过 Resources.getIdentifier() 被动态引用的资源 |
| strict | 保留 resources 或者 代码中 被显示引用的资源 |
默认是 safe 模式 (即shrinkMode="safe"). 如果想使用 strict 模式,需要在<resources>节点中显示声明 shrinkMode="strict",具体如下:
<?xml version="1.0" encoding="utf-8"?>
<resources
      xmlns:tools="http://schemas.android.com/tools"
      tools:shrinkMode="strict" />
开启 strict 模式之后, 可以使用 tools:keep 保留那些你不想被移除的资源, 或者使用tools:discard 直接移除资源
2、 tools:keep
| 说明 | |
|---|---|
| 应用范围 | <resources> |
| 作用对象 | 开启了资源压缩的构建工具 |
| 具体作用 | 使用资源压缩去移除未被使用的资源时,该属性将允许你指明哪些资源可以被保留(比如一些通过Resources.getIdentifier() 间接引用的资源) |
| 取值说明 | 资源文件的引用 |
使用时,在 resources 目录下创建一个 xml 文件并指定名称,如:res/raw/keep.xml。创建一个<resources> 节点,并为 tools:keep 赋值,其值代表将被保留的资源,多个资源之间使用逗号间隔,也可以使用 * 作为通配符,示例如下:
<?xml version="1.0" encoding="utf-8"?>
<resources
      xmlns:tools="http://schemas.android.com/tools"
      tools:keep="@layout/used_1,@layout/used_2,@layout/*_3" />
3、 tools:discard
| 说明 | |
|---|---|
| 应用范围 | <resources> |
| 作用对象 | 开启了资源压缩的构建工具 |
| 具体作用 | |
| 取值说明 | |
| 当使用资源压缩工具去除一些无用资源时,使用该属性可以指明一些需要手动删除的资源 (比如:被引用了但是未能生效的资源,或者 Gradle 插件误引用了某些资源被引用). |
使用时,在 resources 目录下创建一个 xml 文件并指定名称,如:res/raw/keep.xml。创建一个<resources> 节点,并为 tools:keep 赋值,其值代表将被保留的资源,多个资源之间使用逗号间隔,也可以使用 * 作为通配符,示例如下:
<?xml version="1.0" encoding="utf-8"?>
<resources
      xmlns:tools="http://schemas.android.com/tools"
      tools:discard="@layout/unused_1" />


 1024
1024


 被折叠的 条评论
为什么被折叠?
被折叠的 条评论
为什么被折叠?
 到【灌水乐园】发言


