


安卓中沉浸式状态栏实现
首先这种特性出现在安卓4.4以上,所以在做的这种功能的时候需要对系统的版本进行判断。随着版本的提高,在5.0的时候系统给我们开放了可以设置状态栏颜色的功能,所以对于5.0以上的相比4.4的又要区别对待,就是在4.4的时候可以将状态栏直接设成透明色,但在5.0的时候,需要在多转一步。我的沉浸式状态栏实现步骤总共分为三步:
第一步:
在values中创建创建两个文件夹,分别为values-v19,values-v21,一个为4.4准备,一个为5.0准备。里面再分别创建style.xml文件,用来设置系统的主题,其中v19的style内容如下:
`   <style name="AppTheme" parent="Theme.AppCompat.Light.NoActionBar">
        <!-- Customize your theme here. -->
        <item name="android:windowTranslucentStatus">true</item>
        <item name="android:windowTranslucentNavigation">true</item>
    </style>
v21中的style内容如下:
    <style name="AppTheme" parent="Theme.AppCompat.Light.NoActionBar">
        <!-- Customize your theme here. -->
        <item name="android:windowTranslucentStatus">false</item>
        <item name="android:windowTranslucentNavigation">true</item>
        <item name="android:statusBarColor">@android:color/transparent</item>
    </style>
其中就可以看出4.4和5.0在主题设置上的差异,之后的操作两者都相同了。
第二步:
在布局文件中进行设置,在根布局中设置:
android:fitsSystemWindows="true"网上看了有些做沉浸式状态栏的时候,好多都说要在根布局设置这个属性,但是我试验的时候却没有生效,所以我将在最顶上的imageview控件中设置了这个属性,结果就可以了。。。
代码如下:
<?xml version="1.0" encoding="utf-8"?>
<android.support.constraint.ConstraintLayout
    xmlns:android="http://schemas.android.com/apk/res/android"
    xmlns:app="http://schemas.android.com/apk/res-auto"
    xmlns:tools="http://schemas.android.com/tools"
    android:layout_width="match_parent"
    android:layout_height="match_parent"
    tools:context="com.example.tiayi.cainiaoxinwendemo.MainActivity"
    tools:layout_editor_absoluteY="81dp"
    tools:layout_editor_absoluteX="0dp">

    <ImageView
        android:id="@+id/imageView"
        android:layout_width="match_parent"
        android:layout_height="203dp"
        android:fitsSystemWindows="true"
        app:srcCompat="@mipmap/ic_launcher"
        android:background="@drawable/singapore"
        app:layout_constraintTop_toTopOf="parent"
        app:layout_constraintBottom_toBottomOf="parent"
        android:layout_marginBottom="8dp"
        app:layout_constraintVertical_bias="0.0"
        android:layout_marginRight="0dp"
        app:layout_constraintRight_toRightOf="parent"
        android:layout_marginLeft="0dp"
        app:layout_constraintLeft_toLeftOf="parent"/>

</android.support.constraint.ConstraintLayout>
第三步:
在清单配置文件中将需要这种功能的activity设置该主题就可以了:
         <activity android:name=".MainActivity"
            android:theme="@style/AppTheme">
            <intent-filter>
                <action android:name="android.intent.action.MAIN"/>

                <category android:name="android.intent.category.LAUNCHER"/>
            </intent-filter>
        </activity>
效果如图:

我这边是将状态栏设成图片背景,如果不要图片背景,可以直接进行设置,我认为只要把握下面这张图就可以了:
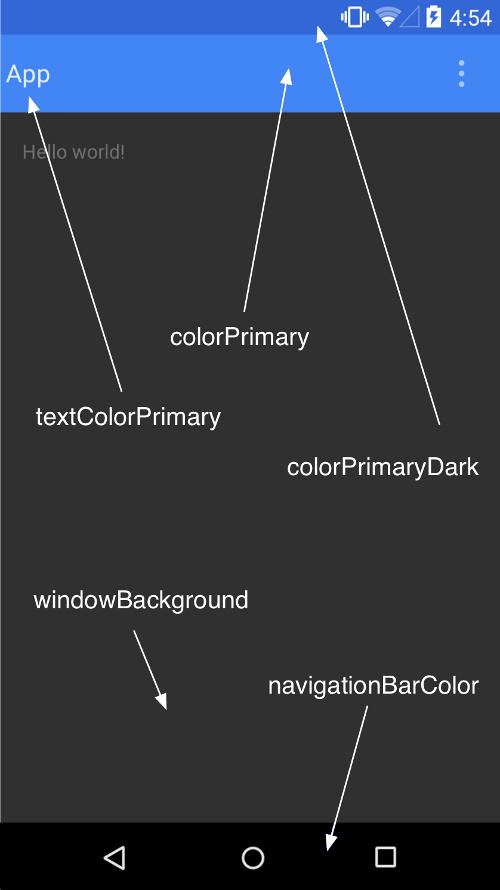
其中几个颜色都可以在style.xml文件中进行设置:
    <style name="AppTheme" parent="Theme.AppCompat.Light.DarkActionBar">
        <!-- Customize your theme here. -->
        <item name="colorPrimary">@color/colorPrimary</item>
        <item name="colorPrimaryDark">@color/colorPrimaryDark</item>
        <item name="colorAccent">@color/colorAccent</item>
    </style>


 260
260


 被折叠的 条评论
为什么被折叠?
被折叠的 条评论
为什么被折叠?
 到【灌水乐园】发言


