


1.介绍
- XXL-JOB是一个轻量级分布式任务调度平台,其核心设计目标是开发迅速、学习简单、轻量级、易扩展。现已开放源代码并接入多家公司线上产品线,开箱即用。
2.准备
- 在pull镜像创建容器之前先准备好mysql,后面系统需要连接mysql配置的表。
- 先去github上面拉取代码,因为是基于docker安装,就不用源码进行启动了,那源码只为了拿取导入表的sql: xxl-job
- 进入db目录,其中 tables_xxl_job.sql 就是我们要导入的sql文件,在Navicat里面创建一个xxl-job的库,然后把表sql执行导入进去。
3.拉取镜像
docker pull xuxueli/xxl-job-admin
- 执行会报错:
	Using default tag: latest
	Error response from daemon: manifest for xuxueli/xxl-job-admin:latest not found
为什么呢?因为官方没有打 latest 的tag标签,所以会提示下载失败!那怎么下载呢?必须制定版本才可以!
可以去docker hub上面查看xuxueli/xxl-job-admin镜像的tags ,选最新的版本进行拉取就可以了
- 拉取版本2.2.0:
docker pull xuxueli/xxl-job-admin:2.2.0
4.创建容器
docker run -di -e PARAMS="--spring.datasource.url=jdbc:mysql://192.168.0.162:3306/xxl-job?Unicode=true&characterEncoding=UTF-8 --spring.datasource.username=root --spring.datasource.password=123456" -p 8082:8080 -v /tmp:/data/applogs --name xxl-job-admin xuxueli/xxl-job-admin:2.0.1
- 注意数据库的ip,用户名,密码,和库名对应上。端口映射自己选,不要被其他端口占用就可以。
5.登陆
- 创建成功后登陆界面:http://10.10.0.17:8082/xxl-job-admin

- 默认用户名admin 密码 123456
5.代码配置
- 依赖引入:
   		  <dependency>
               <groupId>com.xuxueli</groupId>
               <artifactId>xxl-job-core</artifactId>
               <version>2.2.0</version>
           </dependency>
- 配置文件:
#xxl-job
xxl:
 job:
   # xxl-job admin address list, such as "http://address" or "http://address01,http://address02"
   # 配置刚刚启动的xxl-job-admin地址,他会自动注册到xxl-job-admin
   adminAddresses: http://10.10.0.17:8082/xxl-job-admin
   # xxl-job, access token
   accessToken:
   # 配置当前执行器的名字
   appname: ${spring.application.name}
   # xxl-job executor registry-address: default use address to registry , otherwise use ip:port if address is null
   address:
   # xxl-job executor server-info
   ip:
   port: ${global.boot.xxl-job.port:9999}  # 端口可直接写9999
   # 配置日志文件的路径
   logpath: /data/applogs/xxl-job/jobhandler
   # xxl-job executor log-retention-days
   logretentiondays: 30
- 自定义注解@EnableXxlJob
package com.example.aopdemo.config;

import org.springframework.context.annotation.Import;

import java.lang.annotation.*;

@Target(ElementType.TYPE)
@Retention(RetentionPolicy.RUNTIME)
@Documented
@Import({XxlJobConfig.class})
public @interface EnableXxlJob {
}
- 读取配置文件
@Data
@ConfigurationProperties(prefix = "xxl.job")
public class XxlJobProperties {
    private String adminAddresses;
    private String accessToken;
    private String appname;
    private String address;
    private String ip;
    private int port;
    private String logPath;
    private int logRetentionDays;
}
- 创建自动注册到admin管理平台的执行器 OnLine 机器地址
package com.example.aopdemo.config;

import com.xxl.job.core.executor.impl.XxlJobSpringExecutor;
import lombok.Data;
import lombok.extern.slf4j.Slf4j;
import org.springframework.beans.factory.annotation.Autowired;
import org.springframework.boot.context.properties.EnableConfigurationProperties;
import org.springframework.context.annotation.Bean;

/**
 *@author lxy
 *@description
 *@since 2020/12/28
 */
@Data
@Slf4j
@EnableConfigurationProperties(XxlJobProperties.class)
public class XxlJobConfig {
    @Autowired
    private XxlJobProperties properties;

    @Bean
    public XxlJobSpringExecutor xxlJobExecutor() {
        log.info(">>>>>>>>>>> xxl-job config init.");
        XxlJobSpringExecutor xxlJobSpringExecutor = new XxlJobSpringExecutor();
        xxlJobSpringExecutor.setAdminAddresses(properties.getAdminAddresses());
        xxlJobSpringExecutor.setAppname(properties.getAppname());
        xxlJobSpringExecutor.setAddress(properties.getAddress());
        xxlJobSpringExecutor.setIp(properties.getIp());
        xxlJobSpringExecutor.setPort(properties.getPort());
        xxlJobSpringExecutor.setAccessToken(properties.getAccessToken());
        xxlJobSpringExecutor.setLogPath(properties.getLogPath());
        xxlJobSpringExecutor.setLogRetentionDays(properties.getLogRetentionDays());

        return xxlJobSpringExecutor;
    }

    /**
     * 针对多网卡、容器内部署等情况,可借助 "spring-cloud-commons" 提供的 "InetUtils" 组件灵活定制注册IP;
     *
     *      1、引入依赖:
     *          <dependency>
     *             <groupId>org.springframework.cloud</groupId>
     *             <artifactId>spring-cloud-commons</artifactId>
     *             <version>${version}</version>
     *         </dependency>
     *
     *      2、配置文件,或者容器启动变量
     *          spring.cloud.inetutils.preferred-networks: 'xxx.xxx.xxx.'
     *
     *      3、获取IP
     *          String ip_ = inetUtils.findFirstNonLoopbackHostInfo().getIpAddress();
     */
}
- 在启动类上加上自定义的注解
@SpringBootApplication
@EnableXxlJob
public class AopdemoApplication {

    public static void main(String[] args) {
        SpringApplication.run(AopdemoApplication.class, args);
    }

}
- 方法注解使用
@Slf4j
@Component
public class TestJob {
/**
* 1、简单任务示例(Bean模式)
*/
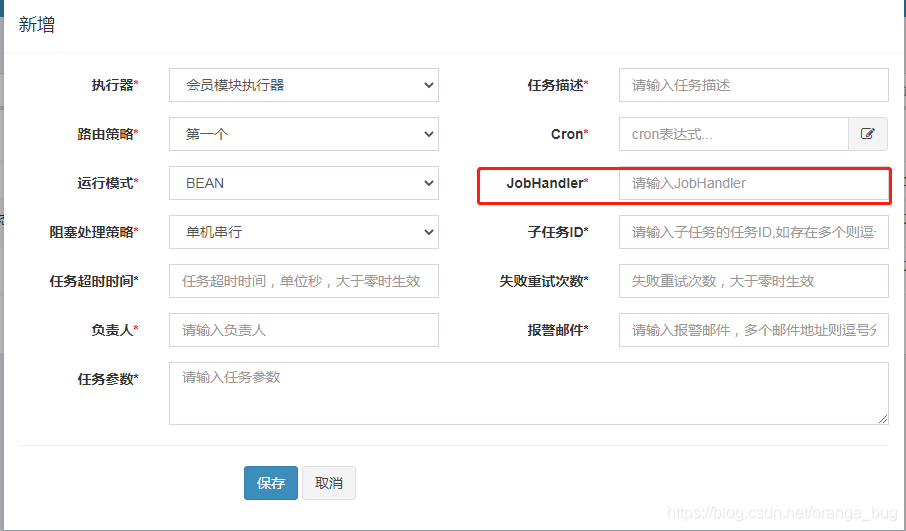
// testJobHandler对应在创建任务的JobHandler名字
@XxlJob("testJobHandler")
public ReturnT<String> testJobHandler(String param){
log.info("XXL-JOB, Hello World. param:{}", param);
System.out.println(param);
return ReturnT.SUCCESS;
}
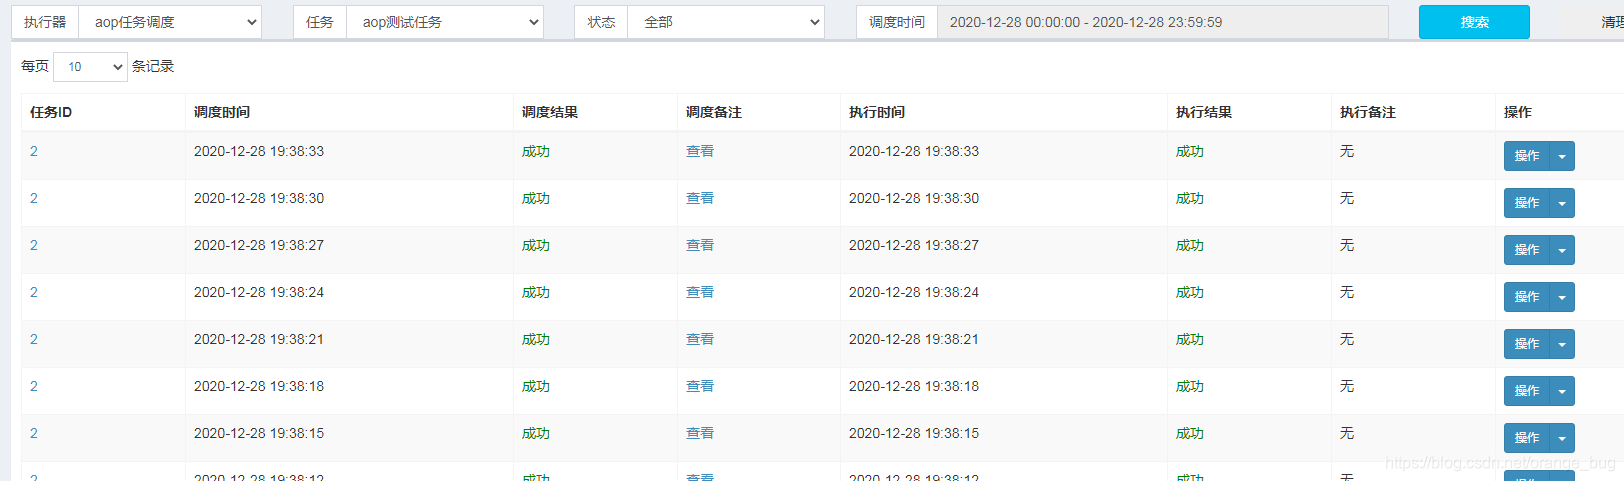
- 启动启动类,执行job任务,成功定时调度


 399
399


 被折叠的 条评论
为什么被折叠?
被折叠的 条评论
为什么被折叠?
 到【灌水乐园】发言


