


文章目录
Apollo使用笔记
一、简介
Apollo 项目于 2016 年在携程框架研发部诞生,初衷是为了解决公司内部配置管理尤其是中间件公共配置的管理难题,秉持着开源开放的精神,项目从第一行代码开始就在开源社区上开源,可以说是一个完全开放的项目。
1. 官方文档
https://www.apolloconfig.com/#/zh/README
2. 代码仓库
https://gitee.com/apolloconfig
- Apollo源码
git clone https://gitee.com/apolloconfig/apollo.git
- Apollo使用示例
git clone https://gitee.com/apolloconfig/apollo-use-cases.git
3. 官方demo环境
- http://81.68.181.139
- User/Password: apollo/admin
二、部署架构
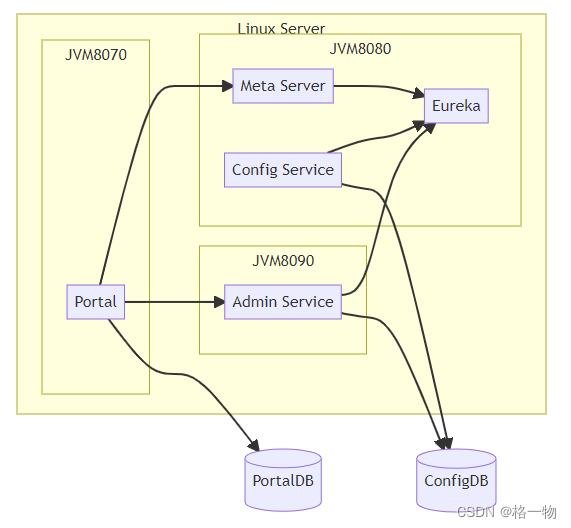
1.系统架构图

- Config Service提供配置的读取、推送等功能,服务对象是Apollo客户端
- Admin Service提供配置的修改、发布等功能,服务对象是Apollo Portal(管理界面)
- Config Service和Admin Service都是多实例、无状态部署,所以需要将自己注册到Eureka中并保持心跳
- 在Eureka之上我们架了一层Meta Server用于封装Eureka的服务发现接口
- Client通过域名访问Meta Server获取Config Service服务列表(IP+Port),而后直接通过IP+Port访问服务,同时在Client侧会做load balance、错误重试
- Portal通过域名访问Meta Server获取Admin Service服务列表(IP+Port),而后直接通过IP+Port访问服务,同时在Portal侧会做load balance、错误重试
- 为了简化部署,我们实际上会把Config Service、Eureka和Meta Server三个逻辑角色部署在同一个JVM进程中
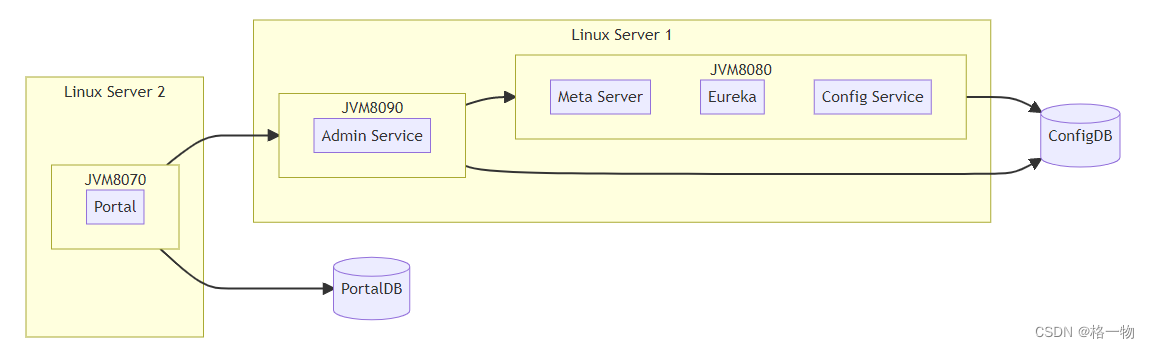
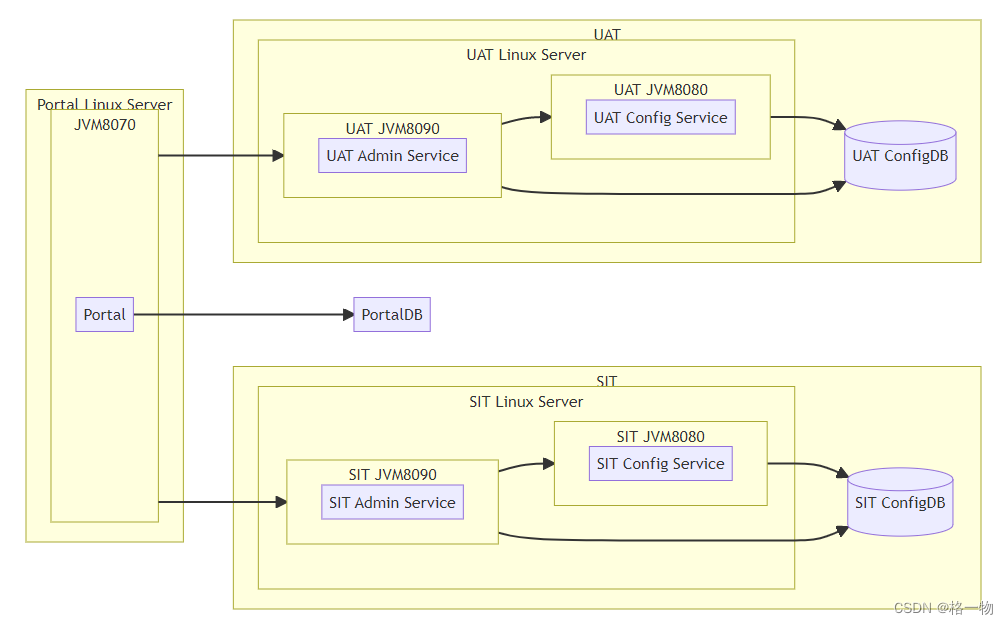
2. 部署架构图
- 单机
- 多机器、单环境
- 多机器、双环境
3. 快速部署
- 版本要求 JDK 1.8+ 、MySQL 5.6.5+
- 安装
git clone https://gitclone.com/github.com/apolloconfig/apollo-quick-start.git
cd ./apollo-quick-start
docker-compose -f docker-compose.yml up
Gracefully stopping… (press Ctrl+C again to force)
- 启动和关闭
docker-compose -f docker-compose.yml start
docker-compose -f docker-compose.yml stop
- 卸载
docker-compose -f docker-compose.yml down -v
- 访问
- http://localhost:8070/
- User/Password: apollo/admin
三、使用
1. 注解使用
1.1 @Value
    @Value("${base.url}")
    private String url;
Spring 注解,支持热更新 (前提确保
apollo.autoUpdateInjectedSpringProperties=true默认true)
1.2 @ApolloJsonValue
| key | value |
|---|---|
| student | {“name”:“zs”, “age”:30} |
    @ApolloJsonValue("${student}")
    private Student student;
Apollo内部注解,支持热更新 (前提确保
apollo.autoUpdateInjectedSpringProperties=true默认true)
1.3 @ConfigurationProperties
| key | value |
|---|---|
| student.name | zs |
| student.age | 30 |
@Data
@Component
@ConfigurationProperties(prefix = "student")
public class Student {
    private String name;
    private Integer age;
}
spring boot注解,不支持热更新,需结合spring cloud注解
@RefreshScope和Apollo注解@ApolloConfigChangeListener自行实现更新逻辑。示例如下
- 方式1
@ApolloConfigChangeListener
注意:
此处
@ApolloConfigChangeListener(value = {"student.properties"}, interestedKeyPrefixes = "student.")标注的属性配置类,不要增加@RefreshScope注解;务必增加
@ApolloConfigChangeListenervalue属性即namespace,否则onChange方法可能监听不到事件源
@Data
@Component
@ConfigurationProperties(prefix = "student")
public class Student {
    private String name;
    private Integer age;
}
@Configuration
public class CustomPropertiesRefresher implements ApplicationContextAware {

    private ApplicationContext applicationContext;

    @Override
    public void setApplicationContext(ApplicationContext applicationContext) throws BeansException {
        this.applicationContext = applicationContext;
    }

    @ApolloConfigChangeListener(value = {"student.properties"}, interestedKeyPrefixes = "student.")
    public void onChange(ConfigChangeEvent changeEvent) {
        System.out.println(changeEvent);
        /**
         * @see org.springframework.cloud.context.properties.ConfigurationPropertiesRebinder#onApplicationEvent
         */
        this.applicationContext.publishEvent(new EnvironmentChangeEvent(changeEvent.changedKeys()));
    }

}
- 方式2
@RefreshScope+@ApolloConfigChangeListener
@Data
@Component
@RefreshScope
@ConfigurationProperties(prefix = "student")
public class Student {
    private String name;
    private Integer age;
}
@Configuration
public class CustomPropertiesRefresher {

    private final RefreshScope refreshScope;

    public CustomPropertiesRefresher(RefreshScope refreshScope) {
        this.refreshScope = refreshScope;
    }

    @ApolloConfigChangeListener(value = {"student.properties"}, interestedKeyPrefixes = "student.")
    public void onChange(ConfigChangeEvent changeEvent) {
        // 刷新spring bean实例(与此前的bean对象不是同一个)
        refreshScope.refresh("student");
    }

}
- 比较和总结
方式1 采用
EnvironmentChangeEvent事件监听机制(观察者模式)扩展性较好;方式2 采用
@RefreshScope重新初始化bean对象,较重,若仅刷新指定属性配置类,需要讲bean name写死(不推荐);但,方式2并非无用武之地,比如修改配置属性后,需要重新初始化bean实例(例如redis集群实例)的场景就很适合该方式。
- e配置监听namespace
@ApolloConfigChangeListener监听的namespace也可在application.yml中配置,多个namespace可使用逗号分割
apollo:
  meta: http://81.68.181.139:8080
  bootstrap:
    enabled: true
    eagerLoad:
      enabled: true
    # will inject 'application' and 'TEST1.apollo' namespaces in bootstrap phase
    namespaces: application,TEST1.apollo,application.yaml

listeners: "application,TEST1.apollo,application.yaml"
@ApolloConfigChangeListener(value = "${listeners}", interestedKeyPrefixes = {"student."})
四、扩展
1. 更改缓存目录位置
Apollo默认会在本地磁盘缓存配置文件,默认缓存目录为
/opt/data;你可以通过操作系统的System EnvironmentAPOLLO_CACHE_DIR(1.9.0+) 或者APOLLO_CACHEDIR(1.9.0之前)来指定默认缓存目录位置,也可以在Spring Boot的application.properties或bootstrap.properties中指定apollo.cache-dir=/opt/data/some-cache-dir(1.9.0+) 或者apollo.cacheDir=/opt/data/some-cache-dir(1.9.0之前)指定缓存目录位置;
2. 属性值加密
对于数据库密码、appKey等敏感信息仍然存在泄露风险,可以根据需要考虑结合
jasypt使用,需要注意的是,使用jasypt加密的属性值热更新会失效,需要自行处理。
- 对于Mac/Linux,默认文件位置为
/opt/data/{appId} - 对于Windows,默认文件位置为
C:\opt\data\{appId}
              <dependency>
                    <groupId>com.github.ulisesbocchio</groupId>
                    <artifactId>jasypt-spring-boot-starter</artifactId>
                    <version>3.0.4</version>
                </dependency>
3. 访问密钥
Apollo从1.6.0版本开始增加访问密钥机制,从而只有经过身份验证的客户端才能访问敏感配置。如果应用开启了访问密钥,客户端需要配置密钥,否则无法获取配置。
apollo.accesskey.secret=1cf998c4e2ad4704b45a98a509d15719
五、原理
1. 客户端设计架构
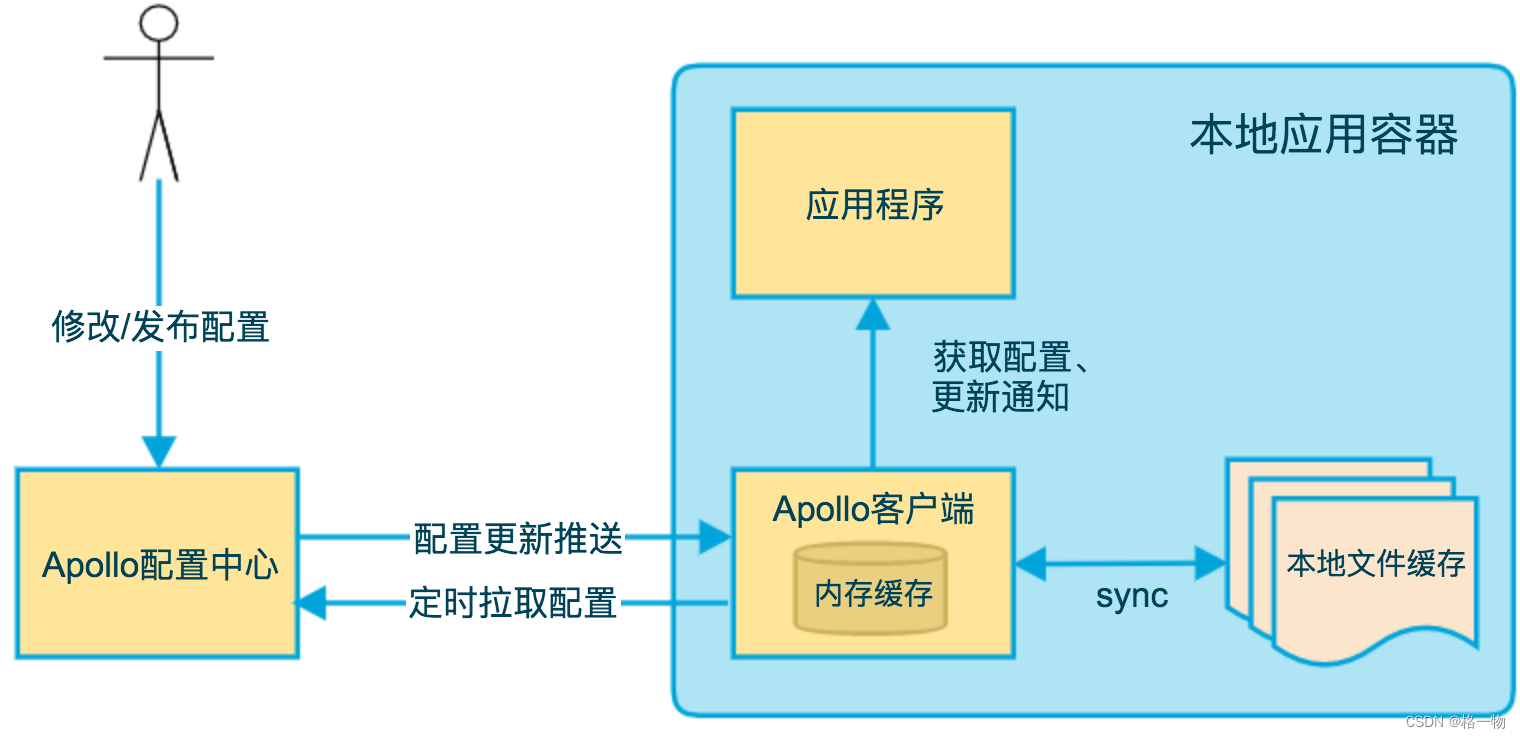
上图简要描述了Apollo客户端的实现原理:
- 客户端和服务端保持了一个长连接,从而能第一时间获得配置更新的推送。(通过Http Long Polling实现)
- 客户端还会定时从Apollo配置中心服务端拉取应用的最新配置。
- 这是一个fallback机制,为了防止推送机制失效导致配置不更新
- 客户端定时拉取会上报本地版本,所以一般情况下,对于定时拉取的操作,服务端都会返回304 - Not Modified
- 定时频率默认为每5分钟拉取一次,客户端也可以通过在运行时指定System Property:
apollo.refreshInterval来覆盖,单位为分钟。
- 客户端从Apollo配置中心服务端获取到应用的最新配置后,会保存在内存中
- 客户端会把从服务端获取到的配置在本地文件系统缓存一份
- 在遇到服务不可用,或网络不通的时候,依然能从本地恢复配置
- 应用程序可以从Apollo客户端获取最新的配置、订阅配置更新通知
注意:在本地开发模式下,Apollo不会实时监测文件内容是否有变化,所以如果修改了配置,需要重启应用生效。
2.调用链
=>
com\ctrip\framework\apollo\apollo-client\1.4.0\apollo-client-1.4.0.jar!\META-INF\spring.factories=>
com.ctrip.framework.apollo.spring.boot.ApolloApplicationContextInitializer#initialize(org.springframework.context.ConfigurableApplicationContext)=>
com.ctrip.framework.apollo.ConfigService#getConfig=>
com.ctrip.framework.apollo.internals.RemoteConfigRepository#RemoteConfigRepository// 启动时http get请求主动拉取数据 this.trySync(); // 创建单线程线程池定时拉取(频率默认5分钟) this.schedulePeriodicRefresh(); // 开启长轮询(客户端 默认延迟2秒执行、每秒限流2次、尝试获取令牌5秒超时后再等5秒、get请求超时时间90秒,服务端超时时间要小于90秒,现在是60秒,若超时则等待1~120秒每次乘2即1,2,4,8,16...96,120),长轮询本质也是pull模式,只不过无数据变更时,阻塞直至超时或有新数据产生(保证实时性要求的同时,优化无效查询降低服务端压力,嗯不错的思路有空我也试试) // com.ctrip.framework.apollo.internals.RemoteConfigLongPollService#startLongPolling this.scheduleLongPollingRefresh();配置项
com.ctrip.framework.apollo.util.ConfigUtil=>
com.ctrip.framework.apollo.internals.AbstractConfigRepository#trySync=>
com.ctrip.framework.apollo.internals.AbstractConfigRepository#fireRepositoryChange=>
com.ctrip.framework.apollo.internals.AbstractConfig#fireConfigChange
@Value和@ApolloJsonValue自动更新=>
com.ctrip.framework.apollo.spring.property.AutoUpdateConfigChangeListener#onChange@Override public void onChange(ConfigChangeEvent changeEvent) { Set<String> keys = changeEvent.changedKeys(); if (CollectionUtils.isEmpty(keys)) { return; } for (String key : keys) { // 1. check whether the changed key is relevant Collection<SpringValue> targetValues = springValueRegistry.get(beanFactory, key); if (targetValues == null || targetValues.isEmpty()) { continue; } // 2. update the value for (SpringValue val : targetValues) { updateSpringValue(val); } } }
springValueRegistry来源于注解扫描结果com.ctrip.framework.apollo.spring.annotation.ApolloProcessor;该接口有两个实现类分别为
com.ctrip.framework.apollo.spring.annotation.SpringValueProcessor和com.ctrip.framework.apollo.spring.annotation.ApolloJsonValueProcessor分别对应@Value和@ApolloJsonValue注解
- 自定义listener更新
ConfigurationProperties=>
com.ctrip.framework.apollo.spring.annotation.ApolloAnnotationProcessor#processMethod=>
com.example.demo.listener.CustomPropertiesRefresher#onChange@ApolloConfigChangeListener(value = {"student.properties"}, interestedKeyPrefixes = "student.") public void onChange(ConfigChangeEvent changeEvent) { System.out.println(changeEvent); /** * @see org.springframework.cloud.context.properties.ConfigurationPropertiesRebinder#onApplicationEvent */ this.applicationContext.publishEvent(new EnvironmentChangeEvent(changeEvent.changedKeys())); }=>
org.springframework.cloud.context.properties.ConfigurationPropertiesRebinder#onApplicationEvent=>
org.springframework.cloud.context.properties.ConfigurationPropertiesRebinder#rebind(java.lang.String)


 5456
5456


 被折叠的 条评论
为什么被折叠?
被折叠的 条评论
为什么被折叠?
 到【灌水乐园】发言


