


快速搭建MyBatis开发环境
在文章开始前我们先搭一个最简单的MyBatis环境,只要3个步骤,这里省去建立表和类等七七八八。
1.XML 配置文件
XML 配置文件(configuration XML)中包含了对 MyBatis 系统的核心设置,包含获取数据库连接实例的数据源(DataSource)和决定事务范围和控制方式的事务管理器(TransactionManager)。XML 配置文件的详细内容后面再探讨,这里先给出一个简单的示例:
<?xml version="1.0" encoding="UTF-8" ?>
<!DOCTYPE configuration
  PUBLIC "-//mybatis.org//DTD Config 3.0//EN"
  "http://mybatis.org/dtd/mybatis-3-config.dtd">
<configuration>
  <environments default="development">
    <environment id="development">
      <transactionManager type="JDBC"/>
      <dataSource type="POOLED">
        <property name="driver" value="${driver}"/>
        <property name="url" value="${url}"/>
        <property name="username" value="${username}"/>
        <property name="password" value="${password}"/>
      </dataSource>
    </environment>
  </environments>
  <mappers>
    <mapper resource="org/mybatis/example/BlogMapper.xml"/>
  </mappers>
</configuration>
2. SQL 语句映射文件
而 SQL 语句映射是个相当大的话题,可能会占去文档的大部分篇幅。这里会给出几个例子。
<?xml version="1.0" encoding="UTF-8" ?>
<!DOCTYPE mapper
  PUBLIC "-//mybatis.org//DTD Mapper 3.0//EN"
  "http://mybatis.org/dtd/mybatis-3-mapper.dtd">
<mapper namespace="org.mybatis.example.BlogMapper">
  <select id="selectBlog" resultType="Blog">
    select * from Blog where id = #{id}
  </select>
</mapper>
3.代码调用
//1.获取配置文件
String resource = "org/mybatis/example/mybatis-config.xml";
InputStream inputStream = Resources.getResourceAsStream(resource);
//2.构建SqlSessionFactory
sqlSessionFactory = new SqlSessionFactoryBuilder().build(inputStream);
//3.获取SqlSession
SqlSession session = sqlSessionFactory.openSession();
try {
//4..取得映射器
  BlogMapper mapper = session.getMapper(BlogMapper.class);
//5.调用对应sql
  Blog blog = mapper.selectBlog(101);
} finally {
  session.close();
}
源码解析
1.获取配置文件
MyBatis使用Resourcs类来完成配置文件的获取,Resourcs类的方法如下:
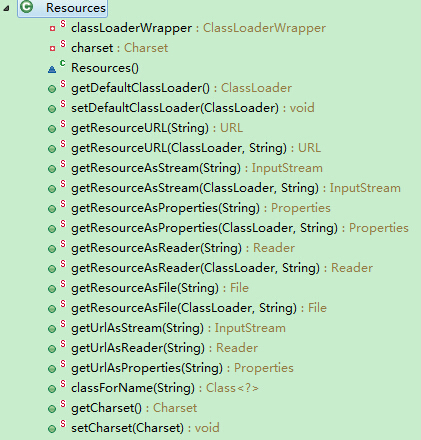
从上图可以看出Resourcs类可以处理资源文件以及URL,并且可以转化为File、Reader、InputStream、Properties几种类,除了File外都可以用于SqlSessionFactory 的构建。
Resourcs类的解析方式并不复杂
public static InputStream getResourceAsStream(String resource) throws IOException {
    return getResourceAsStream(null, resource);
  }

  public static InputStream getResourceAsStream(ClassLoader loader, String resource) throws IOException {
    InputStream in = classLoaderWrapper.getResourceAsStream(resource, loader);
    if (in == null) {
      throw new IOException("Could not find resource " + resource);
    }
    return in;
}ClassLoader[] getClassLoaders(ClassLoader classLoader) {
return new ClassLoader[]{
//用户传入的ClassLoader
classLoader,
//默认的ClassLoader,在Resources类中调用setDefaultClassLoader方法设置
defaultClassLoader
//当前线程的ClassLoader
Thread.currentThread().getContextClassLoader(),
//当前类的ClassLoader
getClass().getClassLoader(),
//ClassLoader.getSystemClassLoader()
systemClassLoader};
}
public InputStream getResourceAsStream(String resource) {
return getResourceAsStream(resource, getClassLoaders(null));
}
InputStream getResourceAsStream(String resource, ClassLoader[] classLoader) {
for (ClassLoader cl : classLoader) {
if (null != cl) {
// 尝试获取InputStream
InputStream returnValue = cl.getResourceAsStream(resource);
// 某些ClassLoader是以"/"开头,若找不到资源文件则再一次尝试
if (null == returnValue) {
returnValue = cl.getResourceAsStream("/" + resource);
}
//找到资源文件则返回
if (null != returnValue) {
return returnValue;
}
}
}
return null;
}2.构建SqlSessionFactory
获取的资源对象作为SqlSessionFactoryBuilder类的参数,SqlSessionFactoryBuilder支持多种方式构建SqlSessionFactory
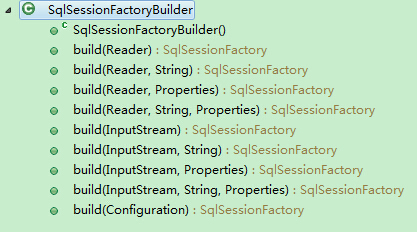
正常情况下SqlSessionFactoryBuilder只需要1个参数便可以进行解析,那为什么要重载多个参数的方法呢?在实际情况下,我们可能会有多种配置方式,例如XML,注解,Properties等,这些配置会出现一些属性的冲突,MyBatis允许同时传入多个不同类型的配置,有着固定的优先顺序。
以下内容摘自官方文档:
如果属性在不只一个地方进行了配置,那么 MyBatis 将按照下面的顺序来加载:
- 在 properties 元素体内指定的属性首先被读取。
- 然后根据 properties 元素中的 resource 属性读取类路径下属性文件或根据 url 属性指定的路径读取属性文件,并覆盖已读取的同名属性。
- 最后读取作为方法参数传递的属性,并覆盖已读取的同名属性。
因此,通过方法参数传递的属性具有最高优先级,resource/url 属性中指定的配置文件次之,最低优先级的是 properties 属性中指定的属性。
接下来看看SqlSessionFactoryBuilder类是如何解析资源 public SqlSessionFactory build(InputStream inputStream) {
return build(inputStream, null, null);
}
public SqlSessionFactory build(InputStream inputStream, String environment) {
return build(inputStream, environment, null);
}
public SqlSessionFactory build(InputStream inputStream, Properties properties) {
return build(inputStream, null, properties);
}
public SqlSessionFactory build(InputStream inputStream, String environment, Properties properties) {
try {
//这里由XMLConfigBuilder类完成解析
XMLConfigBuilder parser = new XMLConfigBuilder(inputStream, environment, properties);
//parse方法返回Configuration类对象,Configuration类保存了各种配置
return build(parser.parse());
} catch (Exception e) {
throw ExceptionFactory.wrapException("Error building SqlSession.", e);
} finally {
ErrorContext.instance().reset();
try {
inputStream.close();
} catch (IOException e) {
// Intentionally ignore. Prefer previous error.
}
}
}
//最终返回的SqlSessionFactory接口的实现类DefaultSqlSessionFactory类
public SqlSessionFactory build(Configuration config) {
return new DefaultSqlSessionFactory(config);
}XMLConfigBuilder类的工作是把XML中配置的内容转化相应的对象,这些对象全部存在Configuration类中,实际的XML解析是由XPathParser类来完成,XPathParser类采用了XPath方式来解析XML文件,这里就省略不提了。
private XPathParser parser;
public XMLConfigBuilder(InputStream inputStream, String environment, Properties props) {
    //实际由XPathParser来解析,结果存在parser对象中
    this(new XPathParser(inputStream, true, props, new XMLMapperEntityResolver()), environment, props);
  }
public Configuration parse() {
    //这里先判断是否解析过,避免重复解析
    if (parsed) {
      throw new BuilderException("Each XMLConfigBuilder can only be used once.");
    }
    parsed = true;
    //configuration是配置文件的根节点
    parseConfiguration(parser.evalNode("/configuration"));
    return configuration;
  }
  //对不同的配置进行处理,基本看名字就知道对应哪部分了,这里暂不详细展开
  private void parseConfiguration(XNode root) {
    try {
      Properties settings = settingsAsPropertiess(root.evalNode("settings"));
      //issue #117 read properties first
      propertiesElement(root.evalNode("properties"));
      loadCustomVfs(settings);
      typeAliasesElement(root.evalNode("typeAliases"));
      pluginElement(root.evalNode("plugins"));
      objectFactoryElement(root.evalNode("objectFactory"));
      objectWrapperFactoryElement(root.evalNode("objectWrapperFactory"));
      reflectionFactoryElement(root.evalNode("reflectionFactory"));
      settingsElement(settings);
      // read it after objectFactory and objectWrapperFactory issue #631
      environmentsElement(root.evalNode("environments"));
      databaseIdProviderElement(root.evalNode("databaseIdProvider"));
      typeHandlerElement(root.evalNode("typeHandlers"));
      mapperElement(root.evalNode("mappers"));
    } catch (Exception e) {
      throw new BuilderException("Error parsing SQL Mapper Configuration. Cause: " + e, e);
    }
  }
这里来看看propertiesElement方法,该方法体现了文档中描述的属性加载顺序
private void propertiesElement(XNode context) throws Exception {
    if (context != null) {
      //先是获取配置文件中的Properties属性
      Properties defaults = context.getChildrenAsProperties();
      String resource = context.getStringAttribute("resource");
      String url = context.getStringAttribute("url");
      if (resource != null && url != null) {
        throw new BuilderException("The properties element cannot specify both a URL and a resource based property file reference.  Please specify one or the other.");
      }
      //然后是从resource或url属性中的资源文件获取,两者不能同时配置
      if (resource != null) {
        defaults.putAll(Resources.getResourceAsProperties(resource));
      } else if (url != null) {
        defaults.putAll(Resources.getUrlAsProperties(url));
      }
      //该对象就是build中的prop参数
      Properties vars = configuration.getVariables();
      if (vars != null) {
        defaults.putAll(vars);
      }
      //最后将属性进行保存,加载顺序和文档中一致
      parser.setVariables(defaults);
      configuration.setVariables(defaults);
    }
  }(root.evalNode("properties"));
这里只是对解析配置的流程做个简单介绍,针对每个配置的具体解析将在讲解到后再具体阐述。
3.获取SqlSession
SqlSessionFactory 有六个方法可以用来创建 SqlSession 实例。通常来说,如何决定是你 选择下面这些方法时:
- Transaction (事务): 你想为 session 使用事务或者使用自动提交(通常意味着很多 数据库和/或 JDBC 驱动没有事务)?
- Connection (连接): 你想 MyBatis 获得来自配置的数据源的连接还是提供你自己
- Execution (执行): 你想 MyBatis 复用预处理语句和/或批量更新语句(包括插入和 删除)?
默认的 openSession()方法没有参数,它会创建有如下特性的 SqlSession:
- 会开启一个事务(也就是不自动提交)
- 连接对象会从由活动环境配置的数据源实例中得到。
- 事务隔离级别将会使用驱动或数据源的默认设置。
- 预处理语句不会被复用,也不会批量处理更新。
SqlSessionFactory的代码比较简单,主要是对事务等特性进行设置,最后返回一个DefaultSqlSession对象。
public SqlSession openSession() {
    //默认的设置
    return openSessionFromDataSource(configuration.getDefaultExecutorType(), null, false);
  }
private SqlSession openSessionFromDataSource(ExecutorType execType, TransactionIsolationLevel level, boolean autoCommit) {
    Transaction tx = null;
    try {
      final Environment environment = configuration.getEnvironment();
      final TransactionFactory transactionFactory = getTransactionFactoryFromEnvironment(environment);
      tx = transactionFactory.newTransaction(environment.getDataSource(), level, autoCommit);
      final Executor executor = configuration.newExecutor(tx, execType);
      return new DefaultSqlSession(configuration, executor, autoCommit);
    } catch (Exception e) {
      closeTransaction(tx); // may have fetched a connection so lets call close()
      throw ExceptionFactory.wrapException("Error opening session.  Cause: " + e, e);
    } finally {
      ErrorContext.instance().reset();
    }
  }
4.获取Mapper
获得SqlSession后,我们可以从中取得对应的Mapper,这些对象在SqlSession初始化时通过configuration传入。Mapper的生成是在构建SqlSessionFactory阶段进行的,位置如下:
private void parseConfiguration(XNode root) {
    try {
      Properties settings = settingsAsPropertiess(root.evalNode("settings"));
      //issue #117 read properties first
      propertiesElement(root.evalNode("properties"));
      loadCustomVfs(settings);
      typeAliasesElement(root.evalNode("typeAliases"));
      pluginElement(root.evalNode("plugins"));
      objectFactoryElement(root.evalNode("objectFactory"));
      objectWrapperFactoryElement(root.evalNode("objectWrapperFactory"));
      reflectionFactoryElement(root.evalNode("reflectionFactory"));
      settingsElement(settings);
      // read it after objectFactory and objectWrapperFactory issue #631
      environmentsElement(root.evalNode("environments"));
      databaseIdProviderElement(root.evalNode("databaseIdProvider"));
      typeHandlerElement(root.evalNode("typeHandlers"));
      //这里解析Mapper
      mapperElement(root.evalNode("mappers"));
    } catch (Exception e) {
      throw new BuilderException("Error parsing SQL Mapper Configuration. Cause: " + e, e);
    }
  }
我们知道Mapper的配置是MyBatis最强大也是最复杂的一部分,这篇文章作为一个入门,只对Mapper的原理进行分析,暂时不对各种高级配置进行讲解。
private void mapperElement(XNode parent) throws Exception {
    if (parent != null) {
      for (XNode child : parent.getChildren()) {
        if ("package".equals(child.getName())) {
          String mapperPackage = child.getStringAttribute("name");
          configuration.addMappers(mapperPackage);
        } else {
          String resource = child.getStringAttribute("resource");
          String url = child.getStringAttribute("url");
          String mapperClass = child.getStringAttribute("class");
          //这里也是讲究一个顺序,避免配置冲突的问题
          if (resource != null && url == null && mapperClass == null) {
            ErrorContext.instance().resource(resource);
            InputStream inputStream = Resources.getResourceAsStream(resource);
            //增对Mapper配置文件由专门的XMLMapperBuilder类来解析
            XMLMapperBuilder mapperParser = new XMLMapperBuilder(inputStream, configuration, resource, configuration.getSqlFragments());
            mapperParser.parse();
          } else if (resource == null && url != null && mapperClass == null) {
            ErrorContext.instance().resource(url);
            InputStream inputStream = Resources.getUrlAsStream(url);
            XMLMapperBuilder mapperParser = new XMLMapperBuilder(inputStream, configuration, url, configuration.getSqlFragments());
            mapperParser.parse();
          } else if (resource == null && url == null && mapperClass != null) {
            Class<?> mapperInterface = Resources.classForName(mapperClass);
            configuration.addMapper(mapperInterface);
          } else {
            throw new BuilderException("A mapper element may only specify a url, resource or class, but not more than one.");
          }
        }
      }
    }
  }


//XMLMapperBuilder的parse方法
public void parse() {
    //先判断是否解析过了,只解析一次
    if (!configuration.isResourceLoaded(resource)) {
      //解析各种配置
      configurationElement(parser.evalNode("/mapper"));
      //放入已解析资源列表,避免重复解析
      configuration.addLoadedResource(resource);
      //将解析的结果放入configuration中
      bindMapperForNamespace();
    }

    //在上面的解析过程中有些类具有继承关系,可能在解析时该类的父类还没解析,
    //这种情况下会先暂停解析,通过调用下面的代码来完成。
    parsePendingResultMaps();
    parsePendingChacheRefs();
    parsePendingStatements();
  }
 private void bindMapperForNamespace() {
    String namespace = builderAssistant.getCurrentNamespace();
    if (namespace != null) {
      Class<?> boundType = null;
      try {
        boundType = Resources.classForName(namespace);
      } catch (ClassNotFoundException e) {
        //ignore, bound type is not required
      }
      if (boundType != null) {
        //在这里将Mapper的类存入configuration中
        if (!configuration.hasMapper(boundType)) {
          // Spring may not know the real resource name so we set a flag
          // to prevent loading again this resource from the mapper interface
          // look at MapperAnnotationBuilder#loadXmlResource
          configuration.addLoadedResource("namespace:" + namespace);
          configuration.addMapper(boundType);
        }
      }
    }
  }
以上的过程中最终存储的是Mapper的类,该类只是用户定义的一个接口,当然还需要实现其中的方法。
在SqlSession调用getMapper方法时,框架内部使用JDK代理技术为我们创建了一个实现类对象。
//具体实现在MapperRegistry类
public <T> T getMapper(Class<T> type, SqlSession sqlSession) {
    //先判断该类是否有配置过
    final MapperProxyFactory<T> mapperProxyFactory = (MapperProxyFactory<T>) knownMappers.get(type);
    if (mapperProxyFactory == null) {
      throw new BindingException("Type " + type + " is not known to the MapperRegistry.");
    }
    try {
      //由MapperProxyFactory类来实例化
      return mapperProxyFactory.newInstance(sqlSession);
    } catch (Exception e) {
      throw new BindingException("Error getting mapper instance. Cause: " + e, e);
    }
  }
public T newInstance(SqlSession sqlSession) {
    final MapperProxy<T> mapperProxy = new MapperProxy<T>(sqlSession, mapperInterface, methodCache);
    return newInstance(mapperProxy);
  }
protected T newInstance(MapperProxy<T> mapperProxy) {
    //返回的是JDK代理对象
    return (T) Proxy.newProxyInstance(mapperInterface.getClassLoader(), new Class[] { mapperInterface }, mapperProxy);
  }
到这里整个原理已经基本明了了,实际上我们是调用了代理对象的方法,具体的定义在MapperProxy类中
public Object invoke(Object proxy, Method method, Object[] args) throws Throwable {
if (Object.class.equals(method.getDeclaringClass())) {
      try {
        return method.invoke(this, args);
      } catch (Throwable t) {
        throw ExceptionUtil.unwrapThrowable(t);
      }
    }
    //从method缓存中获取需要的方法
    final MapperMethod mapperMethod = cachedMapperMethod(method);
    return mapperMethod.execute(sqlSession, args);
  }
  //这里对method进行缓存
  private MapperMethod cachedMapperMethod(Method method) {
    MapperMethod mapperMethod = methodCache.get(method);
    if (mapperMethod == null) {
      mapperMethod = new MapperMethod(mapperInterface, method, sqlSession.getConfiguration());
      methodCache.put(method, mapperMethod);
    }
    return mapperMethod;
}这里没有分析MapperMethod的代码实现,如果有机会写到Mapper配置文件的解析时会再讲解。
其他
附上官方文档的地址,对于MyBatis的学习十分有帮助,本文红字部分均摘自官方文档。
http://www.mybatis.org/mybatis-3/zh/index.html


 2704
2704

 被折叠的 条评论
为什么被折叠?
被折叠的 条评论
为什么被折叠?
 到【灌水乐园】发言


