


6.1 查询提交
Git允许用户使用多种方法,获取单个提交,提交集合,以及指定范围内的提交,虽然这不是常用功能,但能够帮助用户理解Git。
单个提交
每个提交都对应了一个40位字符的SHA-1哈希值,同时还可使用一些更符合人类习惯的方法,来获取提交,如下,
SHA-1缩写
如果用户给出SHA-1哈希值的起始部分,Git就可以找到对应的提交,通常不少于4位,且不会产生同名,比如为了找到特定提交,可运行git log,
$ git log
commit 734713bc047d87bf7eac9674765ae793478c50d3
Author: Scott Chacon <schacon@ gmail.com>
Date:   Fri Jan 2 18:32:33 2009 -0800
    fixed refs handling, added gc auto, updated tests

commit d921970aadf03b3cf0e71becdaab3147ba71cdef
Merge: 1c002dd... 35cfb2b...
Author: Scott Chacon <schacon@ gmail.com>
Date:   Thu Dec 11 15:08:43 2008 -0800
    Merge commit 'phedders/rdocs'

commit 1c002dd4b536e7479fe34593e72e6c6c1819e53b
Author: Scott Chacon <schacon@ gmail.com>
Date:   Thu Dec 11 14:58:32 2008 -0800
    added some blame and merge stuff
如果特定提交的哈希值首部为1c002dd,之后可使用git show,并附带部分哈希值,则可查看特定提交,
$ git show 1c002dd4b536e7479fe34593e72e6c6c1819e53b
$ git show 1c002dd4b536e7479f
$ git show 1c002d
为了获取唯一的提交哈希值缩写,可在git log中,附带–abbrev-commit选项,它将输出每个提交的哈希值缩写,通常是7位,
$ git log --abbrev-commit --pretty=oneline
ca82a6d changed the version number
085bb3b removed unnecessary test code
a11bef0 first commit
通常情况下,8-10位的哈希值缩写,可以保证唯一性,比如截止到2019年2月,linux内核的提交数已超过875,000个,同时在对象数据库中,已保存接近7百万个对象,而这些引用对象,也只使用了12位的哈希值缩写。
分支
如果特定提交为分支的最新提交,可使用分支名,或是提交的哈希值,获取该提交,
$ git show ca82a6dff817ec66f44342007202690a93763949
$ git show topic1
如果用户需要查看分支的哈希值,或者哈希值所对应的引用对象,可使用rev-parse,当然这是一个底层命令,不会用于日常处理,但是它能帮助用户,更好地了解Git内部机制,
$ git rev-parse topic1
ca82a6dff817ec66f44342007202690a93763949
运行日志
运行在后台的Git,通常会保存一个日志,使用reflog,可查看近几个月来,仓库中HEAD和分支的变化,
$ git reflog
734713b... HEAD@{0}: commit: fixed refs handling, added gc auto, updated
d921970... HEAD@{1}: merge phedders/rdocs: Merge made by recursive.
1c002dd... HEAD@{2}: commit: added some blame and merge stuff
1c36188... HEAD@{3}: rebase -i (squash): updating HEAD
95df984... HEAD@{4}: commit: # This is a combination of two commits.
1c36188... HEAD@{5}: rebase -i (squash): updating HEAD
7e05da5... HEAD@{6}: rebase -i (pick): updating HEAD
如果需要查看第5次HEAD变化的细节,可使用,
$ git show HEAD@{5}
用户还可查看特定时间范围内的提交,比如查看master分支中昨天的最后提交,git show只能检索运行日志,运行日志以外的记录,则无能为力,
$ git show master@{yesterday}
在git log命令中,使用-g选项,可对日志记录进行过滤,比如只显示master分支的日志记录,
$ git log -g master
commit 734713bc047d87bf7eac9674765ae793478c50d3
Reflog: master@{0} (Scott Chacon <schacon@ gmail.com>)
Reflog message: commit: fixed refs handling, added gc auto, updated
Author: Scott Chacon <schacon@ gmail.com>
Date:   Fri Jan 2 18:32:33 2009 -0800

    fixed refs handling, added gc auto, updated tests

commit d921970aadf03b3cf0e71becdaab3147ba71cdef
Reflog: master@{1} (Scott Chacon <schacon@ gmail.com>)
Reflog message: merge phedders/rdocs: Merge made by recursive.
Author: Scott Chacon <schacon@ gmail.com>
Date:   Thu Dec 11 15:08:43 2008 -0800

    Merge commit 'phedders/rdocs'
运行日志只能包含本地仓库的变化信息,因此仓库副本之间,不存在一模一样的运行日志,当仓库克隆完成后,运行日志为空,当用户运行git show HEAD@{2.months.ago}命令时,除非运行日志中,已包含了2个月前的记录,否则只会看到本地的最后一次提交,在Unix或linux系统中,不同登录用户的Git运行日志也将不同。
父提交
使用^符号,可获取某个提交的父提交,假定当前的提交历史如下,
$ git log --pretty=format:'%h %s' --graph
* 734713b fixed refs handling, added gc auto, updated tests
*   d921970 Merge commit 'phedders/rdocs'
|\
| * 35cfb2b Some rdoc changes
* | 1c002dd added some blame and merge stuff
|/
* 1c36188 ignore *.gem
运行git show HEAD^,即检索当前最新提交的父提交,
$ git show HEAD^
commit d921970aadf03b3cf0e71becdaab3147ba71cdef
Merge: 1c002dd... 35cfb2b...
Author: Scott Chacon <schacon@ gmail.com>
Date:   Thu Dec 11 15:08:43 2008 -0800
    Merge commit 'phedders/rdocs'
注意,在Windows命令行中,^是一个转义符号,
$ git show HEAD^   # 在Windows系统中,无法运行成功
$ git show HEAD^^  # OK
$ git show "HEAD^" # OK
如果^后跟一个数字,可上溯查找父提交,比如d921970^2,则表示,检索d921970的第二父提交,这类语法只适用于合并提交,因为合并提交会存在多个父提交,第一父提交是主分支(保存合并提交的分支,通常是master)的父提交,第二父提交是从分支(需放入主分支)的父提交,
$ git show d921970^
commit 1c002dd4b536e7479fe34593e72e6c6c1819e53b
Author: Scott Chacon <schacon@ gmail.com>
Date:   Thu Dec 11 14:58:32 2008 -0800
    added some blame and merge stuff

$ git show d921970^2
commit 35cfb2b795a55793d7cc56a6cc2060b4bb732548
Author: Paul Hedderly <paul+git@ mjr.org>
Date:   Wed Dec 10 22:22:03 2008 +0000
    Some rdoc changes
获取父提交的另一个方法,使用~符号,所以HEAD~等同于HEAD^,差别在于,HEAD~2是指,检索第一父提交的第一父提交,可实现第一父提交的上溯迭代,如下,
$ git show HEAD~3
commit 734713b87afb5fbcbea25b7c013f4e2114448b8d
Author: Tom Preston-Werner <tom@ mojombo.com>
Date:   Fri Nov 7 13:47:59 2008 -0500
    ignore *.gem
并等同于HEAD~~~,还可混合使用上述符号,比如HEAD~3^2,可实现第二父提交的三次上溯迭代。
指定范围内的提交
双点格式
双点格式是最常用的范围设定格式,用于查找范围内的所有提交,假设提交历史如下,

如果查看experiment分支中,未合并到master分支的提交,可使用master…experiment,表示只属于experiment分支但不属于master分支的所有提交,为了简化描述,这里使用字母,替代了实际提交。
$ git log master..experiment
D
C
如果颠倒master和experiment的次序,则可得到,只属于master分支但不属于experiment分支的所有提交,
$ git log experiment..master
F
E
上述命令可用于保留experiment分支时,预览需合并的提交,另一个常见用法,查看本地仓库可向远程仓库推送的所有提交,
$ git log origin/master..HEAD
上述命令如果忽略HEAD,即git log origin/master..,Git也会将双点格式的空白一侧,默认为HEAD
多点格式
除了双点格式,如果需要比较多个分支的差异,可使用^符号或--not选项,给出分支的反向标记,即该分支包含的所有提交,不能出现在最终的检索结果中,因此以下三个命令等价:
$ git log refA..refB
$ git log ^refA refB
$ git log refB --not refA
基于上述语法,很容易查找多条分支的差异,例如存在于refA和refB分支,但未包含在refC分支的所有提交,以下两个命令等价,
$ git log refA refB ^refC
$ git log refA refB --not refC
三点格式
使用三点格式,可获取两条分支的差集,即剔除两条分支所拥有的相同提交,如下,
$ git log master...experiment
F
E
D
C
上述命令输出的提交,同时给出一个提交日期的次序,如果上述命令附带–left-right选项,差集包含的所有提交,都将标明宿主分支,
$ git log --left-right master...experiment
< F
< E
> D
> C
6.2 交互式暂存
暂存区命令可帮助用户,实现文件修改的归类,如果用户修改了大量的文件,应该这些修改进行分组,放入到若干次提交中,而不是全部打包到一个巨大的提交中,如果每次提交都能按逻辑归类,那么其他协作者更容易理解用户的意图。
如果git add附带-i或--interactive选项,用户将进入一个交互式shell环境,初始界面如下,
$ git add -i
           staged     unstaged path
  1:    unchanged        +0/-1 TODO
  2:    unchanged        +1/-1 index.html
  3:    unchanged        +5/-1 lib/simplegit.rb

*** Commands ***
  1: [s]tatus  2: [u]pdate  3: [r]evert  4: [a]dd untracked
  5: [p]atch   6: [d]iff    7: [q]uit    8: [h]elp
What now>
这个界面与之前介绍的暂存区,可能存在差异,同时它能提供,比git status更简明更丰富的信息,例如左边列出已暂存的变更,右边列出未暂存的变更。在Commands标题后,给出了一些功能项,比如暂存文件,撤销文件的暂存,只暂存文件的局部,加入未跟踪文件,显示暂存前后的文件差异。
暂存和撤销暂存
在What now>后,输入2或u,可提示用户,哪些文件需要暂存,
What now> u
           staged     unstaged path
  1:    unchanged        +0/-1 TODO
  2:    unchanged        +1/-1 index.html
  3:    unchanged        +5/-1 lib/simplegit.rb
Update>>
如果暂存TODO和index.html,可以输入相应编号:
Update>> 1,2
           staged     unstaged path
* 1:    unchanged        +0/-1 TODO
* 2:    unchanged        +1/-1 index.html
  3:    unchanged        +5/-1 lib/simplegit.rb
Update>>
*表示文件将被暂存,如果直接回车,将执行文件暂存,并输出暂存结果,退出Update状态,
Update>> [enter]
updated 2 paths
What now>
输入s或1,可查询暂存状态,
What now> s
      staged    unstaged path
1:     +0/-1    nothing TODO
2:     +1/-1    nothing index.html
3: unchanged      +5/-1 lib/simplegit.rb
这时TODO和index.html已暂存,simplegit.rb未暂存,如果撤销TODO文件的暂存,可输入3或r,
What now> 3
           staged     unstaged path
  1:        +0/-1      nothing TODO
  2:        +1/-1      nothing index.html
  3:    unchanged        +5/-1 lib/simplegit.rb

Revert>> 1
           staged     unstaged path
* 1:        +0/-1      nothing TODO
  2:        +1/-1      nothing index.html
  3:    unchanged        +5/-1 lib/simplegit.rb
Revert>> [enter]
reverted one path
再次查看状态,TODO文件已取消暂存,
What now> 1
           staged     unstaged path
  1:    unchanged        +0/-1 TODO
  2:        +1/-1      nothing index.html
  3:    unchanged        +5/-1 lib/simplegit.rb
使用d或6,可查看暂存前后的文件差异,它可列出已暂存文件,再输入暂存文件的编号,可查看暂存文件的修改细节,类似于git diff --cached,
What now> 6
           staged     unstaged path
  1:        +1/-1      nothing index.html
Review diff>> 1
diff --git a/index.html b/index.html
index 4d07108..4335f49 100644
--- a/index.html
+++ b/index.html
@@ -16,7 +16,7 @@ Date Finder

<p id="out">...</p>

-<div id="footer">contact : support@github.com</div>
+<div id="footer">contact : email.support@github.com</div>

<script type="text/javascript">
相比于命令操作,使用交互模式,可使暂存区的处理更加简单。
局部暂存
在暂存区中,可实现单个文件的局部暂存,比如simplegit.rb文件有两处修改,只需暂存其一,进入暂存交互模式,输入5或p,可逐个显示文件的所有修改,每个修改又被称为一个文件块,当完成一个文件块的显示后,将等待用户的处理指令,如下,
What now> 5
diff --git a/lib/simplegit.rb b/lib/simplegit.rb
index dd5ecc4..57399e0 100644
--- a/lib/simplegit.rb
+++ b/lib/simplegit.rb
@@ -22,7 +22,7 @@ class SimpleGit
   end

   def log(treeish = 'master')
-    command("git log -n 25 #{treeish}")
+    command("git log -n 30 #{treeish}")
   end

   def blame(path)
Stage this hunk [y,n,a,d,/,j,J,g,e,?]
最后一行给出了多种不同的暂存方案,输入?,可显示不同字符所包含的用法,
Stage this hunk [y,n,a,d,/,j,J,g,e,?]?
y - 暂存当前文件块
n - 不暂存当前文件块
a - 暂存当前和后续的文件块
d - 不暂存当前和后续的文件块
g - 跳转到指定编号的文件块
/ - 使用正则表达,检索匹配的文件块
j - 暂不处理当前文件块,查看下一个未处理的文件块
J - 暂不处理当前文件块,查看下一个文件块
k - 暂不处理当前文件块,查看上一个未处理的文件块
K - 暂不处理当前文件块,查看上一个文件块
s - 将当前文件块分割成更小的文件块
e - 手动编辑当前文件块
? - 显示帮助信息
如果已暂存部分文件块,可查找暂存区状态,
What now> 1
           staged     unstaged path
  1:    unchanged        +0/-1 TODO
  2:        +1/-1      nothing index.html
  3:        +1/-1        +4/-0 lib/simplegit.rb
从simplegit.rb的显示信息可知,暂存和未暂存同时出现了数据(1处修改已暂存,4处修改未暂存),所以该文件实现了局部暂存,这时可退出交互模式,使用git commit,直接提交已暂存的局部修改,如果用户不想进入交互模式,可使用git add -p或git add --patch,直接配置文件的局部暂存,使用git reset --patch,可将暂存文件块全部复位为未暂存,使用git checkout --patch,可基于附带的文件块编号,直接配置对应的文件块,使用git stash save --patch,可隐藏文件块。
6.3 隐藏和清理
通常在项目开发的过程中,大多数时候用户是处于一种无序的状态,同时还需要在分支之间来回切换,如果当前的工作成果,无法产生一次提交,那么用户就需要保存当前的工作场景,便于将来返回,继续之前的开发,这时就需要使用git stash命令。
隐藏命令可保存用户的工作区,即工作区内,正在修改的跟踪文件和暂存变更,用户的工作区场景,将保存在一个专用堆栈(通常用于存储未完成的修改)中,之后可重新恢复用户工作区,甚至能在其他分支上重新恢复。
值得注意,截止2017年10月,Git邮件列表上,讨论最热烈的话题之一,是否弃用git stash save命令,而使用git stash push,因为后者可选择补丁格式的隐藏,而前者不支持该功能,但是git stash save并未正式弃用,因此不必担心无法使用,而用户应当尽快熟悉新命令。
隐藏工作区
为了实现隐藏功能,用户需修改几个项目文件,并暂存一个已修改文件,再运行git status,查看工作区的状态,
$ git status
# Changes to be committed:
#   (use "git reset HEAD <file>..." to unstage)
#      modified:   index.html
#
# Changes not staged for commit:
#   (use "git add <file>..." to update what will be committed)
#   (use "git checkout -- <file>..." to discard changes in working directory)
#      modified:   lib/simplegit.rb
如果用户切换分支,但不想推送当前的修改,可选择隐藏功能,运行git stash或git stash push,WIP是指work in progress,即正在进行的工作,
$ git stash
Saved working directory and index state "WIP on master: 049d078 added the index file"
HEAD is now at 049d078 added the index file
(To restore them type "git stash apply")
这时工作区已经清理干净,
$ git status
# On branch master
nothing to commit, working directory clean
之后用户可切换到其他分支,开始其他的任务,运行git stash list,可查看已隐藏的内容,
$ git stash list
stash@{0}: WIP on master: 049d078 added the index file
stash@{1}: WIP on master: c264051 Revert "added file_size"
stash@{2}: WIP on master: 21d80a5 added number to log
隐藏堆栈中,包含了三个修改,使用git stash apply,可恢复最新的隐藏,如果用户需要恢复最早的隐藏,可使用git stash apply stash@{2},
$ git stash apply
# On branch master
# Changed but not updated:
#   (use "git add <file>..." to update what will be committed)
#
#      modified:   index.html
#      modified:   lib/simplegit.rb
可见储藏已恢复,当然一个干净的工作目录,对于储藏的恢复,并无影响,当在工作目录里,包含了已修改和未提交的文件时,可以使用储藏,如果有变更,无法干净地应用,Git会自动归并冲突,虽然恢复了文件的变更,但暂存文件却未暂存,因此git stash apply需添加--index选项,恢复暂存文件,此时将回到之前的工作进程,
$ git stash apply
# On branch master
# Changes not staged for commit:
#   (use "git add <file>..." to update what will be committed)
#   (use "git checkout -- <file>..." to discard changes in working directory)
#
#      modified:   index.html
#      modified:   lib/simplegit.rb
#
# no changes added to commit (use "git add" and/or "git commit -a")
在恢复隐藏时,Git将会变更对应文件的状态,因此在恢复隐藏之前,用户必须提供一个干净的工作区,同时用户在一条分支上执行隐藏后,可切换到其他分支,恢复同一隐藏,当然用户也可在一个不干净的工作区内,恢复之前的隐藏,但可能会出现不完整的恢复,而引发后续的合并冲突。注意,虽然文件的修改可以恢复,但是文件之前的暂存状态尚未恢复,如果需要实现暂存状态的恢复,必须在git stash apply命令中,附带--index选项,
$ git stash apply --index
On branch master
Changes to be committed:
  (use "git reset HEAD <file>..." to unstage)
    modified: index.html

Changes not staged for commit:
  (use "git add <file>..." to update what will be committed)
  (use "git checkout -- <file>..." to discard changes in working directory)
    modified: lib/simplegit.rb
同时apply命令只能恢复隐藏,无法删除隐藏记录,因此需要使用git stash drop,如果使用git stash pop,隐藏恢复后,堆栈保存的隐藏记录将立即被删除,
$ git stash list
stash@{0}: WIP on master: 049d078 added the index file
stash@{1}: WIP on master: c264051 Revert "added file_size"
stash@{2}: WIP on master: 21d80a5 added number to log
$ git stash drop stash@{0}
Dropped stash@{0} (364e91f3f268f0900bc3ee613f9f733e82aaed43)
隐藏选项
git stash的常用选项–keep-index,index文件不仅可保存暂存区数据,还可保存HEAD指针,
$ git status -s
M index.html
 M lib/simplegit.rb

$ git stash --keep-index
Saved working directory and index state WIP on master: 1b65b17 added the index file
HEAD is now at 1b65b17 added the index file

$ git status -s
M index.html
另一种常见用法,在隐藏中,同等对待跟踪文件和未跟踪文件,默认情况下,git stash只能隐藏已修改和已暂存的跟踪文件,如果附带--include-untracked 或-u选项,隐藏可保存未跟踪文件,此处定义的未跟踪文件,并不包含可忽略文件(ignored),如果需要保存可忽略文件,必须附带--all或-a选项。
$ git status -s
M index.html
 M lib/simplegit.rb
?? new-file.txt

$ git stash -u
Saved working directory and index state WIP on master: 1b65b17 added the index file
HEAD is now at 1b65b17 added the index file

$ git status -s
$
如果附带--patch选项,将不会执行自动隐藏,所有的文件修改将被视为一个个独立的文件块,并基于交互模式,请求用户给出处理指令,以实现隐藏,这与局部文件的暂存很相似,
$ git stash --patch
diff --git a/lib/simplegit.rb b/lib/simplegit.rb
index 66d332e..8bb5674 100644
--- a/lib/simplegit.rb
+++ b/lib/simplegit.rb
@@ -16,6 +16,10 @@ class SimpleGit
        return `#{git_cmd} 2>&1`.chomp
       end
      end
+
+     def show(treeish = 'master')
+       command("git show #{treeish}")
+     end
 end
 test
Stash this hunk [y,n,q,a,d,/,e,?]? y

Saved working directory and index state WIP on master: 1b65b17 added the index file
基于隐藏的分支创建
当用户完成一次隐藏后,并在相同分支上继续开发,这将产生隐藏的恢复问题,即隐藏之后,用户再次修改了相同文件,隐藏一旦恢复,那么用户的后续修改将丢失,这也将导致合并冲突,这时有一种更简单方法,以实现隐藏的恢复,即git stash branch <分支名>,基于隐藏,创建一条新分支,等同于在新分支中,恢复隐藏的工作区场景,一旦恢复成功,可自动删除对应的隐藏记录,
$ git stash branch testchanges
M  index.html
M  lib/simplegit.rb
Switched to a new branch 'testchanges'
On branch testchanges
Changes to be committed:
  (use "git reset HEAD <file>..." to unstage)
    modified:   index.html

Changes not staged for commit:
  (use "git add <file>..." to update what will be committed)
  (use "git checkout -- <file>..." to discard changes in working directory)
    modified:   lib/simplegit.rb

Dropped refs/stash@{0} (29d385a81d163dfd45a452a2ce816487a6b8b014)
清理工作区
如果用户无需隐藏工作区,可以使用git clean进行工作区的简单清理,同时工作区清理,可移除合并或扩展工具生成的冗余,以及编译生成的冗余,以获得一个干净的项目版本,当然运行清理命令时,应当十分小心,因为它可移除工作区中,所有未被跟踪的文件,并且无法恢复,另一个更安全的选择,可运行git stash --all命令,它可移除工作区的所有修改和未跟踪文件,以及可忽略文件,而这些数据将会放入一个隐藏。
如果用户需要移除工作区的冗余文件,可使用git clean,如果需要移除所有未跟踪文件,可使用git clean -f -d,-f选项表示强制执行,如果Git配置变量clean.requireForce设为false,-f选项将失效。
如果需要预览清理命令的执行结果,可附带--dry-run或-n选项,
$ git clean -d -n
Would remove test.o
Would remove tmp/
默认情况下,git clean只移除未跟踪文件,不移除可忽略文件(以及匹配.gitignore模板的文件),如果还需要移除其他类型的文件,比如编译生成的.o文件,可运行一次完全清除,即附带-x选项,
$ git status -s
 M lib/simplegit.rb
?? build.TMP
?? tmp/

$ git clean -n -d
Would remove build.TMP
Would remove tmp/

$ git clean -n -d -x
Would remove build.TMP
Would remove test.o
Would remove tmp/
除了-n选项的预览功能,还可使用-i选项,实现清理操作的交互模式,可使每个文件的清理,都交给用户指令,
$ git clean -x -i
Would remove the following items:
  build.TMP test.o
*** Commands ***
1: clean     2: filter by pattern  3: select by numbers
4: ask each  5: quit               6: help
What now>
注意,如果工作区包含了其他Git仓库,可使用git clean -fd,以免清理操作误删其他仓库的文件,同时还可添加-f选项,以强调执行的等级。
6.4 签名机制
Git可通过加密保证安全性,但步骤有点繁琐,当用户获取他人的开发成果后,需要验证这些数据是否可靠,因此Git提供了一些方式,实现了基于GPG的签名和验证。
GPG
为了实现签名机制,首先需配置GPG,以及安装个人私钥,
$ gpg --list-keys
/Users/schacon/.gnupg/pubring.gpg
---------------------------------
pub 2048R/0A46826A 2014-06-04
uid Scott Chacon (Git signing key) <schacon@gmail.com>
sub 2048R/874529A9 2014-06-04
如果用户未安装私钥,可使用gpg --gen-key,生成一个私钥,
$ gpg --gen-key
一旦私钥生成,就可设定配置变量user.signingkey,以便Git完成签名,
$ git config --global user.signingkey 0A46826A
之后Git将默认使用该私钥,为仓库标签和提交,提供签名
签名标签
在git tag命令中,附带-s选项,就可为新标签提供签名,
$ git tag -s v1.5 -m 'my signed 1.5 tag'
You need a passphrase to unlock the secret key for
user: "Ben Straub <ben@straub.cc>"
2048-bit RSA key, ID 800430EB, created 2014-05-04
运行git show,查看上述标签,可见标签已附带签名,
$ git show v1.5
tag v1.5
Tagger: Ben Straub <ben@straub.cc>
Date:   Sat May 3 20:29:41 2014 -0700

my signed 1.5 tag
-----BEGIN PGP SIGNATURE-----
Version: GnuPG v1

iQEcBAABAgAGBQJTZbQlAAoJEF0+sviABDDrZbQH/09PfE51KPVPlanr6q1v4/Ut
LQxfojUWiLQdg2ESJItkcuweYg+kc3HCyFejeDIBw9dpXt00rY26p05qrpnG+85b
hM1/PswpPLuBSr+oCIDj5GMC2r2iEKsfv2fJbNW8iWAXVLoWZRF8B0MfqX/YTMbm
ecorc4iXzQu7tupRihslbNkfvfciMnSDeSvzCpWAHl7h8Wj6hhqePmLm9lAYqnKp
8S5B/1SSQuEAjRZgI4IexpZoeKGVDptPHxLLS38fozsyi0QyDyzEgJxcJQVMXxVi
RUysgqjcpT8+iQM1PblGfHR4XAhuOqN5Fx06PSaFZhqvWFezJ28/CLyX5q+oIVk=
=EFTF
-----END PGP SIGNATURE-----

commit ca82a6dff817ec66f44342007202690a93763949
Author: Scott Chacon <schacon@gee-mail.com>
Date:   Mon Mar 17 21:52:11 2008 -0700
    changed the version number
验证标签
使用git tag -v <标签名>,可验证附带签名的标签,该命令将使用GPG,进行签名验证,同时验证用户需要获得签名用户的公钥,
$ git tag -v v1.4.2.1
object 883653babd8ee7ea23e6a5c392bb739348b1eb61
type commit
tag v1.4.2.1
tagger Junio C Hamano <junkio@cox.net> 1158138501 -0700

GIT 1.4.2.1

Minor fixes since 1.4.2, including git-mv and git-http with alternates.
gpg: Signature made Wed Sep 13 02:08:25 2006 PDT using DSA key ID F3119B9A
gpg: Good signature from "Junio C Hamano <junkio@cox.net>"
gpg:                aka "[jpeg image of size 1513]"
Primary key fingerprint: 3565 2A26 2040 E066 C9A7 4A7D C0C6 D9A4 F311 9B9A
如果无法获取签名用户的公钥,将出现验证错误,
gpg: Signature made Wed Sep 13 02:08:25 2006 PDT using DSA key ID F3119B9A
gpg: Can't check signature: public key not found
error: could not verify the tag 'v1.4.2.1'
签名提交
Git从1.7.9版开始,就可为单个提交,提供签名,即在git commit命令中,附带-S选项,
$ git commit -a -S -m 'signed commit'
You need a passphrase to unlock the secret key for
user: "Scott Chacon (Git signing key) <schacon@gmail.com>"
2048-bit RSA key, ID 0A46826A, created 2014-06-04

[master 5c3386c] signed commit
 4 files changed, 4 insertions(+), 24 deletions(-)
 rewrite Rakefile (100%)
 create mode 100644 lib/git.rb
为了查看和验证提交的签名,可在git log命令中,附带–show-signature
$ git log --show-signature -1
commit 5c3386cf54bba0a33a32da706aa52bc0155503c2
gpg: Signature made Wed Jun 4 19:49:17 2014 PDT using RSA key ID 0A46826A
gpg: Good signature from "Scott Chacon (Git signing key) <schacon@gmail.com>"
Author: Scott Chacon <schacon@gmail.com>
Date:   Wed Jun 4 19:49:17 2014 -0700
    signed commit
另外还可设置签名的输出格式,如下,
$ git log --pretty="format:%h %G? %aN %s"
5c3386c G Scott Chacon signed commit
ca82a6d N Scott Chacon changed the version number
085bb3b N Scott Chacon removed unnecessary test code
a11bef0 N Scott Chacon first commit
从输出信息可知,只有最新提交的签名(G)通过验证。从1.8.3版本开始,git merge和git pull可附带--verify-signatures选项,验证提交的签名,如果提交未包含签名,或是签名未通过验证,可拒绝提交的合并和同步。
$ git merge --verify-signatures non-verify
fatal: Commit ab06180 does not have a GPG signature.

$ git merge --verify-signatures signed-branch
Commit 13ad65e has a good GPG signature by Scott Chacon (Git signing key)
<schacon@gmail.com>
Updating 5c3386c..13ad65e
Fast-forward
 README | 2 ++
 1 file changed, 2 insertions(+)
如果git merge附带-S选项,可实现合并提交的签名,
$ git merge --verify-signatures -S signed-branch
Commit 13ad65e has a good GPG signature by Scott Chacon (Git signing key)
<schacon@gmail.com>

You need a passphrase to unlock the secret key for
user: "Scott Chacon (Git signing key) <schacon@gmail.com>"
2048-bit RSA key, ID 0A46826A, created 2014-06-04

Merge made by the 'recursive' strategy.
 README | 2 ++
 1 file changed, 2 insertions(+)
6.5 检索
在代码库中,用户经常需要查找函数或类方法的定义和调用,因此Git提供了一组命令,便于在数据库的代码和提交中,快速检索相关信息。
grep
使用grep命令,可基于提交树,工作区,甚至是字符串索引或是正则表达式,默认情况下,grep可基于工作区的文件,实现信息检索,如果附带-n或--line-number选项,可显示匹配内容的行号,
$ git grep -n gmtime_r
compat/gmtime.c:3:#undef gmtime_r
compat/gmtime.c:8: return git_gmtime_r(timep, &result);
compat/gmtime.c:11:struct tm *git_gmtime_r(const time_t *timep, struct tm *result)
compat/gmtime.c:16: ret = gmtime_r(timep, result);
compat/mingw.c:826:struct tm *gmtime_r(const time_t *timep, struct tm *result)
compat/mingw.h:206:struct tm *gmtime_r(const time_t *timep, struct tm *result);
date.c:482: if (gmtime_r(&now, &now_tm))
date.c:545: if (gmtime_r(&time, tm)) {
date.c:758: /* gmtime_r() in match_digit() may have clobbered it */
git-compat-util.h:1138:struct tm *git_gmtime_r(const time_t *, struct tm *);
git-compat-util.h:1140:#define gmtime_r git_gmtime_r
附带-c或--count选项,可显示每个文件的匹配次数,
$ git grep --count gmtime_r
compat/gmtime.c:4
compat/mingw.c:1
compat/mingw.h:1
date.c:3
git-compat-util.h:2
附带-p或--show-function选项,可显示每次匹配所处的函数或类方法,
$ git grep -p gmtime_r *.c
date.c=static int match_multi_number(timestamp_t num, char c, const char *date,
date.c: if (gmtime_r(&now, &now_tm))
date.c=static int match_digit(const char *date, struct tm *tm, int *offset, int *tm_gmt)
date.c: if (gmtime_r(&time, tm)) {
date.c=int parse_date_basic(const char *date, timestamp_t *timestamp, int *offset)
date.c: /* gmtime_r() in match_digit() may have clobbered it */
如果实现更复杂的字串匹配,还可附带--and选项,它可保证一行文本必须匹配多个检索条件,比如查找常量名中,既包含LINK又包含BUF_MAX字串,而Git仓库的版本则限定为v1.8.0,同时附带--break和--heading选项,可使输出信息更易于阅读,
$ git grep --break --heading \
    -n -e '#define' --and \( -e LINK -e BUF_MAX \) v1.8.0
v1.8.0:builtin/index-pack.c
62:#define FLAG_LINK (1u<<20)

v1.8.0:cache.h
73:#define S_IFGITLINK 0160000
74:#define S_ISGITLINK(m) (((m) & S_IFMT) == S_IFGITLINK)

v1.8.0:environment.c
54:#define OBJECT_CREATION_MODE OBJECT_CREATION_USES_HARDLINKS

v1.8.0:strbuf.c
326:#define STRBUF_MAXLINK (2*PATH_MAX)

v1.8.0:symlinks.c
53:#define FL_SYMLINK (1 << 2)

v1.8.0:zlib.c
30:/* #define ZLIB_BUF_MAX ((uInt)-1) */
31:#define ZLIB_BUF_MAX ((uInt) 1024 * 1024 * 1024) /* 1GB */
git grep包含的一些高级功能,已领先于通用的检索命令,比如grep和ack,首先它的速度更快,其次可检索Git文件树,不仅仅是工作区的目录检索。
log
git log也可基于提交描述,或是差异数据,进行检索,比如查找首次出现ZLIB_BUF_MAX常量的提交,这时可附带-S选项,将显示修改该常量的所有提交,
$ git log -S ZLIB_BUF_MAX --oneline
e01503b zlib: allow feeding more than 4GB in one go
ef49a7a zlib: zlib can only process 4GB at a time
从上述的输出信息可知,ef49a7a提交引入了该常量,e01503b提交又进行了修改,如果需要指定更复杂的检索条件,可附带-G选项以及正则表达式。
线性检索
使用-L选项,可检索函数或代码行的变更历史,比如查看zlib.c中git_deflate_bound函数的所有修改,如下,
$ git log -L :git_deflate_bound:zlib.c
commit ef49a7a0126d64359c974b4b3b71d7ad42ee3bca
Author: Junio C Hamano <gitster@pobox.com>
Date:   Fri Jun 10 11:52:15 2011 -0700
    zlib: zlib can only process 4GB at a time

diff --git a/zlib.c b/zlib.c
--- a/zlib.c
+++ b/zlib.c
@@ -85,5 +130,5 @@
-unsigned long git_deflate_bound(z_streamp strm, unsigned long size)
+unsigned long git_deflate_bound(git_zstream *strm, unsigned long size)
{
- return deflateBound(strm, size);
+ return deflateBound(&strm->z, size);
}

commit 225a6f1068f71723a910e8565db4e252b3ca21fa
Author: Junio C Hamano <gitster@pobox.com>
Date:   Fri Jun 10 11:18:17 2011 -0700
    zlib: wrap deflateBound() too

diff --git a/zlib.c b/zlib.c
--- a/zlib.c
+++ b/zlib.c
@@ -81,0 +85,5 @@
+unsigned long git_deflate_bound(z_streamp strm, unsigned long size)
+{
+ return deflateBound(strm, size);
+}
+
如果Git无法支持特定编程语言的函数或类方法,可使用正则表达式,比如上述查找,可使用git log -L ‘/unsigned long git_deflate_bound/’,/^}/:zlib.c,同时用户还可指定文本行数,以及输出信息的排序。
6.6 修改提交
使用Git进行代码管理的大多数时候,用户都需要对本地提交历史进行整理,当然在整理之前,Git还提供了一些技巧,比如在提交暂存区之前,筛选提交所包含的修改文件,需要搁置的待续工作,可使用git stash隐藏,同时用户还可对本地仓库的提交进行修改,比如修改提交的次序,提交描述,提交所包含的文件修改,以及拆分和重组提交,删除提交,但前提是,本地提交并未分享到远程仓库或协作者。
修改最新提交
修改最新提交是最常见的需求,通常包含两个任务,其一,修改提交描述,其二,添加,移除或修改提交所包含的内容,修改最新提交的描述,可使用
$ git commit --amend
该命令可打开一个文本编辑器,导入之前的提交描述,用户只需修改和保存,再退出文本编辑器,这时新的提交描述将更新到最新提交。
如果需要修改最新提交的内容,首先在暂存区中,重建一个新提交,使用git commit --amend,覆盖之前的提交,应当谨慎使用 --amend选项,因为它将修改提交的SHA-1校验值,所以可等同于一次小型的衍合。
注意,如果提交的修改涉及到功能变动,则应当修改提交描述,如果只是小问题,比如改正输入错误或是添加遗忘的文件,可附带--no-edit,避免调用文本编辑器,
$ git commit --amend --no-edit
修改早期提交
修改早期提交,则更加复杂,Git未提供相应的修改工具,必须使用交换式衍合命令,逐个遍历一组提交,以修改特定提交,为开启交互式衍合,需运行git rebase -i,同时附带对应提交的标识,比如需修改第三个(最新提交的)父提交的提交描述,那么附带的提交标识为HEAD~2^或HEAD~3,注意,前三个父提交即第四个提交(逆序,从后往前),
$ git rebase -i HEAD~3
上述命令将逐个遍历HEAD~3..HEAD的所有提交,并逐个给出用户指令,同样该范围内,不能包括已经推送到远程仓库的提交,以避免因共享而产生的冲突,直接运行上述命令,将会启动一个文本编辑器,并在文本编辑器中,显示以下的文本,
pick f7f3f6d changed my name a bit
pick 310154e updated README formatting and added blame
pick a5f4a0d added cat-file

# Rebase 710f0f8..a5f4a0d onto 710f0f8
#
# Commands:
# p, pick <commit> = use commit
# r, reword <commit> = use commit, but edit the commit message
# e, edit <commit> = use commit, but stop for amending
# s, squash <commit> = use commit, but meld into previous commit
# f, fixup <commit> = like "squash", but discard this commit's log message
# x, exec <command> = run command (the rest of the line) using shell
# b, break = stop here (continue rebase later with 'git rebase --continue')
# d, drop <commit> = remove commit
# l, label <label> = label current HEAD with a name
# t, reset <label> = reset HEAD to a label
# m, merge [-C <commit> | -c <commit>] <label> [# <oneline>]
# .       create a merge commit using the original merge commit's
# .       message (or the oneline, if no original merge commit was
# .       specified). Use -c <commit> to reword the commit message.
#
# These lines can be re-ordered; they are executed from top to bottom.
#
# If you remove a line here THAT COMMIT WILL BE LOST.
#
# However, if you remove everything, the rebase will be aborted.
#
# Note that empty commits are commented out
如果运行git log命令,可得到相同的提交列表,只是次序相反,
$ git log --pretty=format:"%h %s" HEAD~3..HEAD
a5f4a0d added cat-file
310154e updated README formatting and added blame
f7f3f6d changed my name a bit
由于交互式衍合命令的起点(HEAD~3)不同,遍历的方向(向后)也不同,因而得到一个逆序列表,由于交互式衍合命令的首次运行,会得到一个输出文本,用户需要配置该文本,重复执行同一命令,才可实现早期提交的修改,在衍合命令的输出文本中,将pick改为edit,等同于将遍历模式改为编辑模式,继续上例,修改第三个父提交,
edit f7f3f6d changed my name a bit
pick 310154e updated README formatting and added blame
pick a5f4a0d added cat-file
保存输出文本,退出文本编辑器,再次运行交互式衍合命令,
$ git rebase -i HEAD~3
Stopped at 7482e0d... updated the gemspec to hopefully work better
You can amend the commit now, with
       git commit --amend

Once you’re satisfied with your changes, run
       git rebase --continue
这时等同于进入了交互式衍合的执行终端,可输入特定提交的修改命令,与最新提交的修改一样,修改完成后,需输入git rebase --continue,继续衍合命令的执行,
$ git commit --amend
$ git rebase --continue
如果用户将衍合输出文本中,多行提交的pick改为edit,上述修改需重复执行,以实现多个提交的修改。
修改提交次序
使用交互式衍合命令,还可以修改早期提交的次序,以及删除早期提交,比如在上述的衍合输出文本中,删除added cat-file提交,并交换剩余两个提交的次序,可将衍合输出文本修改为,
pick 310154e updated README formatting and added blame
pick f7f3f6d changed my name a bit
此时added cat-file行文本已被删除,另两个提交的次序也被修改,保存衍合输出文本,再行运行git rebase -i HEAD~3。
重组提交
使用交互式衍合命令,还可将一组提交重组为一个提交,从之前衍合输出文本的注释中可见,重组指令为s或squash,也就是将pick改为squash,
pick   f7f3f6d changed my name a bit
squash 310154e updated README formatting and added blame
squash a5f4a0d added cat-file
保存衍合输出文本,退出文本编辑器,运行git rebase -i HEAD~3,将输出以下信息,
# This is a combination of 3 commits.
# The first commit's message is:
changed my name a bit

# This is the 2nd commit message:
updated README formatting and added blame

# This is the 3rd commit message:
added cat-file
这时第二和第三提交都已重组到第一提交(f7f3f6d)。
拆分提交
拆分提交是指,将提交恢复到工作区,将所有修改分块,逐块进行暂存和提交,继续使用之前的衍合输出文本,假定updated README formatting and added blame提交,需分成两次提交,即updated README formatting和added blame提交,首先修改衍合输出文本,
pick f7f3f6d changed my name a bit
edit 310154e updated README formatting and added blame
pick a5f4a0d added cat-file
保存衍合输出文本,退出文本编辑器,运行git rebase -i HEAD~3,当遍历到第二个父提交时,交互式衍合命令暂停,等待用户指令,为了实现提交拆分,可使用以下命令,
$ git reset HEAD^    # 将提交恢复到工作区,衍合命令可移动HEAD指针
$ git add README     # 重新暂存,原有提交的变更文件
$ git commit -m 'updated README formatting'  # 提交暂存区
$ git add lib/simplegit.rb    # 重新暂存,原有提交的变更文件
$ git commit -m 'added blame' # 提交暂存区
完成提交拆分后,使用git rebase --continue,继续执行交互式衍合命令,查看提交历史,
$ git log -4 --pretty=format:"%h %s"
1c002dd added cat-file
9b29157 added blame
35cfb2b updated README formatting
f3cc40e changed my name a bit
注意,提交拆分将导致衍合输出文本中,所有提交的SHA-1校验值发生变化,因此需保证这些提交未共享给他人。
filter-branch
如果用户需使用脚本,来修改大量提交,通常会使用filter-branch命令,比如从所有提交中,修改邮箱或删除特定文件。
删除文件
用户的粗心大意经常会造成提交中包含了一些多余文件,比如二进制文件,密码文件等,如果需要遍历整个提交历史,以删除passwords.txt密码文件,这时可以使用git filter-branch --tree-filter,
$ git filter-branch --tree-filter 'rm -f passwords.txt' HEAD
Rewrite 6b9b3cf04e7c5686a9cb838c3f36a8cb6a0fc2bd (21/21)
Ref 'refs/heads/master' was rewritten
filter-branch包含了多个过滤器,以应对不同类型的冗余数据,
[--subdirectory-filter <directory>] 子目录过滤器
[--env-filter <command>]            环境过滤器,用于修改作者/提交者的名字/邮件,提交时间
[--tree-filter <command>]           工作区的文件树过滤器
[--index-filter <command>]          文件索引过滤器,提交包含的每个文件都有一个索引值,但不会检查文件树
[--parent-filter <command>]         父提交过滤器
[--msg-filter <command>]            提交描述过滤器
[--commit-filter <command>]         提交过滤器
[--tag-name-filter <command>]       标签过滤器
–tree-filter会将提交恢复到暂存区,遍历其中的文件,执行附带的系统命令后,再重新提交,这时所有提交包含的passwords.txt文件都将被删除,如果用户需要删除所有提交中,包含的备份文件(以~结尾),可使用git filter-branch --tree-filter ‘rm -f *~’ HEAD。
一个更好的修改方法,首先在一条实验分支上,完成所需的修改,并验证修改结果,验证通过后,再修改master分支,或者将所需修改,导入当前项目的所有分支,这时可使用
git filter-branch --tree-filter 'rm -f passwords.txt' -- --all
注意 --和 --之间有一个空格,用于表示所有分支。
子目录修改
如果用户需要导入其他版本控制系统的数据,其中的子目录已无意义(trunk,tags等等),如果将子目录trunk设定为新项目的根目录,可使用filter-branch,之后的提交删除,将不会影响到trunk子目录,
$ git filter-branch --subdirectory-filter trunk HEAD
Rewrite 856f0bf61e41a27326cdae8f09fe708d679f596f (12/12)
Ref 'refs/heads/master' was rewritten
修改邮箱地址
如果用户忘记配置自己的用户名和邮箱地址,或是转入开源项目后,希望将公司邮箱换成私人邮箱,这时可使用filter-branch --commit-filter,但必须小心操作,
$ git filter-branch --commit-filter '
        if [ "$GIT_AUTHOR_EMAIL" = "schacon@localhost" ];
        then
                GIT_AUTHOR_NAME="Scott Chacon";
                GIT_AUTHOR_EMAIL="schacon@example.com";
                git commit-tree "$@";
        else
                git commit-tree "$@";
        fi' HEAD
执行完毕后,每个提交的作者邮箱都将被修改,由于上述命令会修改整个提交,因此所有提交的SHA-1校验值也将变更。
6.7 撤销提交
三类文件树
reset和checkout命令,主要用于三类文件树的管理,这里的文件树意为文件集合,并不是数据结构,虽然在大多数情况下,索引并不等同于文件树,但是为了描述的简单,这里将默认两者无区别,Git包含的三类文件树,
HEAD, 指向最新提交的指针
索引,  下一次提交的暂存集合
工作区,文件容器
HEAD
HEAD是当前分支的引用指针,并且一直指向当前分支的最新提交,当然也可视为下一次提交的父指针,基于HEAD,可查看最新项目版本(最新项目快照)中所有文件的SHA-1校验值,
$ git cat-file -p HEAD
tree cfda3bf379e4f8dba8717dee55aab78aef7f4daf
author Scott Chacon 1301511835 -0700
committer Scott Chacon 1301511835 -0700
    initial commit

$ git ls-tree -r HEAD
100644 blob a906cb2a4a904a152...  README
100644 blob 8f94139338f9404f2...  Rakefile
040000 tree 99f1a6d12cb4b6f19...  lib
索引
索引即为暂存区的文件集合,Git可使用索引,标识一个文件列表的所有文件,这些文件已从工作区移入暂存区,一旦提交之后,这些文件将在新的项目快照中,替换之前的文件,同时git commit可将文件列表,转换成一个文件树,
$ git ls-files -s
100644 a906cb2a4a904a152e80877d4088654daad0c859 0  README
100644 8f94139338f9404f26296befa88755fc2598c289 0  Rakefile
100644 47c6340d6459e05787f644c2447d2595f5d3a54b 0  lib/simplegit.rb
索引并不是一个真正意义上的树结构,而只是一个清单,但已经满足要求。
工作区
工作区又被称为工作树,另两种文件树只是高效存储了工作区文件的修改,虽然方法比较复杂,同时工作区保存了所有的真实文件(.git目录下),用户可编辑这些文件,
$ tree
.
├── README
├── Rakefile
└── lib
  └── simplegit.rb

1 directory, 3 files
工作流
Git的典型工作流,可基于三类文件树,更易于实现项目快照的保存,

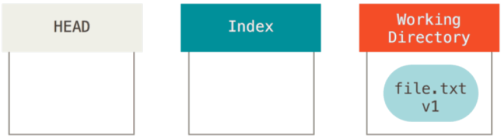
假定用户在工作区目录中,新建了一个文件file.txt,版本为v1,这时运行git init,可创建一个Git本地仓库,同时生成默认分支master,而HEAD引用指针将指向master分支,虽然master分支并无提交,
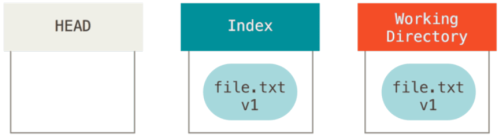
运行git add,将file文件放入暂存区,即索引文件树,
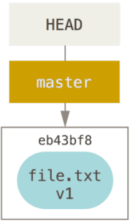
运行git commit,将文件file提交到仓库的master分支,并保存为一个项目快照,
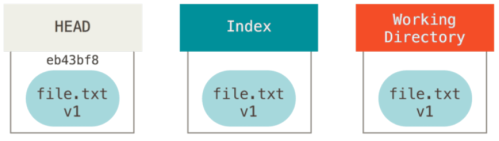
运行git status,用户看不到变更报告,因为三类文件树的内容一致,这时用户修改了file,并生成了v2版本,
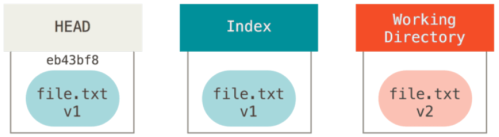
运行git status,依然无法看到变更报告,使用git add,将v2版本暂存到索引文件树,

运行git status,将显示file文件的v1和v2的版本差异,运行git commit将v2版本提交到master分支,
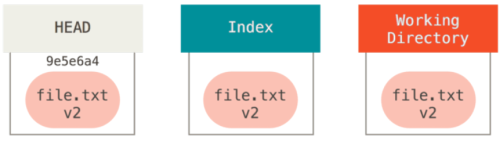

运行git status,此时不存在变更,当用户切换分支时,HEAD也将指向目的分支,如果暂存区或索引文件树中,存在文件,将复制回工作区。
reset
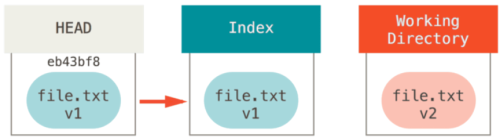
reset命令可将当前的HEAD指针,复位到指定状态,举例说明,假定用户持续修改了file.txt文件,并提交了三次,提交历史如下,同时reset命令可完成以下步骤,

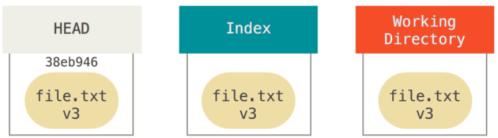
第一步:移动HEAD指针
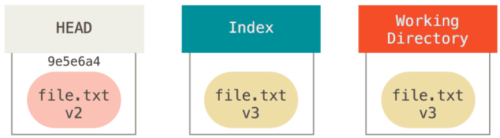
reset移动HEAD的方式,不同于checkout,如果当前分支为master,git reset 9e5e6a4将使HEAD移动到9e5e6a4提交,这里出现一个问题,如果指定的提交,不属于当前分支,如何移动? 如果用户只需要完成第一步,可运行git reset --soft HEAD~,该命令可视为撤销最新提交,而HEAD~表示当前HEAD的父提交,同时用户可更新暂存区(索引文件树),再次运行git commit,这一系列动作,可等同于git commit --amend命令。

第二步:反向更新暂存区(索引文件树)
此时运行git status,可显示暂存区与HEAD(指向)提交之间的差异,运行git reset --mixed,可实现暂存区的反向更新,如果用户需要一次性完成上述两个步骤,可使用git reset HEAD~,

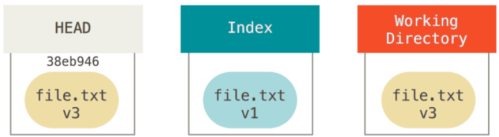
第三步:反向更新工作区
应当注意,git reset --hard存在风险,它也是少数几种能够真正清除数据的Git命令,之前的reset选项都可以恢复,但 --hard的执行结果无法恢复,因为它会强制覆盖掉工作区的对应文件,如果v3版本曾经提交过,用户还可通过reflog命令,完成恢复,如果v3版本并未提交,那么运行git reset --hard,将彻底丢失v3版本。

文件路径的复位
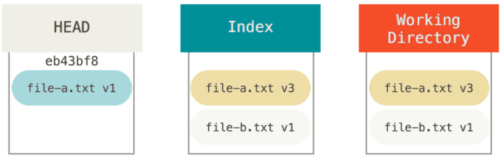
除了之前的应用,reset还可复位单个文件或文件集合,因为HEAD是一个指针,可指向任意提交,如果运行git reset file.txt,可将HEAD移动到file.txt的起始提交,即file.txt的v1版本,再将对应提交,恢复到暂存区,这等同于git reset --mixed HEAD file.txt,
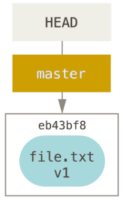
如果用户运行git reset --patch eb43bf8 – file.txt,就可将任意文件的任意版本,反向恢复到暂存区,

所以用户可随意选择旧版本,直接覆盖新版本,同时 --patch选项为默认功能,上述命令可简化为git reset eb43bf8 – file.txt。
重组
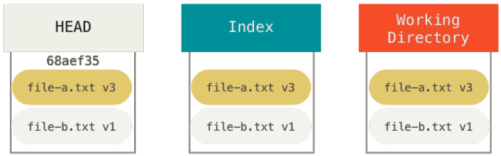
使用reset命令,可将多个提交重组为一个提交,举例说明,在当前项目中,首次提交包含了file-a.txt的v1版,第二次提交包含了file-a.txt的v2版,以及file-b.txt的v1版,第三次提交包含了file-a.txt的v3版,这时用户需要重组第二次提交,

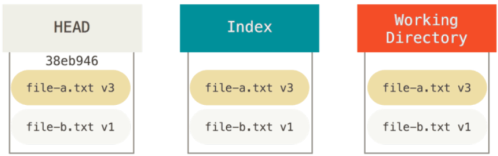
运行git reset --soft HEAD~2,可将HEAD指针移动到首次提交,

运行git commit,提交历史中file-a.txt的v2版已被清除,

checkout
checkout与reset的区别,之前已经提过,当然checkout也可管理三类文件树,同时可基于不同参数,可实现不同的处理,
无文件路径
git checkout [分支名]类似于git reset --hard [分支名],但存在两个重要的差异,其一,checkout不会强制覆盖工作区的文件,而是进行一次简单合并,其二,checkout会将HEAD移动到另一分支的最新提交,而不是移动到当前分支的任意提交,举例说明,假定存在两条分支master和develop,分别指向不同的提交,用户当前处于develop分支,如果运行git reset master,develop分支指针将与master分支指针,指向同一提交,如果运行git checkout master,HEAD将移动到master分支,如下,

附带文件路径
如果checkout命令中,包含了一个文件路径,同样不会移动HEAD指针,可将提交包含的对应文件,反向恢复到暂存区,同时将会覆盖工作区的对应文件,因此这时的checkout更类似于git reset --hard [分支名] [文件路径],所以checkout同样会对工作区造成威胁,同时checkout也可附带 --patch选项,对单个文件进行反向恢复。
6.8 合并
Git的合并操作相当简单,同时还支持同一条分支的多次合并,这意味着长期分支的维护,需要定期合并,以解决时常出现的小冲突,而不是选择一次性合并,来解决大量的冲突。同时Git在面对冲突时,并不倾向于自动解决,更多的时候,则是让用户自行解决这些冲突,以下将介绍不同类型的合并,以及合并之后的回滚。
合并冲突
在进行一次可能出现冲突的合并之前,用户必须提供一个干净的工作区,如果用户的开发正在进行中(work in progress,即WIP),此时的工作区变更可提交到一个临时分支,或是隐藏起来,以便得到一个干净的工作区,举例说明,以下是一个简单的Ruby文件,
#! /usr/bin/env ruby

def hello
    puts 'hello world'
end

hello()
在仓库中,用户创建了一个新分支whitespace,并将上述文件的所有Unix行尾终止符,修改为dos行尾终止符,也就是在行尾加空格,提交到whitespace分支,再将hello world改为hello mundo,再次提交,
$ git checkout -b whitespace
Switched to a new branch 'whitespace'

$ unix2dos hello.rb
unix2dos: converting file hello.rb to DOS format ...

$ git commit -am 'converted hello.rb to DOS'
[whitespace 3270f76] converted hello.rb to DOS
 1 file changed, 7 insertions(+), 7 deletions(-)

$ vim hello.rb
$ git diff -b
diff --git a/hello.rb b/hello.rb
index ac51efd..e85207e 100755
--- a/hello.rb
+++ b/hello.rb
@@ -1,7 +1,7 @@
 #! /usr/bin/env ruby

 def hello
-  puts 'hello world'
+  puts 'hello mundo'^M
 end

 hello()

$ git commit -am 'hello mundo change'
[whitespace 6d338d2] hello mundo change
 1 file changed, 1 insertion(+), 1 deletion(-)
切换到master分支,修改相同内容的同名Ruby文件,即添加一条注释,# prints out a greeting,
$ git checkout master
Switched to branch 'master'

$ vim hello.rb
$ git diff
diff --git a/hello.rb b/hello.rb
index ac51efd..36c06c8 100755
--- a/hello.rb
+++ b/hello.rb
@@ -1,5 +1,6 @@
 #! /usr/bin/env ruby

 +# prints out a greeting
 def hello
   puts 'hello world'
 end

$ git commit -am 'document the function'
[master bec6336] document the function
1 file changed, 1 insertion(+)
之后用户尝试将whitespace分支合并到master分支,当然会出现冲突,
$ git merge whitespace
Auto-merging hello.rb
CONFLICT (content): Merge conflict in hello.rb
Automatic merge failed; fix conflicts and then commit the result.
放弃合并
遇到上述冲突,如果用户未预料到该冲突,或是无能力解决这类冲突,可使用git merge --abort,回滚到合并之前的状态,这种方式只适用于,工作区的变更无法隐藏或无法提交,同时用户也无法解决冲突的场景。
$ git status -sb
## master
UU hello.rb

$ git merge --abort

$ git status -sb
## master
忽略空格
由于行尾的空格,产生了上述冲突,当用户查看这些冲突时,也很容易理解,因为每行文本不同的终止符风格,造成每行文本的内容均不相同,这使得Git无法执行合并,这时可使用-Xignore-all-space或-Xignore-space-change选项,忽略空格符,以完成合并,前一个选项,可在文本行比对时,完全忽略空格符,后一个选项,可忽略空格符的个数,
$ git merge -Xignore-space-change whitespace
Auto-merging hello.rb
Merge made by the 'recursive' strategy.
 hello.rb | 2 +-
 1 file changed, 1 insertion(+), 1 deletion(-)
除去空格符的影响,文件并无其他冲突,如果团队成员意外修改了文本风格,也可使用上述方法进行补救。
手动合并
虽然Git可自动处理之前的空格问题,但是大多数冲突,Git都无法自动处理,必须由用户编写脚本,批量修复冲突,为了方便表达,这里假定Git无法自动处理之前的空格问题,首先用户需了解合并冲突的具体问题,因此需要获得对应文件的三个版本,从分支版本(需合并的分支),主分支版本(合并结果的宿主分支),公共祖先的版本,用户需修正从分支和主分支的版本,之后再进行合并。当然这三个版本的获取也相当简单,在暂存区中,Git基于不同的索引值,保存了这三个版本,索引1为公共祖先的版本,索引2为从分支版本,索引3为主分支版本,使用git show可查看冲突文件的三个版本,
$ git show :1:hello.rb > hello.common.rb
$ git show :2:hello.rb > hello.ours.rb
$ git show :3:hello.rb > hello.theirs.rb
为了获得三个版本的更多细节,可使用ls-files -u,
$ git ls-files -u
100755 ac51efdc3df4f4fd328d1a02ad05331d8e2c9111 1  hello.rb
100755 36c06c8752c78d2aff89571132f3bf7841a7b5c3 2  hello.rb
100755 e85207e04dfdd5eb0a1e9febbc67fd837c44a1cd 3  hello.rb
:1:hello.rb是一个标识,可用于查找公共版本的SHA-1校验值,其他版本类似,这时用户可手工修复主从分支的空格问题,之后运行git merge-file,再次合并冲突文件,
$ dos2unix hello.theirs.rb
dos2unix: converting file hello.theirs.rb to Unix format ...

$ git merge-file -p \
    hello.ours.rb hello.common.rb hello.theirs.rb > hello.rb

$ git diff -b
diff --cc hello.rb
index 36c06c8,e85207e..0000000
--- a/hello.rb
+++ b/hello.rb
@@@ -1,8 -1,7 +1,8 @@@
  #! /usr/bin/env ruby

 +# prints out a greeting
  def hello
-   puts 'hello world'
+   puts 'hello mundo'
  end

  hello()
很显然手动修复的结果,好于之前的ignore-space-change选项,因为真正修复了空格问题,而不仅仅是忽略它。同时用户可以在合并之前,使用git diff,最后确认每个版本之间的差异,附带 --ours选项,可获知从分支的合并结果,
$ git diff --ours
* Unmerged path hello.rb
diff --git a/hello.rb b/hello.rb
index 36c06c8..44d0a25 100755
--- a/hello.rb
+++ b/hello.rb
@@ -2,7 +2,7 @@

 # prints out a greeting
 def hello
-  puts 'hello world'
+  puts 'hello mundo'
 end

 hello()
从以上输出可知,从分支所引入的文件变更,如果附带 --theirs选项,可查看主分支引入的文件变更,-b选项可忽略文件包含的空格,
$ git diff --theirs -b
* Unmerged path hello.rb
diff --git a/hello.rb b/hello.rb
index e85207e..44d0a25 100755
--- a/hello.rb
+++ b/hello.rb
@@ -1,5 +1,6 @@
 #! /usr/bin/env ruby

+# prints out a greeting
 def hello
   puts 'hello mundo'
 end

 hello()
如果使用git diff --base,可查看合并之后,文件包含的所有变更,
$ git diff --base -b
* Unmerged path hello.rb
diff --git a/hello.rb b/hello.rb
index ac51efd..44d0a25 100755
--- a/hello.rb
+++ b/hello.rb
@@ -1,7 +1,8 @@
 #! /usr/bin/env ruby

+# prints out a greeting
 def hello
-  puts 'hello world'
+  puts 'hello mundo'
 end

 hello()
最后使用git clean,清除掉手动合并所创建的临时文件,
$ git clean -f
Removing hello.common.rb
Removing hello.ours.rb
Removing hello.theirs.rb
解决冲突
也许有人并不喜欢上述的解决方法,或者手动编辑也无法实现合并,这时必须使用其他更复杂的方法,以解决冲突。
假定用户有两条长期分支master和mundo,每条分支都有若干提交,当两条长期分支合并时,通常会出现内容冲突,
$ git log --graph --oneline --decorate --all
* f1270f7 (HEAD, master) update README
* 9af9d3b add a README
* 694971d update phrase to hola world
| * e3eb223 (mundo) add more tests
| * 7cff591 add testing script
| * c3ffff1 changed text to hello mundo
|/
* b7dcc89 initial hello world code
同时假定master和mundo分支,都只包含了三次提交,如果用户将mundo合并到master,将出现一个冲突,
$ git merge mundo
Auto-merging hello.rb
CONFLICT (content): Merge conflict in hello.rb
Automatic merge failed; fix conflicts and then commit the result.
打开对应文件,可看到冲突的全部细节,
#! /usr/bin/env ruby

def hello
<<<<<<< HEAD
  puts 'hola world'
=======
  puts 'hello mundo'
>>>>>>> mundo
end

hello()
至于冲突的标识符,之前已经介绍过,当然对于一部分人来说,上述细节依然不够多,这时可使用git checkout --conflict,以获得更多的冲突细节,同时 --conflict可使用不同的参数值,比如diff3或merge(默认值),如果使用diff3,Git将给出更详细的冲突标识,不仅包含主从分支的冲突,而且还给出了与公共祖先的差异,
$ git checkout --conflict=diff3 hello.rb
上述命令执行后,对应文件将给出以下冲突标记,
#! /usr/bin/env ruby

def hello
<<<<<<< ours,#主分支
  puts 'hola world'
||||||| base,#公共祖先
  puts 'hello world'
=======
  puts 'hello mundo'
>>>>>>> theirs,#从分支
end

hello()
如果用户偏爱上述的完整细节,可将merge.conflictstyle变量,配置为diff3,这时diff3即为默认值,
$ git config --global merge.conflictstyle diff3
同时git checkout也可附带 --ours或 --theirs选项,分别查看主从分支将引入的合并变更,而这两个选项同样适用于二进制文件的合并冲突,以及分支中部分文件的合并。
合并日志
解决合并冲突的另一个工具,即git log,查看合并冲突的运行日志,有助于用户了解冲突发生的原因,为获取主从分支中,需要合并的所有提交,可使用三点格式,
$ git log --oneline --left-right HEAD...MERGE_HEAD
< f1270f7 update README
< 9af9d3b add a README
< 694971d update phrase to hola world
> e3eb223 add more tests
> 7cff591 add testing script
> c3ffff1 changed text to hello mundo
上述列表包含了6个提交,为获得更多的细节,可附带 --merge选项,它可显示合并中产生冲突的提交,
$ git log --oneline --left-right --merge
< 694971d update phrase to hola world
> c3ffff1 changed text to hello mundo
如果附带-p选项,可显示冲突文件所包含的所有差异,这将使用户更快查找到冲突原因。
组合差异
由于Git只暂存成功合并的结果,当合并出现冲突状态时,用户运行git diff,只能查看当前冲突点的信息,如果用户在合并冲突发生之后,再运行git diff,将会看到另一种差异输出格式,这被称为组合差异的输出格式,
$ git diff
diff --cc hello.rb
index 0399cd5,59727f0..0000000
--- a/hello.rb
+++ b/hello.rb
@@@ -1,7 -1,7 +1,11 @@@
  #! /usr/bin/env ruby

  def hello
++<<<<<<< HEAD
+   puts 'hola world'
++=======
+   puts 'hello mundo'
++>>>>>>> mundo
  end

  hello()
在上述的组合差异输出中,同样给出了主从分支的所有冲突标记,如果用户手动清除冲突之后,再次运行git diff,可见冲突已被清除,
$ vim hello.rb
$ git diff
diff --cc hello.rb
index 0399cd5,59727f0..0000000
--- a/hello.rb
+++ b/hello.rb
@@@ -1,7 -1,7 +1,7 @@@
  #! /usr/bin/env ruby

  def hello
-   puts 'hola world'
 -  puts 'hello mundo'
++  puts 'hola mundo'
 end

 hello()
从输出信息中可知,从分支的hola world已被清除,主分支的hello mundo也被清除,在合并结果中,保留了hola mundo,因此git log可查看合并之后的细节,如果用户运行git show附带了合并提交,或是运行git log --cc -p,Git将输出类似的信息。
$ git log --cc -p -1
commit 14f41939956d80b9e17bb8721354c33f8d5b5a79
Merge:  f1270f7 e3eb223
Author: Scott Chacon <schacon@gmail.com>
Date:   Fri Sep 19 18:14:49 2014 +0200
    Merge branch 'mundo'

    Conflicts:
        hello.rb

diff --cc hello.rb
index 0399cd5,59727f0..e1d0799
--- a/hello.rb
+++ b/hello.rb
@@@ -1,7 -1,7 +1,7 @@@
  #! /usr/bin/env ruby

  def hello
-   puts 'hola world'
 -  puts 'hello mundo'
++  puts 'hola mundo'
  end

  hello()
撤销合并
在大多数情况下,用户都可修正自己的失误,合并同样可以撤销,假定用户创建了一个特性分支,已将特性分支合并到master,提交历史如下,

现在有两种方法,可实现合并的撤销,但最终的撤销结果并不一致,
修改引用
如果合并从分支还保留在本地仓库,那么只需移动master分支指针,即git reset --hard HEAD~,删除最新提交,如下,

修改提交历史的副作用,将会导致共享仓库出现同步问题,如果合并之后,用户又生成了后续提交,上述方法则不能使用,因为撤销合并,将导致后续提交的丢失。
还原提交
如果用户无法移动分支指针,则可创建一个新提交,并移除合并所引入的所有变更,因此称其为还原,
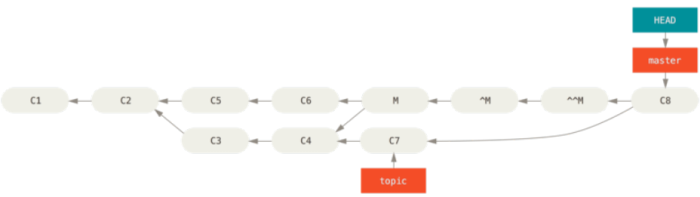
$ git revert -m 1 HEAD
[master b1d8379] Revert "Merge branch 'topic'"
-m 1选项,用于保留主分支的变更,合并提交拥有多个父提交,图示中存在两个父提交C6和C4,-m 1则为保留#1(C6)父提交,清除#2(C4)父提交,如下,

因此^M等同于C6,所以可视为master分支,未合并topic特性分支,之后仍可进行合并,如下,

基于上述分析,当然还原是最佳方案,不会产生副作用,
$ git revert ^M
[master 09f0126] Revert "Revert "Merge branch 'topic'""

$ git merge topic
其他合并类型
主从分支的优先级
之前已介绍过,在merge命令中,使用-Xignore-all-space和-Xignore-space-change选项,处理主从分支的空格问题,在默认情况下,当主从分支的合并出现冲突时,Git会标识冲突文件,并在冲突文件中添加冲突标记,等待用户手工解决,其实还有另一个自动处理冲突的方式,在merge命令中,使用-Xours(从分支)或-Xtheirs(主分支)选项,使得Git自动忽略主或从分支的文件冲突,以实现分支合并。
当使用忽略分支冲突的选项时,Git不会标识冲突文件,将优先保留主或从分支的文件变更,而忽略另一条分支,并且适用于二进制文件,回到之前hello world示例的冲突,
$ git merge mundo
Auto-merging hello.rb
CONFLICT (content): Merge conflict in hello.rb
Resolved 'hello.rb' using previous resolution.
Automatic merge failed; fix conflicts and then commit the result.

使用-Xours(从分支)或-Xtheirs(主分支)选项,
$ git merge -Xours mundo   // 优先保留从分支
Auto-merging hello.rb
Merge made by the 'recursive' strategy.
 hello.rb | 2 +-
 test.sh | 2 ++
 2 files changed, 3 insertions(+), 1 deletion(-)
 create mode 100644 test.sh
用于单个文件合并的命令git merge-file,也适用相同的机制,比如git merge-file --ours,当出现冲突时,这类合并实际是一次假合并,丢弃了一条分支的冲突部分,根本未实现完全合并,同样也可使用以下命令,完成相同的合并结果,
$ git merge -s ours mundo
Merge made by the 'ours' strategy.

$ git diff HEAD HEAD~
$
上述机制适用于以下场景,比如用户创建了一个release分支,并完成了一部分开发,而这些开发结果需合并到master分支,与此同时,有些已修复的bug,则需要合并到release分支,这时用户可将bug修复分支,合并到release分支,并使用merge -s ours命令,同样把bug修复分支,合并到master分支,之后用户再将release分支合并到master分支时,这些bug修复的变更,则不会产生冲突。
子文件树合并
假定用户有两个项目,其中一个项目存放在另一个项目的子目录中,如果用户需要完成一次子树合并,这时Git可自动识别哪个项目是子树,在以下示例中,会将一个独立的子项目,放入主项目的子目录,之后再将子项目合并到主项目中。
首先将子项目Rack,放入主项目中,将Rack项目添加为主项目的远程仓库,并将Rack项目同步到本地,再将Rack项目的master分支,映射为主项目的rack_branch分支,
$ git remote add rack_remote https://github.com/rack/rack
$ git fetch rack_remote --no-tags
warning: no common commits
remote: Counting objects: 3184, done.
remote: Compressing objects: 100% (1465/1465), done.
remote: Total 3184 (delta 1952), reused 2770 (delta 1675)
Receiving objects: 100% (3184/3184), 677.42 KiB | 4 KiB/s, done.
Resolving deltas: 100% (1952/1952), done.
From https://github.com/rack/rack
* [new branch] build    -> rack_remote/build
* [new branch] master   -> rack_remote/master
* [new branch] rack-0.4 -> rack_remote/rack-0.4
* [new branch] rack-0.9 -> rack_remote/rack-0.9

$ git checkout -b rack_branch rack_remote/master
Branch rack_branch set up to track remote branch refs/remotes/rack_remote/master.
Switched to a new branch "rack_branch"
这时子项目Rack已放入主项目的rack_branch分支,切换到不同的分支下,用户将看到不同的工作区目录,
$ ls
AUTHORS  KNOWN-ISSUES  Rakefile  contrib  lib
COPYING  README        bin       example  test

$ git checkout master
Switched to branch "master"
$ ls
README
这是一个重要概念,在Git仓库中,所有分支并不从属于同一个项目,因此不同的分支可能包含完全不同的提交历史。
git read-tree可将一条分支的文件树,读入暂存区和工作区,切换到主项目的master分支,将rack_branch分支(存放于rack目录)合并到主项目的master分支,
$ git read-tree --prefix=rack/ -u rack_branch
这时rack_branch分支的数据,可从主项目的工作区中查找到,如果原始Rack项目出现更新,可使用以下命令,同步到主项目的rack_branch分支,
$ git checkout rack_branch
$ git pull
同时rack_branch分支的更新,还必须同步到主项目的master分支,在git merge命令中,附带 --squash选项,可重组分支的提交,并预设提交描述,同时附带-Xsubtree选项,可指定一次子树合并,
$ git checkout master
$ git merge --squash -s recursive -Xsubtree=rack rack_branch
Squash commit -- not updating HEAD
Automatic merge went well; stopped before committing as requested
此时原始Rack项目的所有变更,都已合并到主项目的本地master分支,用户可开始rack子目录下的文件修改,之后再合并到rack_branch分支。
从上述工作流可知,它类似于子模块的工作流,优点在于,所有代码都放置在一处,而缺点是操作稍微复杂,也容易引发变更的重复集成,以及无关仓库的意外推送。
另一个应当注意的问题,监控rack_branch分支与rack子目录的差异,即保证与原始Rock项目的同步,但此时不能使用diff命令,而需要使用git diff-tree命令,
$ git diff-tree -p rack_branch
或者直接比较Rock项目的本地副本,
$ git diff-tree -p rack_remote/master
6.9 rerere
git rerere可基于用户解决合并冲突的记录,自动处理,后续相似的合并冲突,在大多数情况下,该命令可简化用户的处理负担,为了长期保留的特性分支,最终能干净地合并,同时又不希望因为定期合并,而产生大量的合并提交,这时可使用rerere命令,它可进行临时合并,并基于用户记录,自动处理合并冲突,之后用户可撤销合并,如果定期使用该命令,将能保证长期特性分支无冲突的最终合并,这类机制同样适合于衍合,以及大量相似冲突的自动处理。
rerere的另一个用法,测试一组特性分支的合并结果,如果测试失败,用户可撤销合并,并剔除造成失败的特性分支,再次测试合并结果。
使能rerere功能,可使用配置命令,
$ git config --global rerere.enabled true
虽然用户可创建一个.git/rr-cache目录,隐性开启rerere功能,但使用配置命令更加直观。
以下举例说明,项目中包含了一个文件hello.rb,
#! /usr/bin/env ruby

def hello
  puts 'hello world'
end
在一条分支中,需将文件的hello world改为hola world,而在另一条分支中,需将文件的hello world改为hello mundo,和之前的示例相同,

之后合并两条分支,将出现一个合并冲突,
$ git merge i18n-world
Auto-merging hello.rb
CONFLICT (content): Merge conflict in hello.rb
Recorded preimage for 'hello.rb'
Automatic merge failed; fix conflicts and then commit the result.
这时出现一条新行,Recorded preimage for(rerere开始记录的标记),其余部分则报告了一个合并冲突,通常情况下,用户需要运行git status,查看冲突的所有细节,
$ git status
# On branch master
# Unmerged paths:
# (use "git reset HEAD <file>..." to unstage)
# (use "git add <file>..." to mark resolution)
#
# both modified: hello.rb
git rerere status可显示合并之前的状态,同时该状态将被记录,
$ git rerere status
hello.rb
git rerere diff可显示冲突解决的当前状态,比如用户解决冲突的初始状态,或用户修复冲突的最终状态,
$ git rerere diff
--- a/hello.rb
+++ b/hello.rb
@@ -1,11 +1,11 @@
 #! /usr/bin/env ruby
 def hello
-<<<<<<<
-  puts 'hello mundo'
-=======
+<<<<<<< HEAD
   puts 'hola world'
->>>>>>>
+=======
+  puts 'hello mundo'
+>>>>>>> i18n-world
 end
之前介绍过,同时用户还可使用git ls-files -u,查看冲突文件的公共祖先版本,主从分支的版本,
$ git ls-files -u
100644 39804c942a9c1f2c03dc7c5ebcd7f3e3a6b97519 1 hello.rb
100644 a440db6e8d1fd76ad438a49025a9ad9ce746f581 2 hello.rb
100644 54336ba847c3758ab604876419607e9443848474 3 hello.rb
之后用户选择保留puts ‘hello mundo’,再次运行git rerere diff,查看冲突的修复结果,
$ git rerere diff
--- a/hello.rb
+++ b/hello.rb
@@ -1,11 +1,11 @@
 #! /usr/bin/env ruby
 def hello
-<<<<<<<
-  puts 'hello mundo'
-=======
-  puts 'hola world'
->>>>>>>
+  puts 'hello mundo'
 end
这时Git将记录冲突修复的所有操作,再将冲突文件暂存,并提交到本地仓库,
$ git add hello.rb
$ git commit
Recorded resolution for 'hello.rb'.
[master 68e16e5] Merge branch 'i18n'
Recorded resolution for行,则为rerere记录冲突修复的完成标记,

为了便于描述,需要撤销以上的合并,将特性分支衍合到master分支,这时可使用git reset,清除合并提交,
$ git reset --hard HEAD^
HEAD is now at ad63f15 i18n the hello

$ git checkout i18n-world
Switched to branch 'i18n-world'

$ git rebase master
First, rewinding head to replay your work on top of it...
Applying: i18n one word
Using index info to reconstruct a base tree...
Falling back to patching base and 3-way merge...
Auto-merging hello.rb
CONFLICT (content): Merge conflict in hello.rb
Resolved 'hello.rb' using previous resolution.
Failed to merge in the changes.
Patch failed at 0001 i18n one word
这时发现冲突已被Git自动处理,即Resolved ‘hello.rb’ using previous resolution,使用git diff查看衍合细节,
$ git diff
diff --cc hello.rb
index a440db6,54336ba..0000000
--- a/hello.rb
+++ b/hello.rb
@@@ -1,7 -1,7 +1,7 @@@
  #! /usr/bin/env ruby

  def hello
-   puts 'hola world'
 -  puts 'hello mundo'
++  puts 'hola mundo'
  end

为了实验,使用git checkout,重建冲突文件,
$ git checkout --conflict=merge hello.rb

$ cat hello.rb
#! /usr/bin/env ruby

def hello
<<<<<<< ours
  puts 'hola world'
=======
  puts 'hello mundo'
>>>>>>> theirs
end
再次运行git rerere,
$ git rerere
Resolved 'hello.rb' using previous resolution.

$ cat hello.rb
#! /usr/bin/env ruby
def hello
  puts 'hola mundo'
end
同样发现之前的冲突已被自动处理,将冲突文件暂存,再次衍合到master分支,
$ git add hello.rb
$ git rebase --continue
Applying: i18n one word
6.a 调试
当追踪源码bug时,需要了解bug何时被引入,以及产生bug的原因,这时文件标注功能,将成为用户的好帮手,它将显示指定文件的所有最新变更,以及对应的提交,如果用户需要查看一个类方法是否包含bug,可使用git blame,以下示例将查看Linux内核的顶层Makefile文件,已确定所有最新变更的提交和提交者,-L选项可限定文本行的范围,即69行~82行,
$ git blame -L 69,82 Makefile
b8b0618cf6fab (Cheng Renquan  2009-05-26 16:03:07 +0800 69) ifeq ("$(origin V)", "command line")
b8b0618cf6fab (Cheng Renquan  2009-05-26 16:03:07 +0800 70) KBUILD_VERBOSE = $(V)
^1da177e4c3f4 (Linus Torvalds 2005-04-16 15:20:36 -0700 71) endif
^1da177e4c3f4 (Linus Torvalds 2005-04-16 15:20:36 -0700 72) ifndef KBUILD_VERBOSE
^1da177e4c3f4 (Linus Torvalds 2005-04-16 15:20:36 -0700 73) KBUILD_VERBOSE = 0
^1da177e4c3f4 (Linus Torvalds 2005-04-16 15:20:36 -0700 74) endif
^1da177e4c3f4 (Linus Torvalds 2005-04-16 15:20:36 -0700 75)
066b7ed955808 (Michal Marek   2014-07-04 14:29:30 +0200 76) ifeq ($(KBUILD_VERBOSE),1)
066b7ed955808 (Michal Marek   2014-07-04 14:29:30 +0200 77) quiet =
066b7ed955808 (Michal Marek   2014-07-04 14:29:30 +0200 78) Q =
066b7ed955808 (Michal Marek   2014-07-04 14:29:30 +0200 79) else
066b7ed955808 (Michal Marek   2014-07-04 14:29:30 +0200 80) quiet=quiet_
066b7ed955808 (Michal Marek   2014-07-04 14:29:30 +0200 81) Q = @
066b7ed955808 (Michal Marek   2014-07-04 14:29:30 +0200 82) endif
在命令的输出信息中,第一列为文本行最新变更所对应的提交校验码(局部),后续四列给出了提交者和提交时间,最后两列为文本行号和文件内容,此处的^前缀表示该行自首次提交后,未进行过修改。
另外Git并不会跟踪文件的重命名,但是能在项目快照中查找相关信息,同时也可以查找代码变更的次序,如果git blame附带了-C选项和项目文件,Git可分析对应文件的代码来自何处(有可能是从其他项目文件中复制而来),比如基于GITServerHandler.m扩展了多个文件,其中之一为GITPackUpload.m文件,如果运行git blame,就可清晰分辨代码的原始出处,
$ git blame -C -L 141,153 GITPackUpload.m
f344f58d GITServerHandler.m (Scott 2009-01-04 141)
f344f58d GITServerHandler.m (Scott 2009-01-04 142) - (void) gatherObjectShasFromC
f344f58d GITServerHandler.m (Scott 2009-01-04 143) {
70befddd GITServerHandler.m (Scott 2009-03-22 144)    //NSLog(@"GATHER COMMI
ad11ac80 GITPackUpload.m    (Scott 2009-03-24 145)
ad11ac80 GITPackUpload.m    (Scott 2009-03-24 146)    NSString *parentSha;
ad11ac80 GITPackUpload.m    (Scott 2009-03-24 147)    GITCommit *commit = [g
ad11ac80 GITPackUpload.m    (Scott 2009-03-24 148)
ad11ac80 GITPackUpload.m    (Scott 2009-03-24 149)    //NSLog(@"GATHER COMMI
ad11ac80 GITPackUpload.m    (Scott 2009-03-24 150)
56ef2caf GITServerHandler.m (Scott 2009-01-05 151)    if(commit) {
56ef2caf GITServerHandler.m (Scott 2009-01-05 152)        [refDict setOb
56ef2caf GITServerHandler.m (Scott 2009-01-05 153)
二分搜索
如果用户清楚问题的出处,文件分析当然能够提供帮助,如果用户并不清楚,问题出自哪里,那么必须面对十几甚至上百个提交,这时用户需要使用git bisect命令,它可基于提交历史,执行一次二分搜索,帮助用户尽快确认,引入问题的提交。
举例说明,当用户发布了一个项目版本后,bug报告中提到的问题,并未出现在开发环境中,这时用户需要重现bug,但是并不清楚bug的来源,因此需要二分法进行搜索,首先使用git bisect start,启动二分搜索,再使用git bisect bad,告知Git系统,当前提交存在问题,同时还必须使用git bisect good <最后验证过的提交名>,告知Git系统,已被验证过的最后提交,
$ git bisect start
$ git bisect bad
$ git bisect good v1.0
Bisecting: 6 revisions left to test after this
[ecb6e1bc347ccecc5f9350d878ce677feb13d3b2] error handling on repo
在已验证的最后提交,与当前提交之间,Git找到了12个提交,这时用户需要逐个测试这12个提交,以确定bug的出处,当提交通过测试后,用户可使用git bisect good进行标记,
$ git bisect good
Bisecting: 3 revisions left to test after this
[b047b02ea83310a70fd603dc8cd7a6cd13d15c04] secure this thing
如果在测试过程中,发现提交出现错误,也可使用git bisect bad标记,因为用户可使用二分检索,首先测试区间内的中部提交,以确定bug出现在上半区或下半区,
$ git bisect bad
Bisecting: 1 revisions left to test after this
[f71ce38690acf49c1f3c9bea38e09d82a5ce6014] drop exceptions table
good和bad标记,有利于Git逐步减少提交的检索区间,当发现首个测试失败的提交时,Git可显示该提交的信息,以及相关文件的修改信息,以便用户快速查找bug,
$ git bisect good
b047b02ea83310a70fd603dc8cd7a6cd13d15c04 is first bad commit
commit b047b02ea83310a70fd603dc8cd7a6cd13d15c04
Author: PJ Hyett <pjhyett@ example.com>
Date:   Tue Jan 27 14:48:32 2009 -0800

    secure this thing

:040000 040000 40ee3e7821b895e52c1695092db9bdc4c61d1730
f24d3c6ebcfc639b1a3814550e62d60b8e68a8e4 M  config
完成bug检索后,用户必须执行git bisect reset,复位HEAD指针,
$ git bisect reset
这是一个功能强大的工具,尤其是面对数百个提交时,二分法检索可实现提交的快速过滤,同时bisect也能调用脚本,
$ git bisect start HEAD v1.0
$ git bisect run test-error.sh
test-error.sh脚本中,包含了区间提交的逐个测试,脚本也可添加,类似于make或make tests的自动化测试程序。
6.b 子模块
用户在项目开发中,经常会遇到,需要添加其他开发项目的情况,其他项目可能是第三方的支持库,或者是独立开发的子项目,这时就出现了一个常见问题,既保证两个项目的独立开发,又需要将两个项目组合到一起。
举例说明,假定开发一个网站,需要创建Atom feed,但不想编写生成Atom的代码,则需要使用一个支持库,既可以引用一个共享库(比如CPAN install或Ruby gem),也可以将其复制到项目中,同时共享库的引用,则相当麻烦并且难以开发,因为用户无法保证每个客户端都安装了共享库,如果将共享库的代码,组合到项目中,一旦共享库发生变化,用户项目也需要修改。
因此Git提供了子模块的机制,便于在仓库中,加入其他仓库,所以用户能在开发项目中,克隆其他的仓库,并实现独立提交。
基础
以下示例将开发一个小项目,其中包含了一个主项目和多个子项目,如果将子项目作为子模块,加入到主项目,用户需要使用git submodule add命令,并附带子项目的绝对或相对URL地址,例如当前示例中,需添加一个库DbConnector,
$ git submodule add https://github.com/chaconinc/DbConnector
Cloning into 'DbConnector'...
remote: Counting objects: 11, done.
remote: Compressing objects: 100% (10/10), done.
remote: Total 11 (delta 0), reused 11 (delta 0)
Unpacking objects: 100% (11/11), done.
Checking connectivity... done.
默认情况下,子模块将放置到主项目的一个子目录中,子目录名即DbConnector,当然用户也可在git submodule add末尾,附带一个子模块的自定义存储路径,运行git status,查看仓库的当前状态,
$ git status
On branch master
Your branch is up-to-date with 'origin/master'.

Changes to be committed:
  (use "git reset HEAD <file>..." to unstage)

newfile:    .gitmodules
newfile:    DbConnector
此时已生成了一个新配置文件.gitmodules,其中包含了本地仓库子目录与子项目URL的映射,
[submodule "DbConnector"]
path = DbConnector
url = https://github.com/chaconinc/DbConnector
如果存在多个子模块,.gitmodules也将包含多个配置项,应当注意,该文件也将纳入到版本控制中,和其他配置文件一样,比如.gitignore文件,同时.gitmodules文件也可告知其他用户,如何同步子项目,并且可以使用git config,为子项目URL配置一个别名(相对URL地址)。
完成子项目的添加后,git diff可查看子项目的差异报告,
$ git diff --cached DbConnector
diff --git a/DbConnector b/DbConnector
new file mode 160000
index 0000000..c3f01dc
--- /dev/null
+++ b/DbConnector
@@ -0,0 +1 @@
+Subproject commit c3f01dc8862123d317dd46284b05b6892c7b29bc
尽管DbConnector是工作区的一个子目录,但Git只是将其视为子模块,且不会跟踪子模块的变更,道理很简单,如果不同项目之间因多层嵌套,而造成的相互影响,将导致Git的管理失控,所以git diff只需附带 --submodule选项,即可查看所有子模块的变更状态,
$ git diff --cached --submodule
diff --git a/.gitmodules b/.gitmodules
new file mode 100644
index 0000000..71fc376
--- /dev/null
+++ b/.gitmodules
@@ -0,0 +1,3 @@
+[submodule "DbConnector"]
+   path = DbConnector
+   url = https://github.com/chaconinc/DbConnector
Submodule DbConnector 0000000...c3f01dc (new submodule)
之后用户可生成一个提交,用于标记子模块的添加操作,
$ git commit -am 'added DbConnector module'
[master fb9093c] added DbConnector module
2 files changed, 4 insertions(+)
create mode 100644 .gitmodules
create mode 160000 DbConnector
160000模式是一个特殊类型,这表示DbConnector是一个独立目录,而非子目录或文件,之后可将本地仓库的变更,推送到远程仓库,
$ git push origin master
包含子模块的项目克隆
如果克隆项目中包含子模块,默认情况下,项目克隆只会生成子模块的空目录,
$ git clone https://github.com/chaconinc/MainProject
Cloning into 'MainProject'...
remote: Counting objects: 14, done.
remote: Compressing objects: 100% (13/13), done.
remote: Total 14 (delta 1), reused 13 (delta 0)
Unpacking objects: 100% (14/14), done.
Checking connectivity... done.

$ cd MainProject
$ ls -la
total 16
drwxr-xr-x  9 schacon staff 306 Sep 17 15:21 .
drwxr-xr-x  7 schacon staff 238 Sep 17 15:21 ..
drwxr-xr-x 13 schacon staff 442 Sep 17 15:21 .git
-rw-r--r--  1 schacon staff  92 Sep 17 15:21 .gitmodules
drwxr-xr-x  2 schacon staff  68 Sep 17 15:21 DbConnector
-rw-r--r--  1 schacon staff 756 Sep 17 15:21 Makefile
drwxr-xr-x  3 schacon staff 102 Sep 17 15:21 includes
drwxr-xr-x  4 schacon staff 136 Sep 17 15:21 scripts
drwxr-xr-x  4 schacon staff 136 Sep 17 15:21 src

$ cd DbConnector/
$ ls
$
这时用户必须使用两个命令,git submodule init可初始化本地子模块的配置文件,git submodule update可获取子模块项目的所有数据,并将对应提交,添加到主项目,
$ git submodule init
Submodule 'DbConnector' (https://github.com/chaconinc/DbConnector) registered for path 'DbConnector'

$ git submodule update
Cloning into 'DbConnector'...
remote: Counting objects: 11, done.
remote: Compressing objects: 100% (10/10), done.
remote: Total 11 (delta 0), reused 11 (delta 0)
Unpacking objects: 100% (11/11), done.
Checking connectivity... done.
Submodule path 'DbConnector': checked out 'c3f01dc8862123d317dd46284b05b6892c7b29bc'
子模块DbConnector已正确导入本地,另一种更方便的方法,则是使用git clone --recurse-submodules,它可自动初始化和更新,仓库的所有子模块,
$ git clone --recurse-submodules https://github.com/chaconinc/MainProject
Cloning into 'MainProject'...
remote: Counting objects: 14, done.
remote: Compressing objects: 100% (13/13), done.
remote: Total 14 (delta 1), reused 13 (delta 0)
Unpacking objects: 100% (14/14), done.
Checking connectivity... done.
Submodule 'DbConnector' (https://github.com/chaconinc/DbConnector) registered for path 'DbConnector'
Cloning into 'DbConnector'...
remote: Counting objects: 11, done.
remote: Compressing objects: 100% (10/10), done.
remote: Total 11 (delta 0), reused 11 (delta 0)
Unpacking objects: 100% (11/11), done.
Checking connectivity... done.
Submodule path 'DbConnector': checked out 'c3f01dc8862123d317dd46284b05b6892c7b29bc'
后续开发
获取子模块的更新
使用子模块的简单方法,定期同步原始子项目,并且不对子项目进行修改,运行git fetch和git merge,可获取子模块项目的更新,
$ git fetch
From https://github.com/chaconinc/DbConnector
c3f01dc..d0354fc master -> origin/master

$ git merge origin/master
Updating c3f01dc..d0354fc
Fast-forward
 scripts/connect.sh | 1 +
 src/db.c           | 1 +
 2 files changed, 2 insertions(+)
返回主项目,运行git diff --submodule,可查看子模块项目的所有更新,如果用户希望 --submodule变为默认选项,可将diff.submodule配置变量,设为log,
$ git config --global diff.submodule log

$ git diff
Submodule DbConnector c3f01dc..d0354fc:
> more efficient db routine
> better connection routine
一旦用户需进行主项目的提交,应当锁定子模块的项目更新,另一个子模块项目的更新方式,运行git submodule update --remote,它可实现所有子模块项目的自动获取与合并。
$ git submodule update --remote DbConnector
remote: Counting objects: 4, done.
remote: Compressing objects: 100% (2/2), done.
remote: Total 4 (delta 2), reused 4 (delta 2)
Unpacking objects: 100% (4/4), done.
From https://github.com/chaconinc/DbConnector
   3f19983..d0354fc master -> origin/master
Submodule path 'DbConnector': checked out 'd0354fc054692d3906c85c3af05ddce39a1c0644'
上述命令将默认更新,子模块项目的master分支,当然用户也可以自定义默认分支,比如需要默认更新DbConnector子项目的stable分支,则可以在.gitmodules(常用)或.git/config文件中进行配置,
$ git config -f .gitmodules submodule.DbConnector.branch stable

$ git submodule update --remote
remote: Counting objects: 4, done.
remote: Compressing objects: 100% (2/2), done.
remote: Total 4 (delta 2), reused 4 (delta 2)
Unpacking objects: 100% (4/4), done.
From https://github.com/chaconinc/DbConnector
   27cf5d3..c87d55d stable -> origin/stable
Submodule path 'DbConnector': checked out 'c87d55d4c6d4b05ee34fbc8cb6f7bf4585ae6687'
再运行git status,可查看子模块所获取的新提交,
$ git status
On branch master
Your branch is up-to-date with 'origin/master'.

Changes not staged for commit:
  (use "git add <file>..." to update what will be committed)
  (use "git checkout -- <file>..." to discard changes in working directory)

  modified: .gitmodules
  modified: DbConnector (new commits)
no changes added to commit (use "git add" and/or "git commit -a")
为了更简明的子模块报告,可设定status.submodulesummary配置变量,
$ git config status.submodulesummary 1

$ git status
On branch master
Your branch is up-to-date with 'origin/master'.

Changes not staged for commit:
  (use "git add <file>..." to update what will be committed)
  (use "git checkout -- <file>..." to discard changes in working directory)
  modified: .gitmodules
  modified: DbConnector (new commits)

Submodules changed but not updated:

* DbConnector c3f01dc...c87d55d (4):
  > catch non-null terminated lines
重新设定status.submodulesummary配置变量后,运行git diff,将会显示.gitmodules的最新修改,最新获取的子模块项目的所有提交,以及准备投递到子模块项目的提交,
$ git diff
diff --git a/.gitmodules b/.gitmodules
index 6fc0b3d..fd1cc29 100644
--- a/.gitmodules
+++ b/.gitmodules
@@ -1,3 +1,4 @@
 [submodule "DbConnector"]
        path = DbConnector
        url = https://github.com/chaconinc/DbConnector
+       branch = stable
 Submodule DbConnector c3f01dc..c87d55d:
  > catch non-null terminated lines
  > more robust error handling
  > more efficient db routine
  > better connection routine
一旦用户完成子模块项目的提交,可运行git log -p,查看提交日志,
$ git log -p --submodule
commit 0a24cfc121a8a3c118e0105ae4ae4c00281cf7ae
Author: Scott Chacon <schacon@gmail.com>
Date:   Wed Sep 17 16:37:02 2014 +0200

    updating DbConnector for bug fixes

diff --git a/.gitmodules b/.gitmodules
index 6fc0b3d..fd1cc29 100644
--- a/.gitmodules
+++ b/.gitmodules
@@ -1,3 +1,4 @@
 [submodule "DbConnector"]
        path = DbConnector
        url = https://github.com/chaconinc/DbConnector
+       branch = stable

 Submodule DbConnector c3f01dc..c87d55d:
  > catch non-null terminated lines
  > more robust error handling
  > more efficient db routine
  > better connection routine
子模块的持续开发
主项目和子模块项目支持并行开发,或者用户可选择一个简单的依赖管理系统,比如Maven或Rubygems,以下将举例说明。
运行git submodule update,可同步所有子模块项目的更新,同时Git会将这些更新,放入对应的子目录中,同时每个子模块都是独立的HEAD指针,这意味着每个子模块并不是一个工作分支,无法跟踪主项目的变更(也没必要跟踪),如果用户向子模块提交了变更,那么在下一次git submodule update运行后,这些变更提交也将全部丢失,因此用户需执行两个操作,才能让子模块变成一个工作分支,首先用户需切换到子模块的分支,这时可将用户变更,提交到子模块的分支,之后可运行git submodule update --remote,同步对应的原始子模块项目仓库,之后用户可将同步数据,合并到本地子模块分支,或者衍合当前用户的提交。
首先切换到子模块的分支,
$ git checkout stable
Switched to branch 'stable'
如需合并操作,可附带 --merge选项,以便完成同步后,可自动合并到本地分支,
$ git submodule update --remote --merge
remote: Counting objects: 4, done.
remote: Compressing objects: 100% (2/2), done.
remote: Total 4 (delta 2), reused 4 (delta 2)
Unpacking objects: 100% (4/4), done.
From https://github.com/chaconinc/DbConnector
   c87d55d..92c7337 stable -> origin/stable
Updating c87d55d..92c7337
Fast-forward
 src/main.c | 1 +
 1 file changed, 1 insertion(+)
Submodule path 'DbConnector': merged in '92c7337b30ef9e0893e758dac2459d07362ab5ea'
如果进入DbConnector目录,可见更新数据,已合并到stable分支,假定当前用户向本地子模块项目,提交了一个变更,同时原始子模块项目中,也有其他用户又推送了新的提交,以下是本地提交操作,
$ cd DbConnector/
$ vim src/db.c
$ git commit -am 'unicode support'
[stable f906e16] unicode support
 1 file changed, 1 insertion(+)
如果用户需衍合,本地提交和原始子模块项目的新推送,可使用,
$ git submodule update --remote --rebase
First, rewinding head to replay your work on top of it...
Applying: unicode support
Submodule path 'DbConnector': rebased into '5d60ef9bbebf5a0c1c1050f242ceeb54ad58da94'
如果用户忘记附带 --rebase或 --merge选择,Git完成子模块的远程同步后,将切换到子模块本地副本的默认分支,
$ git submodule update --remote
Submodule path 'DbConnector': checked out '5d60ef9bbebf5a0c1c1050f242ceeb54ad58da94'
此时无需担心,用户只要返回之前的工作分支(提交子模块变更的分支),再手动执行origin/stable的合并或衍合。如果用户创建的子模块变更并未提交,同时又执行了一次子模块的远程同步,将会引发问题,同时避免子模块的远程同步,覆盖掉子模块目录中未保存的变更,
$ git submodule update --remote
remote: Counting objects: 4, done.
remote: Compressing objects: 100% (3/3), done.
remote: Total 4 (delta 0), reused 4 (delta 0)
Unpacking objects: 100% (4/4), done.
From https://github.com/chaconinc/DbConnector
   5d60ef9..c75e92a stable -> origin/stable
error: Your local changes to the following files would be overwritten by checkout: scripts/setup.sh

Please, commit your changes or stash them before you can switch branches.
Aborting
Unable to checkout 'c75e92a2b3855c9e5b66f915308390d9db204aca' in submodule path 'DbConnector'
此时使用自动处理,同样会引发问题,
$ git submodule update --remote --merge
Auto-merging scripts/setup.sh
CONFLICT (content): Merge conflict in scripts/setup.sh
Recorded preimage for 'scripts/setup.sh'
Automatic merge failed; fix conflicts and then commit the result.
Unable to merge 'c75e92a2b3855c9e5b66f915308390d9db204aca' in submodule path 'DbConnector'
推送子模块的变更
如果用户在子模块目录中,创建了一些变更,其中一些通用变更,可推送到远程仓库,而对其他用户无用的变更,可保留在本地,无需推送,
$ git diff
Submodule DbConnector c87d55d..82d2ad3:
  > Merge from origin/stable
  > updated setup script
  > unicode support
  > remove unnecessary method
  > add new option for conn pooling
首先应进行子模块项目的推送,再推送主项目,否则其他用户在同步数据时,可能会遗漏子模块项目的更新,从而导致无法解决的问题,为了消除问题的产生,应当保证,主项目推送之前,所有子模块的推送都已完成,即git push需附带 --recurse-submodules选项,该选项包含了两个参数值,check和on-demand,check可检查子模块的所有提交是否完成推送,如果未完成推送,当前的主项目推送将失败,
$ git push --recurse-submodules=check
The following submodule paths contain changes that can not be found on any remote:
    DbConnector

Please try
    git push --recurse-submodules=on-demand
or cd to the path and use
    git push
to push them to a remote.
解决上述问题的简单方法,用户切换到每个子模块,手动推送其包含的所有提交,子模块提交的推送检查,可配置成默认操作,即push.recurseSubmodules配置变量,需设为check,
参数值on-demand,依次处理子模块和主项目的提交推送,首先完成所有子模块的提交推送,再进行主项目的提交推送,同样该参数值也设为默认操作,即push.recurseSubmodules配置变量,需设为on-demand,
$ git push --recurse-submodules=on-demand
Pushing submodule 'DbConnector'
Counting objects: 9, done.
Delta compression using up to 8 threads.
Compressing objects: 100% (8/8), done.
Writing objects: 100% (9/9), 917 bytes | 0 bytes/s, done.
Total 9 (delta 3), reused 0 (delta 0)
To https://github.com/chaconinc/DbConnector
   c75e92a..82d2ad3 stable -> stable
Counting objects: 2, done.
Delta compression using up to 8 threads.
Compressing objects: 100% (2/2), done.
Writing objects: 100% (2/2), 266 bytes | 0 bytes/s, done.
Total 2 (delta 1), reused 0 (delta 0)
To https://github.com/chaconinc/MainProject
   3d6d338..9a377d1 master -> master
子模块变更的合并
如果不同用户同时变更了同一个子模块,其中一个用户的执行,肯定会遇到问题,也就是说,如果子模块的提交历史中,出现了新分支,并且新分支已经提交到主项目中,这时用户可以进行修正。如果两条分支中,一条分支上,存在另一条分支的直接祖先,基于该祖先提交,可实现两条分支的合并,如下,
$ git pull
remote: Counting objects: 2, done.
remote: Compressing objects: 100% (1/1), done.
remote: Total 2 (delta 1), reused 2 (delta 1)
Unpacking objects: 100% (2/2), done.
From https://github.com/chaconinc/MainProject
   9a377d1..eb974f8 master -> origin/master
Fetching submodule DbConnector
warning: Failed to merge submodule DbConnector (merge following commits not found)
Auto-merging DbConnector
CONFLICT (submodule): Merge conflict in DbConnector
Automatic merge failed; fix conflicts and then commit the result.
从上述输出可知,Git将在子模块的提交历史中,查找两条分支,即子模块远程仓库的本地副本分支DbConnector,以及本地的特性分支,如果两条分支是平行分支,可进行合并,但是输出给出了一个错误信息,merge following commits not found(合并所需的提交并未找到),以下将分析该错误的原因。
为解决以上问题,首先需要查看子模块的当前状态,但是状态信息无法提供多大的帮助,这时可使用git diff,查看两条分支的差异,
$ git diff
diff --cc DbConnector
index eb41d76,c771610..0000000
--- a/DbConnector
+++ b/DbConnector
在上述输出中,eb41d76为特性分支的最新提交,c771610为本地副本的最新提交,同样没有给出更详细的冲突细节,这是由于子模块使用了独立的HEAD指针,如果直接使用git checkout,将无法切换到子模块的特性分支,即eb41d76,因此Git无法提供更多的细节,这时必须使用提交的SHA-1校验值,完成一次绝对跳转,如下,
$ cd DbConnector
$ git rev-parse HEAD  # HEAD直接跳转到子模块的特性分支
eb41d764bccf88be77aced643c13a7fa86714135

$ git branch try-merge c771610
(DbConnector) $ git merge try-merge
Auto-merging src/main.c
CONFLICT (content): Merge conflict in src/main.c
Recorded preimage for 'src/main.c'
Automatic merge failed; fix conflicts and then commit the result.
这时合并冲突的细节出现了,修复main.c文件后,重新提交,
$ vim src/main.c
$ git add src/main.c
$ git commit -am 'merged our changes'
Recorded resolution for 'src/main.c'.
[master 9fd905e] merged our changes

$ cd ..
$ git diff
diff --cc DbConnector
index eb41d76,c771610..0000000
--- a/DbConnector
+++ b/DbConnector
@@@ -1,1 -1,1 +1,1 @@@
- Subproject commit eb41d764bccf88be77aced643c13a7fa86714135
 -Subproject commit c77161012afbbe1f58b5053316ead08f4b7e6d1d
++Subproject commit 9fd905e5d7f45a0d4cbc43d1ee550f16a30e825a

$ git add DbConnector

$ git commit -m "Merge Tom's Changes"
[master 10d2c60] Merge Tom's Changes
首先修复main.c文件的冲突,在DbConnector子模块中,完成一次提交,退出DbConnector子模块的工作区,返回主项目的工作区,将整个DbConnector子模块,再提交到主项目的分支中。
因此之前的错误,即merge following commits not found,真正的原因是,主项目的HEAD指针无法指向子模块的特性分支,如果在主项目工作区,直接合并子模块的分支,永远都存在冲突,如下,
$ git merge origin/master
warning: Failed to merge submodule DbConnector (not fast-forward)
Found a possible merge resolution for the submodule:
 9fd905e5d7f45a0d4cbc43d1ee550f16a30e825a: > merged our changes
If this is correct simply add it to the index for example
by using:
 git update-index --cacheinfo 160000 9fd905e5d7f45a0d4cbc43d1ee550f16a30e825a "DbConnector"

which will accept this suggestion.
Auto-merging DbConnector
CONFLICT (submodule): Merge conflict in DbConnector
Automatic merge failed; fix conflicts and then commit the result.
这时必须进入子模块的工作区,完成本地副本分支和特性分支的合并,再返回主项目的工作区,将之前合并成功的子模块分支,重新提交到主项目中,如下,
$ cd DbConnector/
$ git merge 9fd905e
Updating eb41d76..9fd905e
Fast-forward

$ cd ..
$ git add DbConnector
$ git commit -am 'Fast forwarded to a common submodule child'
应用技巧
foreach命令
可实现开发项目中多个子模块的遍历,并能在所有子模块的处理中,执行相同的一组命令,比如添加新功能或修复bug,首先隐藏所有子模块工作区的当前数据,
$ git submodule foreach 'git stash'
Entering 'CryptoLibrary'
No local changes to save
Entering 'DbConnector'
Saved working directory and index state WIP on stable: 82d2ad3 Merge from
origin/stable
HEAD is now at 82d2ad3 Merge from origin/stable
之后在所有的子模块中,都新建一条分支,
$ git submodule foreach 'git checkout -b featureA'
Entering 'CryptoLibrary'
Switched to a new branch 'featureA'
Entering 'DbConnector'
Switched to a new branch 'featureA'
这时用户可获取整个项目的差异,即主项目和所有子模块,
$ git diff; git submodule foreach 'git diff'
Submodule DbConnector contains modified content
diff --git a/src/main.c b/src/main.c
index 210f1ae..1f0acdc 100644
--- a/src/main.c
+++ b/src/main.c
@@ -245,6 +245,8 @@ static int handle_alias(int *argcp, const char ***argv)
    commit_pager_choice();

+   url = url_decode(url_orig);
+
    /* build alias_argv */
    alias_argv = xmalloc(sizeof(*alias_argv) * (argc + 1));
    alias_argv[0] = alias_string + 1;

Entering 'DbConnector'
diff --git a/src/db.c b/src/db.c
index 1aaefb6..5297645 100644
--- a/src/db.c
+++ b/src/db.c
@@ -93,6 +93,11 @@ char *url_decode_mem(const char *url, int len)
    return url_decode_internal(&url, len, NULL, &out, 0);
 }

+char *url_decode(const char *url)
+{
+   return url_decode_mem(url, strlen(url));
+}
+
 char *url_decode_parameter_name(const char **query)
 {
    struct strbuf out = STRBUF_INIT;
从上述输出可知,用户在子模块中,定义了一个函数,并在主项目中,调用了该函数。
别名
用户可以为超长的Git命令,配置一个别名,但是别名不能与默认命令相冲突,由于子模块命令都比较长,更适合于配置别名,比如,
$ git config alias.sdiff '!'"git diff && git submodule foreach 'git diff'"
$ git config alias.spush 'push --recurse-submodules=on-demand'
$ git config alias.supdate 'submodule update --remote --merge'
使用git supdate则可实现所有子模块的自动更新,使用gitspush,则可完成主项目推送之前,所有子模块的依赖检查。
问题点
子模块的用法还存在一些不完美的小问题,比如子模块的分支切换,就相当复杂,当用户新建一个分支,加入一个子模块之后,返回主项目分支,却无法查看子模块,因为子模块目录是一个未跟踪的目录,如下,
$ git checkout -b add-crypto
Switched to a new branch 'add-crypto'

$ git submodule add https://github.com/chaconinc/CryptoLibrary
Cloning into 'CryptoLibrary'...
...

$ git commit -am 'adding crypto library'
[add-crypto 4445836] adding crypto library
 2 files changed, 4 insertions(+)
 create mode 160000 CryptoLibrary

$ git checkout master
warning: unable to rmdir CryptoLibrary: Directory not empty
Switched to branch 'master'
Your branch is up-to-date with 'origin/master'.

$ git status
On branch master
Your branch is up-to-date with 'origin/master'.

Untracked files:
  (use "git add <file>..." to include in what will be committed)
    CryptoLibrary/

nothing added to commit but untracked files present (use "git add" to track)
移除子模块目录并不困难,但操作上容易产生混淆,首先移除子模块目录,切换到放置子模块的新建分支,必须执行submodule update --init,将子模块添加到新建分支,
$ git clean -ffdx   # 删除子模块目录
Removing CryptoLibrary/

$ git checkout add-crypto # 切换到子模块分支
Switched to branch 'add-crypto'

$ ls CryptoLibrary/  # 查看子模块目录,已空

$ git submodule update --init  # 在分支中,添加子模块
Submodule path 'CryptoLibrary': checked out 'b8dda6aa182ea4464f3f3264b11e0268545172af'

$ ls CryptoLibrary/
Makefile includes scripts src
操作不复杂,但容易产生混乱,大多数人并不清楚子目录和子模块的区别,比如主项目的一些跟踪文件,也可以配置成一个子模块,但是必须小心处理,假定主项目的子目录,需放入一个子模块,那么必须删除之前的子目录,再运行submodule add,
$ rm -Rf CryptoLibrary/
$ git submodule add https://github.com/chaconinc/CryptoLibrary
'CryptoLibrary' already exists in the index
以上只是删除了子目录,并未删除子目录的Git缓存记录,如下,
$ git rm -r CryptoLibrary
$ git submodule add https://github.com/chaconinc/CryptoLibrary
Cloning into 'CryptoLibrary'...
remote: Counting objects: 11, done.
remote: Compressing objects: 100% (10/10), done.
remote: Total 11 (delta 0), reused 11 (delta 0)
Unpacking objects: 100% (11/11), done.
Checking connectivity... done.
如果用户需要切换到主项目的master分支,将遇到一个错误,
$ git checkout master
error: The following untracked working tree files would be overwritten by checkout:
  CryptoLibrary/Makefile
  CryptoLibrary/includes/crypto.h
  ...
Please move or remove them before you can switch branches.
Aborting
这时子模块的工作区中,整个子模块都是未跟踪文件,必须首先处理好这些文件,才可实现分支切换,当然也可使用强制切换命令,checkout -f,这时必须十分小心,因为主项目工作区的子模块目录,将会覆盖掉最新克隆的子模块,
$ git checkout -f master
warning: unable to rmdir CryptoLibrary: Directory not empty
Switched to branch 'master'
切换到master分支后,发现CryptoLibrary子目录为空,这时需运行git submodule update,再次更新子模块,之后进入子模块目录,运行git checkout .以切换到子模块分支,当然用户也可submodule foreach中,附带一个脚本,以便对多个子模块,执行上述操作。
值得注意,新版本Git只在项目顶层(.git目录),保存子模块的数据,这与老版本Git不同,因此移除子模块目录,并不会丢失用户生成的子模块提交或子模块分支。
6.c 打包共享
之前介绍过,基于网络连接,可使用多种常用方法,传输Git数据,实际上还有一种不太常用的方法,却十分有效,适用于多种不同的场景,即Git可将更新数据,打包到单个文件中,比如断网时,用户依然需要将更新数据,传递给项目协作者,这时可使用git bundle命令,该命令可打包所有需推送的更新,并放入一个二进制文件,之后可通过邮件或U盘,进行数据传递,如下,
$ git log
commit 9a466c572fe88b195efd356c3f2bbeccdb504102
Author: Scott Chacon <schacon@gmail.com>
Date:   Wed Mar 10 07:34:10 2010 -0800
    second commit

commit b1ec3248f39900d2a406049d762aa68e9641be25
Author: Scott Chacon <schacon@gmail.com>
Date:   Wed Mar 10 07:34:01 2010 -0800
    first commit
如果用户需要共享本地仓库的提交,同时又没有远程仓库的推送权限,或者不想配置一个远程仓库,则可使用git bundle create,
$ git bundle create repo.bundle HEAD master
Counting objects: 6, done.
Delta compression using up to 2 threads.
Compressing objects: 100% (2/2), done.
Writing objects: 100% (6/6), 441 bytes, done.
Total 6 (delta 0), reused 0 (delta 0)
这时已生成了一个文件repo.bundle,其中包含了重建本地仓库master分支的所有数据,当然在bundle命令中,用户可以打包所有提交或部分提交,上述命令可用于本地仓库的克隆,对于接收到repo.bundle文件的协作者,可使用以下方法,基于二进制文件,克隆一个Git仓库,
$ git clone repo.bundle repo
Cloning into 'repo'...
...

$ cd repo
$ git log --oneline
9a466c5 second commit
b1ec324 first commit
如果用户不想bundle中包含HEAD,可指定-b master,或是其他分支名,假如用户的本地仓库中,又提交了三次,以下将介绍,如何再次使用打包方式,共享后续的三次提交,
$ git log --oneline
71b84da last commit - second repo
c99cf5b fourth commit - second repo
7011d3d third commit - second repo
9a466c5 second commit
b1ec324 first commit
首先在bundle命令中,应给出提交的打包范围,此时与网络推送的自动比对不同,这里需要手工指定,而打包范围的设定有多种方法,在上例中,后续的三个提交都处于master分支,而不在本地副本的master分支(origin/master)中,使用origin/master..master或master ^origin/master,就可指定一个范围,使用log进行测试,
$ git log --oneline master ^origin/master
71b84da last commit - second repo
c99cf5b fourth commit - second repo
7011d3d third commit - second repo
此时可使用git bundle create,附带提交的范围值,打包后续的三个提交,
$ git bundle create commits.bundle master ^9a466c5
Counting objects: 11, done.
Delta compression using up to 2 threads.
Compressing objects: 100% (3/3), done.
Writing objects: 100% (9/9), 775 bytes, done.
Total 9 (delta 0), reused 0 (delta 0)
这时当前目录下,将生成一个打包文件commits.bundle,之后可发送给协作者,协作者可将打包文件,导入仓库副本,而协作者收到打包文件后,可以首先使用bundle verify,验证打包文件是否是一个有效文件,以及对应的祖先提交是否匹配,
$ git bundle verify ../commits.bundle
The bundle contains 1 ref
71b84daaf49abed142a373b6e5c59a22dc6560dc refs/heads/master
The bundle requires these 1 ref
9a466c572fe88b195efd356c3f2bbeccdb504102 second commit
../commits.bundle is okay
如果打包文件只包含最新的两个提交,而遗漏了7011d3d提交,verify命令将报错,
$ git bundle verify ../commits-bad.bundle
error: Repository lacks these prerequisite commits:
error: 7011d3d8fc200abe0ad561c011c3852a4b7bbe95 third commit - second repo
用户还可查看打包文件中,最新提交的细节,
$ git bundle list-heads ../commits.bundle
71b84daaf49abed142a373b6e5c59a22dc6560dc refs/heads/master
同时verify命令也可查看打包文件的最新提交,用户还可使用fetch或pull命令,从打包文件中,导入所有提交,并放入不同的分支中,比如来自master分支的打包提交,将放入本地仓库的other-master分支,
$ git fetch ../commits.bundle master:other-master
From ../commits.bundle
 * [new branch] master -> other-master
之后可查看本地仓库的所有分支的细节,
$ git log --oneline --decorate --graph --all
* 8255d41 (HEAD, master) third commit - first repo
| * 71b84da (other-master) last commit - second repo
| * c99cf5b fourth commit - second repo
| * 7011d3d third commit - second repo
|/
* 9a466c5 second commit
* b1ec324 first commit
6.d 替换
如前所述,Git对象数据库的所有对象,都是不可修改的,但Git提供了一种对象替换的方法,以达到变相修改的目的,最常见的用途,在无需重建整个提交历史的情况下,进行提交的替换,假设仓库中存在大量提交,并分割成两个提交历史,一个是短期的提交历史,提供给活跃的开发者,另一个是巨大而长期的提交历史,可方便有心人进行数据挖掘,那么基于早期提交的替换,可将短期历史嫁接到长期历史中,这意味着用户无需在新的历史提交中,重新写入所有的提交,只是将它们组合在一起。
举例说明,原始仓库将分割成两个仓库,一个是短期仓库,另一个是长期仓库,之后再组合短期和长期仓库,并且无需修改短期仓库的SHA-1校验值,这里使用了一个简单的原始仓库,提交如下,
$ git log --oneline
ef989d8 fifth commit
c6e1e95 fourth commit
9c68fdc third commit
945704c second commit
c1822cf first commit
这时需分割提交历史,从1到4的提交,将放入长期历史,从4到5的提交,将放入短期历史,
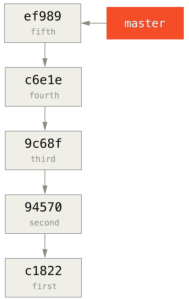
创建长期历史很简单,只需从提交历史中,获取相应提交,再推送到新的远程仓库的master分支,
$ git branch history c6e1e95
$ git log --oneline --decorate
ef989d8 (HEAD, master) fifth commit
c6e1e95 (history) fourth commit
9c68fdc third commit
945704c second commit
c1822cf first commit
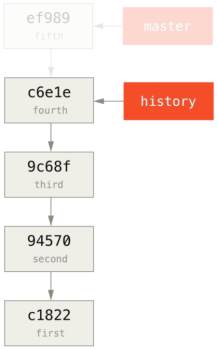
将history分支,推送到新的远程仓库的master分支,
$ git remote add project-history https://github.com/schacon/project-history
$ git push project-history history:master
Counting objects: 12, done.
Delta compression using up to 2 threads.
Compressing objects: 100% (4/4), done.
Writing objects: 100% (12/12), 907 bytes, done.
Total 12 (delta 0), reused 0 (delta 0)
Unpacking objects: 100% (12/12), done.
To git@github.com:schacon/project-history.git
 * [new branch] history -> master
分割提交历史的重要部分,即截取短期历史,同时需要保留一个重叠提交(提交c6e1e95),可用于后续两个提交历史的组合标志位,这里需截取提交4和5,在这种情况下,需要创建一个基础提交,用于扩展出提交历史,同时协作者一旦找到这个基础提交(即原有提交历史的截取点),则可追溯原有的提交历史,因此基础提交的创建完成后,可将剩余提交(提交4和5)衍合成短期提交历史的最新提交,这时用户需要选择一个分割点,即提交3(9c68fdc),commit-tree可基于分割点,创建基础提交,并可生成一个树型存储结构,以及一个新对象的SHA-1校验值,
$ echo 'get history from blah blah blah' | git commit-tree 9c68fdc^{tree}
622e88e9cbfbacfb75b5279245b9fb38dfea10cf

基础提交创建完成后,使用git rebase --onto,衍合所需的剩余提交, --onto选项则表明衍合的起点位于提交3(9c68fdc),
$ git rebase --onto 622e88 9c68fdc
First, rewinding head to replay your work on top of it...
Applying: fourth commit
Applying: fifth commit

这时基于基础提交,剩余的原有提交,已衍合到短期提交历史的顶层,而基础提交中包含的指令,可用于重建之前完整的提交历史,这时用户可将短期提交历史,推送到一个新项目,当协作者克隆该项目后,将看到两个提交,以及一个包含指令的基础提交。
当协作者克隆了上述的短期项目之后,希望恢复之前的完整提交历史,则需要添加第二个远程仓库,获取长期项目的数据,
$ git clone https://github.com/schacon/project  # 短期提交历史
$ cd project

$ git log --oneline master
e146b5f fifth commit
81a708d fourth commit
622e88e get history from blah blah blah

$ git remote add project-history https://github.com/schacon/project-history  # 长期提交历史
$ git fetch project-history
From https://github.com/schacon/project-history
 * [new branch] master -> project-history/master
这时短期项目和长期项目都完成克隆,短期项目放置在master分支,长期项目放置在project-history/master分支,
$ git log --oneline master
e146b5f fifth commit
81a708d fourth commit
622e88e get history from blah blah blah

$ git log --oneline project-history/master
c6e1e95 fourth commit
9c68fdc third commit
945704c second commit
c1822cf first commit
使用git replace,基于重叠提交,简单组合两个提交历史,即master分支的fourth提交,以及project-history/master分支的fourth提交,
$ git replace 81a708d c6e1e95
再次查看master分支的提交历史,
$ git log --oneline master
e146b5f fifth commit
81a708d fourth commit
9c68fdc third commit
945704c second commit
c1822cf first commit
以上结果显示,所有上游提交的SHA-1校验值并未变更,

应当注意,虽然fourth提交的SHA-1校验值,显示为81a708d,实际上已替换成c6e1e95提交的数据,即使运行检查工具,也无法查看到真实的结果,比如,
$ git cat-file -p 81a708d
tree 7bc544cf438903b65ca9104a1e30345eee6c083d
parent 9c68fdceee073230f19ebb8b5e7fc71b479c0252
author Scott Chacon <schacon@gmail.com> 1268712581 -0700
committer Scott Chacon <schacon@gmail.com> 1268712581 -0700

fourth commit
请记住,81a708d的真实父提交,是一个占位符提交(622e88e),并非9c68fdce提交,另一件有趣的事情,所有提交还保留着原有分支的引用,
$ git for-each-ref
e146b5f14e79d4935160c0e83fb9ebe526b8da0d commit refs/heads/master
c6e1e95051d41771a649f3145423f8809d1a74d4 commit refs/remotes/history/master
e146b5f14e79d4935160c0e83fb9ebe526b8da0d commit refs/remotes/origin/HEAD
e146b5f14e79d4935160c0e83fb9ebe526b8da0d commit refs/remotes/origin/master
c6e1e95051d41771a649f3145423f8809d1a74d4 commit refs/replace/81a708dd0e167a3f691541c7a6463343bc457040
从上述输出可知,这只是一个组合关系,并不是一个整体。
6.e 存储证书
如果用户使用SSH协议,连接远程仓库,则需要一个密钥,即使用户未输入用户名和用户密码,也能安全地传输数据,这与HTTP协议不同,因此Git提供了一个认证系统,并具有以下特性,
- 默认情况下,无缓存功能,所有连接都必须提供用户名和用户密码
- 缓存模式(cache)下,内存中保存的证书,会有一个有效期(固定的时间周期),用户密码不会保存在硬盘上,15分钟后,缓存的证书将被清除
- 存储模式(store)下,证书将保存在文本中,且永不过期,除非用户修改了用户密码,否则无需重新申请证书,此模式的缺陷在于,用户密码存储在硬盘的文本中
- 在Mac系统下,Git可使用osxkeychain模式,系统账号附带的密钥链,可缓存证书,虽然证书也保存在硬盘,且永不过期,但是会进行加密,和HTTP证书,Safari auto-fill的保存机制相同
- 在Windows系统下,可安装Git Credential Manager for Windows工具,它类似于osxkeychain,但使用了Windows Credential Store,管控敏感信息
用户可设定Git的配置变量,来选择上述模式,
$ git config --global credential.helper cache
在存储模式下,可附带 --file <存储路径>选项,可指定证书文本的存储路径,默认路径为 ~/.git-credentials,缓存模式下,可附带 --timeout 选项,可指定证书的保存时间,默认值为900(即15分钟),以下是存储模式的配置命令,
$ git config --global credential.helper 'store --file ~/.my-credentials'
Git允许用户配置多种模式,并会按照模式配置的次序,依次验证模式的有效性,一旦某个模式有效,则使用当前模式,比如以下的模式配置段,如果用户在对应目录中,保存了证书文本,将使用存储模式,如果对应目录中,未保存证书文本,则使用缓存模式,
[credential]
helper = store --file /mnt/thumbdrive/.git-credentials
helper = cache --timeout 30000
验证命令
Git验证系统的主命令为git credential,该命令可附带大量的选项,并且能从stdin(标准输入管道)中,读取用户的输入,举例说明,假定使用存储模式,证书文本保存在mygithost主机中,这时fill选项,创建一个验证信息数据块,
$ git credential fill  # 初始化一个交互模式
protocol=https  # Git验证系统将等待stdin的用户输入,需要输入传输协议和主机名
host=mygithost
# 空白行表示用户输入完毕,验证系统将输出,用户证书包含的用户信息
protocol=https  # 验证系统会将用户信息,写入到stdout
host=mygithost
username=bob
password=s3cre7

$ git credential fill # Git验证系统未找到证书,将请求用户输入用户名和密码,而用户输入将会写入stdout,
protocol=https
host=unknownhost
Username for 'https://unknownhost':
Password for 'https://bob@unknownhosprotocol=https
host=unknownhost
username=bob
password=s3cre7
验证系统实际上,可以实现程序调用,即credential.helper的配置信息,如下,
配置值                                     最终执行
foo                                  git-credential-foo
foo -a --opt=bcd                     git-credential-foo -a --opt=bcd
/absolute/path/foo -xyz              /absolute/path/foo -xyz
!f() { echo "password=s3cre7"; }; f  !为逻辑非,shell将执行f()函数
因此之前的证书验证模式的命令,实际为git credential-cache或git credential-store,所以这些命令都可以附带命令行参数,标准格式为git-credential-foo [参数] <可执行操作>,利用stdin/stdout管道协议,可以组合出不同的可执行操作,比如,
- get,可请求用户名和用户密码
- store,可在验证系统的缓存中,保存一组证书
- erase,可从验证系统的缓存中,清除特定证书
store和erase并无请求操作,而get则包含了用户交互,如果用户未提供信息,验证命令只需简单关闭,如果用户提供了相关信息,验证命令将保存这些信息,并会覆盖掉之前Git的相关配置,因此之前示例可跳过git credential,直接使用git credential-store,
$ git credential-store --file ~/git.store store  # 包含以下信息的证书,已被保存
protocol=https
host=mygithost
username=bob
password=s3cre7

$ git credential-store --file ~/git.store get  # 基于URL地址https://mygithost,获取主机的证书
protocol=https
host=mygithost

username=bob  # 证书保存的用户信息
password=s3cre7
~/git.store证书文件的内容如下,
https://bob:s3cre7@mygithost
如果有多个证书,证书文件中,每行文本将包含一个证书,osxkeychain和wincred模型,将使用操作系统原生的存储方式。
证书缓存的定制
git-credential-*等独立程序,相比于git-credential主命令,并无区别,只是写法不同,虽然这些验证程序可兼顾大多数的通用场景,但无法涵盖所有,比如用户所在的开发组,可与其他开发组(也可能为了方便部署),共享一些证书,这些证书保存在一个共享目录中,但用户无需将这些证书,复制到自己的验证目录,因为这些证书会频繁更新,目前还没有出现,能自动实现上述需求的通用验证工具,所以必须人工开发对应的验证操作,同时应当满足以下需求,
- get是唯一需要关注的操作,而store和erase都是写入操作,当接收到写入操作后,只需简单退出
- git-credential-store可处理,共享证书的文件格式
- 除了证书文件的默认存储路径,还应当支持自定义的存储路径
这里使用Ruby语言,编写Git扩展,而使用其他编程语言,可能需花费更多的时间,如下,
#!/usr/bin/env ruby
require 'optparse'
path = File.expand_path '~/.git-credentials' # 定义证书文件的默认路径
OptionParser.new do |opts|
opts.banner = 'USAGE: git-credential-read-only [options] <action>'
opts.on('-f', '--file PATH', 'Specify path for backing store') do |argpath|
path = File.expand_path argpath
end
end.parse!
exit(0) unless ARGV[0].downcase == 'get' # 当get操作出现时,继续执行
exit(0) unless File.exists? path # 当证书文件存在时,继续执行
known = {} # 从stdin中循环读取,一旦出现空白行,将退出循环,所有读取内容都保存在known
while line = STDIN.gets
break if line.strip == ''
k,v = line.strip.split '=', 2
known[k] = v
end
# 循环读取证书文件的文本行,一旦出现与known记录,相匹配的证书,则打印检索结果并退出程序
File.readlines(path).each do |fileline|
prot,user,pass,host = fileline.scan(/^(.*?):\/\/(.*?):(.*?)@(.*)$/).first
if prot == known['protocol'] and host == known['host'] and user == known['username'] then
puts "protocol=#{prot}"
puts "host=#{host}"
puts "username=#{user}"
puts "password=#{pass}"
exit(0)
end
end
将上述验证程序, 保存为git-credential-read-only, 执行该程序,
$ git credential-read-only --file=/mnt/shared/creds get
protocol=https
host=mygithost
protocol=https
host=mygithost
username=bob
password=s3cre7
之后可为该扩展程序,配置一个别名,
$ git config --global credential.helper 'read-only --file /mnt/shared/creds'


 631
631


 被折叠的 条评论
为什么被折叠?
被折叠的 条评论
为什么被折叠?
 到【灌水乐园】发言


