


一、背景
之前的几篇博客已经介绍了Gitlab如何备份恢复与迁移已经脚本监控过程等。
- git学习——> Gitlab如何进行备份恢复与迁移?
http://blog.csdn.net/ouyang_peng/article/details/77070977- Linux学习–>如何通过Shell脚本实现发送邮件通知功能?
http://blog.csdn.net/ouyang_peng/article/details/77363437- Git学习–>如何通过Shell脚本自动定时将Gitlab备份文件复制到远程服务器?
http://blog.csdn.net/ouyang_peng/article/details/77334215- Git学习–>如何通过Shell脚本实现 监控Gitlab备份整个过程并且通过邮件通知得到备份结果?(https://blog.csdn.net/qq446282412/article/details/77371161)
但是这个Gitlab的备份文件就是一个纯粹的tar压缩包,并没有进行加密,所以有可能存在泄漏的风险。因为只要获取到这个tar备份文件,然后重新搭建一个Gitlab环境,即可将代码全部还原。
因此,考虑对这些tar文件进行加密,那么在Linux环境下如何对大文件进行加解密呢?
二、学习Linux下加密知识
2.1 用tar命令和OpenSSL对文件加密压缩和解压
2.1.1压缩
tar -zcf – filename |openssl des3 -salt -k password | dd of=filename.des3
此命令对filename文件进行加码压缩 生成filename.des3加密压缩文件, password 为加密的密码。
2.1.2 解压
dd if=filename.des3 |openssl des3 -d -k password | tar zxf –
注意:命令最后有”-”,它将释放所有的文件。其中**-k password**可以不使用,这样执行完命令后会提示你输入密码,加上-k参数表示在程序中自动验证密码。
2.2 用zip命令对文件加密压缩和解压
2.2.1压缩
方法1:zip -re filename.zip filename 回车,输入2次密码
方法2:zip -rP passwork filename.zip filename passwork是要输入的密码
2.2.2 解压
方法1:unzip filename.zip 按提示输入密码
方法2:unzip -P passwork filename.zip passwork是要解压的密码,这个不会有提示输入密码的操作
3、 OpenSSL加密算法详解
OpenSSL是一个开源的用以实现SSL协议的产品,它主要包括了三个部分:密码算法库、应用程序、SSL协议库。Openssl实现了SSL协议所需要的大多数算法。
查看 帮助文档
[root@localhost ~]# openssl enc --help
unknown option '--help'

options are
-in <file>     input file
-out <file>    output file
-pass <arg>    pass phrase source
-e             encrypt
-d             decrypt
-a/-base64     base64 encode/decode, depending on encryption flag
-k             passphrase is the next argument
-kfile         passphrase is the first line of the file argument
-md            the next argument is the md to use to create a key
                 from a passphrase. See openssl dgst -h for list.
-S             salt in hex is the next argument
-K/-iv         key/iv in hex is the next argument
-[pP]          print the iv/key (then exit if -P)
-bufsize <n>   buffer size
-nopad         disable standard block padding
-engine e      use engine e, possibly a hardware device.

Cipher Types
-aes-128-cbc               -aes-128-cbc-hmac-sha1     -aes-128-cfb
-aes-128-cfb1              -aes-128-cfb8              -aes-128-ctr
-aes-128-ecb               -aes-128-gcm               -aes-128-ofb
-aes-128-xts               -aes-192-cbc               -aes-192-cfb
-aes-192-cfb1              -aes-192-cfb8              -aes-192-ctr
-aes-192-ecb               -aes-192-gcm               -aes-192-ofb
-aes-256-cbc               -aes-256-cbc-hmac-sha1     -aes-256-cfb
-aes-256-cfb1              -aes-256-cfb8              -aes-256-ctr
-aes-256-ecb               -aes-256-gcm               -aes-256-ofb
-aes-256-xts               -aes128                    -aes192
-aes256                    -bf                        -bf-cbc
-bf-cfb                    -bf-ecb                    -bf-ofb
-blowfish                  -camellia-128-cbc          -camellia-128-cfb
-camellia-128-cfb1         -camellia-128-cfb8         -camellia-128-ecb
-camellia-128-ofb          -camellia-192-cbc          -camellia-192-cfb
-camellia-192-cfb1         -camellia-192-cfb8         -camellia-192-ecb
-camellia-192-ofb          -camellia-256-cbc          -camellia-256-cfb
-camellia-256-cfb1         -camellia-256-cfb8         -camellia-256-ecb
-camellia-256-ofb          -camellia128               -camellia192
-camellia256               -cast                      -cast-cbc
-cast5-cbc                 -cast5-cfb                 -cast5-ecb
-cast5-ofb                 -des                       -des-cbc
-des-cfb                   -des-cfb1                  -des-cfb8
-des-ecb                   -des-ede                   -des-ede-cbc
-des-ede-cfb               -des-ede-ofb               -des-ede3
-des-ede3-cbc              -des-ede3-cfb              -des-ede3-cfb1
-des-ede3-cfb8             -des-ede3-ofb              -des-ofb
-des3                      -desx                      -desx-cbc
-id-aes128-GCM             -id-aes128-wrap            -id-aes128-wrap-pad
-id-aes192-GCM             -id-aes192-wrap            -id-aes192-wrap-pad
-id-aes256-GCM             -id-aes256-wrap            -id-aes256-wrap-pad
-id-smime-alg-CMS3DESwrap  -idea                      -idea-cbc
-idea-cfb                  -idea-ecb                  -idea-ofb
-rc2                       -rc2-40-cbc                -rc2-64-cbc
-rc2-cbc                   -rc2-cfb                   -rc2-ecb
-rc2-ofb                   -rc4                       -rc4-40
-rc4-hmac-md5              -seed                      -seed-cbc
-seed-cfb                  -seed-ecb                  -seed-ofb

[root@localhost ~]#
下面介绍使用Openssl进行文件的对称加密操作。
3.1 Openssl支持的加密算法
从上面的帮助文档可以知道,Openssl支持的加密算法有下面几种:
-aes-128-cbc               -aes-128-cbc-hmac-sha1     -aes-128-cfb
-aes-128-cfb1              -aes-128-cfb8              -aes-128-ctr
-aes-128-ecb               -aes-128-gcm               -aes-128-ofb
-aes-128-xts               -aes-192-cbc               -aes-192-cfb
-aes-192-cfb1              -aes-192-cfb8              -aes-192-ctr
-aes-192-ecb               -aes-192-gcm               -aes-192-ofb
-aes-256-cbc               -aes-256-cbc-hmac-sha1     -aes-256-cfb
-aes-256-cfb1              -aes-256-cfb8              -aes-256-ctr
-aes-256-ecb               -aes-256-gcm               -aes-256-ofb
-aes-256-xts               -aes128                    -aes192
-aes256                    -bf                        -bf-cbc
-bf-cfb                    -bf-ecb                    -bf-ofb
-blowfish                  -camellia-128-cbc          -camellia-128-cfb
-camellia-128-cfb1         -camellia-128-cfb8         -camellia-128-ecb
-camellia-128-ofb          -camellia-192-cbc          -camellia-192-cfb
-camellia-192-cfb1         -camellia-192-cfb8         -camellia-192-ecb
-camellia-192-ofb          -camellia-256-cbc          -camellia-256-cfb
-camellia-256-cfb1         -camellia-256-cfb8         -camellia-256-ecb
-camellia-256-ofb          -camellia128               -camellia192
-camellia256               -cast                      -cast-cbc
-cast5-cbc                 -cast5-cfb                 -cast5-ecb
-cast5-ofb                 -des                       -des-cbc
-des-cfb                   -des-cfb1                  -des-cfb8
-des-ecb                   -des-ede                   -des-ede-cbc
-des-ede-cfb               -des-ede-ofb               -des-ede3
-des-ede3-cbc              -des-ede3-cfb              -des-ede3-cfb1
-des-ede3-cfb8             -des-ede3-ofb              -des-ofb
-des3                      -desx                      -desx-cbc
-id-aes128-GCM             -id-aes128-wrap            -id-aes128-wrap-pad
-id-aes192-GCM             -id-aes192-wrap            -id-aes192-wrap-pad
-id-aes256-GCM             -id-aes256-wrap            -id-aes256-wrap-pad
-id-smime-alg-CMS3DESwrap  -idea                      -idea-cbc
-idea-cfb                  -idea-ecb                  -idea-ofb
-rc2                       -rc2-40-cbc                -rc2-64-cbc
-rc2-cbc                   -rc2-cfb                   -rc2-ecb
-rc2-ofb                   -rc4                       -rc4-40
-rc4-hmac-md5              -seed                      -seed-cbc
-seed-cfb                  -seed-ecb                  -seed-ofb
3.2 OpenSSL加密指令语法
openssl可以实现:秘钥证书管理、对称加密和非对称加密 。
3.2.1 对称加密
对称加密需要使用的标准命令为 enc ,用法如下:
openssl enc -ciphername [-in filename] [-out filename] [-pass arg] [-e] [-d] [-a/-base64]
       [-A] [-k password] [-kfile filename] [-K key] [-iv IV] [-S salt] [-salt] [-nosalt] [-z] [-md]
       [-p] [-P] [-bufsize number] [-nopad] [-debug] [-none] [-engine id]
常用选项有:
-chipername选项:加密算法,Openssl支持的算法在上面已经列出了,你只需选择其中一种算法即可实现文件加密功能。
-in filename选项:输入文件,对于加密来说,输入的应该是明文文件;对于解密来说,输入的应该是加密的文件。该选项后面直接跟文件名。
-out filename选项:输出文件,对于加密来说,输出的应该是加密后的文件名;对于解密来说,输出的应该是明文文件名。
-pass选项:选择输入口令的方式,输入源可以是标准输入设备,命令行输入,文件、变量等。
-salt:自动插入一个随机数作为文件内容加密,默认选项
-e:可以指明一种加密算法,若不指的话将使用默认加密算法
-d:解密,解密时也可以指定算法,若不指定则使用默认算法,但一定要与加密时的算法一致
-a和-A选项 :使用-base64位编码格式
-k选项:手动输入加密密钥(不使用该选项,Openssl会使用口令自动提取加密密钥)。
-kfile选项:秘钥的存储文件
-IV选项:输入初始变量(不使用该选项,Openssl会使用口令自动提取初始变量)。
-p选项:打印出加密算法使用的加密密钥。
示例如下:
1、使用aes-128-cbc算法加密文件:
# openssl enc -aes-128-cbc -in install.log -out enc.log
(注:这里install.log是你想要加密的文件,enc.log是加密后的文件,回车后系统会提示你输入密码。)
2、使用aes-128-cbc算法解密刚才加密的文件:
openssl enc -d -aes-128-cbc -in enc.log -out install.log
(注:enc.log是刚才加密的文件,install.log是解密后的文件,-d选项实现解密功能。)
3、加密文件后使用BASE64格式进行编码:
openssl enc -aes-128-cbc -in install.log -out enc.log -a
4、使用多种口令输入方式加密:
openssl enc -des-ede3-cbc -in install.log -out enc.log -pass pass:111111
(这种方法的好处是你可以把它写入到脚本中,自动完成加密功能,不使用pass选项默认系统会提示输入密码并且确认,是需要人工操作的。)
真实示例:
- -aes-128-cbc 加密过程
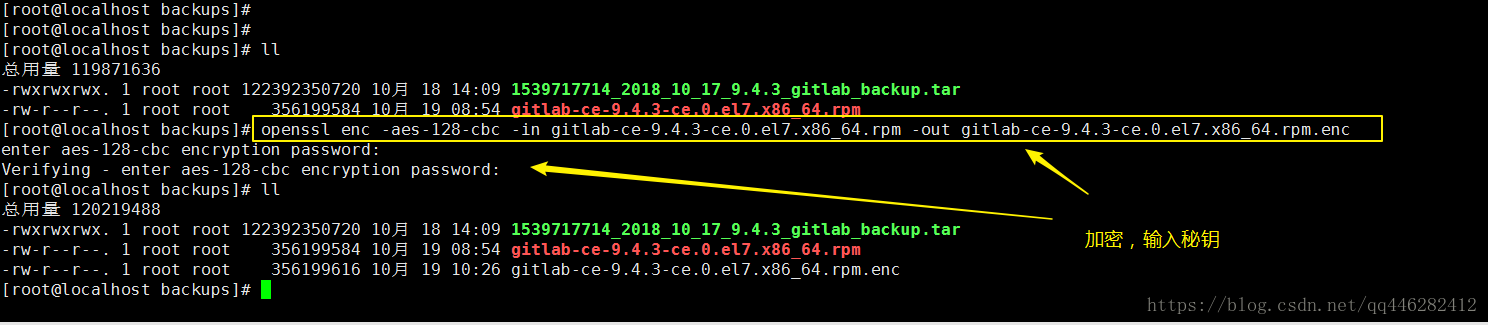
[root@localhost backups]#
[root@localhost backups]# ll
总用量 119871636
-rwxrwxrwx. 1 root root 122392350720 10月 18 14:09 1539717714_2018_10_17_9.4.3_gitlab_backup.tar
-rw-r--r--. 1 root root    356199584 10月 19 08:54 gitlab-ce-9.4.3-ce.0.el7.x86_64.rpm
[root@localhost backups]# openssl enc -aes-128-cbc -in gitlab-ce-9.4.3-ce.0.el7.x86_64.rpm -out gitlab-ce-9.4.3-ce.0.el7.x86_64.rpm.enc
enter aes-128-cbc encryption password:
Verifying - enter aes-128-cbc encryption password:
[root@localhost backups]# ll
总用量 120219488
-rwxrwxrwx. 1 root root 122392350720 10月 18 14:09 1539717714_2018_10_17_9.4.3_gitlab_backup.tar
-rw-r--r--. 1 root root    356199584 10月 19 08:54 gitlab-ce-9.4.3-ce.0.el7.x86_64.rpm
-rw-r--r--. 1 root root    356199616 10月 19 10:26 gitlab-ce-9.4.3-ce.0.el7.x86_64.rpm.enc
[root@localhost backups]#
- -aes-128-cbc 解密过程与对比源文件过程
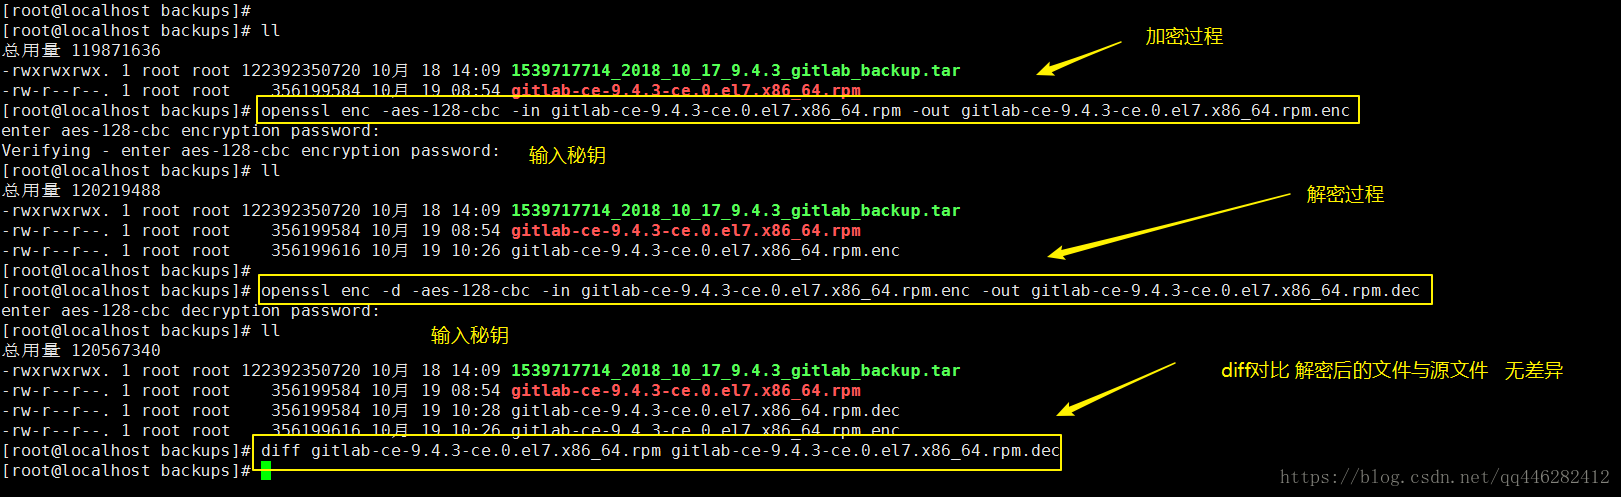
[root@localhost backups]#
[root@localhost backups]# openssl enc -d -aes-128-cbc -in gitlab-ce-9.4.3-ce.0.el7.x86_64.rpm.enc -out gitlab-ce-9.4.3-ce.0.el7.x86_64.rpm.dec
enter aes-128-cbc decryption password:
[root@localhost backups]# ll
总用量 120567340
-rwxrwxrwx. 1 root root 122392350720 10月 18 14:09 1539717714_2018_10_17_9.4.3_gitlab_backup.tar
-rw-r--r--. 1 root root    356199584 10月 19 08:54 gitlab-ce-9.4.3-ce.0.el7.x86_64.rpm
-rw-r--r--. 1 root root    356199584 10月 19 10:28 gitlab-ce-9.4.3-ce.0.el7.x86_64.rpm.dec
-rw-r--r--. 1 root root    356199616 10月 19 10:26 gitlab-ce-9.4.3-ce.0.el7.x86_64.rpm.enc
[root@localhost backups]# diff gitlab-ce-9.4.3-ce.0.el7.x86_64.rpm gitlab-ce-9.4.3-ce.0.el7.x86_64.rpm.dec
[root@localhost backups]#
3.2.2 单向加密
单向加密需要使用的标准命令为 dgst ,用法如下:
openssl dgst [-md5|-md4|-md2|-sha1|-sha|-mdc2|-ripemd160|-dss1] [-c] [-d] [-hex] [-binary]
       [-out filename] [-sign filename] [-keyform arg] [-passin arg] [-verify filename] [-prverify
       filename] [-signature filename] [-hmac key] [file...]
常用选项有:
[-md5|-md4|-md2|-sha1|-sha|-mdc2|-ripemd160|-dss1] :指定一种加密算法
-out filename:将加密的内容保存到指定文件中
示例如下:
[root@localhost test]# openssl dgst -md5 test.txt
MD5(test.txt)= 02785072f72264aabb6038f6cc7b0ad8

[root@localhost test]# echo "hello OuyangPeng" | openssl dgst -md5
(stdin)= 6e5b60fbf9edbff4b488a56d4aed9a11

单向加密除了 openssl dgst 工具还有: md5sum,sha1sum,sha224sum,sha256sum ,sha384sum,sha512sum
[root@localhost test]# sha512sum test.txt
0e58dc7ad649502ad63d5dbb913b65531882d10b74e3ddefa89dd4b425204adddff8ea0c5623b3596d4bb13a43dff896d4def4cac7f1213f27df4577ed7715be  test.txt
[root@localhost test]#

openssl其他的用法详解参考链接: https://www.cnblogs.com/yangxiaolan/p/6256838.html
三、编写脚本
利用OpenSSL的aes算法加解密大数据文件,写成shell脚本,分别有加密、解密、秘钥三个文件
3.1 编写加密脚本 encrypt.sh
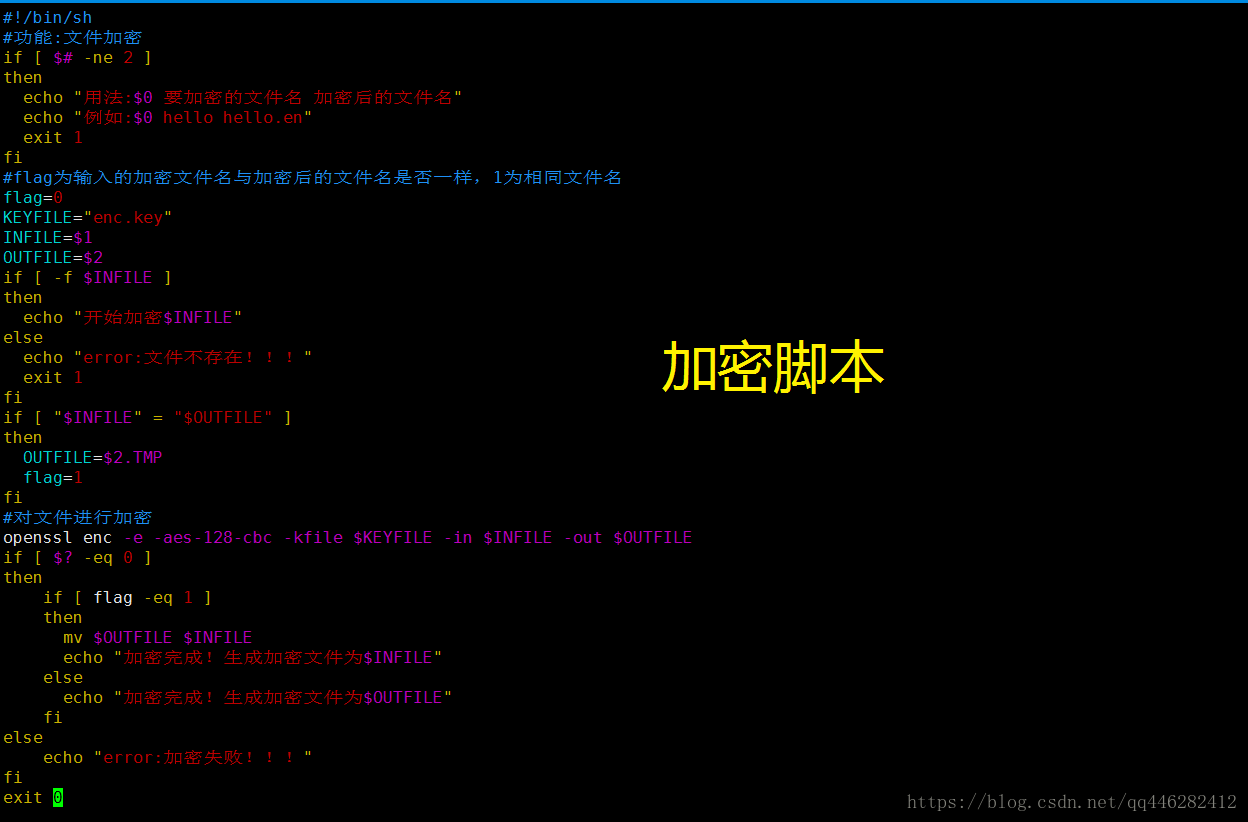
源文件:
#!/bin/sh
#功能:文件加密
if [ $# -ne 2 ]
then
  echo "用法:$0 要加密的文件名 加密后的文件名"
  echo "例如:$0 hello hello.en"
  exit 1
fi
#flag为输入的加密文件名与加密后的文件名是否一样,1为相同文件名
flag=0
KEYFILE="enc.key"
INFILE=$1
OUTFILE=$2
if [ -f $INFILE ]
then
  echo "开始加密$INFILE"
else
  echo "error:文件不存在!!!"
  exit 1
fi
if [ "$INFILE" = "$OUTFILE" ]
then
  OUTFILE=$2.TMP
  flag=1
fi
#对文件进行加密
openssl enc -e -aes-128-cbc -kfile $KEYFILE -in $INFILE -out $OUTFILE
if [ $? -eq 0 ]
then
    if [ flag -eq 1 ]
    then
      mv $OUTFILE $INFILE
      echo "加密完成!生成加密文件为$INFILE"
    else
      echo "加密完成!生成加密文件为$OUTFILE"
    fi
else
    echo "error:加密失败!!!"
fi
exit 0
其中enc.key 为加密的秘钥文件,为16位字符的密码文件

3.2 编写解密脚本 decrpt.sh
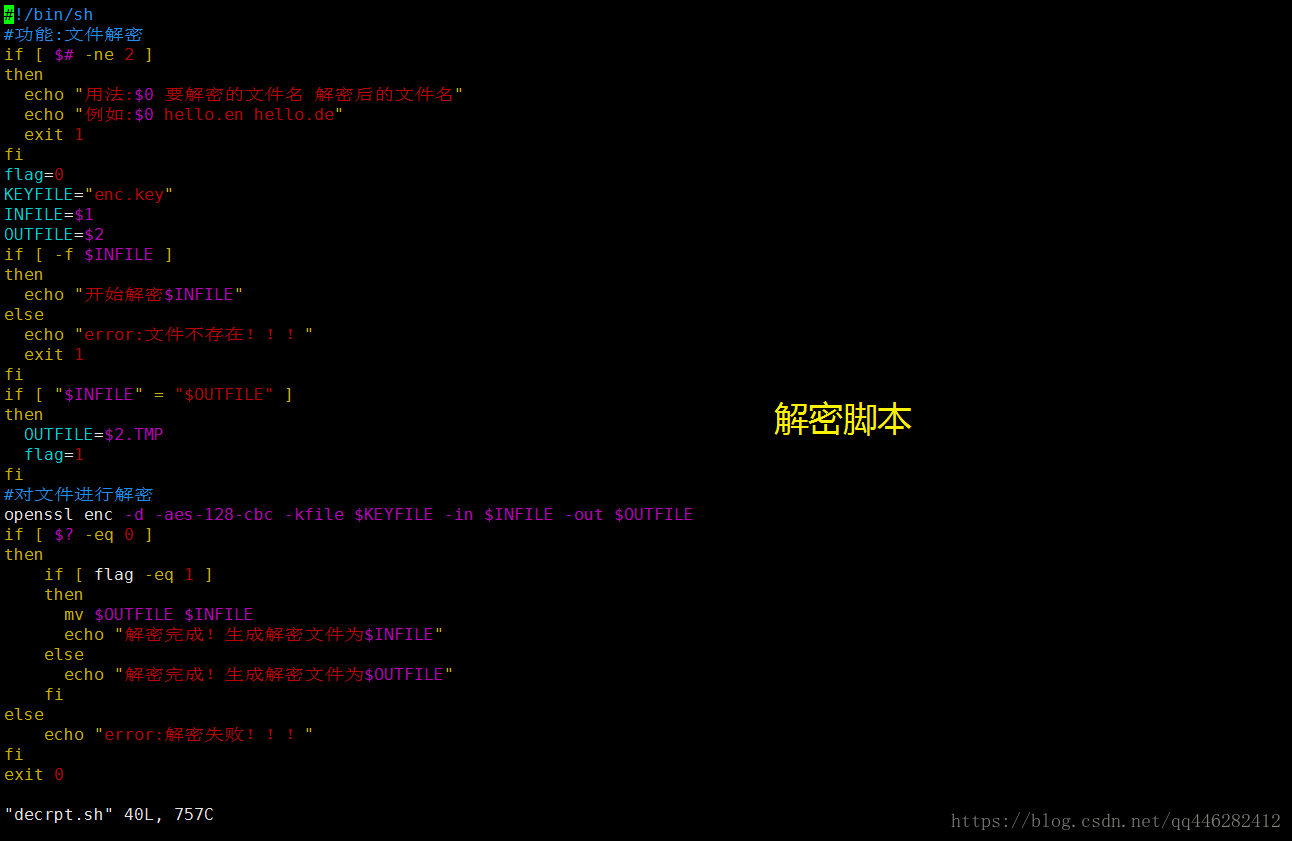
源文件:
#!/bin/sh
#功能:文件解密
if [ $# -ne 2 ]
then
  echo "用法:$0 要解密的文件名 解密后的文件名"
  echo "例如:$0 hello.en hello.de"
  exit 1
fi
flag=0
KEYFILE="enc.key"
INFILE=$1
OUTFILE=$2
if [ -f $INFILE ]
then
  echo "开始解密$INFILE"
else
  echo "error:文件不存在!!!"
  exit 1
fi
if [ "$INFILE" = "$OUTFILE" ]
then
  OUTFILE=$2.TMP
  flag=1
fi
#对文件进行解密
openssl enc -d -aes-128-cbc -kfile $KEYFILE -in $INFILE -out $OUTFILE
if [ $? -eq 0 ]
then
    if [ flag -eq 1 ]
    then
      mv $OUTFILE $INFILE
      echo "解密完成!生成解密文件为$INFILE"
    else
      echo "解密完成!生成解密文件为$OUTFILE"
    fi
else
    echo "error:解密失败!!!"
fi
exit 0
3.3 使用加解密脚本
使用加密脚本

root@ubuntu116:/data/gitlabData/backups# chmod 777 encrypt.sh
您在 /var/mail/root 中有新邮件
root@ubuntu116:/data/gitlabData/backups# ./encrypt.sh
用法:./encrypt.sh 要加密的文件名 加密后的文件名
例如:./encrypt.sh hello hello.en
root@ubuntu116:/data/gitlabData/backups# ./encrypt.sh back.txt back.txt.rsa
开始加密back.txt
./encrypt.sh: 30: [: Illegal number: flag
加密完成!生成加密文件为back.txt.rsa
root@ubuntu116:/data/gitlabData/backups# cat back.txt.rsa
?x???`*¨_D?WL`???z??????M fl??m¤Vo???>????D???????
3.4 使用解密脚本
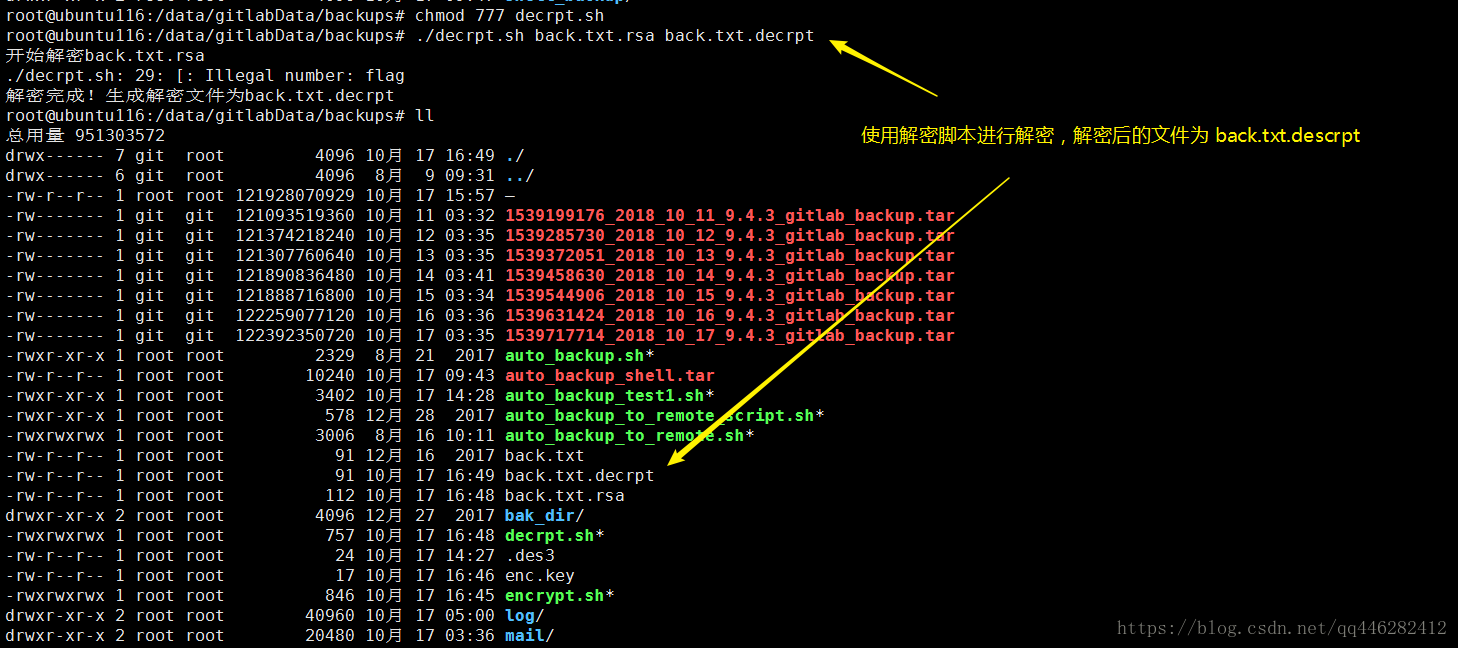
查看解密后的文件,查看未加密的原始文件,看解密之后内容是否一致。

root@ubuntu116:/data/gitlabData/backups# chmod 777 decrpt.sh
root@ubuntu116:/data/gitlabData/backups# ./decrpt.sh back.txt.rsa back.txt.decrpt
开始解密back.txt.rsa
./decrpt.sh: 29: [: Illegal number: flag
解密完成!生成解密文件为back.txt.decrpt
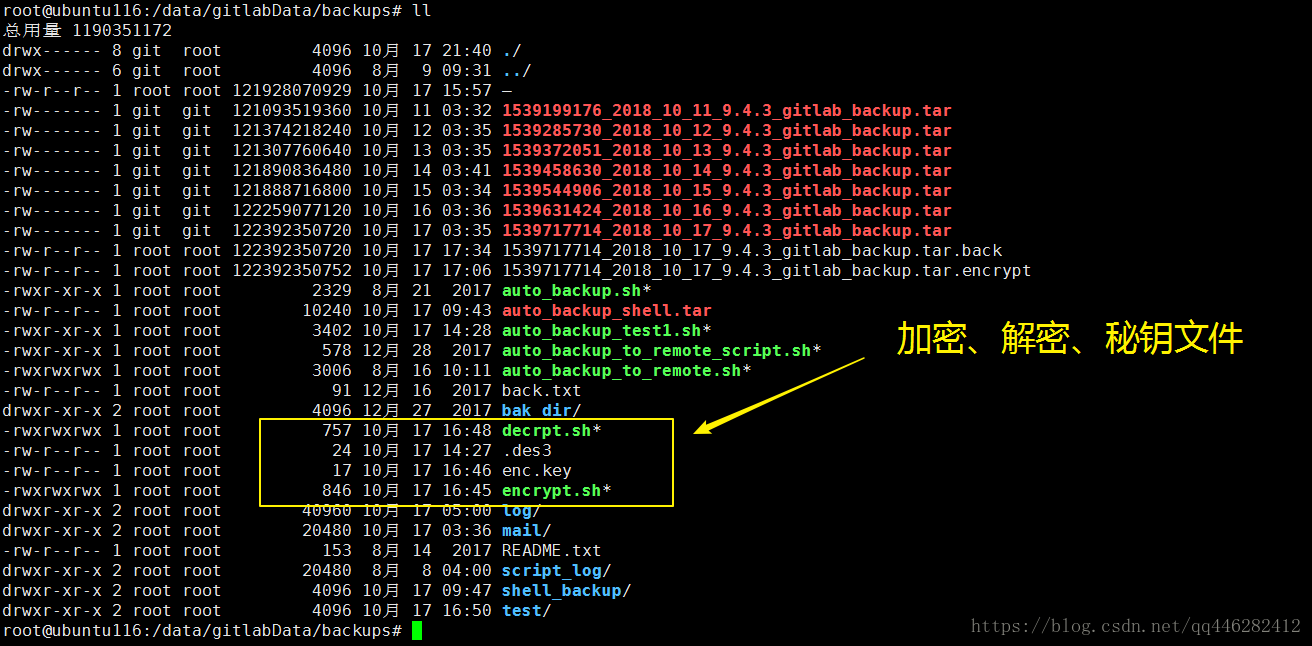
root@ubuntu116:/data/gitlabData/backups# ll
总用量 951303572
drwx------ 7 git root 4096 10月 17 16:49 ./
drwx------ 6 git root 4096 8月 9 09:31 ../
-rw-r--r-- 1 root root 121928070929 10月 17 15:57 –
-rw------- 1 git git 121093519360 10月 11 03:32 1539199176_2018_10_11_9.4.3_gitlab_backup.tar
-rw------- 1 git git 121374218240 10月 12 03:35 1539285730_2018_10_12_9.4.3_gitlab_backup.tar
-rw------- 1 git git 121307760640 10月 13 03:35 1539372051_2018_10_13_9.4.3_gitlab_backup.tar
-rw------- 1 git git 121890836480 10月 14 03:41 1539458630_2018_10_14_9.4.3_gitlab_backup.tar
-rw------- 1 git git 121888716800 10月 15 03:34 1539544906_2018_10_15_9.4.3_gitlab_backup.tar
-rw------- 1 git git 122259077120 10月 16 03:36 1539631424_2018_10_16_9.4.3_gitlab_backup.tar
-rw------- 1 git git 122392350720 10月 17 03:35 1539717714_2018_10_17_9.4.3_gitlab_backup.tar
-rwxr-xr-x 1 root root 2329 8月 21 2017 auto_backup.sh*
-rw-r--r-- 1 root root 10240 10月 17 09:43 auto_backup_shell.tar
-rwxr-xr-x 1 root root 3402 10月 17 14:28 auto_backup_test1.sh*
-rwxr-xr-x 1 root root 578 12月 28 2017 auto_backup_to_remote_script.sh*
-rwxrwxrwx 1 root root 3006 8月 16 10:11 auto_backup_to_remote.sh*
-rw-r--r-- 1 root root 91 12月 16 2017 back.txt
-rw-r--r-- 1 root root 91 10月 17 16:49 back.txt.decrpt
-rw-r--r-- 1 root root 112 10月 17 16:48 back.txt.rsa
drwxr-xr-x 2 root root 4096 12月 27 2017 bak_dir/
-rwxrwxrwx 1 root root 757 10月 17 16:48 decrpt.sh*
-rw-r--r-- 1 root root 24 10月 17 14:27 .des3
-rw-r--r-- 1 root root 17 10月 17 16:46 enc.key
-rwxrwxrwx 1 root root 846 10月 17 16:45 encrypt.sh*
drwxr-xr-x 2 root root 40960 10月 17 05:00 log/
drwxr-xr-x 2 root root 20480 10月 17 03:36 mail/
-rw-r--r-- 1 root root 153 8月 14 2017 README.txt
drwxr-xr-x 2 root root 20480 8月 8 04:00 script_log/
drwxr-xr-x 2 root root 4096 10月 17 09:47 shell_backup/
root@ubuntu116:/data/gitlabData/backups# cat back.txt.decrpt
scp 1513362071_2017_12_16_9.4.3_gitlab_backup.tar root@172.28.3.35:/root/gitlabDataBackup
root@ubuntu116:/data/gitlabData/backups# cat back.txt
scp 1513362071_2017_12_16_9.4.3_gitlab_backup.tar root@172.28.3.35:/root/gitlabDataBackup
您在 /var/mail/root 中有新邮件
从上面可以看出来,解密之后的文件内容和未加密的源文件内容一致!
3.5 对大文件进行加密
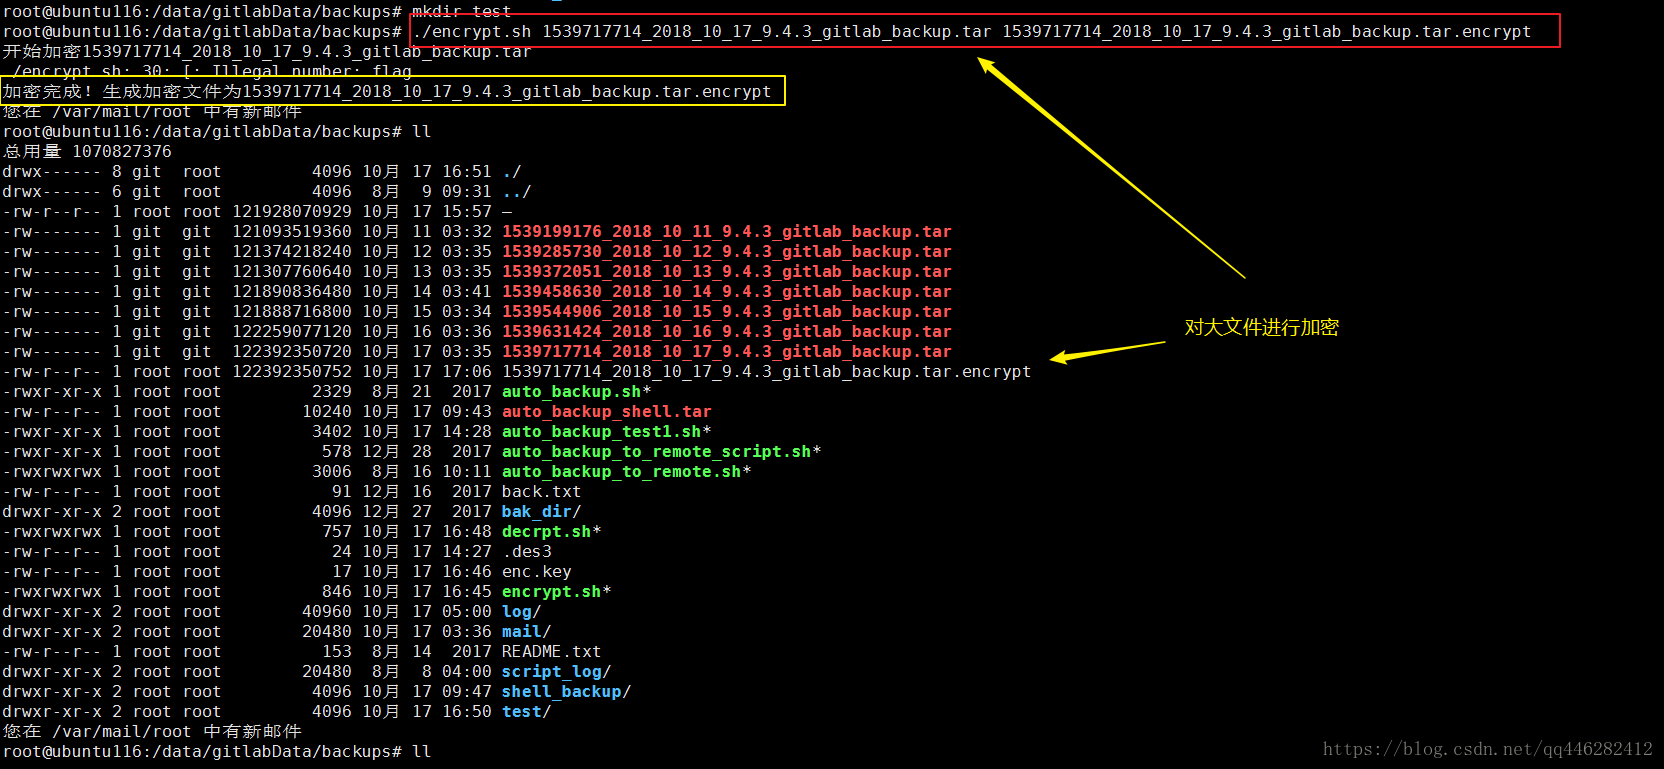
root@ubuntu116:/data/gitlabData/backups# ./encrypt.sh 1539717714_2018_10_17_9.4.3_gitlab_backup.tar 1539717714_2018_10_17_9.4.3_gitlab_backup.tar.encrypt
开始加密1539717714_2018_10_17_9.4.3_gitlab_backup.tar
./encrypt.sh: 30: [: Illegal number: flag
加密完成!生成加密文件为1539717714_2018_10_17_9.4.3_gitlab_backup.tar.encrypt
3.6 对大文件进行解密
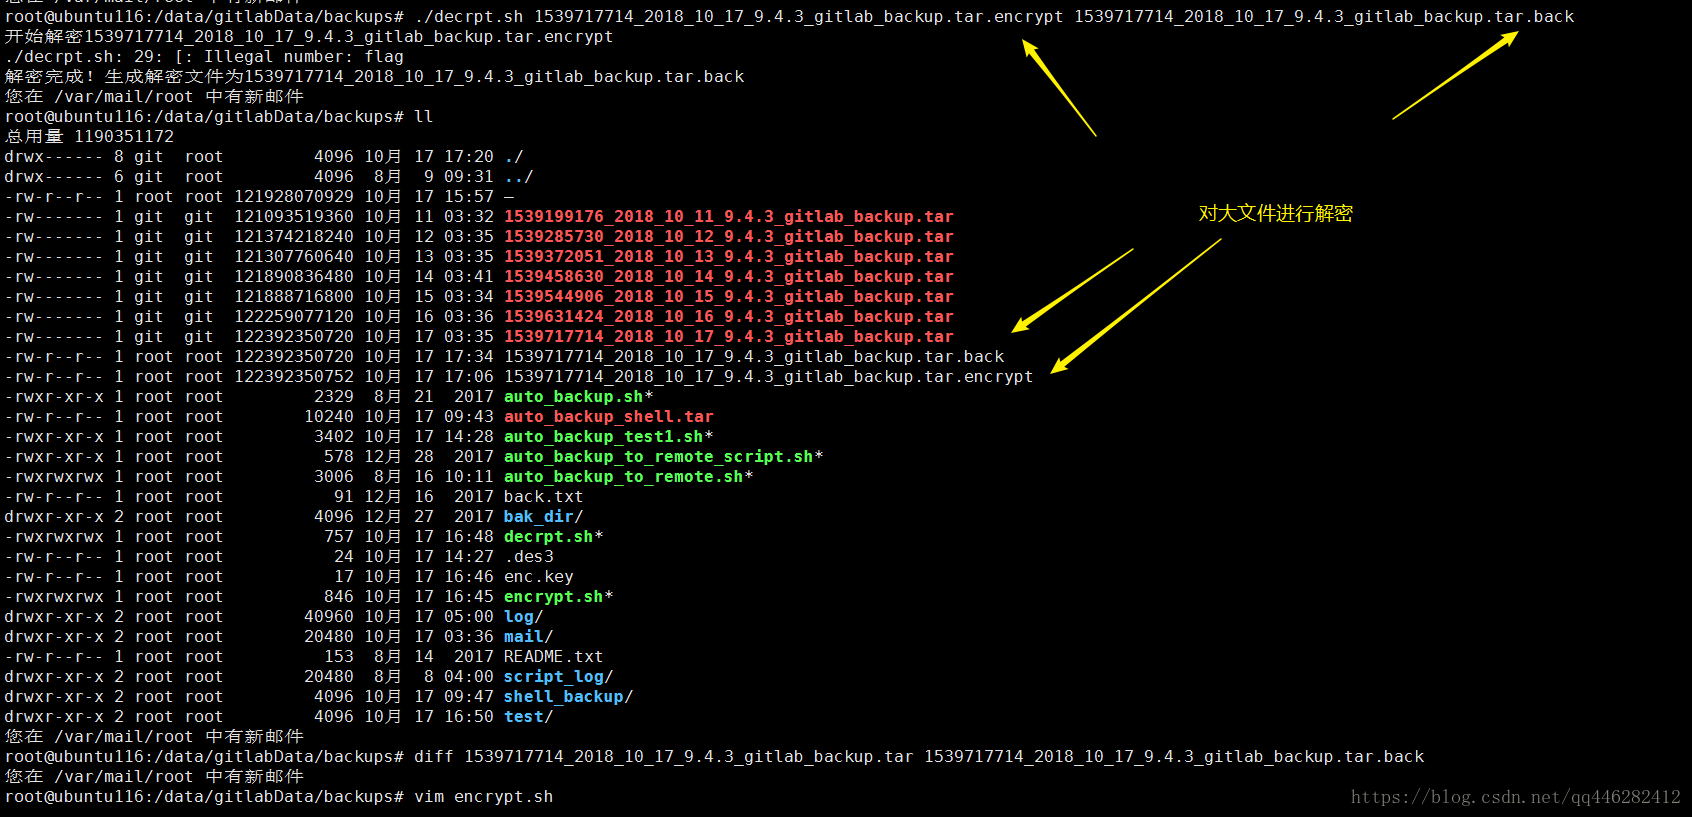
对解密后的大文件和原始的大文件进行diff对比
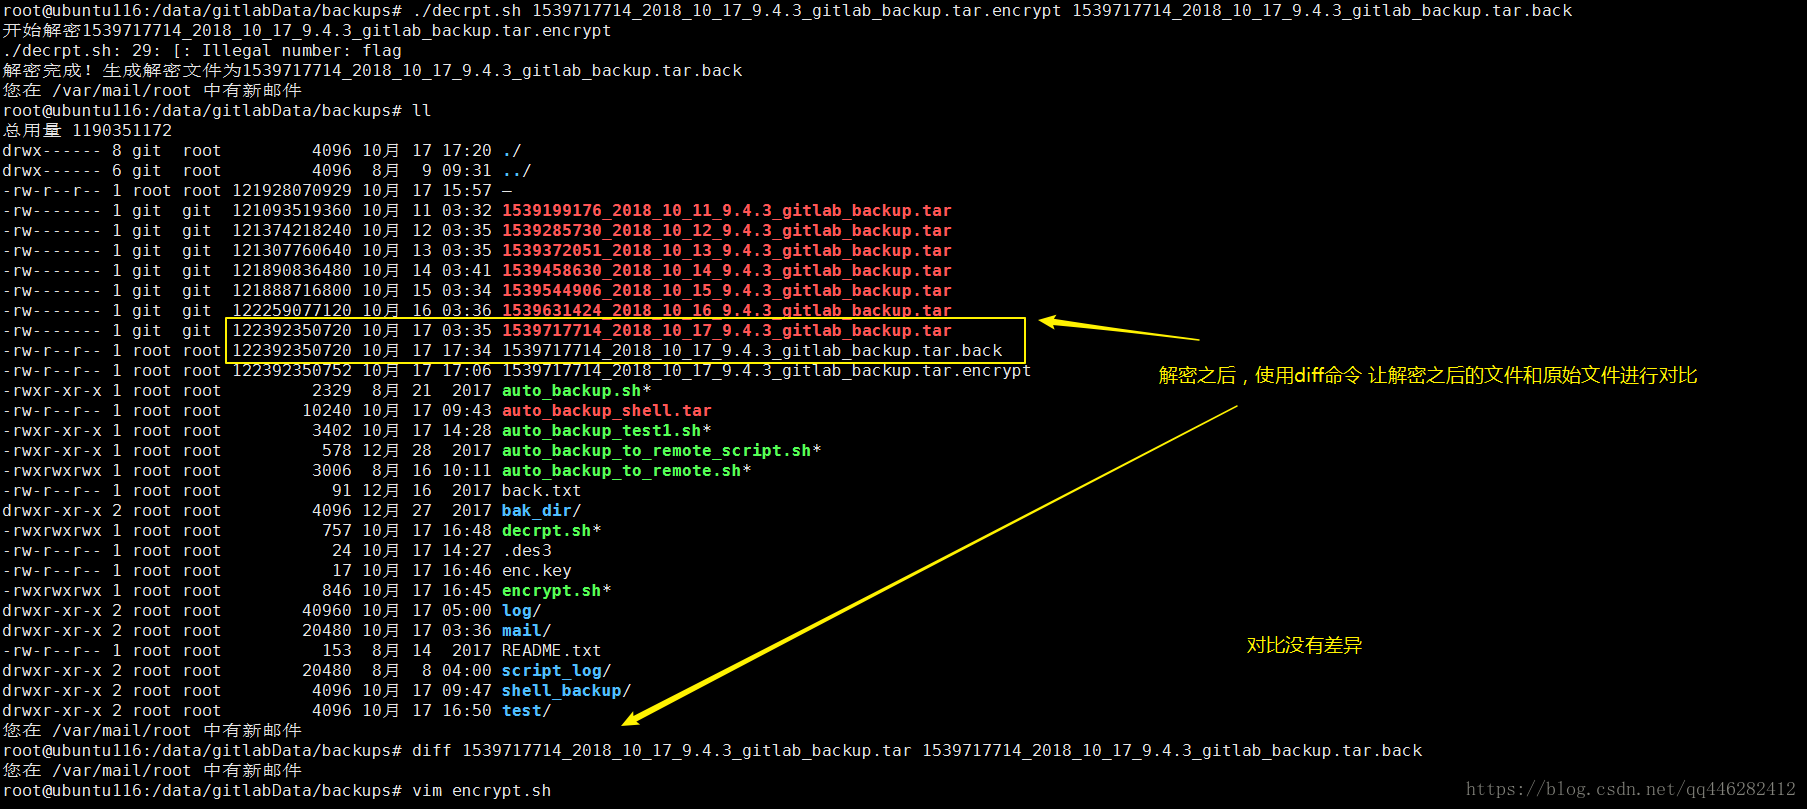
root@ubuntu116:/data/gitlabData/backups# ./decrpt.sh 1539717714_2018_10_17_9.4.3_gitlab_backup.tar.encrypt 1539717714_2018_10_17_9.4.3_gitlab_backup.tar.back
开始解密1539717714_2018_10_17_9.4.3_gitlab_backup.tar.encrypt
./decrpt.sh: 29: [: Illegal number: flag
解密完成!生成解密文件为1539717714_2018_10_17_9.4.3_gitlab_backup.tar.back
您在 /var/mail/root 中有新邮件
root@ubuntu116:/data/gitlabData/backups# ll
总用量 1190351172
drwx------ 8 git  root         4096 10月 17 17:20 ./
drwx------ 6 git  root         4096  8月  9 09:31 ../
-rw-r--r-- 1 root root 121928070929 10月 17 15:57 ?
-rw------- 1 git  git  121093519360 10月 11 03:32 1539199176_2018_10_11_9.4.3_gitlab_backup.tar
-rw------- 1 git  git  121374218240 10月 12 03:35 1539285730_2018_10_12_9.4.3_gitlab_backup.tar
-rw------- 1 git  git  121307760640 10月 13 03:35 1539372051_2018_10_13_9.4.3_gitlab_backup.tar
-rw------- 1 git  git  121890836480 10月 14 03:41 1539458630_2018_10_14_9.4.3_gitlab_backup.tar
-rw------- 1 git  git  121888716800 10月 15 03:34 1539544906_2018_10_15_9.4.3_gitlab_backup.tar
-rw------- 1 git  git  122259077120 10月 16 03:36 1539631424_2018_10_16_9.4.3_gitlab_backup.tar
-rw------- 1 git  git  122392350720 10月 17 03:35 1539717714_2018_10_17_9.4.3_gitlab_backup.tar
-rw-r--r-- 1 root root 122392350720 10月 17 17:34 1539717714_2018_10_17_9.4.3_gitlab_backup.tar.back
-rw-r--r-- 1 root root 122392350752 10月 17 17:06 1539717714_2018_10_17_9.4.3_gitlab_backup.tar.encrypt
-rwxr-xr-x 1 root root         2329  8月 21  2017 auto_backup.sh*
-rw-r--r-- 1 root root        10240 10月 17 09:43 auto_backup_shell.tar
-rwxr-xr-x 1 root root         3402 10月 17 14:28 auto_backup_test1.sh*
-rwxr-xr-x 1 root root          578 12月 28  2017 auto_backup_to_remote_script.sh*
-rwxrwxrwx 1 root root         3006  8月 16 10:11 auto_backup_to_remote.sh*
-rw-r--r-- 1 root root           91 12月 16  2017 back.txt
drwxr-xr-x 2 root root         4096 12月 27  2017 bak_dir/
-rwxrwxrwx 1 root root          757 10月 17 16:48 decrpt.sh*
-rw-r--r-- 1 root root           24 10月 17 14:27 .des3
-rw-r--r-- 1 root root           17 10月 17 16:46 enc.key
-rwxrwxrwx 1 root root          846 10月 17 16:45 encrypt.sh*
drwxr-xr-x 2 root root        40960 10月 17 05:00 log/
drwxr-xr-x 2 root root        20480 10月 17 03:36 mail/
-rw-r--r-- 1 root root          153  8月 14  2017 README.txt
drwxr-xr-x 2 root root        20480  8月  8 04:00 script_log/
drwxr-xr-x 2 root root         4096 10月 17 09:47 shell_backup/
drwxr-xr-x 2 root root         4096 10月 17 16:50 test/
您在 /var/mail/root 中有新邮件
root@ubuntu116:/data/gitlabData/backups# diff 1539717714_2018_10_17_9.4.3_gitlab_backup.tar 1539717714_2018_10_17_9.4.3_gitlab_backup.tar.back
您在 /var/mail/root 中有新邮件
从上面的对比可以看出来,大文件进行加密解密之后,和原始文件进行了diff命令对比,没有任何差异!
四、修改脚本增加日志文件
加密脚本: encrypt.sh
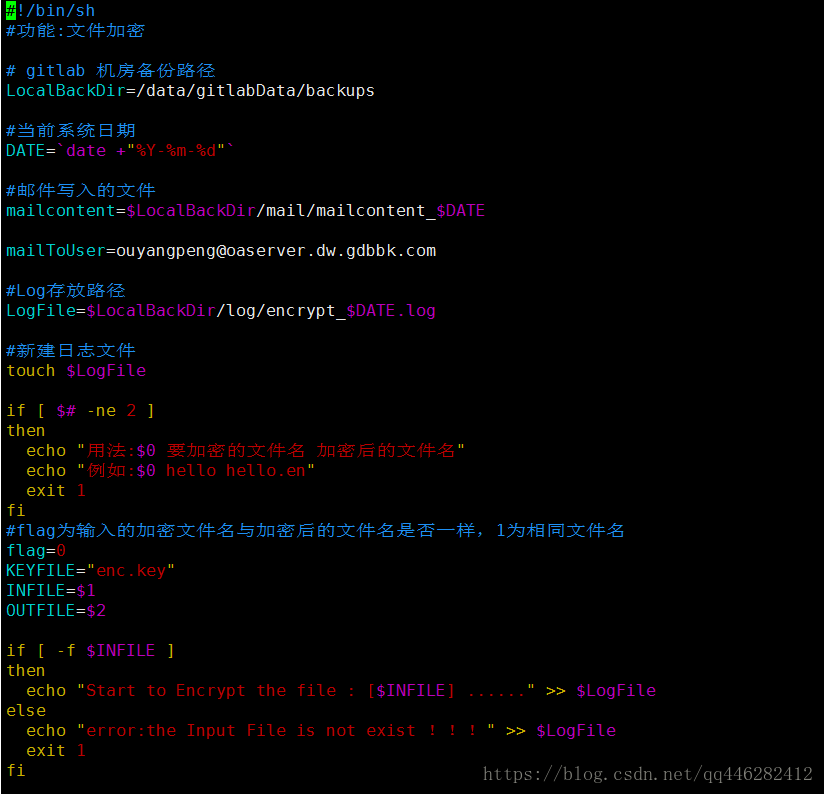
#!/bin/sh
#功能:文件加密
# gitlab 机房备份路径
LocalBackDir=/data/gitlabData/backups
#当前系统日期
DATE=`date +"%Y-%m-%d"`
#邮件写入的文件
mailcontent=$LocalBackDir/mail/mailcontent_$DATE
mailToUser=ouyangpeng@oaserver.dw.gdbbk.com
#Log存放路径
LogFile=$LocalBackDir/log/encrypt_$DATE.log
#新建日志文件
touch $LogFile
if [ $# -ne 2 ]
then
echo "用法:$0 要加密的文件名 加密后的文件名"
echo "例如:$0 hello hello.en"
exit 1
fi
#flag为输入的加密文件名与加密后的文件名是否一样,1为相同文件名
flag=0
KEYFILE="enc.key"
INFILE=$1
OUTFILE=$2
if [ -f $INFILE ]
then
echo "Start to Encrypt the file : [$INFILE] ......" >> $LogFile
else
echo "error:the Input File is not exist !!!" >> $LogFile
exit 1
fi
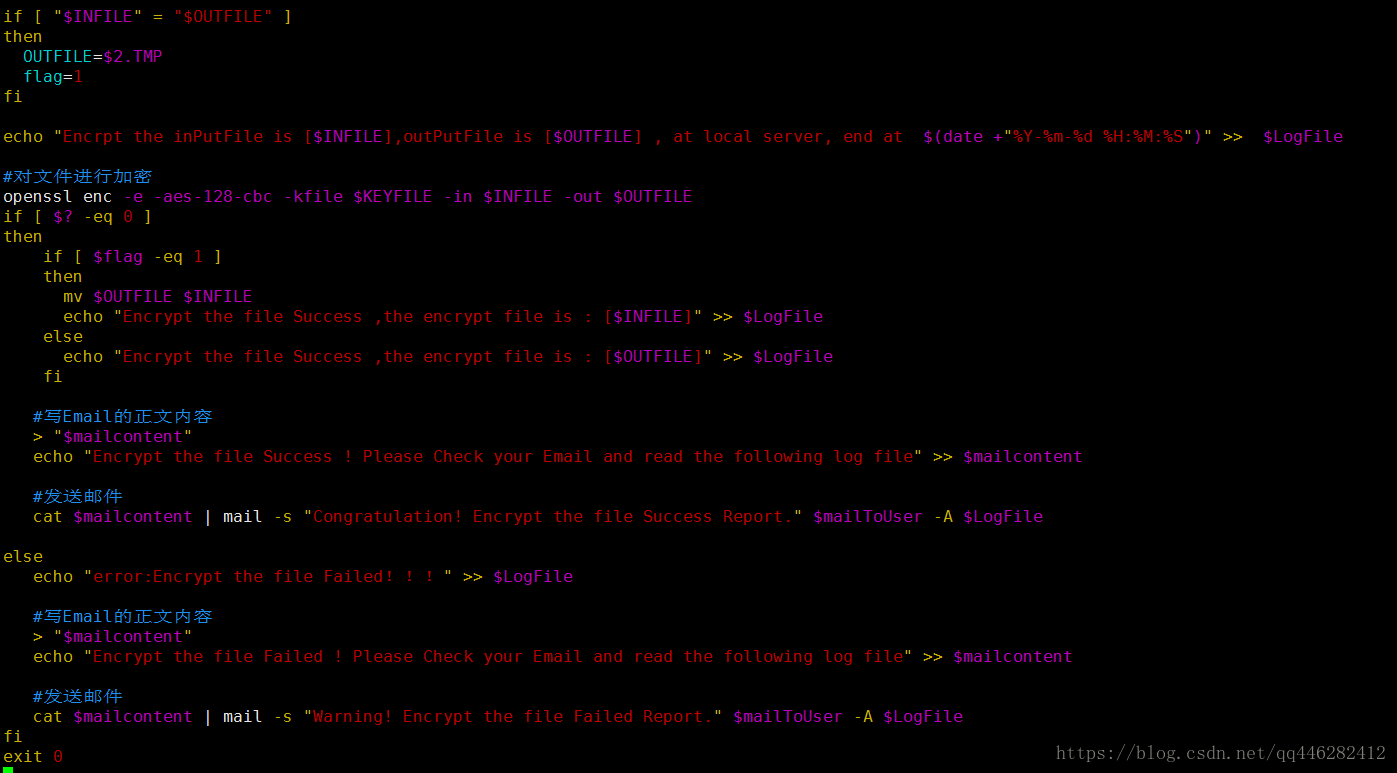
if [ "$INFILE" = "$OUTFILE" ]
then
OUTFILE=$2.TMP
flag=1
fi
echo "Encrpt the inPutFile is [$INFILE],outPutFile is [$OUTFILE] , at local server, end at $(date +"%Y-%m-%d %H:%M:%S")" >> $LogFile
#对文件进行加密
openssl enc -e -aes-128-cbc -kfile $KEYFILE -in $INFILE -out $OUTFILE
if [ $? -eq 0 ]
then
if [ $flag -eq 1 ]
then
mv $OUTFILE $INFILE
echo "Encrypt the file Success ,the encrypt file is : [$INFILE]" >> $LogFile
else
echo "Encrypt the file Success ,the encrypt file is : [$OUTFILE]" >> $LogFile
fi
#写Email的正文内容
> "$mailcontent"
echo "Encrypt the file Success ! Please Check your Email and read the following log file" >> $mailcontent
#发送邮件
cat $mailcontent | mail -s "Congratulation! Encrypt the file Success Report." $mailToUser -A $LogFile
else
echo "error:Encrypt the file Failed!!!" >> $LogFile
#写Email的正文内容
> "$mailcontent"
echo "Encrypt the file Failed ! Please Check your Email and read the following log file" >> $mailcontent
#发送邮件
cat $mailcontent | mail -s "Warning! Encrypt the file Failed Report." $mailToUser -A $LogFile
fi
exit 0
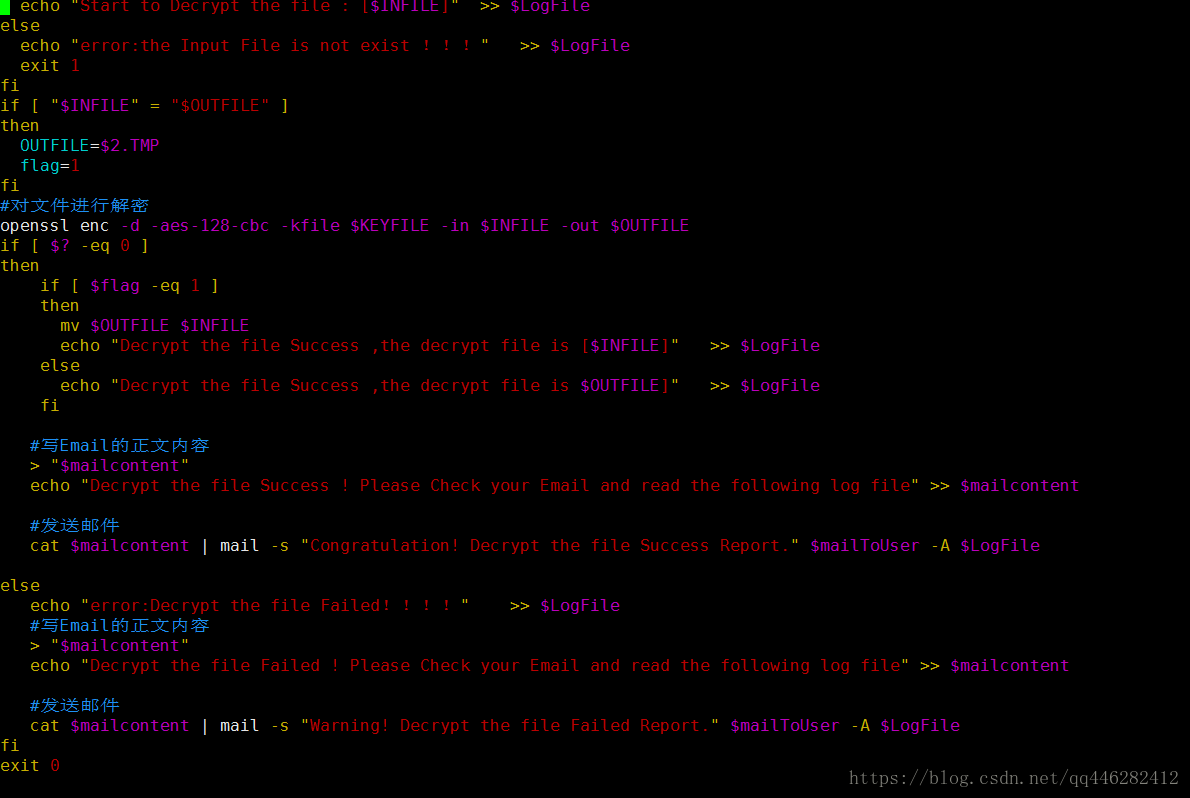
解密脚本 decrpt.sh
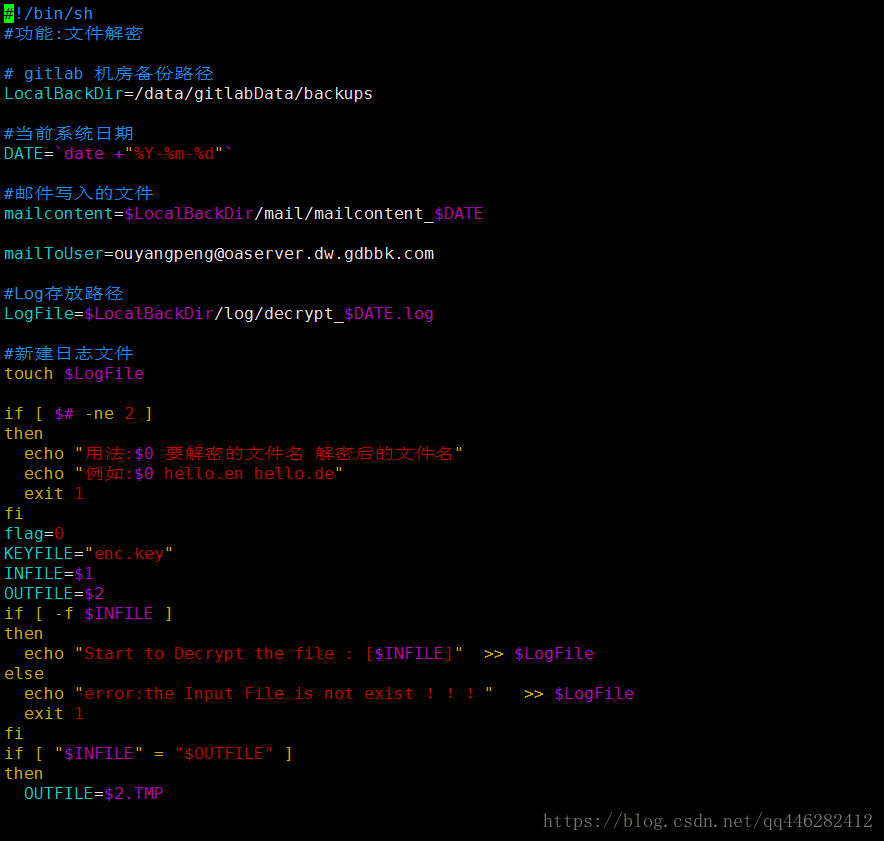
#!/bin/sh
#功能:文件解密

# gitlab 机房备份路径
LocalBackDir=/data/gitlabData/backups

#当前系统日期
DATE=`date +"%Y-%m-%d"`

#邮件写入的文件
mailcontent=$LocalBackDir/mail/mailcontent_$DATE

mailToUser=ouyangpeng@oaserver.dw.gdbbk.com

#Log存放路径
LogFile=$LocalBackDir/log/decrypt_$DATE.log

#新建日志文件
touch $LogFile

if [ $# -ne 2 ]
then
  echo "用法:$0 要解密的文件名 解密后的文件名"
  echo "例如:$0 hello.en hello.de"
  exit 1
fi
flag=0
KEYFILE="enc.key"
INFILE=$1
OUTFILE=$2
if [ -f $INFILE ]
then
  echo "Start to Decrypt the file : [$INFILE]"  >> $LogFile
else
  echo "error:the Input File is not exist !!!"   >> $LogFile
  exit 1
fi
if [ "$INFILE" = "$OUTFILE" ]
then
  OUTFILE=$2.TMP
  flag=1
fi
#对文件进行解密
openssl enc -d -aes-128-cbc -kfile $KEYFILE -in $INFILE -out $OUTFILE
if [ $? -eq 0 ]
then
    if [ $flag -eq 1 ]
    then
      mv $OUTFILE $INFILE
      echo "Decrypt the file Success ,the decrypt file is [$INFILE]"   >> $LogFile
    else
      echo "Decrypt the file Success ,the decrypt file is $OUTFILE]"   >> $LogFile
    fi

   #写Email的正文内容
   > "$mailcontent"
   echo "Decrypt the file Success ! Please Check your Email and read the following log file" >> $mailcontent

   #发送邮件
   cat $mailcontent | mail -s "Congratulation! Decrypt the file Success Report." $mailToUser -A $LogFile

else
   echo "error:Decrypt the file Failed!!!!"    >> $LogFile
   #写Email的正文内容
   > "$mailcontent"
   echo "Decrypt the file Failed ! Please Check your Email and read the following log file" >> $mailcontent

   #发送邮件
   cat $mailcontent | mail -s "Warning! Decrypt the file Failed Report." $mailToUser -A $LogFile
fi
exit 0
4.2 测试脚本
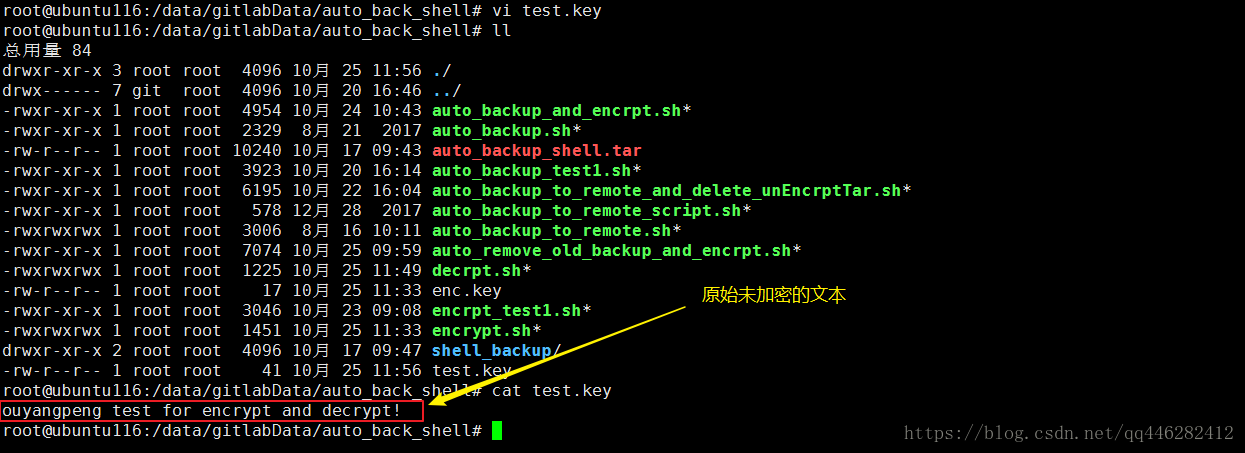
root@ubuntu116:/data/gitlabData/auto_back_shell# vi test.key
root@ubuntu116:/data/gitlabData/auto_back_shell# ll
总用量 84
drwxr-xr-x 3 root root  4096 10月 25 11:56 ./
drwx------ 7 git  root  4096 10月 20 16:46 ../
-rwxr-xr-x 1 root root  4954 10月 24 10:43 auto_backup_and_encrpt.sh*
-rwxr-xr-x 1 root root  2329  8月 21  2017 auto_backup.sh*
-rw-r--r-- 1 root root 10240 10月 17 09:43 auto_backup_shell.tar
-rwxr-xr-x 1 root root  3923 10月 20 16:14 auto_backup_test1.sh*
-rwxr-xr-x 1 root root  6195 10月 22 16:04 auto_backup_to_remote_and_delete_unEncrptTar.sh*
-rwxr-xr-x 1 root root   578 12月 28  2017 auto_backup_to_remote_script.sh*
-rwxrwxrwx 1 root root  3006  8月 16 10:11 auto_backup_to_remote.sh*
-rwxr-xr-x 1 root root  7074 10月 25 09:59 auto_remove_old_backup_and_encrpt.sh*
-rwxrwxrwx 1 root root  1225 10月 25 11:49 decrpt.sh*
-rw-r--r-- 1 root root    17 10月 25 11:33 enc.key
-rwxr-xr-x 1 root root  3046 10月 23 09:08 encrpt_test1.sh*
-rwxrwxrwx 1 root root  1451 10月 25 11:33 encrypt.sh*
drwxr-xr-x 2 root root  4096 10月 17 09:47 shell_backup/
-rw-r--r-- 1 root root    41 10月 25 11:56 test.key
root@ubuntu116:/data/gitlabData/auto_back_shell# cat test.key
ouyangpeng test for encrypt and decrypt!
root@ubuntu116:/data/gitlabData/auto_back_shell#
新建一个用于测试的文件 test.key ,文件内容为
ouyangpeng test for encrypt and decrypt!
4.2.1 测试加密
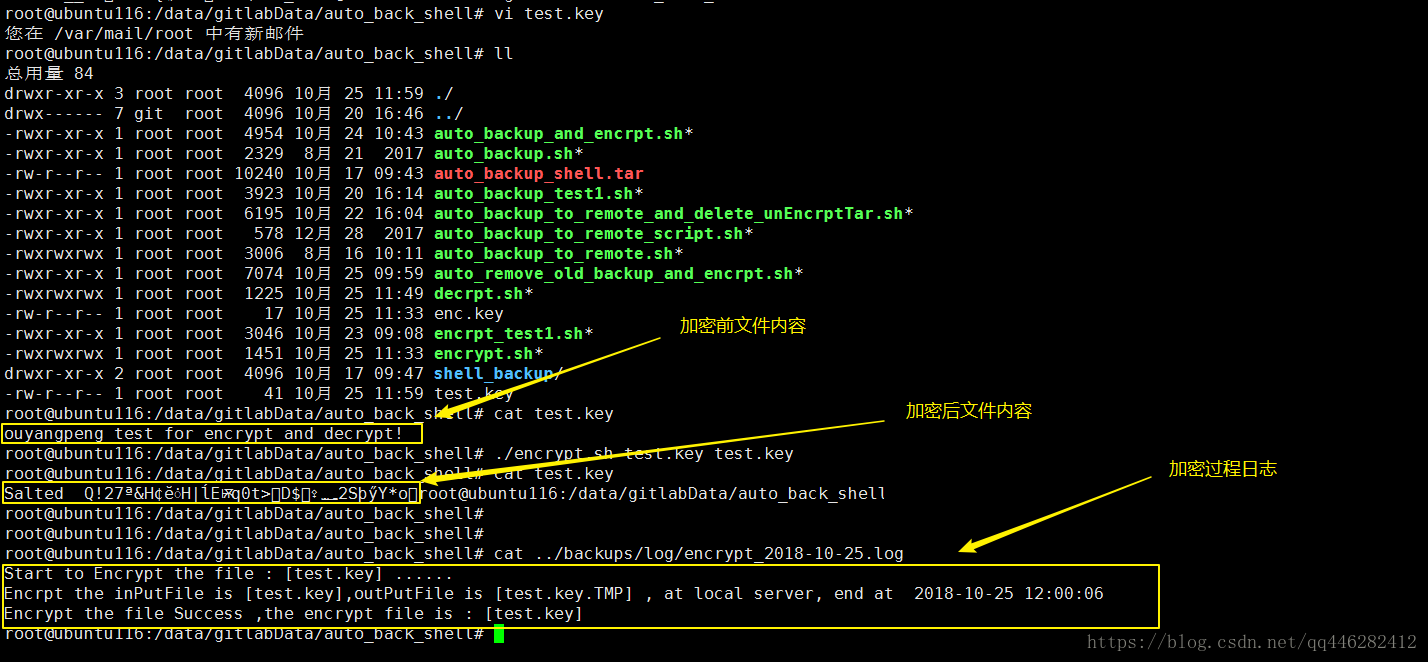
root@ubuntu116:/data/gitlabData/auto_back_shell# cat test.key
ouyangpeng test for encrypt and decrypt!
root@ubuntu116:/data/gitlabData/auto_back_shell# ./encrypt.sh test.key test.key
root@ubuntu116:/data/gitlabData/auto_back_shell# cat test.key
Salted__Q!27?&H???H|?E?q0t>??D$???2?S??Y*o??root@ubuntu116:/data/gitlabData/auto_back_shell#
root@ubuntu116:/data/gitlabData/auto_back_shell#
root@ubuntu116:/data/gitlabData/auto_back_shell#
root@ubuntu116:/data/gitlabData/auto_back_shell# cat ../backups/log/encrypt_2018-10-25.log
Start to Encrypt the file : [test.key] ......
Encrpt the inPutFile is [test.key],outPutFile is [test.key.TMP] , at local server, end at  2018-10-25 12:00:06
Encrypt the file Success ,the encrypt file is : [test.key]
root@ubuntu116:/data/gitlabData/auto_back_shell#
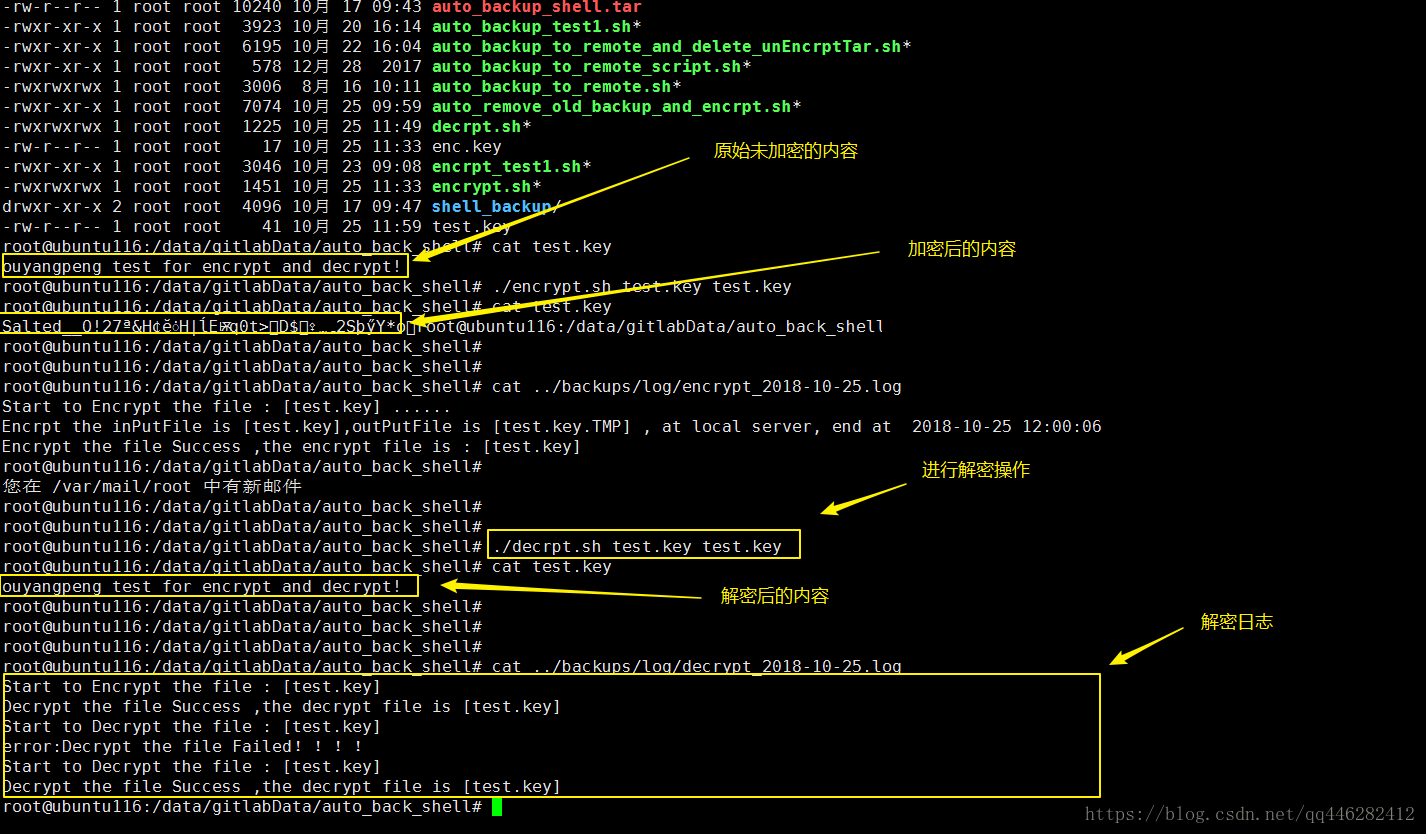
4.2.1 测试解密
root@ubuntu116:/data/gitlabData/auto_back_shell# cat test.key
ouyangpeng test for encrypt and decrypt!
root@ubuntu116:/data/gitlabData/auto_back_shell# ./encrypt.sh test.key test.key
root@ubuntu116:/data/gitlabData/auto_back_shell# cat test.key
Salted__Q!27ª&H¢ĕ߭H|ĺEѬq0t>?D$?⚴2SþӳY*o?root@ubuntu116:/data/gitlabData/auto_back_shell#
root@ubuntu116:/data/gitlabData/auto_back_shell#
root@ubuntu116:/data/gitlabData/auto_back_shell#
root@ubuntu116:/data/gitlabData/auto_back_shell# cat ../backups/log/encrypt_2018-10-25.log
Start to Encrypt the file : [test.key] ......
Encrpt the inPutFile is [test.key],outPutFile is [test.key.TMP] , at local server, end at 2018-10-25 12:00:06
Encrypt the file Success ,the encrypt file is : [test.key]
root@ubuntu116:/data/gitlabData/auto_back_shell#
您在 /var/mail/root 中有新邮件
root@ubuntu116:/data/gitlabData/auto_back_shell#
root@ubuntu116:/data/gitlabData/auto_back_shell#
root@ubuntu116:/data/gitlabData/auto_back_shell# ./decrpt.sh test.key test.key
root@ubuntu116:/data/gitlabData/auto_back_shell# cat test.key
ouyangpeng test for encrypt and decrypt!
root@ubuntu116:/data/gitlabData/auto_back_shell#
root@ubuntu116:/data/gitlabData/auto_back_shell#
root@ubuntu116:/data/gitlabData/auto_back_shell#
root@ubuntu116:/data/gitlabData/auto_back_shell# cat ../backups/log/decrypt_2018-10-25.log
Start to Encrypt the file : [test.key]
Decrypt the file Success ,the decrypt file is [test.key]
Start to Decrypt the file : [test.key]
error:Decrypt the file Failed!!!!
Start to Decrypt the file : [test.key]
Decrypt the file Success ,the decrypt file is [test.key]
root@ubuntu116:/data/gitlabData/auto_back_shell#
这样 加解密过程都会有日志记录下来啦,并且会发送邮件通知到我!


作者:欧阳鹏 欢迎转载,与人分享是进步的源泉!
转载请保留原文地址:https://blog.csdn.net/ouyang_peng/article/details/83117025
如果觉得本文对您有所帮助,欢迎您扫码下图所示的支付宝和微信支付二维码对本文进行随意打赏。您的支持将鼓励我继续创作


 278
278

 被折叠的 条评论
为什么被折叠?
被折叠的 条评论
为什么被折叠?
 到【灌水乐园】发言


