


Android为了让我们更好地管理数据库,专门提供了一个SQLiteOpenHelper帮助类。
![]()
![]()

SQLiteOpenHelper是一个抽象类,想要使用它,就需要创建一个自己的帮助类去继承他它。
SQLiteOpenHelper中有两个抽象方法,onCreate()和onUpgrade(),重写这两个方法然后分别在这两个方法中实现创建和升级数据库。
SQLiteOpenHelper中还有两个重要的实例方法,getReadableDatabase()和getWritableDatabase()。这两个方法都可以创建或打开一个现有的数据库(如果数据库存在直接打开,否则创建一个新的数据库),并返回一个可对数据库进行读写操作的对象。
SQLiteOpenHelper中有两个构造方法可写,一般选择只有四个参数的构造方法。
第一个参数Context上下文;第二个参数是数据库名;第三个参数是允许返回一个自定义Cursor,一般用不到,传入null;第四个参数是当前数据库的版本号,可用于对数据库进行升级操作。
create table Book(
id integer primary key autoincrement,
author text, —— text表示文本类型
price real, —— real表示浮点型
pages integer —— integer表示整型
name text) ——
还有blob表示二进制类型;primary key是将id设为主键,autoincremene关键字表示id列是自增长。
创建数据表非常简单,例子待会在最后演示,项目代码在最后给出。
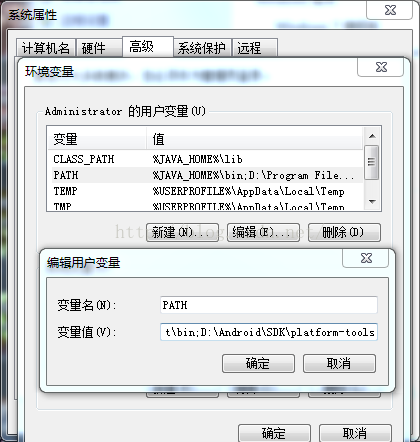
数据库表创建好之后如何查看呢?我们使用adb shell来对数据库和表的创建情况进行检查。adb是Android SDK中自带的一个调试工具,它放在sdk的platform-tools目录下,如果想要在命令中使用这个工具,就必须先把它的路径配置到环境变量中。
配置adb的环境变量和配置JDK环境变量一样,都是在path变量下添加就可以了。如图:
我的platform-tools路径是这个,D:\Android\SDK\platform-tools,你找到你的SDK路径下相对于的platform-tools路径来配置就可以了。
现在需要先创建一个项目:我自己创建了一个SQLiteTest项目,以下是项目代码:
项目需要运行在虚拟机上才能查看数据库,因为我们是不能查看真机(手机)上的数据库文件的,除非你root。
运行之后,数据库和数据表就都生成了。
项目中的建表语句:非常简单,表名news,id是integer整型,primary代表id为主键, autoincrement代表id自增长,接下来的title,content,type,都是text文本型,time是long型,这些都是任由你来定义的。
//创建表
@Override
public void onCreate(SQLiteDatabase db) {
    //建表语句
    String news = "CREATE TABLE news(_id integer primary key autoincrement,title text,content text,type text,time long)";
    //执行语句
    db.execSQL(news);
}
在MainActivity中打开或创建数据库:
//获得创建数据库管理者对象
MySQLiteManager manager = new MySQLiteManager(MainActivity.this);
//打开数据库或创建数据库
manager.getReadableDatabase();
//获取管理数据库的对象helper之后就可以对数据库进行增删改查了。
        MySQLiteHelper helper = new MySQLiteHelper(MainActivity.this);
//插入数据上面的插入数据,删除数据,修改数据和查看数据的方法都是先在MySQLiteHelper自定义的帮助类中实现了才能调用的。下面是MySQLiteHelper类的代码:
helper.insert("马航事件", "马来西亚航班失联,....", "国际", 0);
for (int i = 0; i < 100; i++) {//循环插入100条数据
helper.insert("title"+i, "content"+i, "type"+i, i);
}
//删除一条数据
helper.delete(7);
//更改一条数据,把第21条数据的内容改成:“你好title”
helper.upData(21, "你好title");
//查看表中所有数据
helper.selectAll();
//从传入的页数开始查询,每次查询20条数据(分页查询)
helper.select(10);
package com.wzxy.sqlitetest;

import android.content.Context;
import android.database.Cursor;
import android.database.sqlite.SQLiteDatabase;
import android.util.Log;

/**
 * Created by prx on 2015/12/29.
 */
public class MySQLiteHelper {//用来管理数据库的类

    private MySQLiteManager manager;

    public MySQLiteHelper(Context context) {
        //创建管理数据库的类的对象
        manager = new MySQLiteManager(context);
    }

    // 插入
    public void insert(String title, String content, String type, long time) {
        String sql = "insert into news(title,content,type,time) values(?,?,?,?);";
        SQLiteDatabase db = manager.getReadableDatabase();
        db.execSQL(sql, new Object[]{title, content, type, time});
        db.close();
    }

    // 删除
    public void delete(int id) {
        String sql = "delete from news where _id = ?";
        SQLiteDatabase db = manager.getWritableDatabase();
        db.execSQL(sql, new Object[]{id});
        db.close();
    }

    // 修改
    /*
     * id:修改条件 title:修改内容
    */
    public void upData(int id, String title) {
        String sql = "update news set title = ? where _id = ?";
        SQLiteDatabase db = manager.getReadableDatabase();
        db.execSQL(sql, new Object[]{title, id});
        db.close();
    }

    // 查询
    public void selectAll() {
        String sql = "select * from news";
        SQLiteDatabase db = manager.getReadableDatabase();
        Cursor cursor = db.rawQuery(sql, null);
        int count = cursor.getCount();
        while (cursor.moveToNext()) {
            String title = cursor.getString(cursor.getColumnIndex("title"));
            String content = cursor.getString(cursor.getColumnIndex("content"));
            String type = cursor.getString(cursor.getColumnIndex("type"));
            String time = cursor.getString(cursor.getColumnIndex("time"));
            Log.i("Data", "title:" + title + ",content:" + content
                    + ",type:" + type + ",time:" + time);
        }
    }

    //分页查询
    public void select(int id) {
        SQLiteDatabase db = manager.getReadableDatabase();
        int count = db.rawQuery("select * from news", null).getCount();
        int page = count / 20 + count % 20 > 0 ? 1 : 0;
        String sql = null;
        if (id + 20 > count && id < count) {
            sql = "select * from news limit " + id + "," + (count - id);
        } else if (id + 20 < count) {
            sql = "select * from news limit " + id + ",20";
        }

        Cursor cursor = db.rawQuery(sql, null);
        while (cursor.moveToNext()) {
            String title = cursor.getString(cursor.getColumnIndex("title"));
            String content = cursor.getString(cursor.getColumnIndex("content"));
            String type = cursor.getString(cursor.getColumnIndex("type"));
            String time = cursor.getString(cursor.getColumnIndex("time"));
            Log.i("=-Data-=", "title:" + title + ",content:" + content
                    + ",type:" + type + ",time:" + time);
        }
    }
}
写好项目并且运行之后,我们就可以查看到底有没有创建好数据库了。使用命令窗口:
打开数据库:
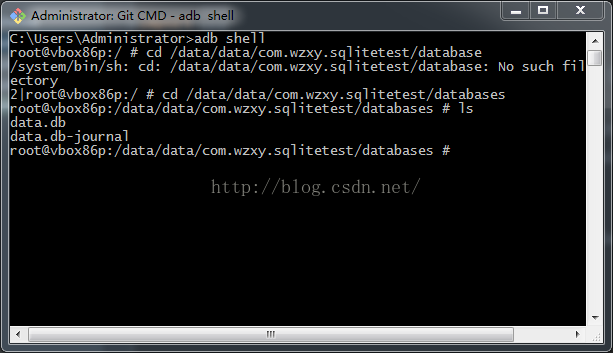
配置好环境之后,就可以使用adb工具了。打开命令行界面,输入 adb shell,就可以进入控制台。
然后使用cd 命令进入到数据库的目录下,data/data/com.wzxy.sqlitetest/databases
com.wzxy.sqlitetest是项目包名。
使用ls命令查看目录下有什么,可以看到有两个文件,data.db 这个就是创建的数据库啦,
另一个data.db-journal是支持数据库而产生的日志文件。
使用简单的命令管理数据库:
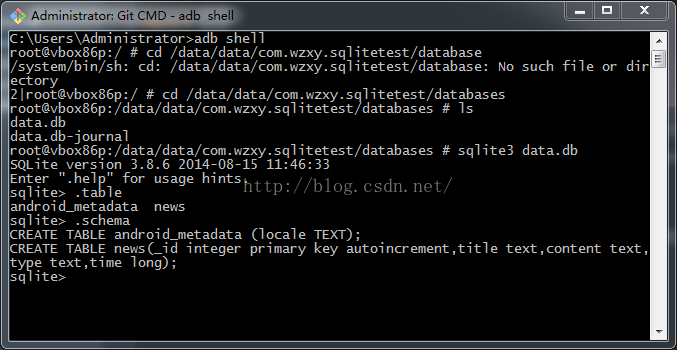
使用sqlite命令来打开数据库,只需输入:sqlite3,后面加上数据库名就可以啦!如下图
打开数据库后,就可以对数据库进行管理了。
键入 .table 命令查看数据库中有哪些数据表,从下图可以看到我这里只有一张news数据表。
另外那个android_metadata文件是每个数据库都会自动生成的。
键入 .schema 命令来查看建表语句。
更新数据库操作:
原来只有一句创建表的代码,只创建了一张表,现在要添加一张数据表category,
于是在MySQLiteManager类的onCreate中再添加一条建表语句,如下红色字体:
//创建表但是添加了一张数据表,需要更新数据库才能生效。
@Override
public void onCreate(SQLiteDatabase db) {
//建表语句
String news = "CREATE TABLE news(_id integer primary key autoincrement,title text,content text,type text,time long)";
String category = "CREATE TABLE category(_id integer primary key autoincrement,title text,content text,type text,time long)";
//执行语句
db.execSQL(news);
db.execSQL(category);
}
在onUpgrade方法中操作:
//更新数据表,版本号发生改变时调用onUpgrade方法需要版本号改变时才会调用,所以,要更新版本号:
@Override
public void onUpgrade(SQLiteDatabase db, int oldVersion, int newVersion) {
//当版本号改变的时候,先删除原来的数据库,再重新创建。
db.execSQL("drop table if exists news");
db.execSQL("drop table if exists category");
onCreate(db);
}
原来一开始版本号是:1
private static final int VERSION = 1;后来要更新数据库的时候,把1改为2,onUpgrade()方法就会执行了。
private static final int VERSION = 2;
在这里输入 .table 命令查看有没有生成一张新的数据表category,如下图,,创建就成功了,更新数据库成功!
好了,今天就先到这里,基础的东西要一点点来嘛。


 177
177


 被折叠的 条评论
为什么被折叠?
被折叠的 条评论
为什么被折叠?
 到【灌水乐园】发言


