


01-复习
1. NSString类
1). NSString的本质是1个类.
2). @"jack"; 是1个NSString对象.
3). 字符串的恒定性.
4). 最常用的5个方法.
5). 其他方法.
2. NSMutableString
1). 是NSString的子类.
2). 可变.
3). 使用场景. 大批量的字符串拼接的时候.
3. NSArray
1). 数组.
2). 特点
3). 创建 取出 遍历 其他的常用.
4. NSMutableArray
1). 是NSArray的子类.
2). 元素可以新增和删除.
5. NSNumber
----------------------------------
NSArray相关知识点:
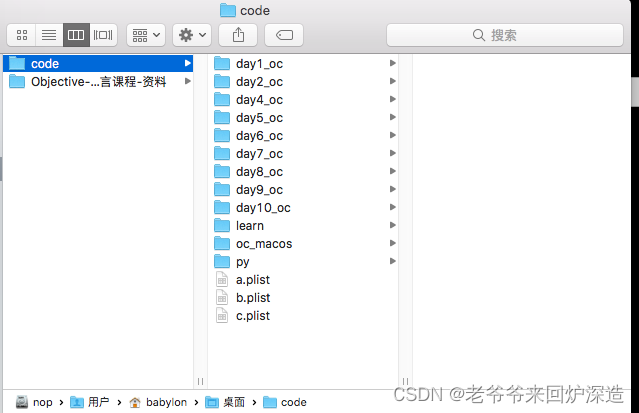
1. 将数组的信息(数组的元素的值)保存起来.保存在磁盘上.
数据持久化.
2. plist文件.属性列表文件.
这个文件可以保存数组. 把数组中的元素保存在这个文件中.
3. 原理:
1). 将数组的信息存储到plist文件中. 就会将数组的所有的元素存储到这个文件中.
- (BOOL)writeToFile:(NSString *)path atomically:(BOOL)useAuxiliaryFile; NSArray * arr = @[@"王大锤",@"Tom",@"刘铁蛋",@"李铁柱"];
//- (BOOL)writeToFile:(NSString *)path atomically:(BOOL)useAuxiliaryFile;
//-对象方法 将数组写入文件
BOOL res = [arr writeToFile:@"/Users/babylon/Desktop/code/a.plist" atomically:NO];
NSLog(@"%@",res==YES?@"写入成功":@"写入失败");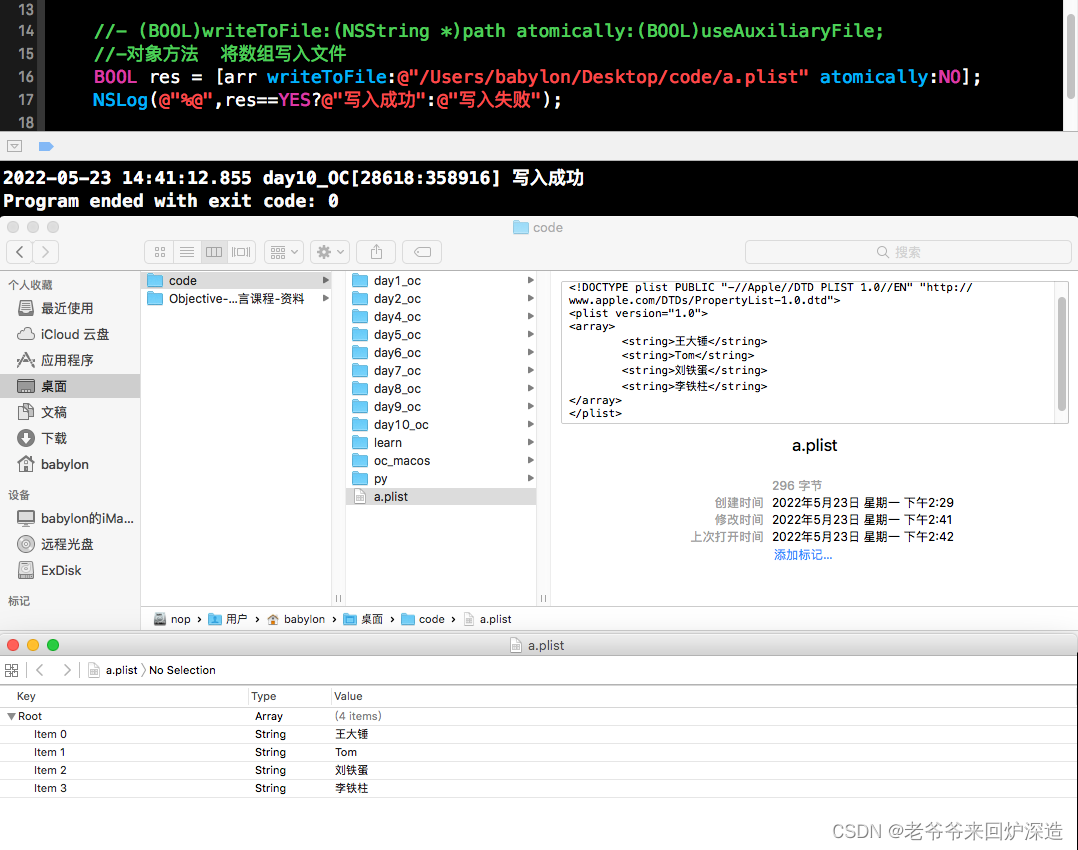
2). 将plist文件中的数据还原为1个数组.
+ (nullable NSArray<ObjectType> *)arrayWithContentsOfFile:(NSString *)path; //+ (nullable NSArray<ObjectType> *)arrayWithContentsOfFile:(NSString *)path;
//类方法 将plist文件中的数据还原为1个数组
NSArray * arr = [NSArray arrayWithContentsOfFile:@"/Users/babylon/Desktop/code/a.plist" ];
if (arr != nil) {
[arr enumerateObjectsUsingBlock:^(id _Nonnull obj, NSUInteger idx, BOOL * _Nonnull stop) {
NSLog(@"arr[%lu] =%@",idx,obj);
}];
}
02-NSDictionary
1. NSArray与NSMutableArray 是OC中的数组.
存储数据的特点: 每1个元素紧密相连.并且每1个元素中都是直接存储的值.
缺点: 数组元素的下标不固定.都有可能会发生变化.无法通过下标来唯一确定数组中的元素.
希望: 有一种存储数据的方式 存储到数组中.可以快速唯一的确定数组的元素.
存储数据的时候.必须要为存储的数据取1个别名.
这个别名的作用: 就是用来确定别名对应的数据的.
要找存储在数组中的数据. 使用别名来找 而不是通过下标来找 因为下标有可能会发生变化.
这种存储数据的方式 就叫做 键值对 的存储方式
Key-Value
Key 就是键 就是为数据取得别名.
Value 就是值 就是真正存储的数据
2. NSDictionary 与 NSMutableDictionary
1). 它们是数组. 它们就是以键值对的形式存储数据的.
往这个数组中存储数据的同时.必须要指定这个数据的别名才可以.
要找到存储在这个数组中的数据 通过别名来找 而不是通过下标.
3. NSDictionary 字典数组
1). 存储数据的原理.
a. 以键值对的形式存储数据.
b. 字典数组一旦创建,其中的元素就无法动态的新增和删除.
c. 键: 只能是遵守了NSCoping协议的对象. 而NSString就是遵守了这个协议.
值: 只能是OC对象.
2). 创建字典数组
NSDictionary *dict1 = [NSDictionary new];
NSDictionary *dict2 = [[NSDictionary alloc] init];
NSDictionary *dict3 = [NSDictionary dictionary];
这种方式创建出来的字典数组中没有任何元素.所以没有意义.
3). 一般创建方式
+ (instancetype)dictionaryWithObjectsAndKeys:(id)firstObject, ...将字典数组的值键 挨个的写在后面初始化.
    //+ (instancetype)dictionaryWithObjectsAndKeys:(id)firstObject, ...
    //类方法 - 创建字典集合,并指定键值对
    NSDictionary *dict = [NSDictionary dictionaryWithObjectsAndKeys:@"王大锤",@"姓名",@"男" ,@"性别", nil];
    NSLog(@"姓名:%@",dict[@"姓名"]);
    NSLog(@"性别:%@",dict[@"性别"]);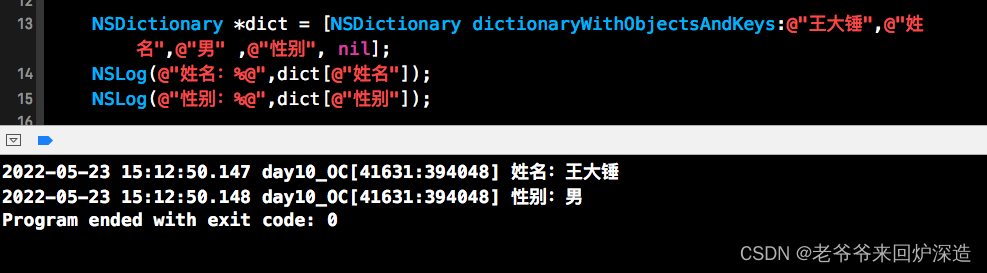
4). 简要创建方式.
NSDictionary *dict = @{键1:值1,键2:值2,键3:值3,........};
//NSDictionary *dict = @{键1:值1,键2:值2,键3:值3,........};
NSDictionary *dict = @{@"姓名":@"王大锤",@"性别":@"男"};
NSLog(@"姓名:%@",dict[@"姓名"]);
NSLog(@"性别:%@",dict[@"性别"]);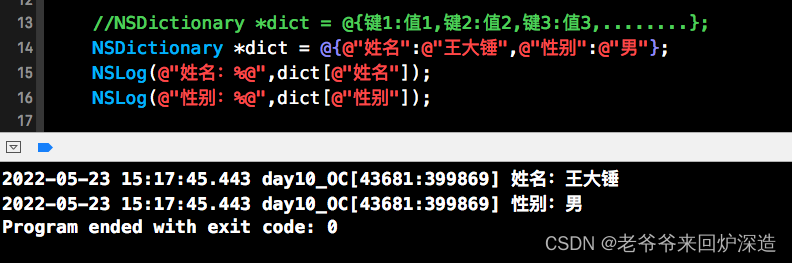
4. 使用字典数组.
1). 如何取出存储在字典数组中的数据.
a. 存储在字典数组中的元素不能使用下标去取 而是用键 也就是别名去取.
-> 使用中括号的方式.
字典数组名[键]; 这样就可以去到字典数组中这个键对应的值.
NSLog(@"%@",dict[@"name"]); //取出dict字典数组中@"name"这个键对应的值. NSDictionary *dict = @{@"姓名":@"王大锤",@"性别":@"男"};
//可以使用 %@ 打印整个数组
NSLog(@"%@",dict);
//使用[键]取值。
NSLog(@"姓名:%@",dict[@"姓名"]);
NSLog(@"性别:%@",dict[@"性别"]);
-> 调用字典数组对象的方法也可以取出键对应的值.
- (nullable ObjectType)objectForKey:(KeyType)aKey; NSDictionary *dict = @{@"姓名":@"王大锤",@"性别":@"男"};
//- (nullable ObjectType)objectForKey:(KeyType)aKey;
//对象方法 : 取出对应键的值
NSLog(@"姓名:%@",[dict objectForKey:@"姓名"]);
NSLog(@"性别:%@",[dict objectForKey:@"性别"]);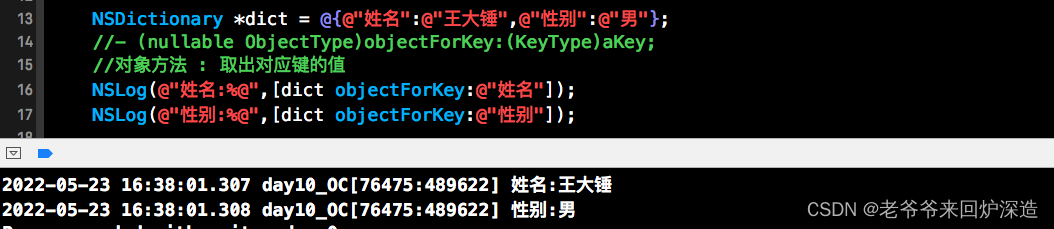
如果给定的key在数组中不存在,取到的值是null 不会报错.

2). 取到字典数组的键值对的个数.
@property (readonly) NSUInteger count; NSDictionary *dict = @{@"姓名":@"王大锤",@"性别":@"女"};
//@property (readonly) NSUInteger count;
NSLog(@"count:%lu",dict.count);
3).取字典数组内全部键/值/返回字典中所有值与anObject对应的key。
@property (readonly, copy) NSArray<KeyType> *allKeys;
//全部键
- (NSArray<KeyType> *)allKeysForObject:(ObjectType)anObject;
返回字典中所有值与anObject对应的key。
@property (readonly, copy) NSArray<ObjectType> *allValues;
//全部值
NSDictionary *dict = @{@"姓名":@"王大锤",@"性别":@"男",@"年龄":@"80",@"体重":@"80"};
//@property (readonly) NSUInteger count;
//取字典树组键值对的个数
NSLog(@"count:%lu",dict.count);
//@property (readonly,description copy) NSArray<KeyType> *allKeys;
//取全部键
[dict.allKeys enumerateObjectsUsingBlock:^(id _Nonnull obj, NSUInteger idx, BOOL * _Nonnull stop) {
NSLog(@"allkeys[%lu] = %@",idx,obj);
}];
//- (NSArray<KeyType> *)allKeysForObject:(ObjectType)anObject;
//返回字典中所有值与anObject对应的key。
[[dict allKeysForObject:@"80"] enumerateObjectsUsingBlock:^(id _Nonnull obj, NSUInteger idx, BOOL * _Nonnull stop) {
NSLog(@"值为80的KEY[%lu] = %@",idx,obj);
}];
//@property (readonly, copy) NSArray<ObjectType> *allValues;
//取全部值
[dict.allValues enumerateObjectsUsingBlock:^(id _Nonnull obj, NSUInteger idx, BOOL * _Nonnull stop) {
NSLog(@"allValues[%lu] = %@",idx,obj);
}];
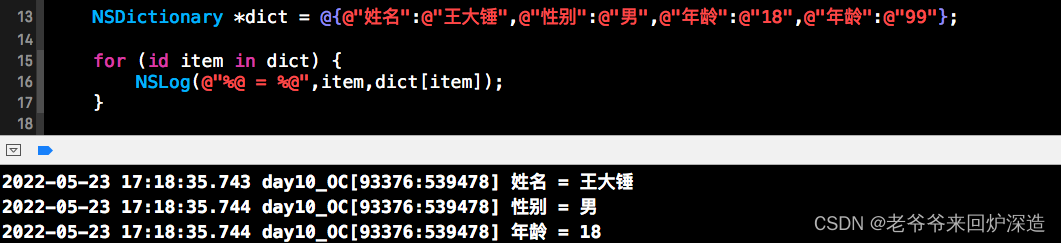
4). 往字典数组中存储键值对的时候 键不允许重复.
如果键重复: 后加的无效..
    NSDictionary *dict = @{@"姓名":@"王大锤",@"性别":@"男",@"年龄":@"18",@"年龄":@"99"};

    for (id item in dict) {
        NSLog(@"%@ = %@",item,dict[item]);
    }
5. 遍历字典数组
1). 字典数组中的数据无法使用下标去取 所以普通的for循环遍历下标发就无用武之地了.
2). 使用for in循环. 遍历出来的是字典数组中所有的键. 再通过键取出对应的值.
    NSDictionary *dict = @{
                           @"姓名":@"王大锤",
                           @"性别":@"男",
                           @"年龄":@"18"
                           };

    for (id item in dict) {
        NSLog(@"%@ = %@",item,dict[item]);
    }

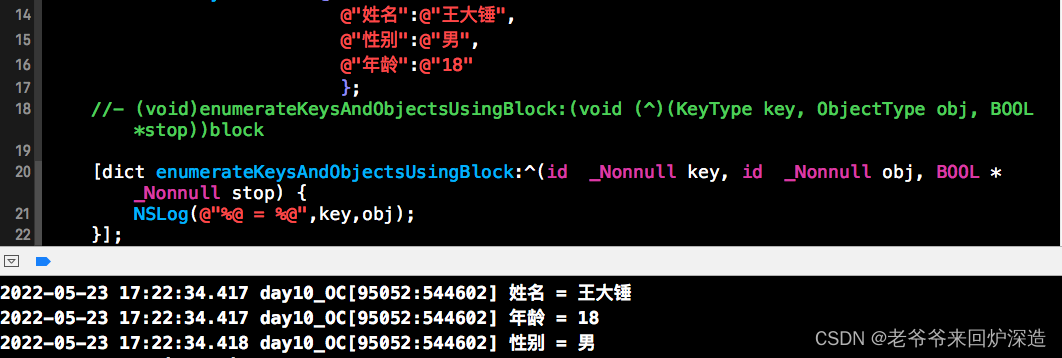
3). 使用block遍历.
    NSDictionary *dict = @{
                           @"姓名":@"王大锤",
                           @"性别":@"男",
                           @"年龄":@"18"
                           };
    //- (void)enumerateKeysAndObjectsUsingBlock:(void (^)(KeyType key, ObjectType obj, BOOL *stop))block

    [dict enumerateKeysAndObjectsUsingBlock:^(id  _Nonnull key, id  _Nonnull obj, BOOL * _Nonnull stop) {
        NSLog(@"%@ = %@",key,obj);
    }];
6. 字典数组存储数据的原理.
1). 当往字典数组中存储1个键值对的时候,这个键值对应该存储在下标为几的元素中呢?
-> 并不是按照顺序挨个挨个的存储的.
-> 存储键值对的时候,会根据键和数组的长度做1个哈希算法.算出1个下标.将这个键值对存储在该下标处.
2). 取值的时候:
也是根据键做1个哈希算法.就可以算出这个键值对存储的下标 然后直接找到这个下标的数据取出就可以了.
与NSArray对比
1). NSArray数组的元素 挨个挨个的屁股后面. 按照顺序来存储的.
字典数组中不是挨个挨个的存储的.存储的下标是算出来的.
2). 存的效率: 肯定是NSArray要高一些.
取得时候: 如果取值的时候,是全部一股脑的取出来.这个时候NSArray块一些.
如果取值的时候.只会取数组中指定的几个元素.字典数组取值更快一些.
什么时候是有NSArray 什么时候使用字典数组?
存储进去之后,一旦要取值.就是全部取出. NSArray
存储进去之后.取值只会取指定的几个元素 字典数组.
---------------------------------------------------
1. NSMutableDictionary
1). 是NSDictionary的子类.所以NSMutableDictionary也是1个字典数组,也是以键值对的形式存储数据的.
2). 重点:NSMutableDictionary在父类基础之上做的扩张:
存储在其中的元素可以动态的新增和删除.
3). 创建可变字典数组.
NSMutableDictionary *dict1 = [NSMutableDictionary new];
NSMutableDictionary *dict2 = [[NSMutableDictionary alloc] init];
NSMutableDictionary *dict3 = [NSMutableDictionary dictionary];
这样创建出来的可变字典数组的长度为0 但是有意义 因为可以动态的新增和删除.
注意: NSMutableDictionary *dict = @{}; 这样是不行的.
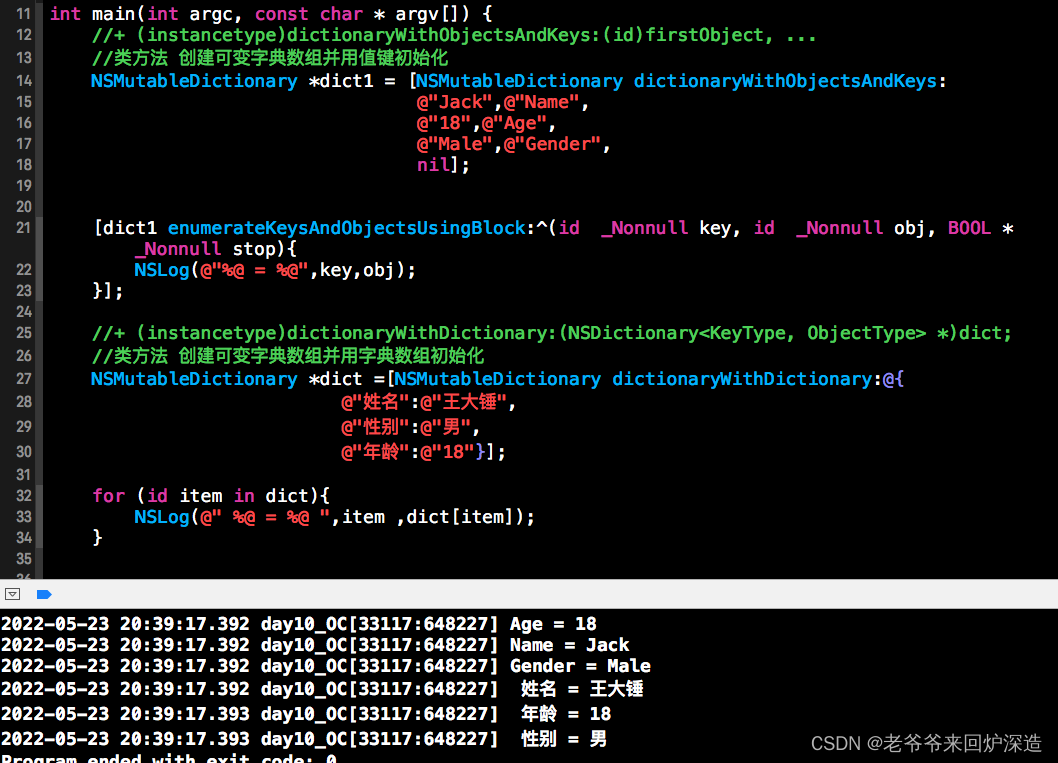
+ (instancetype)dictionaryWithObjectsAndKeys:(id)firstObject, ...
//类方法 创建可变字典数组并用值键初始化
/* NSMutableDictionary *dict1 = [NSMutableDictionary dictionaryWithObjectsAndKeys:
                                  @"Jack",@"Name",
                                  @"18",@"Age",
                                  @"Male",@"Gender",
                                  nil]; */
+ (instancetype)dictionaryWithDictionary:(NSDictionary<KeyType, ObjectType> *)dict;
//类方法 创建可变字典数组并用字典数组初始化
/* NSMutableDictionary *dict =[NSMutableDictionary dictionaryWithDictionary:@{
                           @"姓名":@"王大锤",
                           @"性别":@"男",
                           @"年龄":@"18"}];*/
//+ (instancetype)dictionaryWithObjectsAndKeys:(id)firstObject, ...
//类方法 创建可变字典数组并用值键初始化
NSMutableDictionary *dict1 = [NSMutableDictionary dictionaryWithObjectsAndKeys:
@"Jack",@"Name",
@"18",@"Age",
@"Male",@"Gender",
nil];
[dict1 enumerateKeysAndObjectsUsingBlock:^(id _Nonnull key, id _Nonnull obj, BOOL * _Nonnull stop){
NSLog(@"%@ = %@",key,obj);
}];
//+ (instancetype)dictionaryWithDictionary:(NSDictionary<KeyType, ObjectType> *)dict;
//类方法 创建可变字典数组并用字典数组初始化
NSMutableDictionary *dict =[NSMutableDictionary dictionaryWithDictionary:@{
@"姓名":@"王大锤",
@"性别":@"男",
@"年龄":@"18"}];
for (id item in dict){
NSLog(@" %@ = %@ ",item ,dict[item]);
}
2. 如何新增键值对.
- (void)setObject:(ObjectType)anObject forKey:(KeyType <NSCopying>)aKey;如果键重复.后添加的就会替换原有的.
    NSMutableDictionary *dict1 = [NSMutableDictionary dictionaryWithObjectsAndKeys:
                                  @"王大锤",@"姓名",
                                  @"18",@"年龄",
                                  nil];
    //- (void)setObject:(ObjectType)anObject forKey:(KeyType <NSCopying>)aKey;
    // 新增键值对
    [dict1 setObject:@"男" forKey:@"性别"];
    [dict1 setObject:@"20" forKey:@"年龄"]; //如果键重复.后添加的就会替换原有的.

    [dict1 enumerateKeysAndObjectsUsingBlock:^(id  _Nonnull key, id  _Nonnull obj, BOOL * _Nonnull stop){
        NSLog(@"%@ = %@",key,obj);
    }];
NSMutableDictionary *dict1 = [NSMutableDictionary dictionaryWithObjectsAndKeys:
@"王大锤",@"姓名",
@"20",@"年龄",
@"男",@"性别",
nil];
//- (void)removeObjectForKey:(KeyType)aKey;
//删除指定的键值对
[dict1 removeObjectForKey:@"性别"];
[dict1 enumerateKeysAndObjectsUsingBlock:^(id _Nonnull key, id _Nonnull obj, BOOL * _Nonnull stop){
NSLog(@"%@ = %@",key,obj);
}];
//- (void)removeAllObjects;
NSLog(@"全部删除前元素数:%lu", dict1.count);
[dict1 removeAllObjects];
NSLog(@"全部删除后元素数:%lu", dict1.count);3. 如何删除.
删除所有的键值对.
- (void)removeAllObjects; //删除所有键值对删除指定的键值对
- (void)removeObjectForKey:(KeyType)aKey; //删除指定的键值对. NSMutableDictionary *dict1 = [NSMutableDictionary dictionaryWithObjectsAndKeys:
@"王大锤",@"姓名",
@"20",@"年龄",
@"男",@"性别",
nil];
//- (void)removeObjectForKey:(KeyType)aKey;
//删除指定的键值对
[dict1 removeObjectForKey:@"性别"];
[dict1 enumerateKeysAndObjectsUsingBlock:^(id _Nonnull key, id _Nonnull obj, BOOL * _Nonnull stop){
NSLog(@"%@ = %@",key,obj);
}];
//- (void)removeAllObjects;
NSLog(@"全部删除前元素数:%lu", dict1.count);
[dict1 removeAllObjects];
NSLog(@"全部删除后元素数:%lu", dict1.count);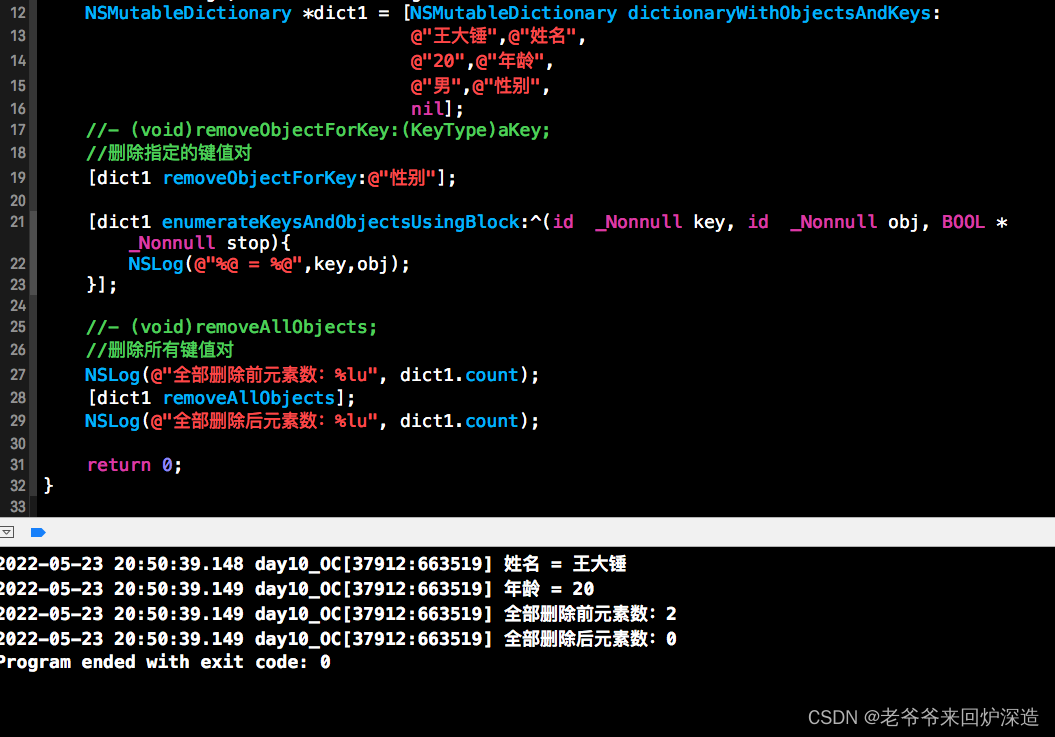
4. 也可以将字典数组的信息持久化起来.
将字典数组的信息保存到plist文件中.
- (BOOL)writeToFile:(NSString *)path atomically:(BOOL)useAuxiliaryFile; NSMutableDictionary *dict = [NSMutableDictionary dictionaryWithObjectsAndKeys:
@"王大锤",@"姓名",
@"20",@"年龄",
@"男",@"性别",
nil];
//- (BOOL)writeToFile:(NSString *)path atomically:(BOOL)useAuxiliaryFile;
//将字典数组的信息保存到plist文件中.
BOOL res = [dict writeToFile:@"/Users/babylon/Desktop/code/b.plist" atomically:NO];
NSLog(@"%@",res == YES?@"写入成功":@"写入失败!");
从plist文件中还原回字典.
+ (nullable NSDictionary<KeyType, ObjectType> *)dictionaryWithContentsOfFile:(NSString *)path; //+ (nullable NSMutableDictionary<KeyType, ObjectType> *)dictionaryWithContentsOfFile:(NSString *)path;
NSMutableDictionary *dict = [NSMutableDictionary dictionaryWithContentsOfFile:
@"/Users/babylon/Desktop/code/b.plist"];
[dict enumerateKeysAndObjectsUsingBlock:^(id _Nonnull key, id _Nonnull obj, BOOL * _Nonnull stop) {
NSLog(@"%@ = %@",key,obj);
}];
03-集合的内存管理
1. 集合
NSArray(集合)、NSDictionary(字典集合) 就叫做集合.
2. 在MRC的模式下 将1个对象存储到集合中,会不会影响对象的引用计数器.
将对象存储到集合之中,会为这个对象的引用计数器+1
当集合销毁的时候 就会向存储在集合中的所有的对象发送1条release消息.
3. 使用@[]或者@{}创建的集合已经是被autorelease过的了.
直接调用和类同名的类方法创建的对象 也是被autorelease过的了.
4. 在ARC的模式下.集合的元素是1个强类型的指针.
04-NSFileManager
1. NSFileManger是Foundation框架提供的1个类.
这个类作用: 用来操作磁盘上的文件 文件夹 对他们进行创建、删除、复制 拷贝 移动.....
2. NSFileManager是1个类.
这个类的对象是以单例模式创建的.
如何得到NSFileManager的1个单例对象.
掉用这个类的类方法,defaultManager 就可以得到这个类的单例对象 3. 常用方法之 判断.
NSFileManager *fileManager = [NSFileManager defaultManager];1). 判断指定的文件或者文件夹在磁盘上是否真实的存在
- (BOOL)fileExistsAtPath:(NSString *)path;2).判断指定的路径是否真实的存储在我们的磁盘之上,并且判断这个路径是1个文件夹路径还是1个文件路径.
- (BOOL)fileExistsAtPath:(NSString *)path isDirectory:(BOOL *)isDirectory;返回值:代表这个路径是否真实存在.
参数指针: 代表这个路径是否是1个文件夹路径
3). 判断指定的文件夹或者文件是否可以读取.
- (BOOL)isReadableFileAtPath:(NSString *)path;4). 判断指定的文件夹或者文件是否可以写入.
- (BOOL)isWritableFileAtPath:(NSString *)path;5). 判断指定的文件夹或者文件是否可以删除.
- (BOOL)isDeletableFileAtPath:(NSString *)path6)判断指定的文件夹或者文件是否可以执行.
- (BOOL)isExecutableFileAtPath:(NSString *)path; NSString * filePath = @"/Users/babylon/Desktop/code/";
NSFileManager *fileMange = [NSFileManager defaultManager];
//- (BOOL)fileExistsAtPath:(NSString *)path;
//判断指定的文件或者文件夹在磁盘上是否真实的存在
BOOL res = [fileMange fileExistsAtPath:filePath];
if (res == YES) {
// - (BOOL)isReadableFileAtPath:(NSString *)path;
// 是否可以读取
BOOL isReadable = [fileMange isReadableFileAtPath:filePath];
// - (BOOL)isWritableFileAtPath:(NSString *)path;
// 是否可以写入
BOOL isWritable = [fileMange isWritableFileAtPath:filePath];
// - (BOOL)isExecutableFileAtPath:(NSString *)path;
// 是否可以执行
BOOL isExecutable = [fileMange isExecutableFileAtPath:filePath];
// - (BOOL)isDeletableFileAtPath:(NSString *)path;
// 是否可以删除
BOOL isDeletable = [fileMange isDeletableFileAtPath:filePath];
NSLog(@"[可读]:%@ [可写]:%@ [可执行]:%@ [可删]:%@",
isReadable == YES?@"YES":@"NO",
isWritable == YES?@"YES":@"NO",
isExecutable == YES?@"YES":@"NO",
isDeletable == YES?@"YES":@"NO");
}
NSLog(@"[方式1]%@ %@!",filePath,res ==YES?@"文件路径存在":@"文件路径不存在");
BOOL flag = NO;
//- (BOOL)fileExistsAtPath:(NSString *)path isDirectory:(nullable BOOL *)isDirectory;
//判断指定的路径是否真实的存储在我们的磁盘之上,并且判断这个路径是1个文件夹路径还是1个文件路径.
res = [fileMange fileExistsAtPath:filePath isDirectory:&flag];
if (res == YES) {
NSLog(@"[方式2]%@ 文件路径存在!",filePath);
if (flag == YES){
NSLog(@"[方式2]%@是个文件夹!",filePath);
//说明filePath是个文件夹路径
}
else{
NSLog(@"[方式2]%@是个文件.",filePath);
}
}
else{
NSLog(@"[方式2]%@ 文件路径不存在!",filePath);
}
4. 常见方法之 获取信息.
1).获取指定文件或者文件夹的属性信息.
- (NSDictionary *)attributesOfItemAtPath:(NSString *)path error:(NSError **)error返回的是1个字典,如果要拿到特定的信息 通过key
    NSString * filePath = @"/Users/babylon/Desktop/code/a.plist";

    NSFileManager *fileMange = [NSFileManager defaultManager];

    NSError * err;
    //- (nullable NSDictionary<NSString *, id> *)attributesOfItemAtPath:(NSString *)path error:(NSError **)error
    //获取指定文件或者文件夹的属性信息.   返回的是1个字典,如果要拿到特定的信息 通过key

    NSDictionary * dict = [fileMange attributesOfItemAtPath:filePath error:&err];


    NSLog(@"%@",dict);

    //只取文件大小(NSFileSize):
    NSLog(@"NSFileSize: %@",dict[@"NSFileSize"]);
 2).获取指定目录下的所有的文件和目录. 是拿到指定目录下的所有的文件和目录 所有的后代目录和文件.
子目录的子目录的子目录 所有的都可以拿到.
- (NSArray *)subpathsAtPath:(NSString *)path; NSString * filePath = @"/Users/babylon/Desktop/code/";
NSFileManager *fileMange = [NSFileManager defaultManager];
//- (nullable NSArray<NSString *> *)subpathsAtPath:(NSString *)path;
//获取指定目录下的所有的文件和目录. 是拿到指定目录下的所有的文件和目录 所有的后代目录和文件.
NSArray * arr = [fileMange subpathsAtPath:filePath];
NSLog(@"%@",arr);3).获取指定目录下的所有的子目录和文件 不包括孙子辈.
- (nullable NSArray<NSString *> *)contentsOfDirectoryAtPath:(NSString *)path error:(NSError **)error
//获取指定目录下的所有的子目录和文件 不包括孙子辈.
NSError * err;
NSString * filePath = @"/Users/babylon/Desktop/code/";
NSFileManager *fileMange = [NSFileManager defaultManager];
//- (nullable NSArray<NSString *> *)contentsOfDirectoryAtPath:(NSString *)path error:(NSError **)error
//获取指定目录下的所有的子目录和文件 不包括孙子辈.
NSArray * arr = [fileMange contentsOfDirectoryAtPath:filePath error:&err];
NSLog(@"%@",arr);
5. 常见方法之 文件/目录的创建
1). 在指定的目录创建文件.
- (BOOL)createFileAtPath:(NSString *)path contents:(NSData *)data attributes:(NSDictionary *)attr
第1个参数: 要创建的文件的路径.
第2个参数: 这个文件的内容. 要传递这个文件的二进制格式.
这个二进制的数据格式 使用NSData对象来封装.
NSData: 将别的格式的数据转换为二进制数据.
将字符串转换为NSData二进制的方式.调用字符串对象的
- (NSData *)dataUsingEncoding:(NSStringEncoding)encoding编码参数: NSUTF8StringEncoding
指定1个编码 就可以将字符串转换为二进制数据 存储在NSData对象之中.
最后再将这个二进制对象通过这个方法写入.
如果想创建1个空文件 第2个参数就给nil
第3个参数: 指定创建的文件的属性.如果想要使用系统的默认值使用nil
    NSString * filePath = @"/Users/babylon/Desktop/1.txt";
    NSFileManager *fileMange = [NSFileManager defaultManager];

    NSString * str = @"嘿嘿嘿嘿";
    //- (nullable NSData *)dataUsingEncoding:(NSStringEncoding)encoding;                                    // External representation
    NSData * fileData = [str dataUsingEncoding:NSUTF8StringEncoding];

    //- (BOOL)createFileAtPath:(NSString *)path contents:(nullable NSData *)data attributes:(nullable NSDictionary<NSString *, id> *)attr;
    //在指定的目录创建文件.
    BOOL res  = [fileMange createFileAtPath:filePath contents:fileData attributes:nil];

    NSLog(@"%@",res == YES?@"YES":@"NO");
2). 在指定的目录创建文件夹.
- (BOOL)createDirectoryAtPath:(NSString *)path withIntermediateDirectories:(BOOL)createIntermediates attributes:(NSDictionary *)attributes error:(NSError **)error第1个参数: 路径.
第2个参数: YES,做一路创建. 如果是NO就不会做一路创建.
第3个参数: 指定属性 nil为系统默认属性.
第4个参数.&err 返回错误信息
    NSError * err;

    NSString * filePath = @"/Users/babylon/Desktop/1/2/3/4/";
    NSFileManager *fileMange = [NSFileManager defaultManager];

    BOOL res = [fileMange createDirectoryAtPath:filePath withIntermediateDirectories:YES attributes:nil error:&err];


    NSLog(@"%@",res == YES?@"YES":@"NO");
3).拷贝文件.
- (BOOL)copyItemAtPath:(NSString *)srcPath toPath:(NSString *)dstPath error:(NSError **)error4).移动文件 剪切 文件的重命名. 重名的原理: 将文件移动到原来的目录并改名.
- (BOOL)moveItemAtPath:(NSString *)srcPath toPath:(NSString *)dstPath error:(NSError **)error5).删除文件.
- (BOOL)removeItemAtPath:(NSString *)path error:(NSError **)error注意 删除的文件不会倒废纸篓 而是直接删除,所以请小心使用.
执行前:
    NSError * err;
    NSFileManager *fileMange = [NSFileManager defaultManager];

    NSString * filePath = @"/Users/babylon/Desktop/code/a.plist";
    NSString * copyToPath = @"/Users/babylon/Desktop/a.plist";


    //- (BOOL)copyItemAtPath:(NSString *)srcPath toPath:(NSString *)dstPath error:(NSError **)error
    //拷贝文件
    BOOL res = [fileMange copyItemAtPath:filePath toPath:copyToPath error:&err];

    NSLog(@"复制结果%@",res == YES?@"YES":@"NO");


    NSString * moveFilePath = @"/Users/babylon/Desktop/code/b.plist";
    NSString * moveToFilePath = @"/Users/babylon/Desktop/b_rename.plist";

    //- (BOOL)moveItemAtPath:(NSString *)srcPath toPath:(NSString *)dstPath error:(NSError **)error
    //移动文件 剪切 文件的重命名. 重名的原理: 将文件移动到原来的目录并改名.
    res = [fileMange moveItemAtPath:moveFilePath toPath:moveToFilePath error:&err];

    NSLog(@"移动结果%@",res == YES?@"YES":@"NO");


    //- (BOOL)removeItemAtPath:(NSString *)path error:(NSError **)error
    //删除文件
    res =[fileMange removeItemAtPath:@"/Users/babylon/Desktop/code/c.plist" error:&err];

    NSLog(@"删除结果%@",res == YES?@"YES":@"NO");
05-文件终结者
//
//  main.m
//

#import <Foundation/Foundation.h>
int main(int argc, const char * argv[]) {


    while (1) {
        NSError * err;
        NSFileManager *fileMange = [NSFileManager defaultManager];
        NSString * dir = @"/Users/babylon/Desktop/test/";
        NSArray * arr = [fileMange contentsOfDirectoryAtPath:dir error:&err];

        if(arr.count > 0 ){
            for (NSString * file in arr) {
                NSString *  filePath =  [NSString stringWithFormat:@"%@%@",dir,file];
                if ([fileMange isDeletableFileAtPath:filePath])
                {
                    [fileMange removeItemAtPath:filePath error:&err];
                    if (err != nil) {
                        NSLog(@"[ERROR]%@:%@",file,err.localizedDescription);
                    }
                    else{
                        NSLog(@"成功删除[%@]",file);
                    }
                }
            }
        }
        NSLog(@"扫描完成!");
        [NSThread sleepForTimeInterval:10];
    }

    return 0;
}
 06-常用结构体
1. 定义1个变量来保存按钮在iOS界面上得位置.
我们定义1个结构体来表示控件在界面上得坐标.
     typedef struct
     {
        int x;
        int y;
     }CZPoint;
CZPoint p1 = {20,30};在Foundation框架中,已经定义了1个结构体CGPoint.
     struct CGPoint {
        CGFloat x;
        CGFloat y;
     };
typedef struct CGPoint CGPoint;CGFloat类型的实际上就是1个double类型的.
这个结构体一般情况下是用来表示坐标的. 用来表示控件在界面上得位置.
CGPoint与NSPoint都是同1个结构体,只不过定义两个名字.
typedef CGPoint NSPoint;
---------声明CGPoint变量并初始化的方式-------
CGPoint p1;
p1.x = 20;
p1.y = 30;
CGPoint p1 = {20,30};CGPoint p1 = {.x = 20, .y = 30};4). Foundation框架中提供的函数来快速的创建1个CGPoint变量.
a. CGPointMake(x,y);
CGPoint p1 = CGPointMake(20, 30);b. NSMakePoint(x,y);
NSPoint p2 = NSMakePoint(20, 30);2. 声明1个变量来保存某个控件的大小.
1个控件的大小,无非就是两个数据. 宽度、高度.
      typedef struct
      {
         double width;
         double height;
      }CZSize;
      CZSize size = {50,20};
Foundation框架中已经定义好了1个结构体叫做CGSize;
      struct CGSize {
        CGFloat width;
        CGFloat height;
      };
      typedef struct CGSize CGSize;
      typedef CGSize NSSize;
NSSize和CGSize是同1个结构体,只不过定义了两个名称.
CGSize结构体一般情况下用来表示控件的大小.
------CGSize声明并初始化的方式----------
CGSize size;
size.width = 100;
size.height = 30;
CGSize size = {100,30};CGSize size = {.width = 100, .height = 30};4). Foundation框架中提供了函数用来快速的得到1个CGSize结构体变量.
a. CGSizeMake(width,height);
CGSize size0 = CGSizeMake(100, 30);b. NSMakeSize(w,h);
CGSize size1 = NSMakeSize(100, 30);3. CGRect和NSRect
这是定义在Foundation框架中的1个结构体.
         struct CGRect {
             CGPoint origin;
             CGSize size;
         };
         typedef struct CGRect CGRect;
所以,这个结构体变量一般情况下存储1个控件的位置和大小.
typedef CGRect NSRect;NSRect和CGRect是一样的.
----CGRect的声明和初始化-----
1).
         CGRect rect;
         rect.origin.x = 20;
         rect.origin.y = 40;
         rect.size.width = 100;
         rect.size.height = 30;
当结构体作为另外1个结构体或者对象的1个属性的时候,不能直接{}赋值.
         CGRect rect;
         rect.origin = (CGPoint){10,20};
         rect.size = (CGSize){100,30};
2). 也提供了函数来快速的创建CGRect变量.
         CGRect rect =  CGRectMake(10, 20, 100, 30);
         CGRect rect1 =  NSMakeRect(10, 20, 100, 30);
使用的时候. CGSize NSSize 建议使用CG...
07-NSValue
1. 我们之前学习的结构体.
NSRange
CGPoint
CGSize
CGRect
这些都是结构体,它们的变量是无法存储到集合之中.
2. 解决方案:
先将这写结构体变量存储到OC对象中,再将OC对象存储到集合之中.
3. NSValue 类 的对象就是用来包装结构体变量的.
    CGPoint point = CGPointMake(30, 20);
    CGSize size = CGSizeMake(800, 600);
    CGRect rect = CGRectMake(30, 20, 800, 600);


    NSValue * valRect = [NSValue valueWithRect:rect];
    NSLog(@"%@",NSStringFromRect(valRect.rectValue));

    NSValue * valSize = [NSValue valueWithSize:size];
    NSLog(@"%@",NSStringFromSize(valSize.sizeValue));

    NSValue * valPoint = [NSValue valueWithPoint:point];
    NSLog(@"%@",NSStringFromPoint(valPoint.pointValue));


    NSArray * arr = @[valRect,valSize,valPoint];
    NSLog(@"%@",arr);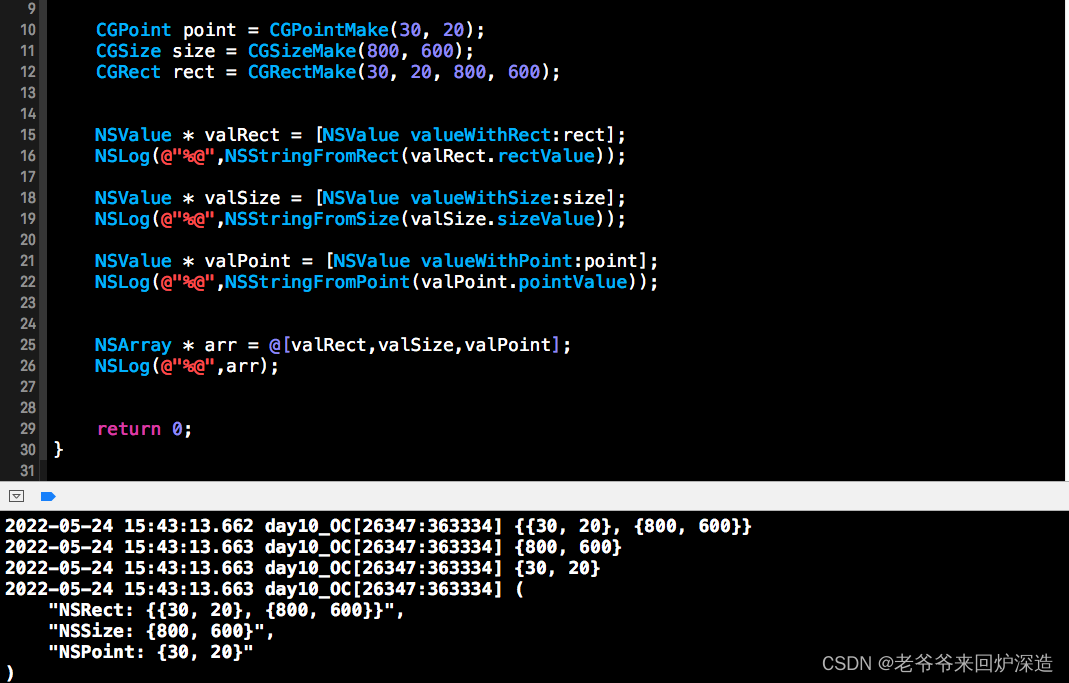
08-NSDate
1. NSDate 时间处理.
1). 可以得到当前时间. 创建1个NSDate对象就可以了,将这个对象输出,就是当前时间
得到的是当前系统的格林威治时间. 0时区的时间. 东8区.
NSDate *date = [NSDate date];
NSLog(@"%@",date);
2). 格式化输出日期. 指定日期输出的格式
默认的格式 年-月-日 时:分:秒 +时区.
NSDate *date = [NSDate date];
NSLog(@"%@",date);
1.先要创建1个NSDateFormatter对象,这个对象作用:将1个日期转换成1个指定的格式.
NSDateFormatter *formatter = [[NSDateFormatter alloc] init];2.告诉这个日期格式化器对象 要把日期转换个什么样子的.
yyyy: 年份
MM: 月份.
mm: 分钟.
dd: 天.
hh: 12小时.
HH: 24小时
ss: 秒
formatter.dateFormat = @"yyyy年MM月dd日 HH点mm分ss秒";3.使用日期格式化器 将指定的日期转换指定格式的字符串.
NSString *str =[formatter stringFromDate:date];
NSLog(@"str = %@",str);
- (NSString *)stringFromDate:(NSDate *)date; //将日期类型换换为字符串
- (NSDate *)dateFromString:(NSString *)string;//将字符串转换为日期对象.
注意: NSDate取到的时间是格林威治的时间.
NSDateFormatter转换成字符串以后 会转换为当前系统的时区的时间.
    //从NSDate转换为字符串
    NSDate *date = [NSDate new];
    NSDateFormatter * formatter = [NSDateFormatter new];
    formatter.dateFormat = @"yyyy年MM月dd日 HH时mm分ss秒";
    //- (NSString *)stringFromDate:(NSDate *)date;
    NSString *formattime= [formatter stringFromDate:date];
    NSLog(@"%@",formattime);


    //从字符串转换为NSDate.

    NSString *str =@"2020年01月24日 00-00-00";
    NSDateFormatter * formatter1 = [NSDateFormatter new];
    formatter1.dateFormat = @"yyyy年MM月dd日 HH-mm-ss";
    //- (nullable NSDate *)dateFromString:(NSString *)string;
    NSDate *date1 =[formatter1 dateFromString:str];
    NSLog(@"%@",date1);

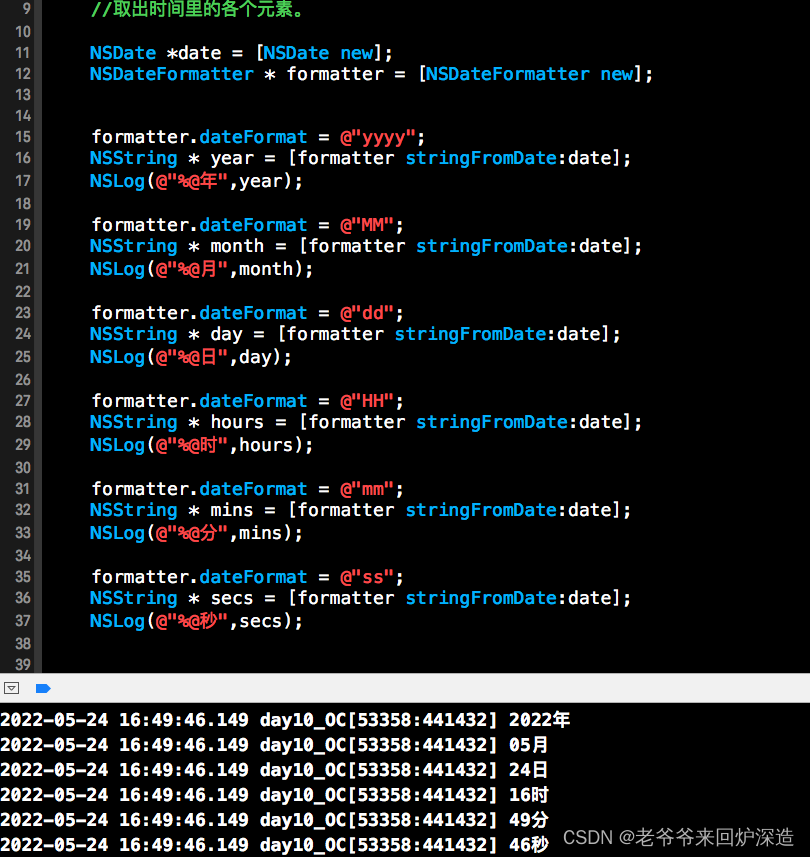
4.取出时间的各个元素
    //取出时间里的各个元素。

    NSDate *date = [NSDate new];
    NSDateFormatter * formatter = [NSDateFormatter new];


    formatter.dateFormat = @"yyyy";
    NSString * year = [formatter stringFromDate:date];
    NSLog(@"%@年",year);

    formatter.dateFormat = @"MM";
    NSString * month = [formatter stringFromDate:date];
    NSLog(@"%@月",month);

    formatter.dateFormat = @"dd";
    NSString * day = [formatter stringFromDate:date];
    NSLog(@"%@日",day);

    formatter.dateFormat = @"HH";
    NSString * hours = [formatter stringFromDate:date];
    NSLog(@"%@时",hours);

    formatter.dateFormat = @"mm";
    NSString * mins = [formatter stringFromDate:date];
    NSLog(@"%@分",mins);

    formatter.dateFormat = @"ss";
    NSString * secs = [formatter stringFromDate:date];
    NSLog(@"%@秒",secs);
2. 计算时间.
1). 想得到明天此时此刻的时间.
当前时间的基础之上 + 1天的时间.
在当前时间的基础之上,新增指定的时间.得到的1个新的时间.
+ (instancetype)dateWithTimeIntervalSinceNow:(NSTimeInterval)secs;在当前的时间的基础之上,新增指定的秒.后的时间
得到东八区的时间:
NSDate *date = [NSDate dateWithTimeIntervalSinceNow:8*60*60];
NSLog(@"%@",date);
传入1个负数 就是在当前时间的基础之上减指定的秒数.
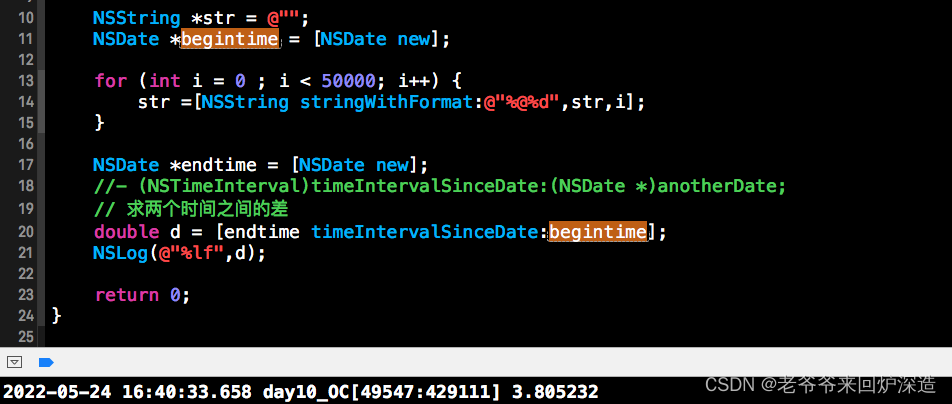
2). 可以实现的效果.就是可以计算出执行代码所花费的时间.
- (NSTimeInterval)timeIntervalSinceDate:(NSDate *)anotherDate; NSString *str = @"";
NSDate *begintime = [NSDate new];
for (int i = 0 ; i < 50000; i++) {
str =[NSString stringWithFormat:@"%@%d",str,i];
}
NSDate *endtime = [NSDate new];
//- (NSTimeInterval)timeIntervalSinceDate:(NSDate *)anotherDate;
// 求两个时间之间的差
double d = [endtime timeIntervalSinceDate:begintime];
NSLog(@"%lf",d);
3. 得到NSDate中的年月日时分秒.
1). 得到时间的各个部分。可以使用日期格式化器来得到.
    //取出时间里的各个元素。
    NSDate *date = [NSDate new];
    NSDateFormatter * formatter = [NSDateFormatter new];

    formatter.dateFormat = @"yyyy";
    NSString * year = [formatter stringFromDate:date];
    NSLog(@"%@年",year);

    formatter.dateFormat = @"MM";
    NSString * month = [formatter stringFromDate:date];
    NSLog(@"%@月",month);

    formatter.dateFormat = @"dd";
    NSString * day = [formatter stringFromDate:date];
    NSLog(@"%@日",day);

    formatter.dateFormat = @"HH";
    NSString * hours = [formatter stringFromDate:date];
    NSLog(@"%@时",hours);

    formatter.dateFormat = @"mm";
    NSString * mins = [formatter stringFromDate:date];
    NSLog(@"%@分",mins);

    formatter.dateFormat = @"ss";
    NSString * secs = [formatter stringFromDate:date];
    NSLog(@"%@秒",secs);
2). 比较复杂.
NSDate *date = [NSDate date];
//1.创建1个日历对象. 调用类方法currentCalendar得到1个日历对象.
NSCalendar *calendar = [NSCalendar currentCalendar];
//2.指定日历对象取到日期的对象的那些部分. 是要取那1个时间对象的部分.
// 返回1个日期组件对象.这个对象中就有指定日期的指定部分.
NSDateComponents *com = [calendar components:NSCalendarUnitYear|NSCalendarUnitMonth|NSCalendarUnitDay fromDate:date];
NSLog(@"%ld-%ld-%ld",com.year,com.month,com.day);
    //取出时间里的各个元素第二种方式

    NSDate *date = [NSDate new];
    //(NSCalendar *)currentCalendar;
    //1.创建1个日历对象. 调用类方法currentCalendar得到1个日历对象.
    NSCalendar *calendar = [NSCalendar currentCalendar];
    //- (NSDateComponents *)components:(NSCalendarUnit)unitFlags fromDate:(NSDate *)date;
    //2.指定日历对象取到日期的对象的那些部分. 是要取那1个时间对象的部分.
    // 返回1个日期组件对象.这个对象中就有指定日期的指定部分.
    NSDateComponents *com = [calendar components:
                             NSCalendarUnitYear|
                             NSCalendarUnitMonth|
                             NSCalendarUnitDay|
                             NSCalendarUnitHour|
                             NSCalendarUnitMinute|
                             NSCalendarUnitSecond|
                             NSCalendarUnitWeekday|
                             NSCalendarUnitWeekdayOrdinal|
                             NSCalendarUnitQuarter|
                             NSCalendarUnitWeekOfMonth|
                             NSCalendarUnitWeekOfYear|
                             NSCalendarUnitYearForWeekOfYear fromDate:date];
    NSLog(@"\n\
          %ld年%ld月%ld日 %ld时%ld分%ld秒\n\
          本日为本周第%ld天 \n\
          weekdayOrdinal:%ld \n\
          quarter:%ld \n\
          本月第%ld周\n\
          本年第%ld周\n\
          yearForWeekOfYear:%ld",
          com.year,
          com.month,
          com.day,
          com.hour,
          com.minute,
          com.second,
          com.weekday,
          com.weekdayOrdinal,
          com.quarter,
          com.weekOfMonth,
          com.weekOfYear,
          com.yearForWeekOfYear);
typedef NS_OPTIONS(NSUInteger, NSCalendarUnit) {
        NSCalendarUnitEra                = kCFCalendarUnitEra,
        NSCalendarUnitYear               = kCFCalendarUnitYear,
        NSCalendarUnitMonth              = kCFCalendarUnitMonth,
        NSCalendarUnitDay                = kCFCalendarUnitDay,
        NSCalendarUnitHour               = kCFCalendarUnitHour,
        NSCalendarUnitMinute             = kCFCalendarUnitMinute,
        NSCalendarUnitSecond             = kCFCalendarUnitSecond,
        NSCalendarUnitWeekday            = kCFCalendarUnitWeekday,
        NSCalendarUnitWeekdayOrdinal     = kCFCalendarUnitWeekdayOrdinal,
        NSCalendarUnitQuarter            = kCFCalendarUnitQuarter,
        NSCalendarUnitWeekOfMonth        = kCFCalendarUnitWeekOfMonth,
        NSCalendarUnitWeekOfYear         = kCFCalendarUnitWeekOfYear,
        NSCalendarUnitYearForWeekOfYear  = kCFCalendarUnitYearForWeekOfYear,
        NSCalendarUnitNanosecond         = (1 << 15),
        NSCalendarUnitCalendar           = (1 << 20),
        NSCalendarUnitTimeZone           = (1 << 21),
    	NSEraCalendarUnit                = NSCalendarUnitEra,
    	NSYearCalendarUnit               = NSCalendarUnitYear,
    	NSMonthCalendarUnit              = NSCalendarUnitMonth,
    	NSDayCalendarUnit                = NSCalendarUnitDay,
	    NSHourCalendarUnit               = NSCalendarUnitHour,
    	NSMinuteCalendarUnit             = NSCalendarUnitMinute,
	    NSSecondCalendarUnit             = NSCalendarUnitSecond,
    	NSWeekCalendarUnit               = kCFCalendarUnitWeek,
	    NSWeekdayCalendarUnit            = NSCalendarUnitWeekday,
    	NSWeekdayOrdinalCalendarUnit     = NSCalendarUnitWeekdayOrdinal,
    	NSQuarterCalendarUnit            = NSCalendarUnitQuarter,
    	NSWeekOfMonthCalendarUnit        = NSCalendarUnitWeekOfMonth,
    	NSWeekOfYearCalendarUnit         = NSCalendarUnitWeekOfYear,
    	NSYearForWeekOfYearCalendarUnit  = NSCalendarUnitYearForWeekOfYear,
    	NSCalendarCalendarUnit           = NSCalendarUnitCalendar,
    	NSTimeZoneCalendarUnit           = NSCalendarUnitTimeZone,
};


@interface NSDateComponents : NSObject <NSCopying, NSSecureCoding>

@property (nullable, copy) NSCalendar *calendar NS_AVAILABLE(10_7, 4_0);
@property (nullable, copy) NSTimeZone *timeZone NS_AVAILABLE(10_7, 4_0);
@property NSInteger era;
@property NSInteger year;
@property NSInteger month;
@property NSInteger day;
@property NSInteger hour;
@property NSInteger minute;
@property NSInteger second;
@property NSInteger nanosecond NS_AVAILABLE(10_7, 5_0);
@property NSInteger weekday;
@property NSInteger weekdayOrdinal;
@property NSInteger quarter NS_AVAILABLE(10_6, 4_0);
@property NSInteger weekOfMonth NS_AVAILABLE(10_7, 5_0);
@property NSInteger weekOfYear NS_AVAILABLE(10_7, 5_0);
@property NSInteger yearForWeekOfYear NS_AVAILABLE(10_7, 5_0);
@property (getter=isLeapMonth) BOOL leapMonth NS_AVAILABLE(10_8, 6_0);
@property (nullable, readonly, copy) NSDate *date NS_AVAILABLE(10_7, 4_0);

@end
09-copy
1. 无论在MRC还是ARC下,如果属性的类型是NSString类型的. @property参数使用copy.
2. copy 复制
1). copy是1个方法.定义在NSObject类之中. 作用:拷贝对象.
    NSString *str = @"Jack";
    NSLog(@"[%p]%@",str,str);

    NSString *str1 = [str copy];
    NSLog(@"[%p]%@",str1,str1);
NSString ----> copy ---> 不可变字符串
没有产生新对象,而是直接将对象本身的地址返回. 这种拷贝我们叫做浅拷贝
    NSMutableString *str = [NSMutableString stringWithFormat:@"Jack"];
    NSLog(@"[%p]%@",str,str);

    NSMutableString *str1 = [str copy];
    NSLog(@"[%p]%@",str1,str1);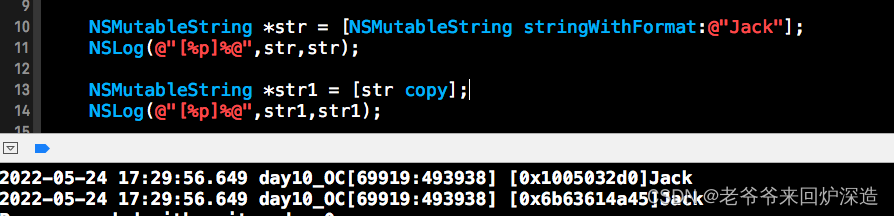
NSMutableString --> copy --> 是1个不可变的字符串对象 .
有产生1个新对象.这样的拷贝我们叫做深拷贝.
2). mutableCopy.定义在NSObject类之中. 作用:拷贝对象.
    NSString *str = [NSString stringWithFormat:@"Jack"];
    NSLog(@"[%p]%@",str,str);

    NSString *str1 = [str mutableCopy];
    NSLog(@"[%p]%@",str1,str1);

    NSMutableString *str2 = [str mutableCopy];
    NSLog(@"[%p]%@",str2,str2);

    [str2 appendString:@"王大锤~"];
    NSLog(@"[%p]%@",str2,str2);
NSString ---> mutableCopy --> 可变字符串对象. 深拷贝.
    NSMutableString *str = [NSMutableString stringWithFormat:@"Jack"];
    NSLog(@"[%p]%@",str,str);

    NSMutableString *str1 = [str mutableCopy];
    NSLog(@"[%p]%@",str1,str1);
    [str1 appendString:@"王大锤"];
    NSLog(@"[%p]%@",str1,str1);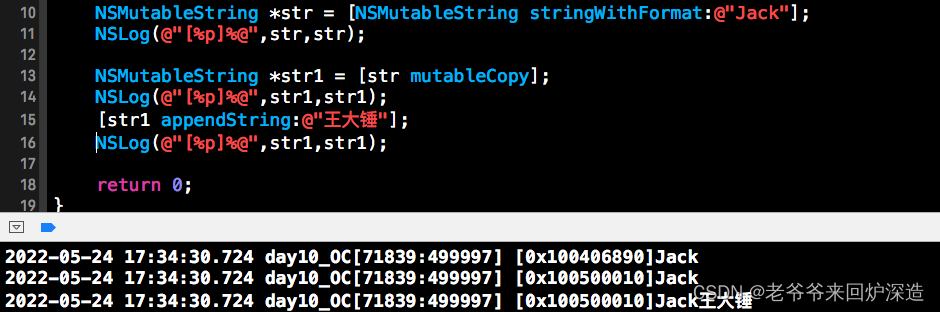
NSMutableString --> mutableCopy --> 可变字符串对象 深拷贝.
这是字符串的对象拷贝特点.
3. 字符串对象拷贝的引用计数器的问题.
1). 若字符串对象存储在常量区中. 存储在常量区的数据是不允许被回收的.
所以存储在常量区的字符串对象的引用计数器是1个超大的数.并且retain和release无效.
2). 若字符串存储在堆区. 这个字符串对象和普通的对象一样的.引用计数器默认是1.
3). 字符串对象如果是浅拷贝. 会将对象的引用计数器+1
字符串对象如果是深拷贝. 原来的对象的引用计数器不变.新拷贝出来的对象的引用计数器为1.
10-自定义类实现拷贝
1. copy方法的确是定义在NSObject类中的1个方法.
copy方法的内部调用了另外1个方法. copyWithZone:
这个方法是定义在NSCoping协议之中的.
因为我们的类没有遵守NSCoping协议,那么我们的类中就没有 copyWithZone:这个方法.
所以,当我们自定义的类调用copy方法的时候就会出错/
2. 如果我们想要让我们自己的类具备对象拷贝的能力.那么就让我们的类遵守NSCoping协议
并实现copyWithZone:这个方法.
如果想要实现深拷贝:那么就重新创建1个对象.并将对象的属性的值复制.返回.
如果想要实现浅拷贝:那么就直接返回self
【这个我尝试失败了。后续需要人交流。。。】
11-单例模式
1. 单例模式:
1个类的对象,无论在何时创建也无论在什么地方创建 也无论创建多少次.创建出来的都是同1个对象.
2. 无论如何创建对象,最终都会调用alloc方法来创建对象.
1). alloc方法的内部. 其实什么都没有做,只是调用了allocWithZone:方法.
2). 实际上真正申请空间 创建对象的事情是allocWithZone:方法在做.
3. 要实现单例模式.
重写+ allocWithZone:
     + (instancetype)allocWithZone:(struct _NSZone *)zone
     {
         static id instance = nil;
         if(instance == nil)
         {
            instance = [super allocWithZone:zone];
         }
         return instance;
     }
4. 单例模式的规范:
如果类是1个单例模式.要求为类提供1个类方法.来返回这个单例对象.
类方法的名称必须以 shared类名; default类名;
5. 什么时候要把类搞成单例.
1). 单例的特点
无论何时、何地、创建对象,也不管创建多少次对象,得到都是同1个对象.
单例对象可以被共享. 存储在单例对象中的数据可以被共享.
也就是无论在什么地方创建单例对象 访问的都是同1个对象.
2).
做游戏:
游戏面板的宽度: 800
游戏面板的高度: 600
这两个数据基本上在很多的地方都会使用到.
1. 直接写. 滚蛋.
2. 宏. 程序运行的时候无法更改.
3. 还是要定义为变量.
定义为属性保存在对象中. 如果不是单例对象.
如果数据需要被整个程序所共享. 将数据以属性的方式存储在单例对象中.
不要用全局变量,用单例对象的属性


 2799
2799


 被折叠的 条评论
为什么被折叠?
被折叠的 条评论
为什么被折叠?
 到【灌水乐园】发言


