项目实战第七记
1.写在前面
- 上一篇博客实现了对用户前后端对接,本篇博客主要实现对页面的优化
- 本篇博客需要对vue的路由和组件化有所了解,读者可以提前学习相关知识
2. 页面优化
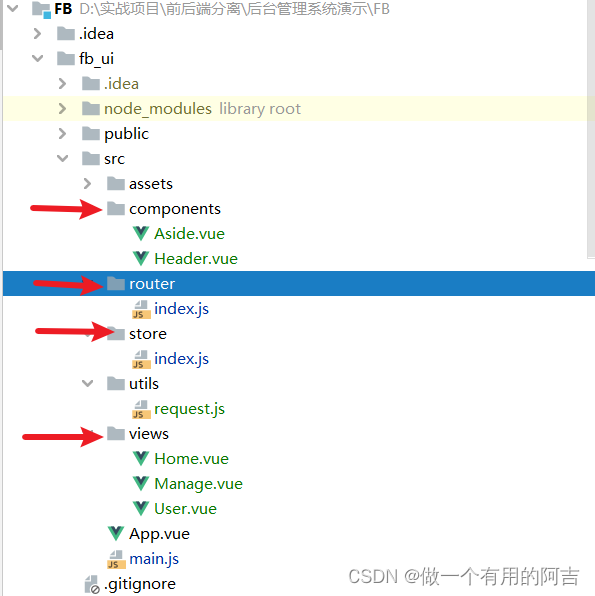
对HomeView.vue(改名Manage.vue)页面进行改造,拆分成一个个组件,现有的项目结构如下,箭头部分是本篇博客改动部分。

2.1 Aside.vue
侧边栏代码抽取
<template>
  <el-menu :default-openeds="['1', '3']" style="min-height: 100%; overflow-x: hidden"
           background-color="rgb(48, 65, 86)"
           text-color="#fff"
           active-text-color="#ffd04b"
           :collapse-transition="false"
           :collapse="isCollapse"
           router
  >
    <div style="height: 60px; line-height: 60px; text-align: center">
      <img src="../assets/logo.png" alt="" style="width: 20px; position: relative; top: 5px; right: 5px">
      <b style="color: white" v-show="logoTextShow">后台管理系统</b>
    </div>
    <el-menu-item index="/">
      <template slot="title">
        <i class="el-icon-s-home"></i>
        <span slot="title">主页</span>
      </template>
    </el-menu-item>
    <el-submenu index="2">
      <template slot="title">
        <i class="el-icon-menu"></i>
        <span slot="title">系统管理</span>
      </template>
      <el-menu-item index="/user">
        <i class="el-icon-user"></i>
        <span slot="title">用户管理</span>
      </el-menu-item>
    </el-submenu>

  </el-menu>
</template>

<script>
export default {
  name: "Aside",
  props: {
    isCollapse: Boolean,
    logoTextShow: Boolean
  }

}
</script>

<style scoped>

</style>
2.2.1 如何在当前组件下引入其他组件
这是引入组件的基本步骤
// 第一步  引入组件
import Aside from "@/components/Aside";

// 第二步,在components加入
components: {
    Aside,
  },

// 第三步 使用组件
<el-aside :width="sideWidth + 'px'" style="box-shadow: 2px 0 6px rgb(0 21 41 / 0.35);">
  <Aside :is-collapse="isCollapse" :logo-text-show="logoTextShow"/>
</el-aside>
2.2.2 父组件向子组件传递数据(番外篇)
在Vue中,父组件可以通过props属性向子组件传递数据。在父组件中使用子组件时,可以在子组件的标签上使用v-bind指令来绑定数据,将数据传递给子组件。例如:
<template>
  <div>
    <child-component :message="parentMessage" :isCollase="isCollase"></child-component>
  </div>
</template>

<script>
import ChildComponent from './ChildComponent.vue'

export default {
  components: {
    ChildComponent
  },
  data() {
    return {
      parentMessage: 'Hello from parent component',
      isCollase: false
    }
  }
}
</script>
在子组件中,可以通过props属性来接收父组件传递过来的数据。例如:
<template>
  <div>
    <p>{{ message }}</p>
  </div>
</template>

<script>
export default {
  props: {
    message: String,
    isCollase: Boolean
  }
}
</script>
这样,父组件中的parentMessage会传递给子组件中的message,并在子组件中显示出来。了解完这个,页面组件化基本大功告成
2.2 Header.vue
页面头部抽取
<template>
  <div style="line-height: 60px; display: flex">
    <div style="flex: 1;">
      <span :class="collapseBtnClass" style="cursor: pointer; font-size: 18px" @click="collapse"></span>

      <el-breadcrumb separator=">" style="display: inline-block; margin-left: 10px">
        <el-breadcrumb-item :to="'/'">首页</el-breadcrumb-item>
        <el-breadcrumb-item v-for="(item, index) in breadCrumbs" :key="item.path">
          <router-link :to="item.path">{{ item.meta.title }}</router-link>
        </el-breadcrumb-item>
      </el-breadcrumb>
    </div>
    <el-dropdown style="width: 70px; cursor: pointer">
      <span>王小虎</span><i class="el-icon-arrow-down" style="margin-left: 5px"></i>
      <el-dropdown-menu slot="dropdown" style="width: 100px; text-align: center">
        <el-dropdown-item style="font-size: 14px; padding: 5px 0">个人信息</el-dropdown-item>
        <el-dropdown-item style="font-size: 14px; padding: 5px 0">退出</el-dropdown-item>
      </el-dropdown-menu>
    </el-dropdown>
  </div>
</template>

<script>
export default {
  name: "Header",
  props: {
    collapseBtnClass: String,
    collapse: Boolean,
  },
  watch: {
    $route() {
      this.getBreadcrumb();
    }
  },
  data(){
    return {
      breadCrumbs: []
    }
  },
  created() {
    this.getBreadcrumb()
  },
  methods: {
    getBreadcrumb(){
      this.breadCrumbs = this.$route.matched.filter(item => item.meta && item.meta.title);
    }
  }
}
</script>

<style scoped>

</style>
2.3 User.vue
展示内容抽取
<template>

  <div>
    <div style="margin: 10px 0">
      <el-input style="width: 200px" placeholder="请输入名称" suffix-icon="el-icon-search" v-model="username"></el-input>
      <el-input style="width: 200px" placeholder="请输入地址" suffix-icon="el-icon-position" class="ml-5" v-model="address"></el-input>
      <el-button class="ml-5" type="primary" @click="getList">搜索</el-button>
      <el-button icon="el-icon-refresh" size="mini" @click="resetQuery">重置</el-button>
    </div>

    <div style="margin: 10px 0">
      <el-button type="primary" @click="handleAdd">新增 <i class="el-icon-circle-plus-outline"></i></el-button>
      <el-button type="warning" plain icon="el-icon-edit" size="mini" :disabled="single" @click="handleUpdate">修改</el-button>
      <el-button type="danger" :disabled="multiple" @click="handleDelete">删除 <i class="el-icon-remove-outline"></i></el-button>
      <el-button type="primary">导入 <i class="el-icon-bottom"></i></el-button>
      <el-button type="primary">导出 <i class="el-icon-top"></i></el-button>
    </div>

    <el-table v-loading="loading" :data="tableData" border stripe :header-cell-class-name="headerBg" @selection-change="handleSelectionChange">
      <el-table-column type="selection" width="55"></el-table-column>
      <el-table-column prop="id" label="序号" width="140"></el-table-column>
      <el-table-column prop="username" label="用户名" width="140"></el-table-column>
      <el-table-column prop="nickname" label="昵称" width="140"></el-table-column>
      <el-table-column prop="email" label="邮箱" width="200"></el-table-column>
      <el-table-column prop="address" label="地址" width="140"></el-table-column>
      <el-table-column prop="createTime" label="创建时间" width="140"></el-table-column>
      <el-table-column label="操作"  align="center">
        <template v-slot="scope">
          <el-button type="success" @click="handleUpdate(scope.row)">编辑 <i class="el-icon-edit"></i></el-button>
          <el-button type="danger" @click="handleDelete(scope.row)">删除 <i class="el-icon-remove-outline"></i></el-button>
        </template>
      </el-table-column>
    </el-table>
    <div style="padding: 10px 0">
      <el-pagination
          class="page"
          @size-change="handleSizeChange"
          @current-change="handleCurrentChange"
          :page-sizes="[5, 10]"
          :page-size="pageSize"
          layout="total, sizes, prev, pager, next, jumper"
          :total="total">
      </el-pagination>
    </div>

    <!--  用户信息       -->
    <el-dialog title="用户信息" :visible.sync="dialogFormVisible" width="30%" >
      <el-form label-width="80px" size="small">
        <el-form-item label="用户名">
          <el-input v-model="form.username" autocomplete="off"></el-input>
        </el-form-item>
        <el-form-item label="昵称">
          <el-input v-model="form.nickname" autocomplete="off"></el-input>
        </el-form-item>
        <el-form-item label="邮箱">
          <el-input v-model="form.email" autocomplete="off"></el-input>
        </el-form-item>
        <el-form-item label="电话">
          <el-input v-model="form.phone" autocomplete="off"></el-input>
        </el-form-item>
        <el-form-item label="地址">
          <el-input v-model="form.address" autocomplete="off"></el-input>
        </el-form-item>
      </el-form>
      <div slot="footer" class="dialog-footer">
        <el-button @click="dialogFormVisible = false">取 消</el-button>
        <el-button type="primary" @click="save">确 定</el-button>
      </div>
    </el-dialog>
  </div>

</template>

<script>
export default {
  name: "User",
  data(){
    return {
      tableData: [],
      pageSize: 5,
      total: 0,
      pageNum: 1,
      username: '',
      address: '',
      collapseBtnClass: 'el-icon-s-fold',
      isCollapse: false,
      sideWidth: 200,
      logoTextShow: true,
      headerBg: 'headerBg',
      dialogFormVisible: false,
      form: {},
      // 遮罩层
      loading: true,
      // 选中数组
      ids: [],
      // 非单个禁用
      single: true,
      // 非多个禁用
      multiple: true,
    }
  },
  created() {
    this.getList();
  },
  methods: {
    getList(){
      this.loading = true;
      this.request.get('/user/page',
          {
            params: {
              pageNum: this.pageNum,
              pageSize: this.pageSize,
              username: this.username,
              address: this.address
            }
          }
      ).then(res => {
        this.tableData = res.data.records;
        this.total = res.data.total;
        this.loading = false;
      })
    },
    handleSizeChange(val) {
      this.pageSize = val;
    },
    handleCurrentChange(val) {
      this.pageNum = val;
      this.getList();
    },
    // 新增
    handleAdd(){
      this.dialogFormVisible = true;
      this.form = {};
    },
    save(){
      this.request.post("/user",this.form).then(res => {
        if(res.code === "200" || res.code === 200){
          this.$message.success("操作成功")
        }else {
          this.$message.error("操作失败")
        }
        this.dialogFormVisible = false;
        this.getList();
      })
    },
    // 修改
    handleUpdate(row){
      this.form = row;
      this.dialogFormVisible = true;
    },
    // 删除
    handleDelete(row){
      let _this = this;
      const userIds = row.id || this.ids;
      this.$confirm('是否确认删除用户编号为"' + userIds + '"的数据项?', '删除用户', {
        confirmButtonText: '确定',
        cancelButtonText: '取消',
        type: 'warning'
      }).then(() => {
        _this.request.delete("/user/"+userIds).then(res=>{
          if(res.code === "200" || res.code === 200){
            _this.$message.success("删除成功")
          }else {
            _this.$message.error("删除失败")
          }
          this.getList();
        })
      }).catch(() => {
      });
    },
    // 多选框选中数据
    handleSelectionChange(selection) {
      this.ids = selection.map(item => item.id);
      this.single = selection.length != 1;
      this.multiple = !selection.length;
    },
    // 重置按钮
    resetQuery(){
      this.username = undefined;
      this.address = undefined;
      this.getList();
    }

  }
}
</script>

<style scoped>

</style>
2.4 Manage.vue
完整的整体页面代码
<template>
  <el-container style="min-height: 100vh">

    <el-aside :width="sideWidth + 'px'" style="box-shadow: 2px 0 6px rgb(0 21 41 / 0.35);">
      <Aside :is-collapse="isCollapse" :logo-text-show="logoTextShow"/>
    </el-aside>

    <el-container>
      <el-header style="border-bottom: 1px solid #ccc;">
        <Header :collapse-btn-class="collapseBtnClass" :collapse="isCollapse"/>
      </el-header>

      <el-main>
        <!--  表示当前页面的子路由会在 <router-view/> 里面显示     -->
        <router-view/>
      </el-main>

    </el-container>
  </el-container>
</template>

<script>

import Aside from "@/components/Aside";
import Header from "@/components/Header";

export default {
  name: 'HomeView',
  components: {
    Aside,
    Header
  },
  data() {
    return {
      collapseBtnClass: 'el-icon-s-fold',
      isCollapse: false,
      sideWidth: 200,
      logoTextShow: true,
      headerBg: 'headerBg',
    }
  },
  methods: {
    collapse() {  // 点击收缩按钮触发
      this.isCollapse = !this.isCollapse
      if (this.isCollapse) {  // 收缩
        this.sideWidth = 64
        this.collapseBtnClass = 'el-icon-s-unfold'
        this.logoTextShow = false
      } else {   // 展开
        this.sideWidth = 200
        this.collapseBtnClass = 'el-icon-s-fold'
        this.logoTextShow = true
      }
    }
  }
}
</script>

<style>
.headerBg {
  background: #eee!important;
}
</style>
2.5 页面路由
指定路由所对应的页面
import Vue from 'vue'
import VueRouter from 'vue-router'
import Manage from '../views/Manage.vue'

Vue.use(VueRouter)
//定义一个路由对象数组
const routes = [
  {
    path: '/',
    component: Manage,
    // 重定向
    redirect: "/home",
    // 子组件
    children: [
      {
        // 注:子组件路径不要含/
        path: 'home',
        name: '首页',
        component: () => import('../views/Home.vue'),
        meta: {
          title: '首页'
        }
      },
      {
        path: 'user',
        name: '用户管理',
        component: () => import('../views/User.vue'),
        meta: {
          title: '用户管理'
        }
      }
    ]
  }
]
//使用路由对象数组创建路由实例,供main.js引用
const router = new VueRouter({
  mode: 'history',
  base: process.env.BASE_URL,
  routes
})

export default router
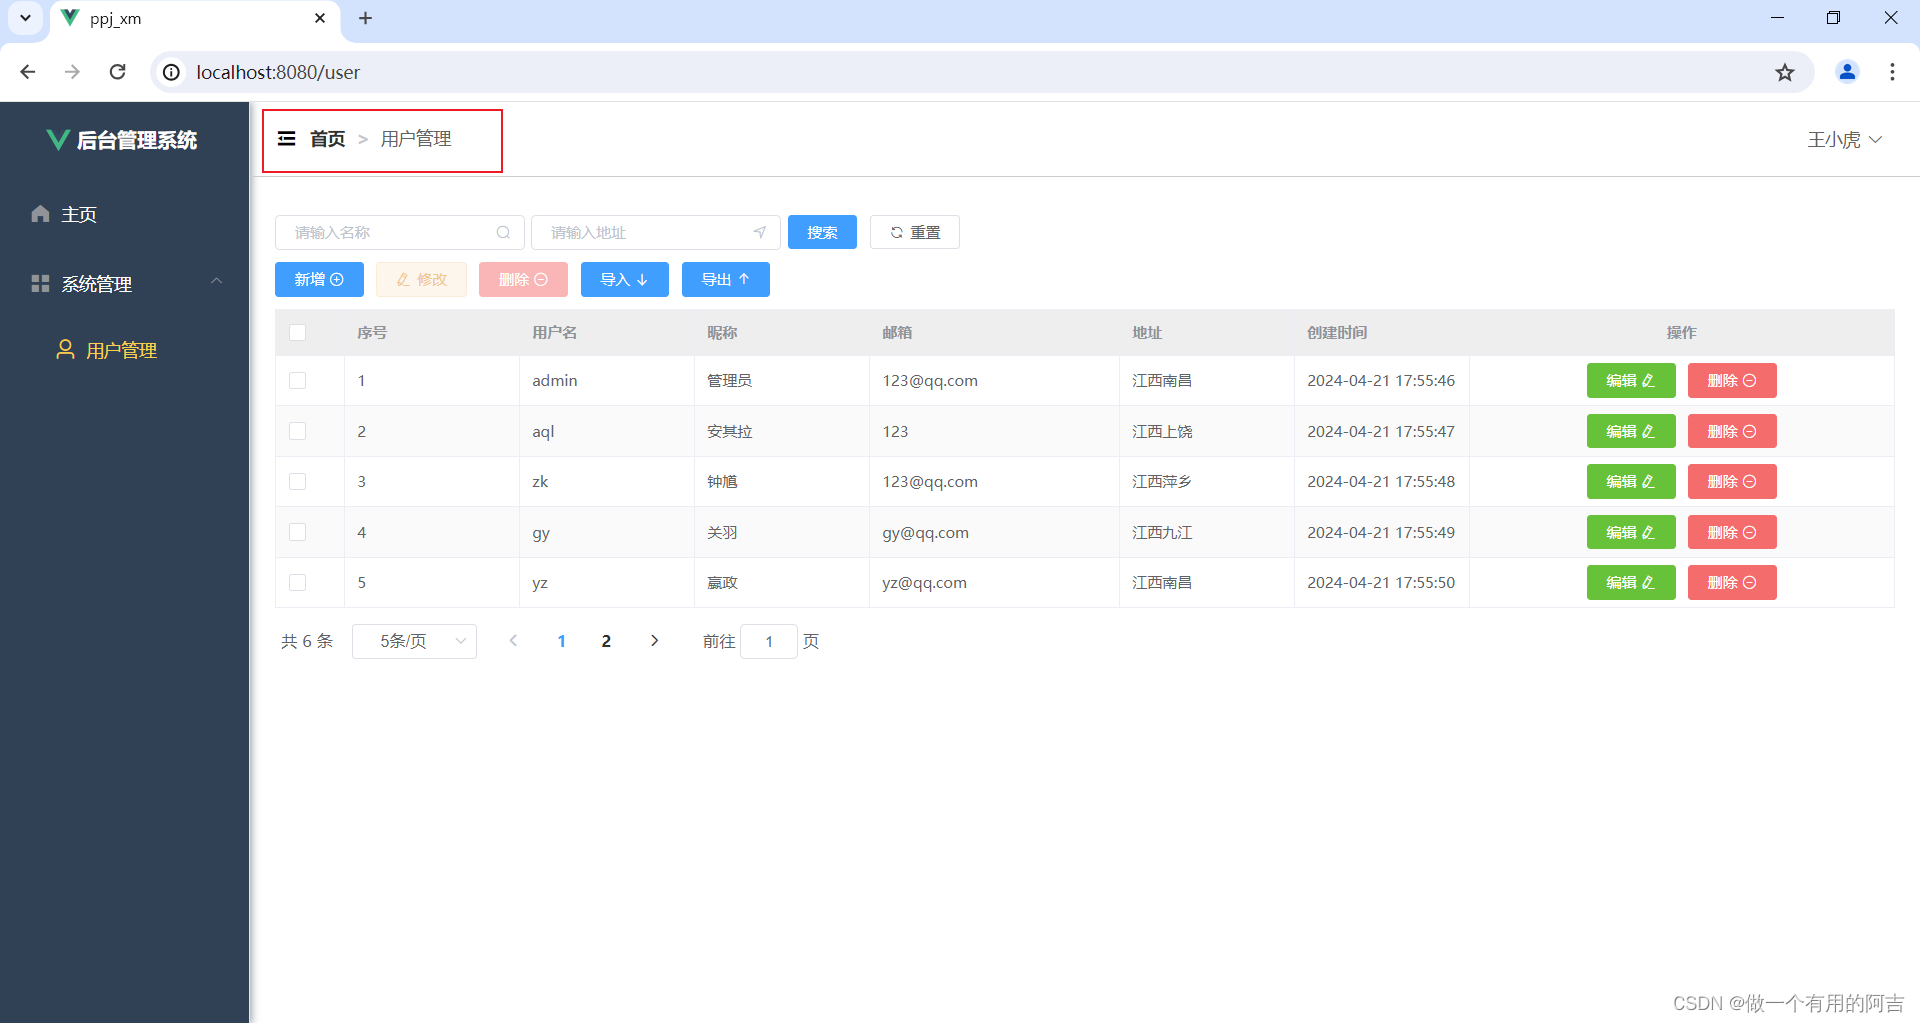
2.6 最终页面显示

3 难点
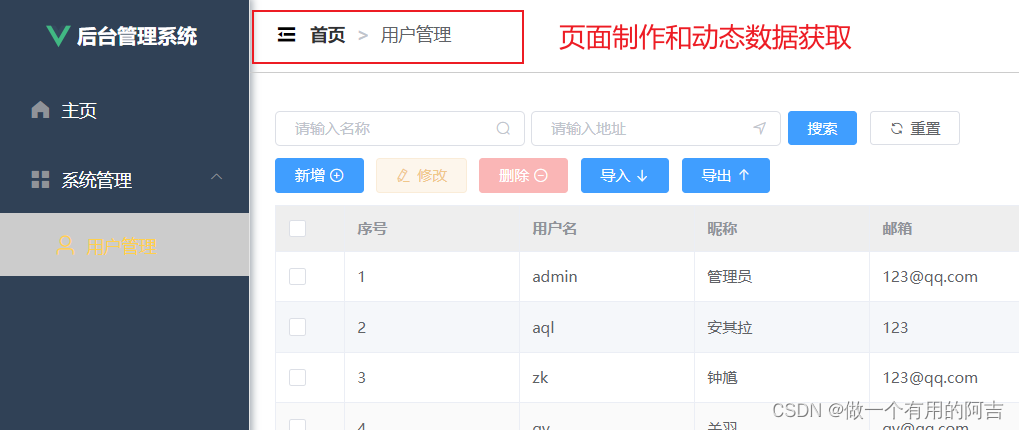
如何显示当前操作所在的目录

3.1 meta的使用
路由的index.js改动,添加meta属性
import Vue from 'vue'
import VueRouter from 'vue-router'
import Manage from '../views/Manage.vue'
import store from "@/store";

Vue.use(VueRouter)
//定义一个路由对象数组
const routes = [
  {
    path: '/',
    component: Manage,
    redirect: "/home",
    children: [
      {
        path: 'home',
        name: '首页',
        component: () => import('../views/Home.vue'),
        //添加meta属性
        meta: {
          title: '首页'
        }
      },
      {
        path: 'user',
        name: '用户管理',
        component: () => import('../views/User.vue'),
        //添加meta属性
        meta: {
          title: '用户管理'
        }
      }
    ]
  }
]
//使用路由对象数组创建路由实例,供main.js引用
const router = new VueRouter({
  mode: 'history',
  base: process.env.BASE_URL,
  routes
})
export default router
3.2 面包屑
主要步骤:
1. 第一步,获取相应的路由记录
2. 第二步,当当前路由发生变化时,更新路由记录
3. 注意for循环,添加:key=“value”,value唯一
<template>
  <div style="line-height: 60px; display: flex">
    <div style="flex: 1;">
      <span :class="collapseBtnClass" style="cursor: pointer; font-size: 18px" @click="collapse"></span>
      <el-breadcrumb separator=">" style="display: inline-block; margin-left: 10px">
        <el-breadcrumb-item :to="'/'">首页</el-breadcrumb-item>
        <el-breadcrumb-item v-for="(item, index) in breadCrumbs" :key="item.path">
          <router-link :to="item.path">{{ item.meta.title }}</router-link>
        </el-breadcrumb-item>
      </el-breadcrumb>
    </div>
    <el-dropdown style="width: 70px; cursor: pointer">
      <span>王小虎</span><i class="el-icon-arrow-down" style="margin-left: 5px"></i>
      <el-dropdown-menu slot="dropdown" style="width: 100px; text-align: center">
        <el-dropdown-item style="font-size: 14px; padding: 5px 0">个人信息</el-dropdown-item>
        <el-dropdown-item style="font-size: 14px; padding: 5px 0">退出</el-dropdown-item>
      </el-dropdown-menu>
    </el-dropdown>
  </div>
</template>

<script>
export default {
  name: "Header",
  props: {
    collapseBtnClass: String,
    collapse: Boolean,
  },
  // 当当前路由发生变化时,调用getBreadcrumb方法来更新面包屑导航的数据
  watch: {
    $route() {
      this.getBreadcrumb();
    }
  },
  data(){
    return {
      breadCrumbs: []
    }
  },
  created() {
    this.getBreadcrumb()
  },
  methods: {
    getBreadcrumb(){
      // 从当前路由的匹配记录中过滤出具有meta属性且包含title属性的路由记录
      this.breadCrumbs = this.$route.matched.filter(item => item.meta && item.meta.title);
    }
  }
}
</script>

<style scoped>

</style>
总结
- 学习vue组件化思想以及vue路由;
- 父组件如何向子组件传递数据,子组件如何接收数据;
- 本篇博客面包屑方法与原视频不同,不同方法实现同一个功能,可用来参考借鉴。
声明
项目源于此地址:程序员青戈
写在最后
如果此文对您有所帮助,请帅戈靓女们务必不要吝啬你们的Zan,感谢!!不懂的可以在评论区评论,有空会及时回复。
文章会一直更新


 8297
8297


 被折叠的 条评论
为什么被折叠?


