


目录
1.11 ant-design-vue :https://antdv.com/docs/vue/introduce-cn/
1.12 element-plus:A Vue 3 UI Framework | Element Plus
1.13 vant :Vant - Mobile UI Components built on Vue
1、vue3的优势:
1.1 社区生态
1.11 ant-design-vue :https://antdv.com/docs/vue/introduce-cn/
ant-design-vue 是 Ant Design 的 Vue 实现
1.12 element-plus:A Vue 3 UI Framework | Element Plus
1.13 vant :Vant - Mobile UI Components built on Vue
1.14 Naive UI :Naive UI
1.15 VueUse : VueUse | VueUse
基于composition组合api的常用集合
1.2 整体优化
-
性能提升
-
首次渲染更快
-
diff算法更快
-
内存占用更少
-
打包体积更小
-
-
更好的Typescript支持
-
Composition API (重点)
1.3 相关文档
2、组合式API
2.1 什么是组合式api
2.11 风格对比
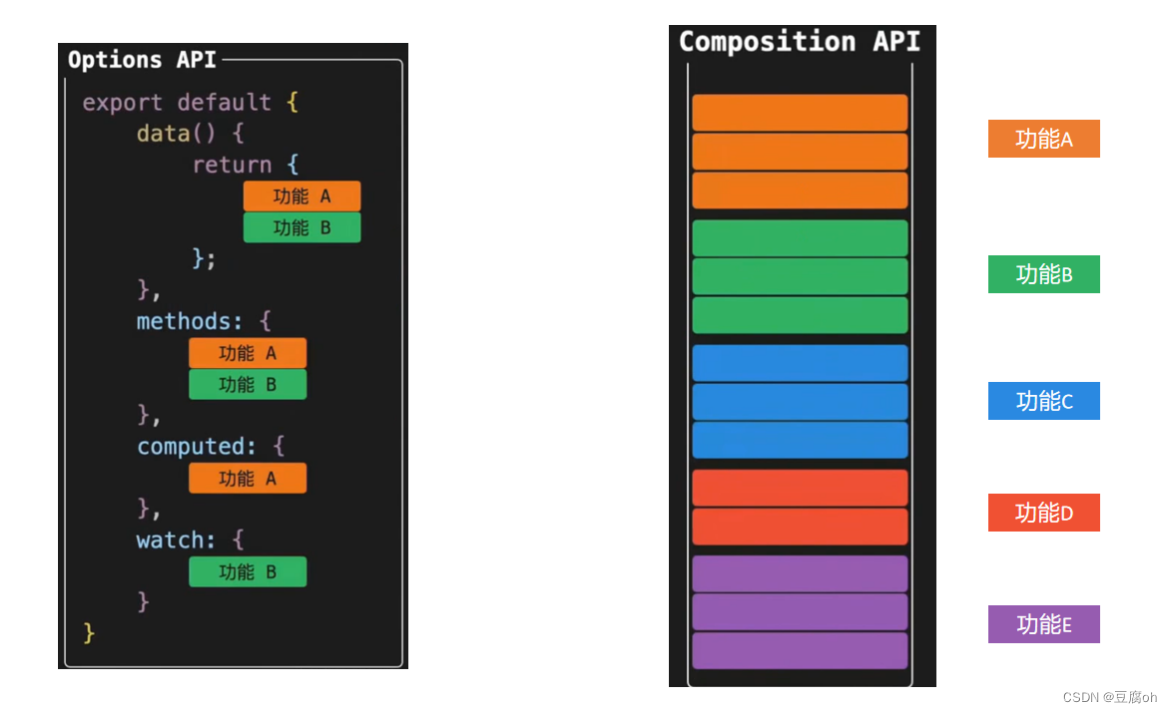
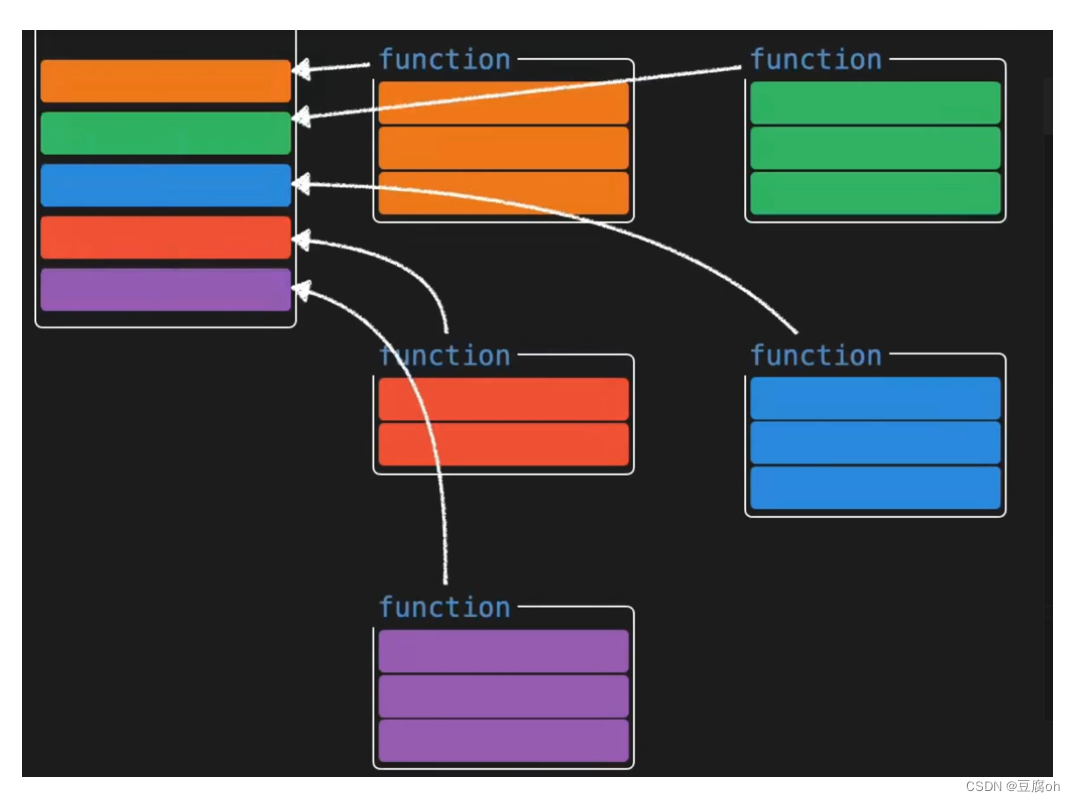
2.12 demo对比
选项式api
<template>
  <div>
    <!-- 功能一模板 -->
    <button @click="show">显示</button>
    <button @click="hide">隐藏</button>
    <div v-if="showDiv">一个被控制显隐的div</div>
  </div>
  <div>
    <!-- 功能二模板 -->
    <button @click="changeRed">红色</button>
    <button @click="changeYellow">蓝色</button>
    <div :style="`color:${fontColor}`">一个被控制字体颜色的的div</div>
  </div>
</template>

<script>
export default {
  name: 'App',
  data() {
    return {
      showDiv: true, // 功能一数据
      fontColor: '' // 功能二数据
    }
  },
  methods: {
    // 功能一方法
    show() {
      this.showDiv = true
    },
    hide() {
      this.showDiv = false
    },
    // 功能二方法
    changeRed() {
      this.fontColor = 'red'
    },
    changeYellow() {
      this.fontColor = 'blue'
    }
  }
}
</script>
组合式api
<template>
  <div>
    <!-- 功能一模板 -->
    <button @click="show">显示</button>
    <button @click="hide">隐藏</button>
    <div v-if="showDivFlag">一个被控制显隐的div</div>
  </div>
  <div>
    <!-- 功能二模板 -->
    <button @click="changeRed">红色</button>
    <button @click="changeBlue">蓝色</button>
    <div :style="`color:${fontColor}`">一个被控制字体颜色的的div</div>
  </div>
</template>

<script>
import { ref } from 'vue'
export default {
  name: 'App',
  setup() {
    // 功能一
    const showDivFlag = ref(true)
    function show() {
      showDivFlag.value = true
    }
    function hide() {
      showDivFlag.value = false
    }
    // 功能二

    const fontColor = ref('')
    function changeRed() {
      fontColor.value = 'red'
    }
    function changeBlue() {
      fontColor.value = 'blue'
    }
    return { showDivFlag, show, hide, fontColor, changeRed, changeBlue }
  }
}
</script>
可对其进行优化 (可对方法进行抽离,使结构简洁,方便维护和扩展)
<script>
import { ref } from 'vue'
function useShow() {
  const showDivFlag = ref(true)
  function show() {
    showDivFlag.value = true
  }
  function hide() {
    showDivFlag.value = false
  }
  return { showDivFlag, show, hide }
}

function useColor() {
  const fontColor = ref('')
  function changeRed() {
    fontColor.value = 'red'
  }
  function changeBlue() {
    fontColor.value = 'blue'
  }
  return { fontColor, changeRed, changeBlue }
}
export default {
  name: 'App',
  setup() {
    // 功能一
    const { showDivFlag, show, hide } = useShow()
    // 功能二
    const { fontColor, changeRed, changeBlue } = useColor()
    return { showDivFlag, show, hide, fontColor, changeRed, changeBlue }
  }
}
</script>
2.2 setup 函数
setup 函数是一个新的组件选项,作为组件中组合式API 的起点(入口)
setup函数只会在组件初始化的时候执行一次
setup函数在beforeCreate生命周期钩子执行之前执行,实例还没生成,没有this
2.21 参数
1、props 响应式,当传入新的 prop 时,它将被更新
2、context
export default {
  setup(props, context) {
    // Attribute (非响应式对象,等同于 $attrs)
    console.log(context.attrs)

    // 插槽 (非响应式对象,等同于 $slots)
    console.log(context.slots)

    // 触发事件 (方法,等同于 $emit)
    console.log(context.emit)

    // 暴露公共 property (函数)
    console.log(context.expose)
  }
}
2.3 响应式api
reactive
接收一个普通的对象传入,把对象数据转化为响应式对象并返回
1. 从vue框架中导入reactive函数
2. 在setup函数中调用reactive函数并将想要变成响应式的对象数据当成参数传入
3. 在setup函数中把reactive函数调用完毕之后的返回值以对象的形式返回出去
<template>
  <div>{{ state.name }}</div>
  <div>{{ state.age }}</div>
  <button @click="state.name = 'pink'">改值</button>
</template>

<script>
import { reactive } from 'vue'
export default {
  setup () {
    const state = reactive({
      name: 'cp',
      age: 18
    })
    return {
      state
    }
  }
}
</script>
ref
接受一个简单类型或者复杂类型的传入并返回一个响应式且可变的 ref 对象
1. 从vue框架中导出ref函数
2. 在setup函数中调用ref函数并传入数据(简单类型或者复杂类型)
3. 在setup函数中把ref函数调用完毕的返回值以对象的形式返回出去
4. 注意:在setup函数中使用ref结果,需要通过.value 访问,模板中使用不需要加.value
<template>
  <div>{{ money }}</div>
  <button @click="changeMondy">改值</button>
</template>

<script>
import { ref } from 'vue'
export default {
  setup() {
    let money = ref(100)
    console.log(money.value)
    return {
      money
    }
  }
}
</script>
computed
根据现有响应式数据经过一定的计算得到全新的数据
1. 从vue框架中导入computed 函数
2. 在setup函数中执行computed函数,并传入一个函数,在函数中定义计算公式
3. 把computed函数调用完的返回值放到setup函数return出去的对象中
<template>
  {{ list }}
  {{ filterList }}
  <button @click="changeList">change list</button>
</template>

<script>
import { computed, ref } from 'vue'
export default {
  setup() {
    const list = ref([1, 2, 3, 4, 5])
    // 输入大于3的数字
    const filterList = computed(() => {
      return list.value.filter(item => item > 3)
    })
    // 修改list的函数
    function changeList() {
      list.value.push(6, 7, 8)
    }
    return {
      list,
      filterList,
      changeList
    }
  }
}
</script>
watch
基于响应式数据的变化执行回调逻辑,和vue2中的watch的功能完全一致
1. 从vue框架中导入watch函数
2. 在setup函数中执行watch函数开启对响应式数据的监听
3. watch函数接收三个常规参数
1. 第一个参数为函数,返回你要监听变化的响应式数据
2. 第二个参数为响应式数据变化之后要执行的回调函数
3. 第三个参数为一个对象,在里面配置是否开启立刻执行或者深度监听
立即执行
<template>
  {{ age }}
  <button @click="age++">change age</button>
</template>
<script>
import { ref, watch } from 'vue'
export default {
  setup() {
    const age = ref(18)
    watch(() => {
      // 返回你想要监听的响应式属性(ref产生的对象必须加.value)
      return age.value
    }, () => {
      // 数据变化之后的回调函数
      console.log('age发生了变化')
    },{ immediate: true})
    return {
      age
    }
  }
}
</script>
深度监听
<template>
  {{ state.name }}
  {{ state.info.age }}
  <button @click="name = 'pink'">change name</button>
  <button @click="info.age++">change age</button>
</template>

<script>
import { reactive, toRefs, watch } from 'vue'
export default {
  setup() {
    const state = reactive({
      name: 'cp',
      info: {
        age: 18
      }
    })
    watch(() => {
      return state
    }, () => {
      // 数据变化之后的回调函数
      console.log('age发生了变化')
    }, {
      deep: true
    })
    return {
      state
    }
  }
}
</script>
readonly
传入一个对象(响应式或普通)或 ref,返回一个原始对象的只读代理。一个只读的代理是“深层的”,对象内部任何嵌套的属性也都是只读的
const original = reactive({ count: 0 })

const copy = readonly(original)

watchEffect(() => {
  // 依赖追踪
  console.log(copy.count)
})

// original 上的修改会触发 copy 上的侦听
original.count++

// 无法修改 copy 并会被警告
copy.count++ // warning!
watchEffect
立即执行传入的一个函数,并响应式追踪其依赖,并在其依赖变更时重新运行该函数。
const count = ref(0)
watchEffect(() => console.log(count.value))
// -> 打印出 0
setTimeout(() => {
count.value++
// -> 打印出 1
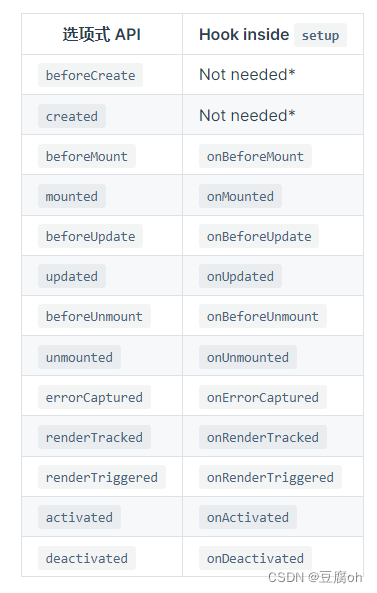
}, 100)2.4 生命周期
2.5 父子通信
1. setup函数提供俩个参数,第一个参数为props,第二个参数为一个对象context
2. props为一个对象,内部包含了父组件传递过来的所有prop数据,context对象包含了attrs,slots, emit属性,其中的emit可以触发自定义事件的执行从而完成子传父
//father
<template>
  <son :name="name" @get-msg="getMsg"></son>
</template>

<script>
import { ref } from 'vue'
import Son from './components/son'
export default {
  components: {
    Son
  },
  setup() {
    const name = ref('cp')
    function getMsg(msg) {
      console.log(msg)
    }
    return {
      name,
      getMsg
    }
  }
}
</script>
//son
<template>
<div>
{{name}}
<button @click="setMsgToSon">set</button>
</div>
</template>
<script>
export default {
props: {
name: {
type: String
}
},
emits: ['get-msg'], // 声明当前组件触发的自定义事件
setup(props,{emit}) {
console.log(props.name)
function setMsgToSon(){
emit('get-msg','这是一条来自子组件的msg信息')
}
return {
setMsgToSon
}
}
}
</script>2.6 依赖注入
provide 和 inject 提供依赖注入,功能类似 2.x 的 provide/inject。两者都只能在当前活动组件实例的 setup() 中调用。
基础实用
<template>
  <father></father>
</template>

<script>
import Father from '@/components/Father'
import { provide } from 'vue'
export default {
  components: {
    Father
  },
  setup() {
    let name = 'doufu'
    // 使用provide配置项注入数据 key - value
    provide('name', name)
  }
}
</script>
<template>
我是子组件
{{ name }}
</template>
<script>
import { inject } from 'vue'
export default {
setup() {
const name = inject('name')
return {
name
}
}
}
</script>响应式使用
<template>
  <father></father>
  <button @click="changeName">change name</button>
</template>

<script>
import Father from '@/components/Father'
import { provide, ref } from 'vue'
export default {
  components: {
    Father
  },
  setup() {
    // 使用ref转换成响应式再传递
    let name = ref('豆腐')
    function changeName(){
      name.value = 'pink'
    }
    provide('name', name)
    return {
      changeName
    }
  }
}
</script>
2.7 模板refs
在模板中使用ref,我们都很清楚,它一般有三种使用场景
1. ref + 普通dom标签 获取真实dom对象
2. ref + 组件标签 获取组件实例对象
3. ref + v-for 获取由dom对象(实例对象)组成的数组 (不经常使用)
实现步骤
1. 使用ref函数传入null创建 ref对象 => const hRef = ref(null)
2. 模板中通过定义ref属性等于1中创建的ref对象名称建立关联 => <h1 ref="hRef"></h1>
3. 把hRefreturn出去
4. 使用 => hRef.value
<template>
  <div ref="root"></div>
</template>

<script>
  import { ref, onMounted } from 'vue'

  export default {
    setup() {
      const root = ref(null)

      onMounted(() => {
        // 在渲染完成后, 这个 div DOM 会被赋值给 root ref 对象
        console.log(root.value) // <div/>
      })

      return {
        root,
      }
    },
  }
</script>
// v-for中使用
<template>
<div v-for="(item, i) in list" :ref="el => { divs[i] = el }">
{{ item }}
</div>
</template>
<script>
import { ref, reactive, onBeforeUpdate } from 'vue'
export default {
setup() {
const list = reactive([1, 2, 3])
const divs = ref([])
// 确保在每次变更之前重置引用
onBeforeUpdate(() => {
divs.value = []
})
return {
list,
divs,
}
},
}
</script>


 450
450


 被折叠的 条评论
为什么被折叠?
被折叠的 条评论
为什么被折叠?
 到【灌水乐园】发言


