


Vue组件实例的作用域是相互独立的,这就意味着不同组件之间的数据无法相互引用,所以对于Vue来说组件间的数据通信非常重要。首先我们需要知道在vue中组件之间存在什么样的关系, 才更容易理解他们的通信方式。下图为关系说明:
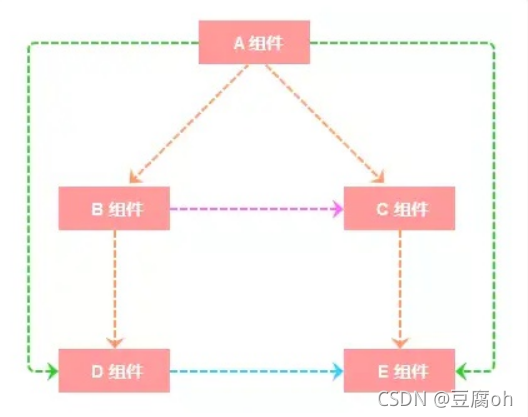
如上图所示, A与B、A与C、B与D、C与E组件之间是父子关系; B与C之间是兄弟关系;A与D、A与E之间是隔代关系; D与E是堂兄关系(非直系亲属) 针对以上关系归类为两类:
1、父子组件之间的通讯
2、非父子之间的通选(兄弟组件、堂兄组件等)
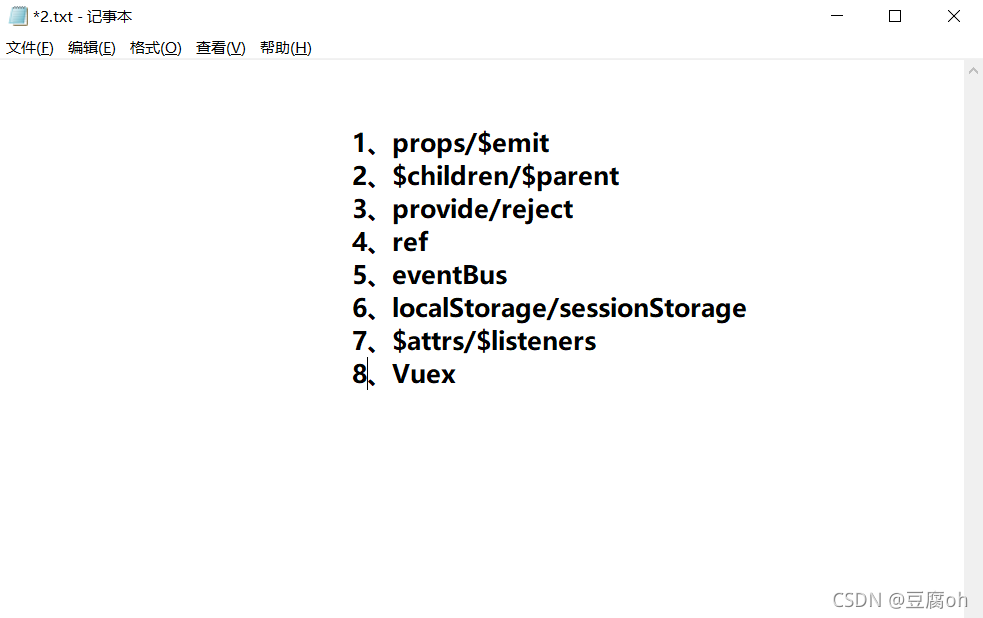
本文会介绍组件间通信的8种方式如下图目录所示:并介绍在不同的场景下如何选择有效方式实现的组件间通信方式,希望可以帮助小伙伴们更好理解组件间的通信。
方法一:props/$emit
父组件通过props的方式向子组件传递数据,子组件通过$emit(绑定事件) 可以向父组件通信。
1、父组件向子组件传递数据
下面通过一个例子说明父组件如何向子组件传递数据:在子组件MyProduc中如何获取父组件App.vue中的数据list
示例代码:
//App.vue中向子组件MyProduct传入数据
<template>
     <!--
      步骤:
        1. 子组件 - props - 变量 (准备接收)
        2. 父组件 - 传值进去
     -->
  <div>
    <MyProduct v-for="obj in list" :key="obj.id"
    :title="obj.proname"
    :price="obj.proprice"
    :intro="obj.info"
    ></MyProduct>
  </div>
</template>

<script>
import MyProduct from './components/MyProduct'  //引入组件
export default {
  data() {
    return {
      list: [
        {
          id: 1,
          proname: "超级好吃的棒棒糖",
          proprice: 18.8,
          info: "开业大酬宾, 全场8折",
        },
        {
          id: 2,
          proname: "超级好吃的大鸡腿",
          proprice: 34.2,
          info: "好吃不腻, 快来买啊",
        },
        {
          id: 3,
          proname: "超级无敌的冰激凌",
          proprice: 14.2,
          info: "炎热的夏天, 来个冰激凌了",
        },
      ],
    };
  },
  // 注册组件
  components: {
    // MyProduct: MyProduct
    MyProduct
  }
};
</script>
//components/MyProduct.vue接收
<template>
  <div class="my-product">
    <h3>标题: {{ title }}</h3>
    <p>价格: {{ price }}元</p>
    <p>{{ intro }}</p>
  </div>
</template>

<script>
export default {
  props: ['title', 'price', 'intro']
}
</script>

<style>
.my-product {
  width: 400px;
  padding: 20px;
  border: 2px solid #000;
  border-radius: 5px;
  margin: 10px;
}
</style>
2、子组件向父组件传递数据
父: @自定义事件名="父methods函数"
子: this.$emit("自定义事件名", 传值) - 执行父methods里函数代码
$emit绑定一个自定义事件(subprice), 当这个语句被执行时, 就会将参数(index与价格)传递给父组件,父组件通过v-on监听并接收参数
示例代码
//App.vue
<template>
  <div>
    <!-- 子传父 -->
    <!-- 父组件, @自定义事件名="父methods函数" -->
    <MyProduct v-for="(obj, ind) in list" :key="obj.id"
    :title="obj.proname"
    :price="obj.proprice"
    :intro="obj.info"
    :index="ind"
    @subprice="fn"
    ></MyProduct>
  </div>
</template>

<script>

import MyProduct from './components/MyProduct_sub'
export default {
  data() {
    return {
      list: [
        {
          id: 1,
          proname: "超级好吃的棒棒糖",
          proprice: 18.8,
          info: "开业大酬宾, 全场8折",
        },
        {
          id: 2,
          proname: "超级好吃的大鸡腿",
          proprice: 34.2,
          info: "好吃不腻, 快来买啊",
        },
        {
          id: 3,
          proname: "超级无敌的冰激凌",
          proprice: 14.2,
          info: "炎热的夏天, 来个冰激凌了",
        },
      ],
    };
  },
  components: {
    MyProduct
  },
  methods: {
    fn(inde, price){
      // 逻辑代码
      this.list[inde].proprice > 1 &&
      (this.list[inde].proprice = (this.list[inde].proprice - price).toFixed(2))
    }
  }
};
</script>
//components/MyProduct_sub.vue
<template>
  <div class="my-product">
    <h3>标题: {{ title }}</h3>
    <p>价格: {{ price }}元</p>
    <p>{{ intro }}</p>
    <button @click="subFn">宝刀-砍1元</button>
  </div>
</template>

<script>
import eventBus from '../EventBus'
export default {
  props: ['index', 'title', 'price', 'intro'],
  methods: {
    subFn(){
      this.$emit('subprice', this.index, 1) // 子向父
    }
  }
}
</script>

<style>
.my-product {
  width: 400px;
  padding: 20px;
  border: 2px solid #000;
  border-radius: 5px;
  margin: 10px;
}
</style>方法二:$parent/$chidren
vue官网API里这样描述

示例代码:
//App.vue中

 <template>
   <div class="hello_world">
     <div>{{msg}}</div>
     <son></son>
     <button @click="changeA">点击改变子组件值</button>
   </div>
 </template>

 <script>
 import son from './components/son.vue'
 export default {
   name: 'HelloWorld',
   components: { son },
   data() {
     return {
       msg:'Welcome'
     }
   },

   methods: {
     changeA() {

       this.$children[0].messageA = 'this is new value'
     }
   }
 }
 </script>
//son.vue

<template>
   <div class="com_a">
     <span>{{messageA}}</span>
     <p>获取父组件的值为:  {{parentVal}}</p>
   </div>
 </template>

 <script>
 export default {
   data() {
     return {
       messageA: 'this is old'
     }
   },
   computed:{
     parentVal(){
       return this.$parent.msg;  //在计算属性中获取父组件的数据
     }
   }
 }
 </script>
注意:得到
$parent和$children的值不一样,$children的值是数组,而$parent是个对象
方法三:provide/inject
类型:
provide:Object | () => Object
inject:Array<string> | { [key: string]: string | Symbol | Object }
理解 :
provide/ inject 是vue2.2.0新增的api, 简单来说就是父组件中通过provide来提供变量, 然后再子组件中通过inject来注入变量 ,这里不论子组件嵌套有多深, 只要调用了 inject 那么就可以注入 provide中的数据
示例代码:
//App.vue中定义变量,引入子组件
<template>
<div>
<son></son>
</div>
</template>
<script>
import son from './components/son.vue'
export default {
name: "dad",
provide: {
for: "demo"
},
components:{
son
}
}
</script>
//./components/Son.vue 子组件中引入孙子组件调用父组件数据
<template>
<div>
{{demo}}
<groundSon></groundSon>
</div>
</template>
<script>
import groundSon from './components/groundSon.vue'
export default {
name: "son",
inject: ['for'],
data() {
return {
demo: this.for
}
},
components: {
groundSon
}
}
</script>
// ./components/groundSon.vue 孙子组件中引用它爷爷的数据
<template>
<div>
{{demo}}
</div>
</template>
<script>
export default {
name: "groundSon",
inject: ['for'],
data() {
return {
demo: this.for
}
}
}
</script>方法四:ref/refs
ref:如果在普通的 DOM 元素上使用,引用指向的就是 DOM 元素;如果用在子组件上,引用就指向组件实例,可以通过实例直接调用组件的方法或访问数据
示例代码:
 <template>
   <son ref="sonDate"></son>
 </template>
 <script>
import son from './components/son.vue'
   export default {
     components:{
       son
    }
     mounted () {
       const sonDate= this.$refs.sonDate;
       console.log(sonDate.name);  // this is son
       sonDate.sayHello();  // hello
     }
   }
 </script>
<template></tempelate>
<script>
export default {
data () {
return {
name: 'this is son'
}
},
methods: {
sayHello () {
console.log('hello')
}
}
}
</script>方法五:eventBus 事件中心管理组件间的通信
在vue中可以使用它来作为沟通桥梁的概念, 就像是所有组件共用相同的事件中心,可以向该中心注册发送事件或接收事件, 所以组件都可以通知其他组件。
注意:eventBus也有不方便之处, 当项目较大,就容易造成难以维护的灾难
代码示例:
1、实例化
//main.js挂载
import Vue from 'vue'
export const EventBus = new Vue()
2、发送事件
//App.vue中引入两个兄弟组件
 <template>
   <div>
     <dad></dad>
     <uncle></uncle>
   </div>
 </template>

 <script>
 import dad from './components/dad.vue'
 import uncle from './components/uncle.vue'
 export default {
   components: { dad, uncle }
 }

 </script>
 //./components/dad.vue发送事件,点击后num++
<template>
   <div>
     <button @click="additionHandle">+加法器</button>
   </div>
 </template>

 <script>
 import  {EventBus} from '../main'

 export default {
   data(){
     return{
       num:1
     }
   },

   methods:{
     additionHandle(){
       EventBus.$emit('addition', {
         num:this.num++
       })
     }
   }
 }
 </script>
// ./compoents/uncle.vue 中$on监听接收数据
<template>
<div>计算和: {{count}}</div>
</template>
<script>
import {EventBus} from '../main'
export default {
data() {
return {
count: 0
}
},
mounted() {
EventBus.$on('addition', param => {
this.count = this.count + param.num;
})
}
}
</script>
移除事件监听:
import { eventBus } from 'event-bus.js'
EventBus.$off('addition', {})
$emit,$on,$off 分别为分发、监听、取消监听事件
方法六:localStorage/sessinStorage
这种通讯比较简单 ,数据存储在Application中查看,但是数据和状态混乱不易维护。
window.localStorage.setItem(key,value)//保存数据
window.localStorage.getItem(key) //获取数据
window.localStorage.removeItem(key)//删除数据
注意用
JSON.parse()/JSON.stringify()做数据格式转换localStorage/sessionStorage可以结合vuex, 实现数据的持久保存,同时使用vuex解决数据和状态混乱问题
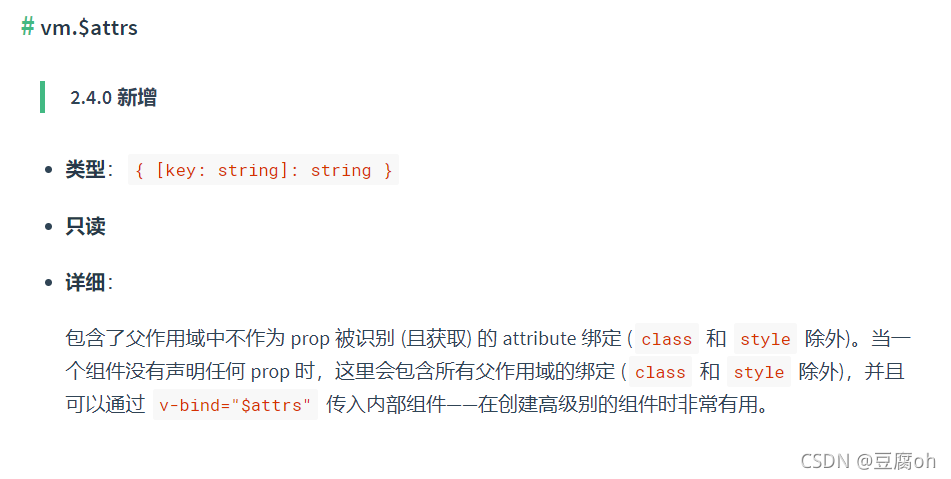
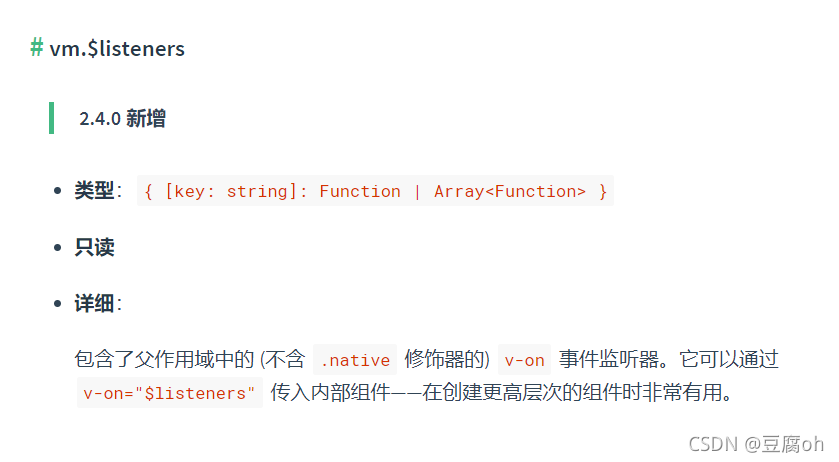
方法七:$attrs/$listeners
vue.js实例property中记载
代码示例:
 //App.vue中传入数据到dad组件
<template>
   <div>
     <dad
       :name="name"
       :age="age"
       :gender="gender"
       :height="height"
       title="苍老师"
     ></dad>
   </div>
 </template>
 <script>
 import dad './components/dad.vue'
 export default {
   components: { dad},
   data() {
     return {
       name: "井空",
       age: "18",
       gender: "女",
       height: "158"
     };
   }
 };
 </script>
// ./components/dad.vue中接收数据,数据在实例创建完成后被立即同步调用在控制台,并传给son组件
<template>
<div>
<p>name: {{ name}}</p>
<p>childCom1的$attrs: {{ $attrs }}</p>
<son v-bind="$attrs"></son>
<!-- v-bind="$attrs",将父组件中不被认为props特性绑定的属性传入子组件中,就是将未识别的属性可以通过 v-bind="$attrs" 传入内部组件 -->
</div>
</template>
<script>
import son from './son.vue'
export default {
components: {
son
},
inheritAttrs: false, // 可以关闭自动挂载到组件根元素上的没有在props声明的属性
props: {
name: String // name作为props属性绑定
},
created() {
console.log(this.$attrs);
// { "age": "18", "gender": "女", "height": "158", "title": "雅蠛蝶" }
}
};
</script>//./components/son.vue接受数据并在控制台渲染
<template>
<div class="border">
<p>age: {{ age}}</p>
<p>childCom2: {{ $attrs }}</p>
</div>
</template>
<script>
export default {
inheritAttrs: false,
props: {
age: String
},
created() {
console.log(this.$attrs);
// { "gender": "女", "height": "158", "title": "雅蠛蝶" }
}
};
</script>
简单来说: $attrs与 $listeners 是两个对象, $attrs 里存放的是父组件中绑定的非 Props 属性, $listeners里存放的是父组件中绑定的非原生事件。


 9371
9371

 被折叠的 条评论
为什么被折叠?
被折叠的 条评论
为什么被折叠?
 到【灌水乐园】发言


