


 本文详细介绍了在SpringBoot中使用OAuth2进行用户认证的工作流程,包括如何配置认证服务器、客户端信息以及通过密码模式获取access_token的过程。
工作流程
将用户和密码传过去,直接获取access_token,用户同意授权动作是在第三方应用上完成,而不是在认证服务器,第三方应用申请令牌时,直接带用户名和密码去向认证服务器申请令牌。这种方式认证服务器无法判断用户是否真的授权,用户和密码可能是第三方应用盗取的
工作流程:
- 用户向客户端直接提供认证服务器想要的用户名和密码
- 客户端将用户名和密码发给认证服务器,向认证服务器请求令牌
- 认证服务器确认后,向客户端提供访问令牌
基本使用
<dependency>
    <groupId>org.springframework.boot</groupId>
    <artifactId>spring-boot-starter-security</artifactId>
    <version>2.3.12.RELEASE</version>
</dependency>
<dependency>
    <groupId>org.springframework.security.oauth</groupId>
    <artifactId>spring-security-oauth2</artifactId>
    <version>2.3.4.RELEASE</version>
</dependency>
<dependency>
    <groupId>org.springframework.boot</groupId>
    <artifactId>spring-boot-starter-web</artifactId>
    <version>2.3.12.RELEASE</version>
</dependency>
@Configuration
public class MyOAuth2Config {

    /**
    * 加密方式
    */
    @Bean
    public PasswordEncoder passwordEncoder(){
        return new BCryptPasswordEncoder();
    }
}
- 创建安全配置类:指定认证用户的用户名和密码,用户和密码是资源的所有者,
- 创建认证服务器:这个客户端id和密码跟上面的用户名和密码是不一样的,客户端id和密码是应用系统的标识,每个应用系统对应一个客户端id和密码
/**
 * 安全配置类
 */
@EnableWebSecurity
public class OAuth2SecurityConfig extends WebSecurityConfigurerAdapter {

    @Autowired
    private PasswordEncoder passwordEncoder;

    /**
     * password密码模式要使用此认证管理器
     */
    @Bean
    @Override
    public AuthenticationManager authenticationManagerBean() throws Exception {
        return super.authenticationManagerBean();
    }

    /**
     * 用户类信息
     */
    @Override
    protected void configure(AuthenticationManagerBuilder auth) throws Exception {
        auth.inMemoryAuthentication()
                .withUser("admin")
                .password(passwordEncoder.encode("123456"))
                .authorities("admin_roles");
    }
}
/**
 * 认证服务器
 */
@Configuration
@EnableAuthorizationServer //开启认证服务器
public class OAuth2AuthorizationServerConfig extends AuthorizationServerConfigurerAdapter {

    @Autowired
    private PasswordEncoder passwordEncoder;

    /**
     * 配置被允许访问此认证服务器的客户端详细信息
     * 1.内存管理
     * 2.数据库管理方式
     */
    @Override
    public void configure(ClientDetailsServiceConfigurer clients) throws Exception {
        clients.inMemory()
                //客户端名称
                .withClient("test-pc")
                //客户端密码
                .secret(passwordEncoder.encode("123456"))
                //资源id,商品资源
                .resourceIds("oauth2-server")
                /**
                 * 授权类型,可同时支持多种授权类型
                 * authorization_code:授权码模式
                 * password:密码模式
                 * implicit:简化模式
                 * client_credentials:客户端模式
                 * refresh_token:更新令牌
                 */
                .authorizedGrantTypes("password","refresh_token")
                //授权范围标识,哪部分资源可访问(all是标识,不是代表所有)
                //比如指定微服务名称,则只可以访问指定的微服务
                .scopes("all")
                //false跳转到授权页面手动点击授权,true不用手动授权,直接响应授权码
                .autoApprove(false)
                //客户端回调地址,一定要和申请授权码时用的redirect_uri一致
                //当获取授权码后,认证服务器会重定向到指定的这个URL,并且带着一个授权码code响应
                .redirectUris("http://www.baidu.com/");
    }

    @Override
    public void configure(AuthorizationServerEndpointsConfigurer endpoints) throws Exception {
        //密码模式需要配置认证管理器
        endpoints.authenticationManager(authenticationManager);
    }
}
获取Access Token
接口获取
Access Token Request(密码模式获取token)
客户端通过在HTTP请求体中添加"application/x-www-form-urlencoded"格式的参数来向令牌端点请求。
- grant_type :必须的。而且值必须是"password"。
- username :必须的。资源所有者的用户名。
- password :必须的。资源所有者的密码。
- scope:可选的。
POST /token HTTP/1.1
Host: server.example.com
Authorization: Basic czZCaGRSa3F0MzpnWDFmQmF0M2JW
Content-Type: application/x-www-form-urlencoded

grant_type=password&username=johndoe&password=A3ddj3w
例如:http://localhost:8080/oauth/token?client_id=test-pc&client_secret=123456&grant_type=password&username=admin&password=123456
Access Token Response
HTTP/1.1 200 OK
Content-Type: application/json;charset=UTF-8
Cache-Control: no-store
Pragma: no-cache

{
    "access_token":"2YotnFZFEjr1zCsicMWpAA",
    "token_type":"example",
    "expires_in":3600,
    "refresh_token":"tGzv3JOkF0XG5Qx2TlKWIA",
    "example_parameter":"example_value"
}
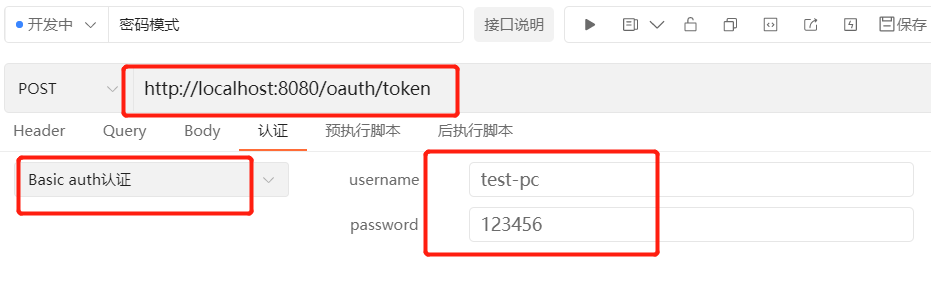
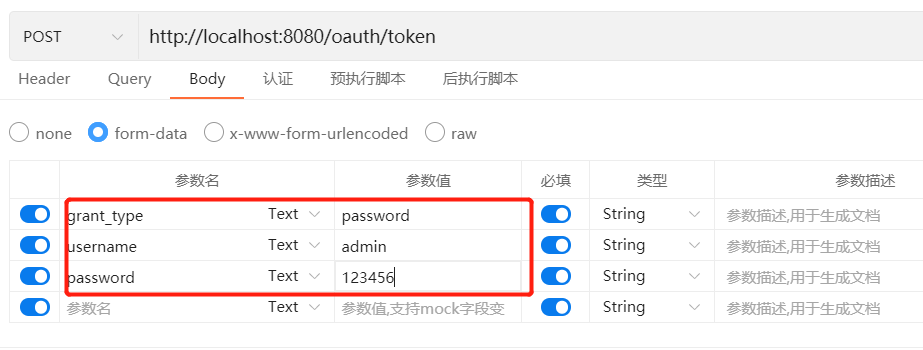
Postman获取
- 访问地址:http://localhost:8080/oauth/token
- POST方式下指定认证模式
- 请求体指定授权方式、用户名、密码


 1169
1169


 被折叠的 条评论
为什么被折叠?
被折叠的 条评论
为什么被折叠?
 到【灌水乐园】发言


