


前言
我们了解到授权码模式是OAuth2.0四种模式流程最复杂模式,复杂程度由大至小:授权码模式 > 隐式授权模式 > 密码模式 > 客户端模式
其中密码模式的流程是:让用户填写表单提交到授权服务器,表单中包含用户的用户名、密码、(client_Id + client_secret)的加密串,授权服务器先解析并校验客户端信息,然后校验用户信息,完全通过返回access_token,否则默认都是401 状态码,提示未授权无法访问
Demo基本结构
这里主要关注security-authorization-server与security-resource-server这两个模块
Maven依赖
    <properties>
        <java.version>1.8</java.version>
        <project.build.sourceEncoding>UTF-8</project.build.sourceEncoding>
        <project.reporting.outputEncoding>UTF-8</project.reporting.outputEncoding>
        <spring-boot.version>2.1.18.RELEASE</spring-boot.version>
        <spring-cloud.version>Greenwich.SR6</spring-cloud.version>
    </properties>

    <dependencies>
        <!--web容器-->
        <dependency>
            <groupId>org.springframework.boot</groupId>
            <artifactId>spring-boot-starter-web</artifactId>
        </dependency>
        <!--安全认证框架-->
        <dependency>
            <groupId>org.springframework.boot</groupId>
            <artifactId>spring-boot-starter-security</artifactId>
        </dependency>
        <!--稳定的spring-security-oauth2版本-->
        <dependency>
            <groupId>org.springframework.security.oauth</groupId>
            <artifactId>spring-security-oauth2</artifactId>
            <version>2.3.6.RELEASE</version>
        </dependency>
        <dependency>
            <groupId>org.springframework.security.oauth.boot</groupId>
            <artifactId>spring-security-oauth2-autoconfigure</artifactId>
        </dependency>
        <!--Lombok-->
        <dependency>
            <groupId>org.projectlombok</groupId>
            <artifactId>lombok</artifactId>
            <optional>true</optional>
        </dependency>
        <!--测试依赖-->
        <dependency>
            <groupId>org.springframework.boot</groupId>
            <artifactId>spring-boot-starter-test</artifactId>
            <scope>test</scope>
        </dependency>
    </dependencies>
搭建授权服务器(Authorization Server)
文中服务器均使用demo级别配置,请勿直接使用到生产环境
授权服务器结构主体:
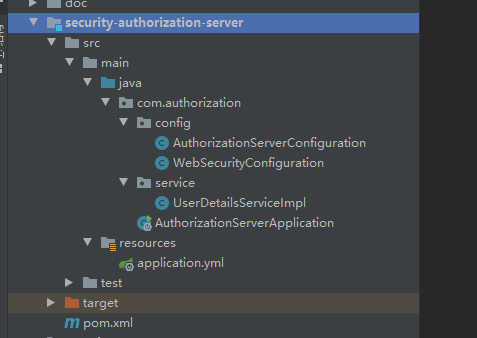
WebSecurityConfiguration:
package com.authorization.config;

import org.springframework.context.annotation.Bean;
import org.springframework.context.annotation.Configuration;
import org.springframework.security.authentication.AuthenticationManager;
import org.springframework.security.config.annotation.authentication.builders.AuthenticationManagerBuilder;
import org.springframework.security.config.annotation.web.builders.HttpSecurity;
import org.springframework.security.config.annotation.web.configuration.WebSecurityConfigurerAdapter;
import org.springframework.security.crypto.bcrypt.BCryptPasswordEncoder;
import org.springframework.security.crypto.password.PasswordEncoder;

import java.util.Collections;

/**
 * @description:
 * @Author C_Y_J
 * @create 2022/1/7 14:53
 **/
@Configuration
public class WebSecurityConfiguration extends WebSecurityConfigurerAdapter {

    /**
     * 密码编码解码器
     *
     * @return
     */
    @Bean
    public PasswordEncoder passwordEncoder() {
        return new BCryptPasswordEncoder();
    }

    @Bean
    @Override
    public AuthenticationManager authenticationManagerBean() throws Exception {
        return super.authenticationManagerBean();
    }

    @Override
    protected void configure(AuthenticationManagerBuilder auth) throws Exception {
        // 添加一个用户、保存在内存中
        auth.inMemoryAuthentication()
                .withUser("user")
                .password(passwordEncoder().encode("123456"))
                .authorities(Collections.emptyList());
    }

    @Override
    protected void configure(HttpSecurity http) throws Exception {
        // 所有请求都需要通过认证
        http.authorizeRequests()
                .anyRequest().authenticated();
        // 允许Basic登录
        http.httpBasic();
        // 关跨域保护
        http.csrf().disable();
    }

}
继承WebSecurityConfigurerAdapter的方法,实现个性化配置,这里我们使用内存保存一个名为user、密码为123456的用户,与授权服务器交互的用户就是他了。
除了配置用户,我们需要对服务的资源进行保护,这里将所有的请求都要求通过认证才可以访问,用户登录需要使用httpBasic形式(就是那种网页弹个窗要求登录的那种😄)。
Spring Security 5.x版本后,要求显示声明使用的密码器,就是PasswordEncoder了,常用BCryptPasswordEncoder,简单的可以认为它是使用时间戳和盐进行加密的一种算法,同一个密码被加密后也不会相同。
AuthorizationServerConfiguration:
package com.authorization.config;

import lombok.AllArgsConstructor;
import org.springframework.context.annotation.Configuration;
import org.springframework.security.authentication.AuthenticationManager;
import org.springframework.security.crypto.bcrypt.BCryptPasswordEncoder;
import org.springframework.security.oauth2.config.annotation.configurers.ClientDetailsServiceConfigurer;
import org.springframework.security.oauth2.config.annotation.web.configuration.AuthorizationServerConfigurerAdapter;
import org.springframework.security.oauth2.config.annotation.web.configuration.EnableAuthorizationServer;
import org.springframework.security.oauth2.config.annotation.web.configurers.AuthorizationServerEndpointsConfigurer;
import org.springframework.security.oauth2.config.annotation.web.configurers.AuthorizationServerSecurityConfigurer;

/**
 * @description: @EnableAuthorizationServer 实现授权服务器
 * @Author C_Y_J
 * @create 2022/1/7 11:35
 **/
@Configuration
@AllArgsConstructor
@EnableAuthorizationServer
public class AuthorizationServerConfiguration extends AuthorizationServerConfigurerAdapter {

    private final AuthenticationManager authenticationManager;

    @Override
    public void configure(AuthorizationServerEndpointsConfigurer endpoints) {
		// 配置端点
        endpoints.authenticationManager(authenticationManager);
    }

    @Override
    public void configure(ClientDetailsServiceConfigurer clients) throws Exception {
        clients
                // 配置内存中
                .inMemory()
                // 该客户端id
                .withClient("client_1")
                // 该客户端密钥
                .secret(new BCryptPasswordEncoder().encode("client_1_secret"))
                // 该客户端token有效时间  秒
                .accessTokenValiditySeconds(3600)
                // 该客户端支持的模式
                .authorizedGrantTypes("refresh_token", "password", "authorization_code", "implicit")
                // 该客户端允许的授权范围配置
                .scopes("userInfo", "server", "all")
                // 该客户端资源列表
                .resourceIds("resource")
                // false 允许跳转到授权页面
                .autoApprove(false)
                // 该客户端验证回调地址
                .redirectUris("http://www.baidu.com");

    }

    @Override
    public void configure(AuthorizationServerSecurityConfigurer security) throws Exception {
        // 允许表单提交
        security.allowFormAuthenticationForClients();
        // 校验token的条件是已经通过身份认证的
        security.checkTokenAccess("isAuthenticated()");
    }
}
通过@Configuration 和EnableAuthorizationServer开启授权服务器配置,通过重写AuthorizationServerConfigurerAdapter的方法来完成自定义授权服务器。
OAuth2.0密码模式中,要求不仅仅用户需要登录,还要求客户端也需要登录,这里就需要在configure(ClientDetailsServiceConfigurer clients)这个方法中配置客户端(第三方应用)的登录信息:
withClient中配置的是客户端id(client_id)。- secret为客户端的密码,要求使用加密器进行加密。
- 授权码的authorizedGrantTypes必须配置有
"password"(密码模式),这里是可以同时支持多种授权模式的。 - scopes,请求资源作用域,用于限制客户端与用户无法访问没有作用域的资源
- resourceIds,可选,资源id,可以对应一个资源服务器,个人理解为某个资源服务器的所有资源标识
- redirectUris,回调地址,有两个作用:1.回调客户端地址,返回授权码; 2.校验是否是同一个客户端
application.yml:
这里我只配置了
# 服务器端口
server:
  port: 6600
搭建资源服务器(Resource Server)
资源服务器结构主体:
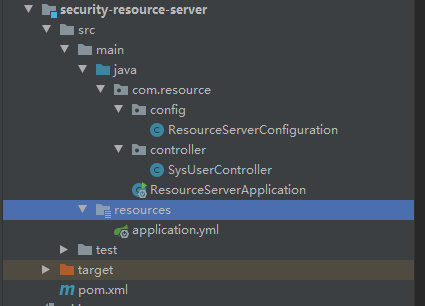
ResourceServerConfiguration:
package com.resource.config;

import org.springframework.context.annotation.Bean;
import org.springframework.context.annotation.Configuration;
import org.springframework.context.annotation.Primary;
import org.springframework.security.config.annotation.web.builders.HttpSecurity;
import org.springframework.security.oauth2.config.annotation.web.configuration.EnableResourceServer;
import org.springframework.security.oauth2.config.annotation.web.configuration.ResourceServerConfigurerAdapter;
import org.springframework.security.oauth2.provider.token.RemoteTokenServices;

/**
 * @description: @EnableResourceServer 实现资源服务器
 * @Author C_Y_J
 * @create 2022/1/7 11:33
 **/
@Configuration
@EnableResourceServer
public class ResourceServerConfiguration extends ResourceServerConfigurerAdapter {

    @Override
    public void configure(HttpSecurity http) throws Exception {
        http
                // 针对所有的请求
                .authorizeRequests()
                // 匹配规则:/user/{id}  不需要登录认证
                .antMatchers("/user/info/{id}").permitAll()
                // 匹配规则:任何请求 需要登录认证
                .anyRequest().authenticated();

        //允许表单登录
        http.formLogin();

        // 开启httpBasic认证
        http.httpBasic();

        // 关闭csrf防护
        http.csrf().disable();
    }


    @Primary
    @Bean
    public RemoteTokenServices remoteTokenServices() {
        RemoteTokenServices remoteTokenServices = new RemoteTokenServices();
        // 设置授权服务器check_token端点完整地址
        remoteTokenServices.setCheckTokenEndpointUrl("http://localhost:6600/oauth/check_token");
        // 设置客户端id与secret,注意:client_secret值不能使用passwordEncoder加密!
        remoteTokenServices.setClientId("client_1");
        remoteTokenServices.setClientSecret("client_1_secret");
        return remoteTokenServices;
    }

    @Override
    public void configure(ResourceServerSecurityConfigurer resources) {
        // 设置授权服务器的资源列表
        resources.resourceId("resource");
    }
}
通过@Configuration 和@EnableResourceServer这两个注解标识服务是一个资源服务器,重写ResourceServerConfigurerAdapter来实现自定义授权服务器
配置configure(HttpSecurity http)方法,这里可以代替Spring Security同名方法配置,开启所有请求需要授权才可访问
配置资源相关设置configure(ResourceServerSecurityConfigurer resources),这里只设置resourceId 后续的使用redis校验token也在这里设置
校验token的配置,这里使用了远程调用授权服务器帮忙校验token的方式,只需要显示注入RemoteTokenServices remoteTokenServices()的Bean,就可以调用授权服务器的/oauth/check_token端点,设置客户端配置的值,详见注释
SysUserController:
package com.resource.controller;

import org.springframework.security.core.Authentication;
import org.springframework.security.core.context.SecurityContextHolder;
import org.springframework.security.core.userdetails.UserDetails;
import org.springframework.web.bind.annotation.GetMapping;
import org.springframework.web.bind.annotation.PathVariable;
import org.springframework.web.bind.annotation.RequestMapping;
import org.springframework.web.bind.annotation.RestController;

/**
 * @description:
 * @Author C_Y_J
 * @create 2021/12/10 10:49
 **/
@RestController
@RequestMapping("/user")
public class SysUserController {

    /**
     * 通过ID查询用户信息
     *
     * @param id ID
     * @return 用户信息
     */
    @GetMapping("/info/{id}")
    public String user(@PathVariable Integer id) {
        return ("通过" + id + "查询用户信息");
    }

    /**
     * 用户认证信息
     */
    @GetMapping(value = "/authentication")
    public String info() {
        Authentication authentication = SecurityContextHolder.getContext().getAuthentication();
        if (!authentication.isAuthenticated()) {
            return null;
        }
        Object principal = authentication.getPrincipal();
        String username = null;
        if (principal instanceof UserDetails) {
            username = ((UserDetails) principal).getUsername();
        } else {
            username = principal.toString();
        }
        return username;
    }

}
application.yml:
# 服务器端口
server:
  port: 7700
获取token
POST请求,localhost:6600/oauth/token,参数如图:
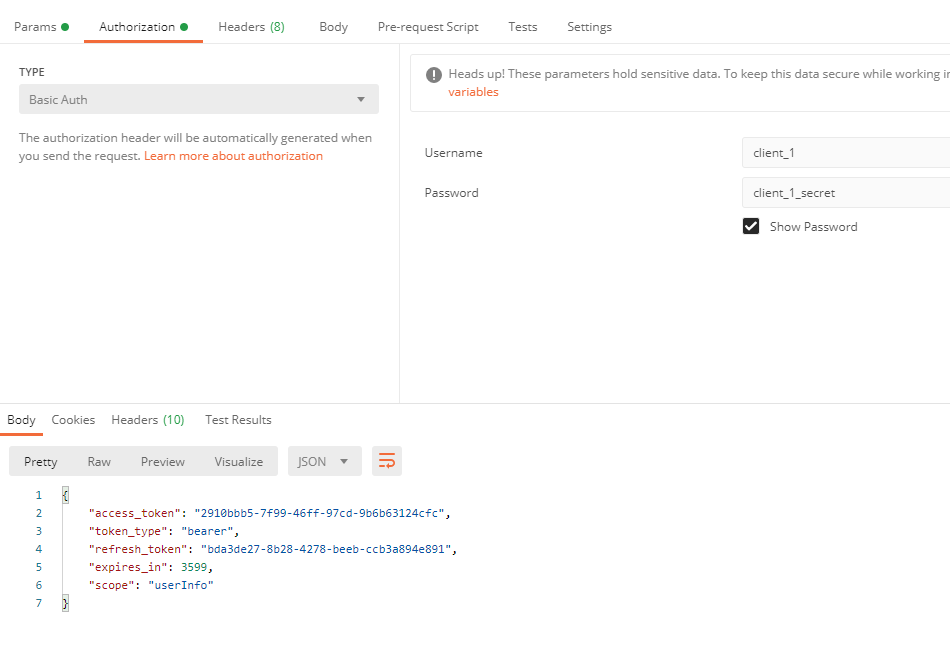
BasicAuth:这里填的是客户端配置的client_id和client_secret的值,配置后会在Header中添加Authorization:Basic Y2xpZW50XzE6Y2xpZW50XzFfc2VjcmV0,Basic空格后的是client_id:client_secret`具体值被Base64后得到的值
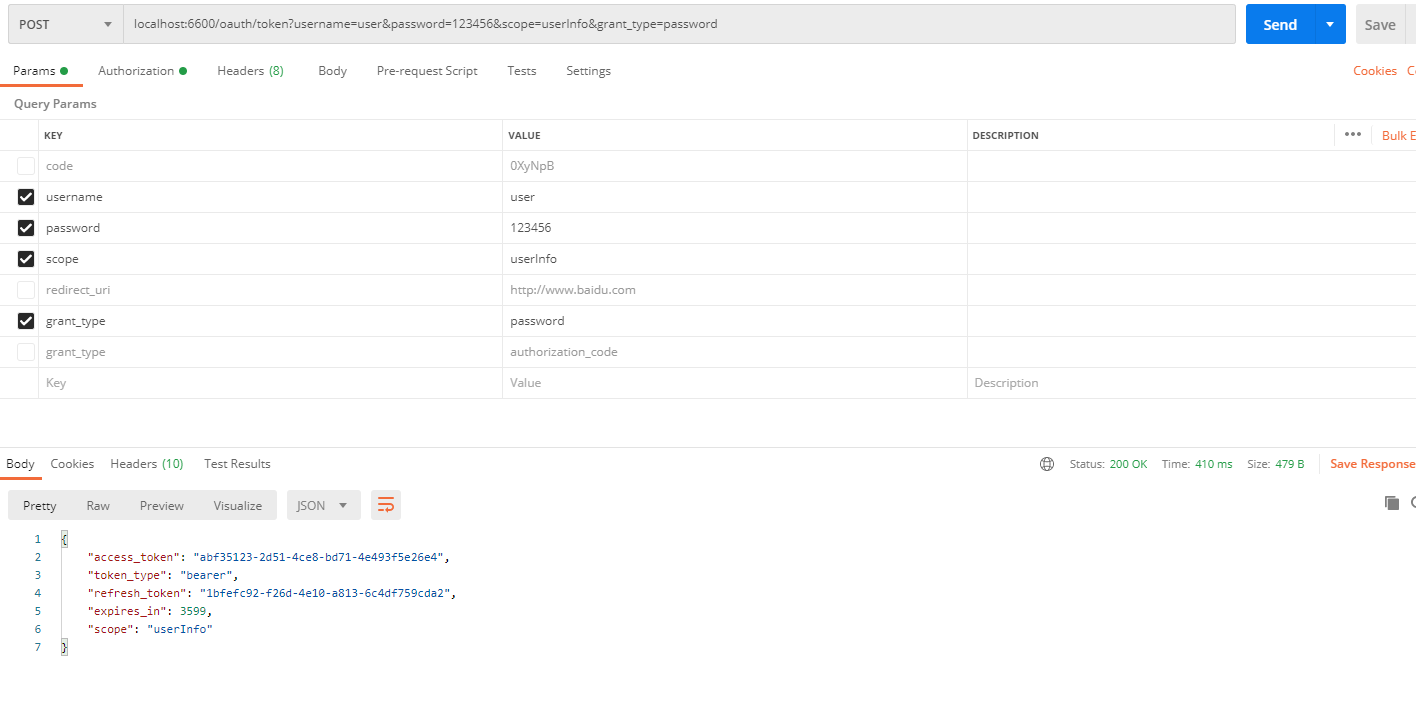
请求参数列表:
- username=账号
- password=密码
- scope=作用域
- grant_type=password
最后我们获得了授权服务的响应,包含token的json。
username:user
password:123456
scope:userInfo
grant_type:password
{
   "access_token": "abf35123-2d51-4ce8-bd71-4e493f5e26e4",
   "token_type": "bearer",
   "refresh_token": "1bfefc92-f26d-4e10-a813-6c4df759cda2",
   "expires_in": 3599,
   "scope": "userInfo"
}
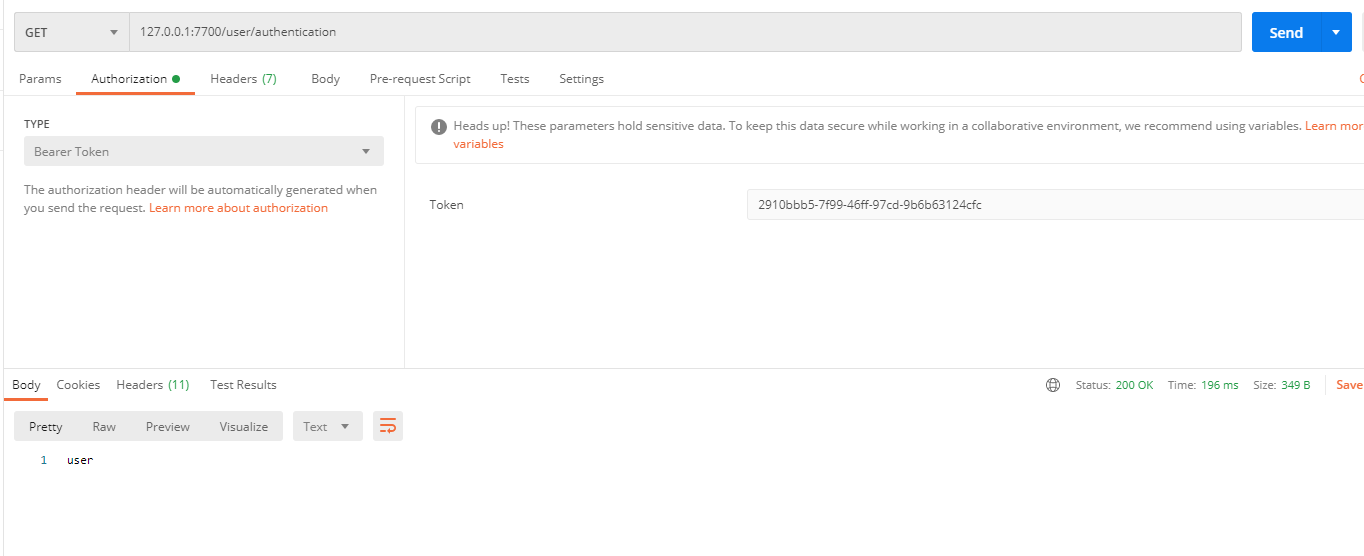
携带token访问
复制之前获取到的token,添加token访问接口。
Bearer Token相当于在Headers中添加Authorization:Bearer空格access_token。
后记
本文仅说明密码模式的精简化配置,某些部分如资源服务再访问授权服务去校验token这部分生产环境可能会换成Jwt、Redis等tokenStore实现,授权服务器中的用户信息与客户端信息生产环境应从数据库中读取,对应Spring Security的UserDetailsService实现类或用户信息的Provider等。


 924
924


 被折叠的 条评论
为什么被折叠?
被折叠的 条评论
为什么被折叠?
 到【灌水乐园】发言


