


帧内角度预测函数如下
void IntraPrediction::predIntraAng( const ComponentID compId, PelBuf &piPred, const PredictionUnit &pu, const bool useFilteredPredSamples )根据预测模式调用模式预测函数,这篇文章主要讲planner和DC模式。
其他模式待更新。。。
1、planner模式
planner模式预测的参考模板示意图如下

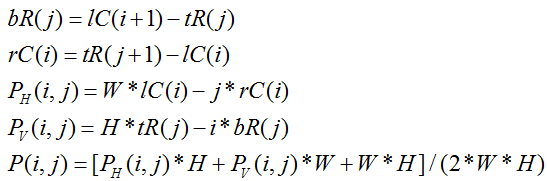
这里公式都用乘除法给出,实际程序中采用移位。图中LB为lC(i+1)和RT为tR(j+1)。
planner模式的具体程序注释如下
void IntraPrediction::xPredIntraPlanar( const CPelBuf &pSrc, PelBuf &pDst, const SPS& sps )
{
  const uint32_t width  = pDst.width;
  const uint32_t height = pDst.height;
#if JVET_M0102_INTRA_SUBPARTITIONS
  const uint32_t log2W  = g_aucLog2[width  < 2 ? 2 : width];
  const uint32_t log2H  = g_aucLog2[height < 2 ? 2 : height];
#else
  const uint32_t log2W  = g_aucLog2[ width ];
  const uint32_t log2H  = g_aucLog2[ height ];
#endif

  int leftColumn[MAX_CU_SIZE + 1], topRow[MAX_CU_SIZE + 1], bottomRow[MAX_CU_SIZE], rightColumn[MAX_CU_SIZE];
#if JVET_M0102_INTRA_SUBPARTITIONS
  const uint32_t offset = 1 << (log2W + log2H);
#else
  const uint32_t offset = width * height;
#endif

  // Get left and above reference column and row
  for( int k = 0; k < width + 1; k++ )
  {
    topRow[k] = pSrc.at( k + 1, 0 );//上参考
  }

  for( int k = 0; k < height + 1; k++ )
  {
    leftColumn[k] = pSrc.at( 0, k + 1 );//左参考
  }

  // Prepare intermediate variables used in interpolation
  int bottomLeft = leftColumn[height];//左下lc(i+1)
  int topRight = topRow[width];//右上tR(j+1)

  for( int k = 0; k < width; k++ )
  {
    bottomRow[k] = bottomLeft - topRow[k];//lC(i+1)-tR(j)
    topRow[k]    = topRow[k] << log2H;//tR(j)*H
  }

  for( int k = 0; k < height; k++ )
  {
    rightColumn[k] = topRight - leftColumn[k];//tR(j+1)-lC(i)
    leftColumn[k]  = leftColumn[k] << log2W;//lC(i)*W
  }

  const uint32_t finalShift = 1 + log2W + log2H;//2WH
  const uint32_t stride     = pDst.stride;
  Pel*       pred       = pDst.buf;
  for( int y = 0; y < height; y++, pred += stride )
  {
    int horPred = leftColumn[y];//W*lC(i)

    for( int x = 0; x < width; x++ )
    {
      horPred += rightColumn[y];//Ph(i,j)=W*lC(i)-j*rC(i)
      topRow[x] += bottomRow[x];//Pv(i,j)=H*tR(j)-i*bR(j)

      int vertPred = topRow[x];
      pred[x]      = ( ( horPred << log2H ) + ( vertPred << log2W ) + offset ) >> finalShift;
      //P(i,j)=(Ph(i,j)*H+Pv(i,j)*W+W*H)/(2*W*H)
    }
  }
}
2、DC模式
根据PU的形状,对于正方形的PU计算上边和左边的参考像素的均值,对于非正方形计算长长边的均值,然后填充PU。
DC模式的具体程序注释如下
void IntraPrediction::xPredIntraDc( const CPelBuf &pSrc, PelBuf &pDst, const ChannelType channelType, const bool enableBoundaryFilter )
{
  const Pel dcval = xGetPredValDc( pSrc, pDst );//DC计算入口
  pDst.fill( dcval );

#if HEVC_USE_DC_PREDFILTERING
  if( enableBoundaryFilter )
  {
    xDCPredFiltering( pSrc, pDst, channelType );
  }
#endif
}
DC值的具体计算
Pel IntraPrediction::xGetPredValDc( const CPelBuf &pSrc, const Size &dstSize )
{
  CHECK( dstSize.width == 0 || dstSize.height == 0, "Empty area provided" );

  int idx, sum = 0;
  Pel dcVal;
  const int width  = dstSize.width;
  const int height = dstSize.height;
  const auto denom     = (width == height) ? (width << 1) : std::max(width,height);//对于正方形计算所有参考像素,非正方形计算长边
  const auto divShift  = g_aucLog2[denom];
  const auto divOffset = (denom >> 1);//偏置

  if ( width >= height )//计算上参考
  {
    for( idx = 0; idx < width; idx++ )
    {
      sum += pSrc.at( 1 + idx, 0 );
    }
  }
  if ( width <= height )//计算左参考
  {
    for( idx = 0; idx < height; idx++ )
    {
      sum += pSrc.at( 0, 1 + idx );
    }
  }

  dcVal = (sum + divOffset) >> divShift;//计算DC值
  return dcVal;
}


 1157
1157


 被折叠的 条评论
为什么被折叠?
被折叠的 条评论
为什么被折叠?
 到【灌水乐园】发言


