


TensorFlow简介:
官网上对TensorFlow的介绍是,一个使用数据流图(data flow graphs)技术来进行数值计算的开源软件库。数据流图中的节点,代表数值运算;节点节点之间的边,代表多维数据(tensors)之间的某种联系。我们可以在多种设备(含有CPU或GPU)上通过简单的API调用来使用该系统的功能。
TensorFlow包含构建数据流图与计算数据流图等基本步骤,图中的节点表示数学操作,图中连结各节点的边表示多维数组,即:tensors(张量)。 张量是TensorFlow最核心的组件,所有运算和优化都是基于张量进行的。张量是基于向量和矩阵的推广,可以将标量看为零阶张量,矢量看做一阶张量,矩阵看做二阶张量(后面详细介绍)。
数据流图是描述有向图中的数值计算过程。有向图中的节点通常代表数学运算,但也可以表示数据的输入、输出和读写等操作;有向图中的边表示节点之间的某种联系,它负责传输多维数据(Tensors)。图中这些tensors的flow也就是TensorFlow的命名来源。
基本使用:
-
将计算流程表示成图;
-
通过Sessions来执行图计算;
-
将数据表示为tensors;
-
使用Variables来保持状态信息;
-
分别使用feeds和fetches来填充数据和抓取任意的操作结果;
TensorFlow初识,简单实例
import tensorflow as tf
a =tf.placeholder("float")
b =tf.placeholder("float")
y = tf.multiply(a,b)
sess = tf.Session()
print(sess.run(y, feed_dict={a: 3, b: 3}))
| Operation | Description |
| tf.add | sum |
| tf.subtract | substraction |
| tf.multiply | multiplication |
| tf.div | division |
| tf.mod | module |
| tf.abs | return the absolute value |
| tf.neg | return negative value |
| tf.sign | return the sign |
| tf.inv | returns the inverse |
| tf.square | calculates the square |
| tf.round | returns the nearest integer |
| tf.sqrt | calculates the square root |
| tf.pow | calculates the power |
| tf.exp | calculates the exponential |
| tf.log | calculates the logarithm |
| tf.maximum | returns the maximum |
| tf.minimum | returns the minimum |
| tf.cos | calculates the cosine |
| tf.sin | calculates the sine |
tf.subtract(tf.constant(3.0),tf.constant(1))
"""
TypeError: Input 'y' of 'Sub' Op has type int32 that does not
match type float32 of argument 'x'.
"""
上面代码需改为:
tf.subtract(tf.cast(tf.constant(3.0), tf.int32), tf.constant(1))另外,还会用到的矩阵计算方法:
| Operation | Description |
| tf.diag | returns a diagonal tensor with a given diagonal values |
| tf.transpose | returns the transposes of the argument |
| tf.matmul | returns a tensor product of multiplying two tensors listed as arguments |
| tf.matrix_determinant | returns the determinant of the square matrix specified as an argument |
| tf.matrix_inverse | returns the inverse of the square matrix specified as an argument |
为了抓取输出结果,在执行session的run函数后,通过print函数打印状态信息。
填充(Feeds):
TensorFlow提供的机制:先创建特定数据类型的占位符(placeholder),之后再进行数据的填充("feed_dict= ");如果不对placeholder()的变量进行数据填充,将会引发错误。
基本数据类型:
| 数据类型 | Python 类型 | 描述 |
|---|---|---|
DT_FLOAT | tf.float32 | 32 位浮点数. |
DT_DOUBLE | tf.float64 | 64 位浮点数. |
DT_INT64 | tf.int64 | 64 位有符号整型. |
DT_INT32 | tf.int32 | 32 位有符号整型. |
DT_INT16 | tf.int16 | 16 位有符号整型. |
DT_INT8 | tf.int8 | 8 位有符号整型. |
DT_UINT8 | tf.uint8 | 8 位无符号整型. |
DT_STRING | tf.string | 可变长度的字节数组.每一个张量元素都是一个字节数组. |
DT_BOOL | tf.bool | 布尔型. |
DT_COMPLEX64 | tf.complex64 | 由两个32位浮点数组成的复数:实数和虚数. |
DT_QINT32 | tf.qint32 | 用于量化Ops的32位有符号整型. |
DT_QINT8 | tf.qint8 | 用于量化Ops的8位有符号整型. |
DT_QUINT8 | tf.quint8 | 用于量化Ops的8位无符号整型. |
张量的阶
TensorFlow用张量表示所有的数据,张量可看成一个n维的数组或列表,在图中的节点之间流通。张量的维数称为阶,注:张量的阶和矩阵的阶不是同一个概念。下面的张量(使用Python的list定义)是2阶:
t = [[1, 2, 3], [4, 5, 6], [7, 8, 9]]| 阶 | 数学实例 | Python 例子 |
|---|---|---|
| 0 | 纯量 (只有大小) | s = 1 |
| 1 | 向量(大小和方向) | v = [1, 2, 3] |
| 2 | 矩阵(数据表) | m = [[1, 2, 3], [4, 5, 6], [7, 8, 9]] |
| 3 | 3阶张量 (数据立体) | t = [[[2], [4], [6]], [[8], [10], [12]], [[14], [16], [18]]] |
| n | n阶 | .... |
张量的形状
TensorFlow使用三种记号描述张量的维度:阶,形状及维数,它们之间的关系:
| 阶 | 形状 | 维数 | 实例 |
|---|---|---|---|
| 0 | [ ] | 0-D | 一个 0维张量. 一个纯量. |
| 1 | [D0] | 1-D | 一个1维张量的形式[5]. |
| 2 | [D0, D1] | 2-D | 一个2维张量的形式[3, 4]. |
| 3 | [D0, D1, D2] | 3-D | 一个3维张量的形式 [1, 4, 3]. |
| n | [D0, D1, ... Dn] | n-D | 一个n维张量的形式 [D0, D1, ... Dn]. |
张量的一些常用操作:
| Operation | Description |
| tf.shape | To find a shape of a tensor |
| tf.size | To find the size of a tensor |
| tf.rank | To find a rank of a tensor |
| tf.reshape | To change the shape of a tensor keeping the same elements contained |
| tf.squeeze | To delete in a tensor dimensions of size 1 |
| tf.expand_dims | To insert a dimension to a tensor |
| tf.slice | To remove a portions of a tensor |
| tf.split | To divide a tensor into several tensors along one dimension |
| tf.tile | To create a new tensor replicating a tensor multiple times |
| tf.concat | To concatenate tensors in one dimension |
| tf.reverse | To reverse a specific dimension of a tensor |
| tf.transpose | To transpose dimensions in a tensor |
| tf.gather | To collect portions according to an index |
vectors = tf.constant(conjunto_puntos)
extended_vectors = tf.expand_dims(vectors, 0)
print (expanded_vectors.get_shape())TensorFlow计算图:
有了张量和基于张量的各种操作,之后需要将各种操作整合起来,输出结果。但不幸的是,随着操作种类和数量的增多,有可能引发各种意想不到的问题,包括多个操作之间应该并行还是顺次执行,如何协同各种不同的底层设备,以及如何避免各种类型的冗余操作等等。这些问题有可能拉低整个深度学习网络的运行效率或者引入不必要的Bug,计算图正是为解决这一问题产生的。
论文《Learning Deep Architectures for AI》作者用不同的占位符(*,+,sin)构成操作结点,以字母x、a、b构成变量结点,以有向线段将这些结点连接起来,组成一个表征运算逻辑关系的清晰明了的“图”型数据结构,这就是最初的计算图。
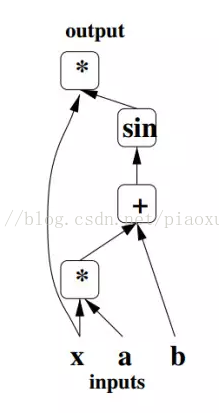
计算图的引入可以让开发者从宏观上俯瞰整个神经网络的内部结构,就好像编译器可以从整个代码的角度决定如何分配寄存器那样,计算图也可以从宏观上决定代码运行时的GPU内存分配,以及分布式环境中不同底层设备间的相互协作方式。除此之外,现在也有许多深度学习框架将计算图应用于模型调试,可以实时输出当前某一操作类型的文本描述。
实例1:
node1 = tf.constant(3.0, dtype=tf.float32)
node2 = tf.constant(4.0) # also tf.float32 implicitly
print(node1, node2)
Tensor("Const_2:0", shape=(), dtype=float32) Tensor("Const_3:0", shape=(), dtype=float32)
sess = tf.Session()
print(sess.run([node1, node2]))实例2:
node3 = tf.add(node1, node2)
print("node3:", node3)
print("sess.run(node3):", sess.run(node3))
node3: Tensor("Add_1:0", shape=(), dtype=float32)
sess.run(node3): 7.0
为了使算法容易理解,TensorFlow中的可视化工具Tensorboard包含了一些debug函数与优化程序,可以察看不同类型的参数统计结果与图中的计算细节(这部分以后参照实例学习一下)。
实例3:
输入可以是任意量,例如构建模型:y=w*x+b,w和b一定时,x是可变量:
W = tf.Variable([.3], dtype=tf.float32)
b = tf.Variable([-.3], dtype=tf.float32)
x = tf.placeholder(tf.float32)
linear_model = W*x + b
init = tf.global_variables_initializer()
import tensorflow as tf
W = tf.Variable([.5], dtype=tf.float32)
b = tf.Variable([-.5], dtype=tf.float32)
x = tf.placeholder(tf.float32)
linear_model = W*x + b
#print("linear_model:",linear_model)

init = tf.global_variables_initializer()
sess = tf.Session()
sess.run(init)
print(sess.run(linear_model, {x: [1, 2, 3, 4]}))实例4:
import tensorflow as tf

W = tf.Variable(1)
assign_W = W.assign(10)#修改变量方法,assign
with tf.Session() as sess:
    sess.run(W.initializer)
    print(W.eval())
    sess.run(assign_W)
print(W.eval())import tensorflow as tf
W = tf.Variable(10)
sess1 = tf.Session()
sess2 = tf.Session()
sess1.run(W.initializer)
sess2.run(W.initializer)
print('W add 1=',sess1.run(W.assign_add(1)))
print('W sun 2=',sess2.run(W.assign_sub(2)))
sess1.close()
sess2.close()参考:
https://www.tensorflow.org/get_started/get_started
http://jorditorres.org/research-teaching/tensorflow/first-contact-with-tensorflow-book/first-contact-with-tensorflow/#cap1
http://blog.csdn.net/liyuqian199695/article/details/61647946
http://wiki.jikexueyuan.com/project/tensorflow-zh/resources/dims_types.html


 4714
4714


 被折叠的 条评论
为什么被折叠?
被折叠的 条评论
为什么被折叠?
 到【灌水乐园】发言


