


In this blog post I will run through the two ways you can add the custom Lync presence status to your company Lync users estate or to your own personal Lync 2013 client.
The way I see this is, if you are an administrator then using powershell and policies you can go to a good level of custom presence integration within your Lync environment. If you are an end user and you want to create your own custom presence status, then this can be done without the need of your IT team (The caveat around this is you need access to the registry on your machine and usually this requires admin credentials.)
Firstly we will look at the Administrator way of creating the custom presence within the Lync Environment
step 1
We need to create a custom Presence XML file this is the file Lync will read to get the unique new presence statuses
format needs to be the following
<?xml version=”1.0″?>
<customStates xmlns=”http://schemas.microsoft.com/09/2009/communicator/customStates“>
<customState ID=”1″ availability=”online”>
<activity LCID=”1033″>Working from Home</activity>
<activity LCID=”1044″> </activity>
<activity LCID=”1055″> </activity>
</customState>
<customState ID=”2″ availability=”busy”>
<activity LCID=”1033″>In a Lync Meeting</activity>
<activity LCID=”1036″> </activity>
</customState>
<customState ID=”3″ availability=”busy”>
<activity LCID=”1033″>Meeting with Client – Public Sector</activity>
<activity LCID=”1055″> </activity>
<activity LCID=”1036″> </activity>
</customState>
<customState ID=”4″ availability=”do-not-disturb”>
<activity LCID=”1033″>Interviewing</activity>
<activity LCID=”1036″> </activity>
</customState>
</customStates>
Now Save this a .XML format file. (Save it onto your local drive, then in time we will copy this to a file share or the root of your Lync 2013 server
In this post im going to copy the file to the Lync frontend in my lab. (NOTE: you need to copy it to a server/desktop which has webserver enabled and working.
for my lab the path is,https://lync2013.northernlync.co.uk/clientpresence/Northernlync_custompresence.xml

Once your added and tested the path and it returns the custom states in a IE page then you are good to continue. If you don’t get the custom states then you need to jump back into IIS and fix your Virtual directory folder path.
Step 2
Now we need to go into the Lync Management Shell on the Lync 2013 frontend.
At this point we can do one of two things. 1, we can add the custom presence to an existing client policy or 2, we are required to create a new Client Policy.
<to add a new client policy the PS command will be -
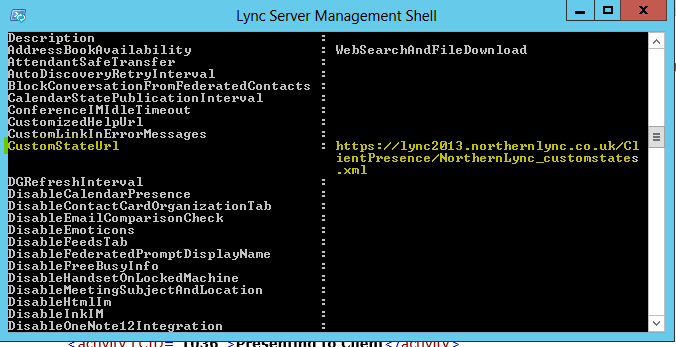
New-CsClientPolicy -Identity NorthernlyncCustomStates -CustomStateURL “https://lync2013.northernlync.co.uk/ClientPresence/NorthernLync_customstates.xml“
Once ive ran the above you can see its created the policy
Step 3
We now need to assign the policy to a user.
again using powershell you need to grant the policy using the following command Grant-CsClientPolicy -Identity “<username>” -PolicyName <nameofcustompolicy>.
eg: Grant-CsClientPolicy -Identity “Iain Smith” -PolicyName NorthernlyncCustomStates.
![]()
Now get the user to log out of the Lync Client and relog back in. (don’t forget to Kill the lync.exe off before logging back in)

There you have it.. a Lync Client Policy based Custom Presence.
—————————————————————————————————
Now lets look at a way you can do it a an individual user of Lync. – I would go as far as saying this option would always a secondary option, and im just detailing it for this blog and would never suggest it to one of my customers.
STEP 1
Same again we start with the creation of the .XML file in the same format.. (this time I’m going to change the names of the states so that we can see the new ones are getting picked up)
<?xml version=”1.0″?>
-<customStates xmlns=”http://schemas.microsoft.com/09/2009/communicator/customStates“>
-<customState availability=”online” ID=”1″>
<activity LCID=”1033″>In the Lync Lab</activity>
</customState>-<customState availability=”busy” ID=”2″>
<activity LCID=”1033″>SuperBusy</activity>
</customState>-<customState availability=”busy” ID=”3″>
<activity LCID=”1033″>Meeting with Client – Lync Call</activity>
</customState>-<customState availability=”do-not-disturb” ID=”4″>
<activity LCID=”1033″>Blogging</activity>
</customState>
</customStates>
STEP 2
Save the .xml to a place on your own machine. ie: C: etc etc – for me im saving it to c:\Users\smitiai\Downloads on my local desktop machine which is running my lync 2013 client
STEP 3
We need to go into the registry now and add the paths into the folders for the Lync client startup process to hook into them.
goto start – regedit (might need Admin credentials at this point)
navigate to or Add HKEY_LOCAL_MACHINE\SOFTWARE\Policies\Microsoft\Office\15.0\Lync\EnableSIPHighSecurityMode
and set the dword = value 0

no navigate to OR add HKEY_LOCAL_MACHINE\SOFTWARE\Policies\Microsoft\Office\15.0\Lync\CustomStateURL

again log out of the Lync client, kill the process then log back in to pick up the new custom states


 166
166

 被折叠的 条评论
为什么被折叠?
被折叠的 条评论
为什么被折叠?
 到【灌水乐园】发言


